Tenant Management
HENGSHI SENSE supports a tenant model where it serves both a platform provider and multiple enterprise customers. The platform provider manages tenants, provides data to them, and tenants perform data analysis within the system.
HENGSHI SENSE introduces the concept of workspaces, providing a one-way transmission channel between the platform provider and tenants. This allows the platform provider to easily build dedicated BI analysis spaces for each enterprise customer.
A typical tenant use case is a large supermarket providing sales data to suppliers. For example, a large supermarket provides beverage sales data to beverage suppliers. In this scenario, the large supermarket is the platform provider, the data provider, and various beverage brand suppliers such as Coca-Cola, Pepsi, Jiaduobao, and Nongfu Spring are tenants. Tenants will enter their respective tenant systems to view sales data for their brands. The spaces of different tenants are independent and unaware of each other.
Create and Manage Tenants
The platform provider creates and manages tenants in Tenant Management, where they can view tenant information (status, expiration date, maximum number of tenant users, engine allocation), and query tenants by expiration date and status.
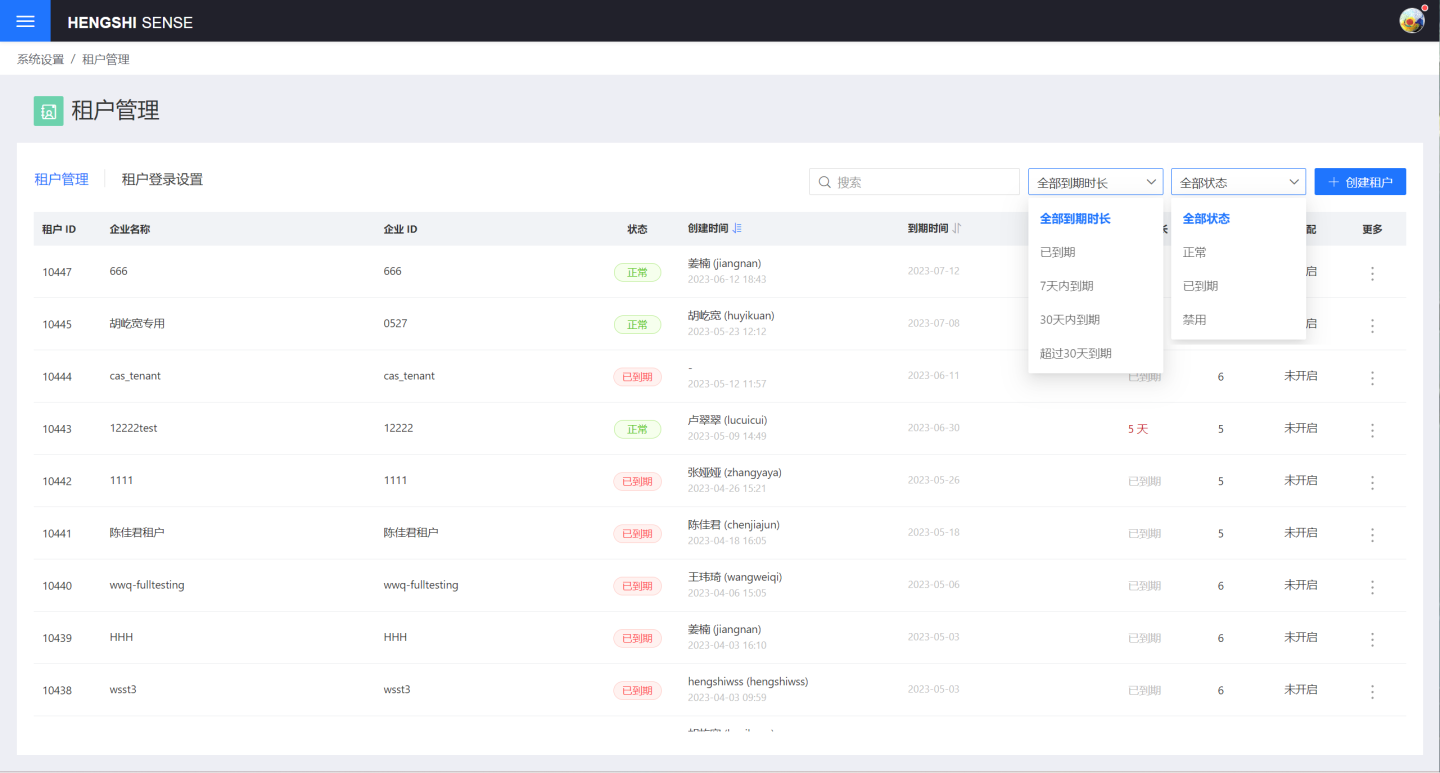
After a tenant's expiration, the system will send an email notification to the platform provider, who will decide whether to remind the tenant.
Enable Tenant Space
The platform provider must apply to HENGSHI for authorization with "Multi-Tenant Functionality" to enable the system's multi-tenant feature. During the application, the platform provider sets the maximum number of tenants and the maximum number of users within a tenant. HENGSHI will generate the corresponding license based on the requirements. The platform provider updates the authorization file in the software authorization to enable the tenant functionality. After enabling the tenant functionality, the platform provider can create tenants.
Create Tenant
The platform provider can create tenants in two ways: most platform providers manually create tenants in the system, while a few create tenants through tenant authentication mode.
Manually Create Tenant
In System Settings -> Tenant Management, click on New Tenant. In the New Tenant pop-up window, fill in the tenant information including Enterprise ID, Enterprise Name, administrator information such as username and email, service information including validity period and user limit, and set the tenant system expiration reminder.
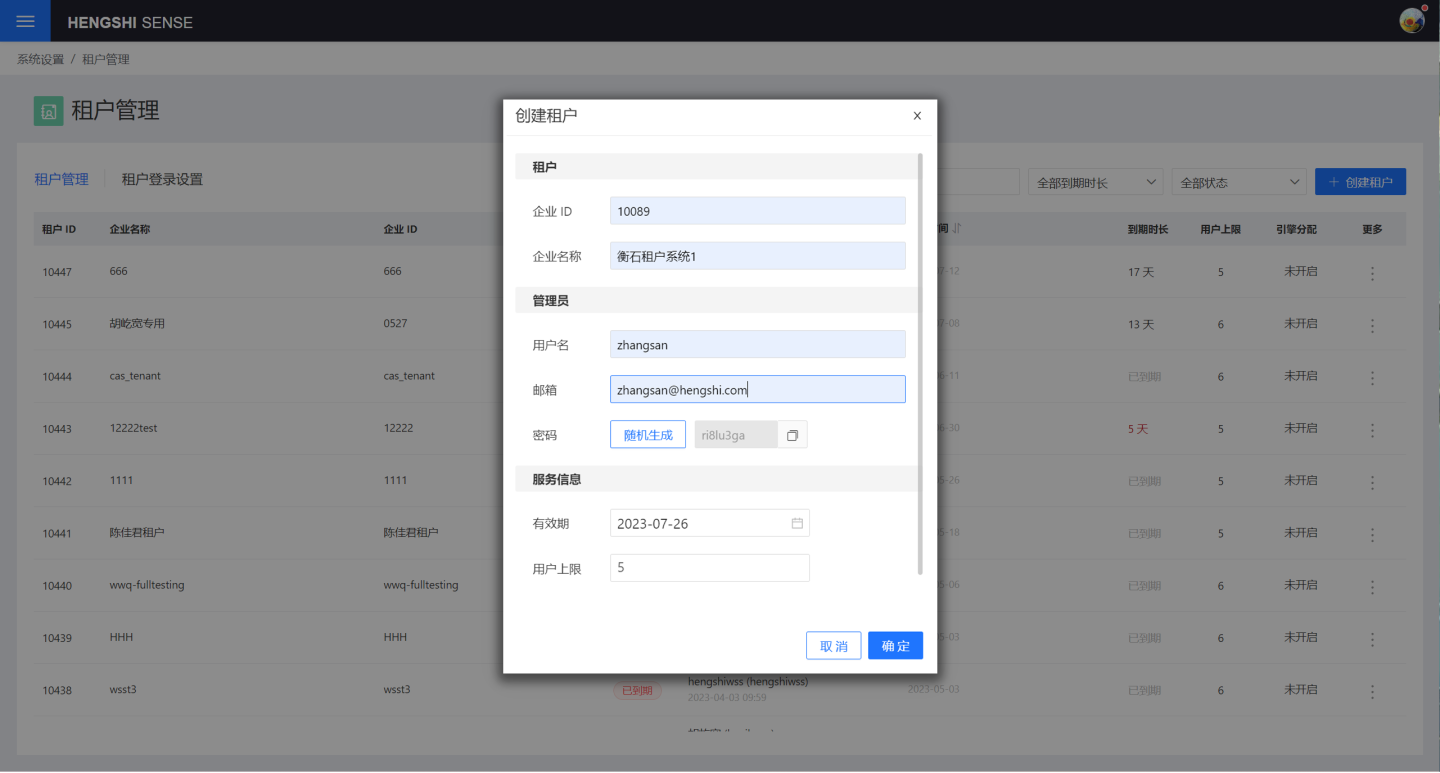
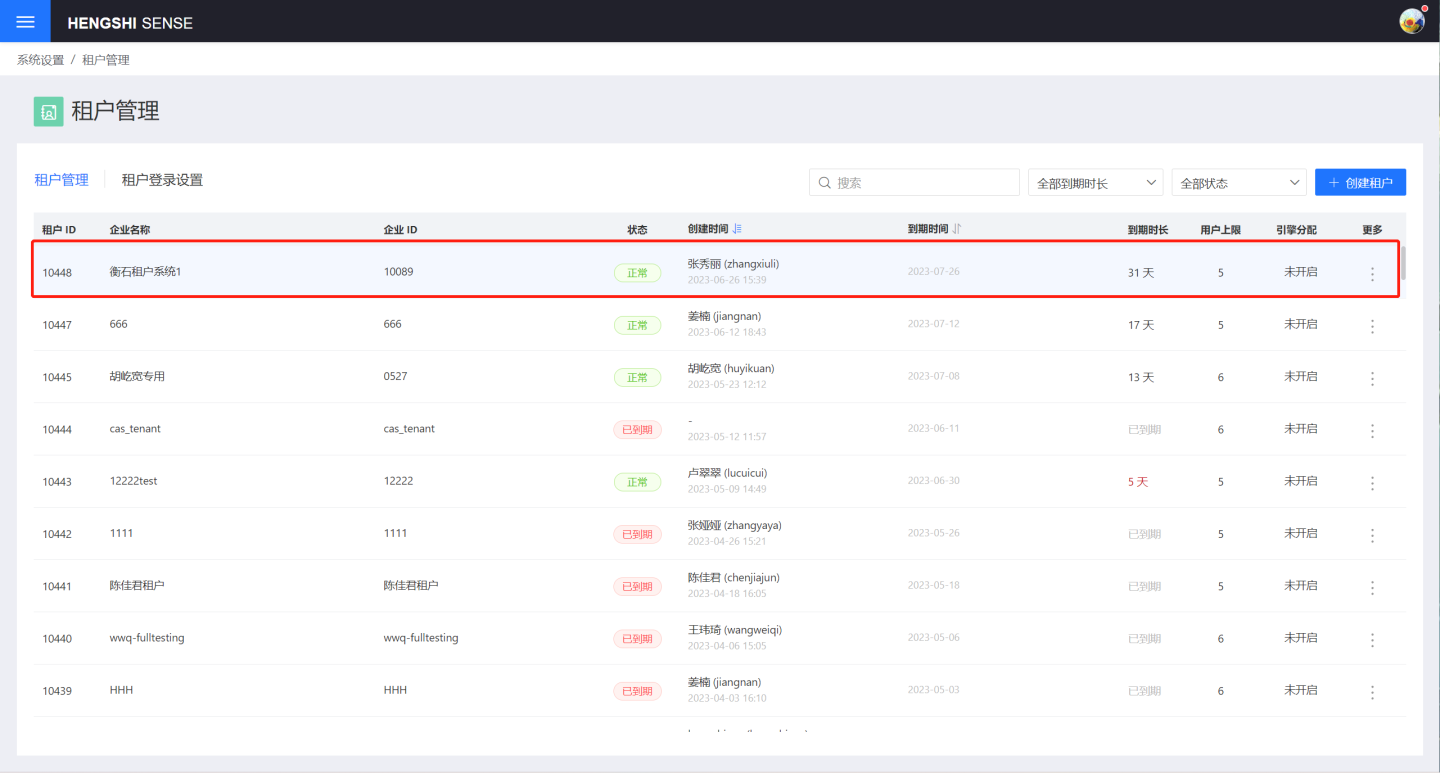
After successfully creating the tenant, the tenant information can be seen on the tenant management page. The tenant is in an open state, and the tenant administrator can log into the tenant system using the Enterprise ID, username, and password to start the tenant space.
Tip
- The tenant is the enterprise customer, and the tenant administrator is the administrator of the tenant system, responsible for managing and maintaining the tenant system. When the platform provider authorizes resources to the tenant, it authorizes the tenant, not the tenant administrator.
- The system only sets the administrator information when creating the user, used to start the tenant space, but does not retain or use the tenant administrator information in the system.
- The platform provider can only see the tenant, not the users in the tenant system, and does not manage the users within the tenant system (including the tenant administrator).
Tenant Authentication Mode
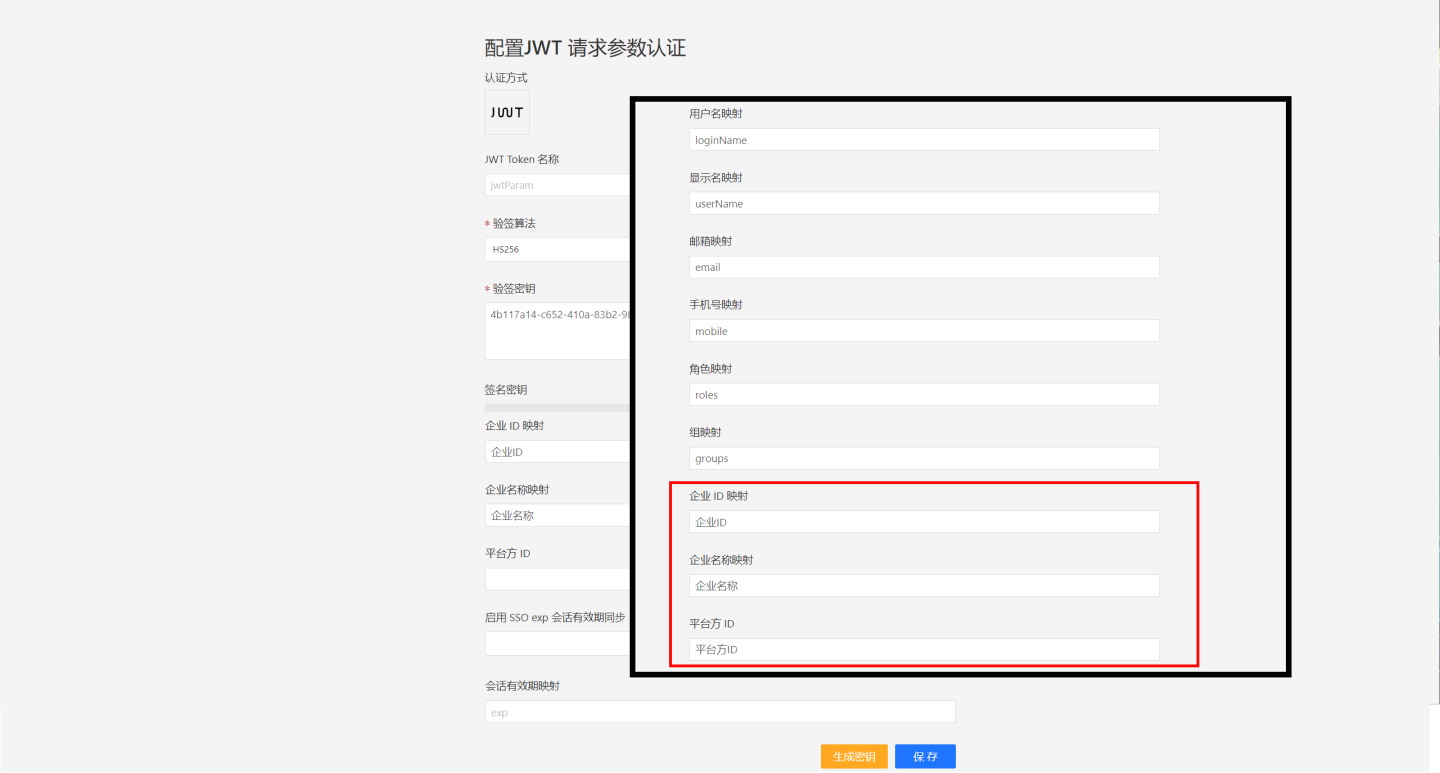
The platform enables the tenant authentication mode, allowing the selection of a platform to which the tenant system can be connected. Users of the tenant system can directly log in using the corresponding authentication method. After logging in, the platform will automatically generate a tenant information entry in the tenant management page.
As shown in the figure, a tenant logs into the tenant system using JWT authentication, filling in the enterprise ID mapping, enterprise name mapping, platform ID, and other information in the login details. Upon successful login, the platform's tenant management will automatically add a tenant information entry. At this point, only the tenant information for that enterprise is present, and there is no tenant administrator. The tenant system administrator can be designated through Upgrade to Administrator.
Tip
When using the authentication mode to log into the tenant system, the platform only adds a tenant information entry for the first user to log in.
Edit Tenant
After a tenant is created, it can be edited to modify the tenant's enterprise ID, enterprise name, tenant expiration date and user limit, and tenant system expiration reminder.
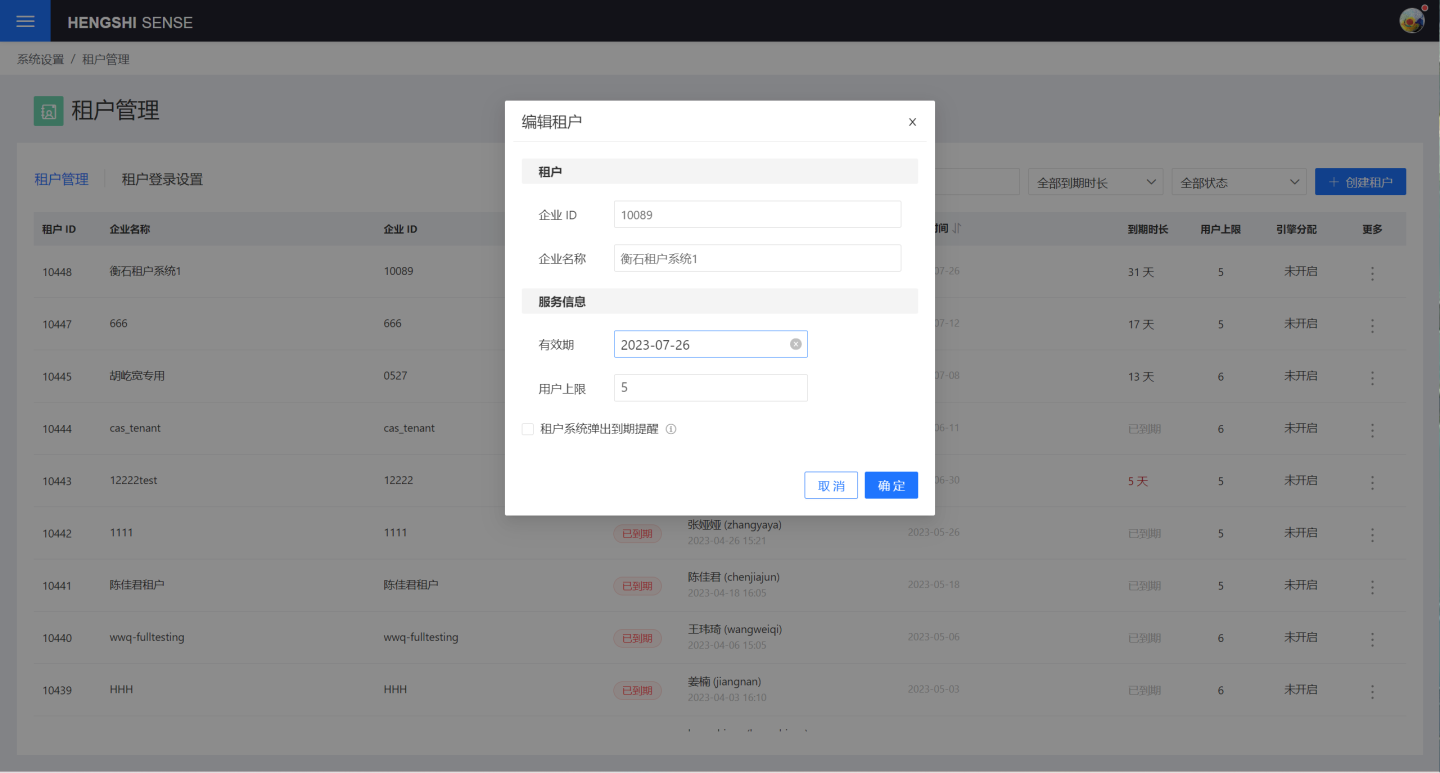
Reset User Password
The platform can reset the password for users within the tenant system. This function is used when all users within the tenant have forgotten their passwords and cannot log into the tenant system. This function is applicable to extreme scenarios and is generally not used.
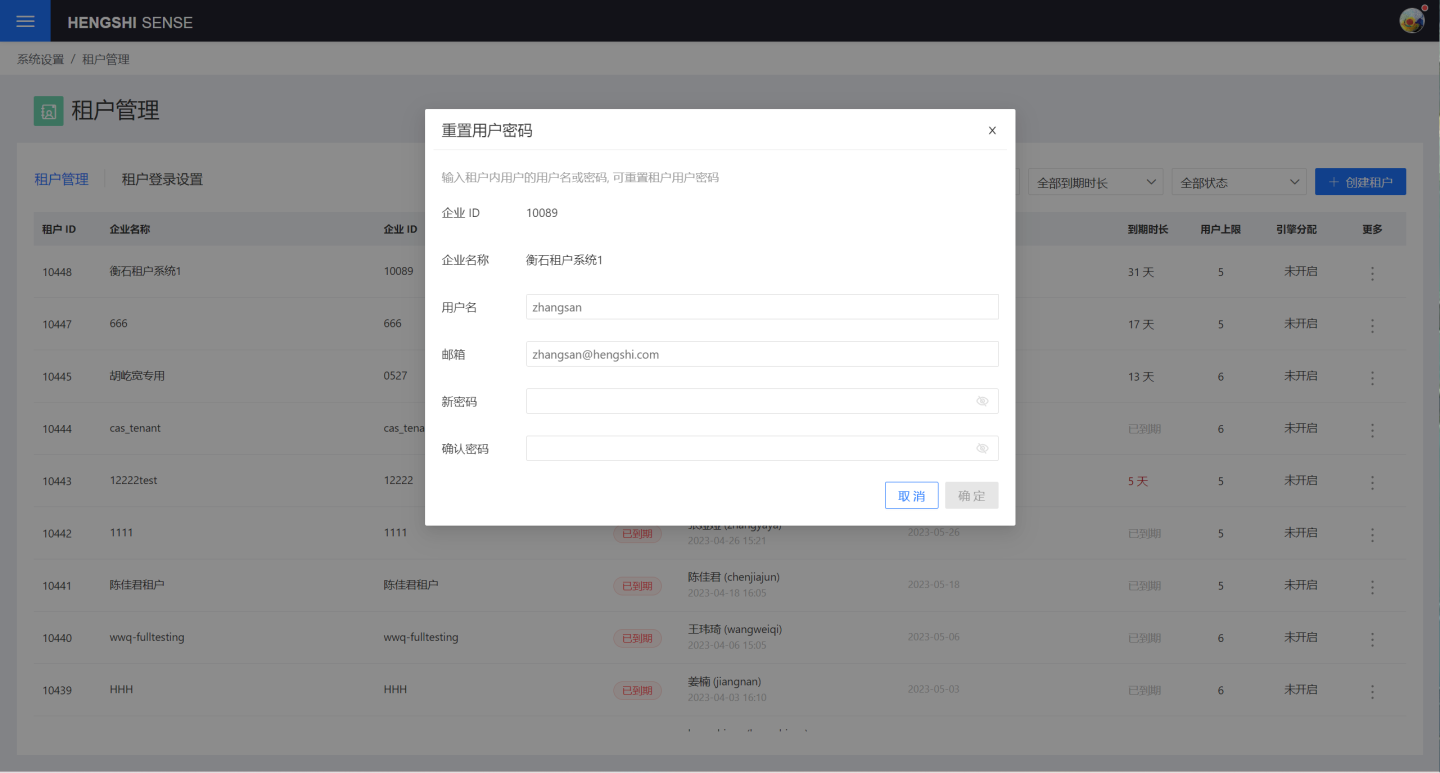
Enable/Disable Tenant
After a tenant is created, it is in an enabled state. The platform can disable the tenant, after which users of the tenant system will be unable to log in.
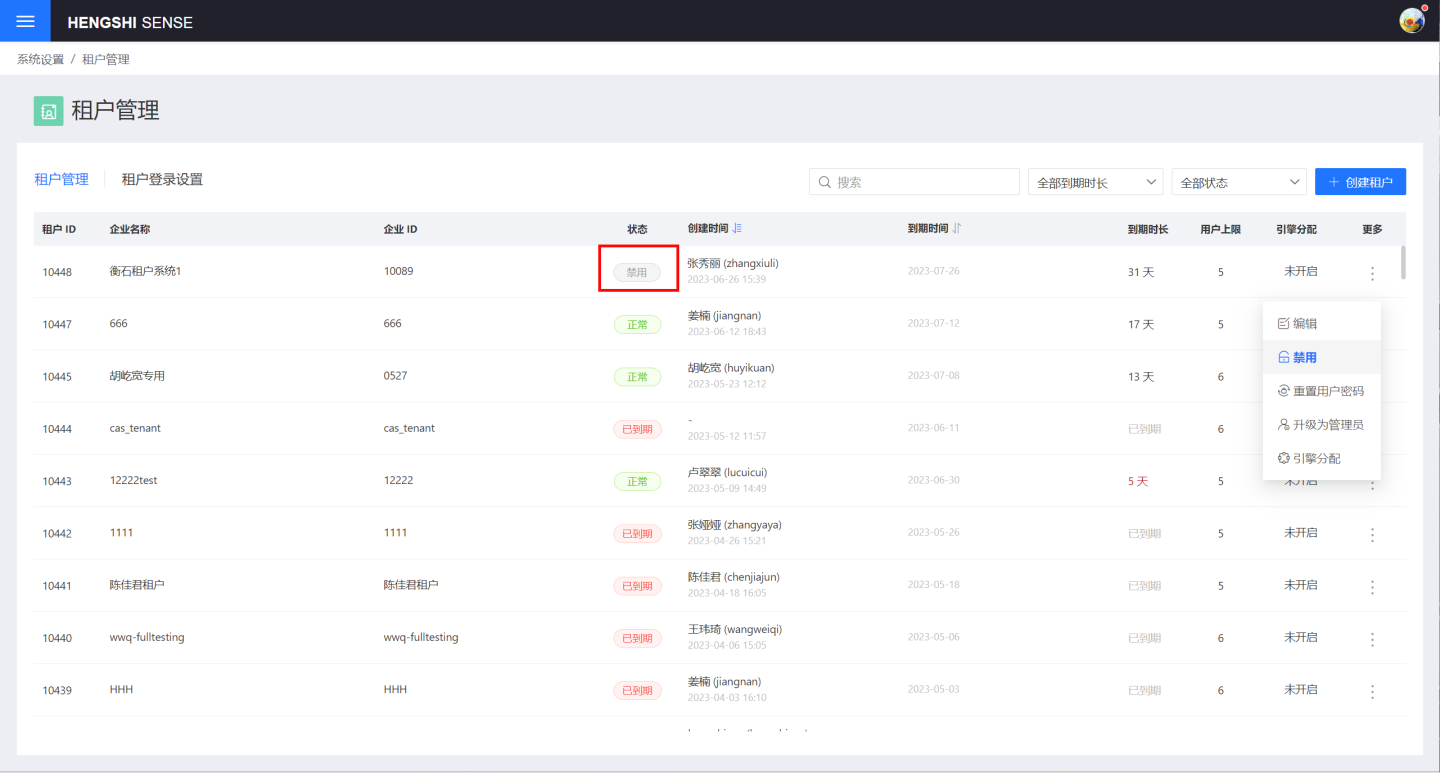
Engine Allocation
The platform can allocate engines to tenants. Each tenant uses an independent engine. As shown in the figure, set the number of resources allocated to the tenant in the tenant engine allocation pop-up window. 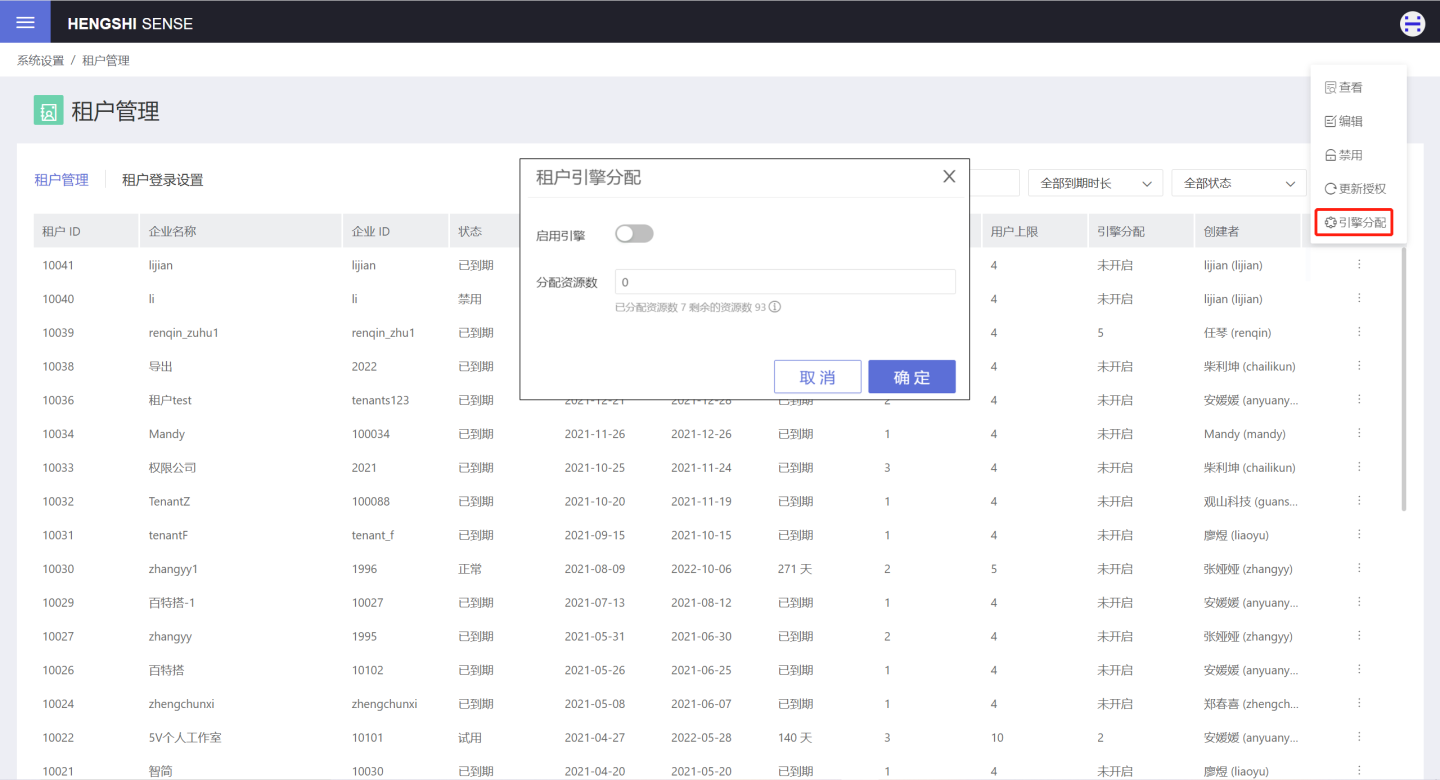
Tenant engines can be set in the system settings. After configuring the total number of engine allocations, the system automatically calculates the CPU computing power and memory size represented by each resource. Currently, the total number of engines is 100 and cannot be modified. 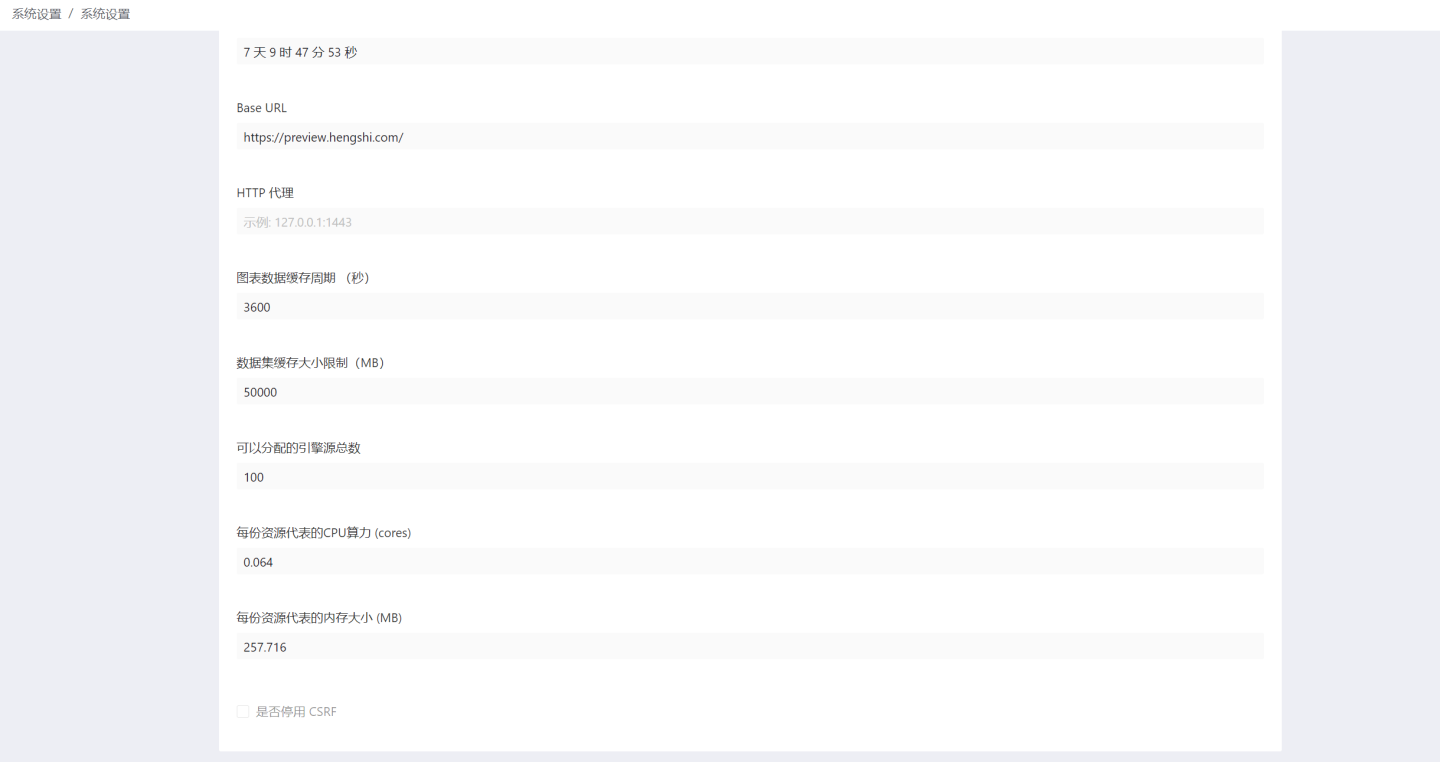
Upgrade to Administrator
The upgrade to administrator function primarily promotes a user within the tenant system to an administrator. This function is mainly used for users logging into the tenant system using the Multi-Tenant Authentication Mode. Since there is no administrator in the system when tenant users log in using the multi-tenant authentication mode, the platform can use this function to upgrade a user within the tenant system to an administrator to manage and maintain the tenant system.
Tenant Login Settings
The tenant login settings page allows you to set the default login method for the system, customize the platform login page, and set the tenant login page.
Tenant Features
The platform provides each tenant with an independent space, supporting data analysis within the space, which is managed and maintained by the tenant administrator. Tenant members perform data modeling and analysis within the system. The platform cannot view the contents of the tenant space.
The tenant system includes data analysis functions, with relevant modules such as System Management, Data Connections, Data Filling, Data Mart, App Creation, and App Market. Tenant members can build data models, create dashboards, and conduct business data analysis.
In addition to providing data analysis space for tenants, the platform can also share resources with tenants. Sharing is unidirectional, meaning only the platform can share resources with tenants, and tenant system content cannot be shared with the platform. Below is an introduction to resource sharing by the platform.
Platform Sharing
The platform can share resources with tenants, and tenant administrators can manage secondary authorization of these resources within the tenant system, granting access to other users within the tenant. Below is an introduction to resource sharing methods in various modules by the platform.
Data Connection Sharing
The platform authorizes data connections to tenants by establishing rules in the data connection module. Tenant users can view the platform's resources in the platform connections section of the data connection module. 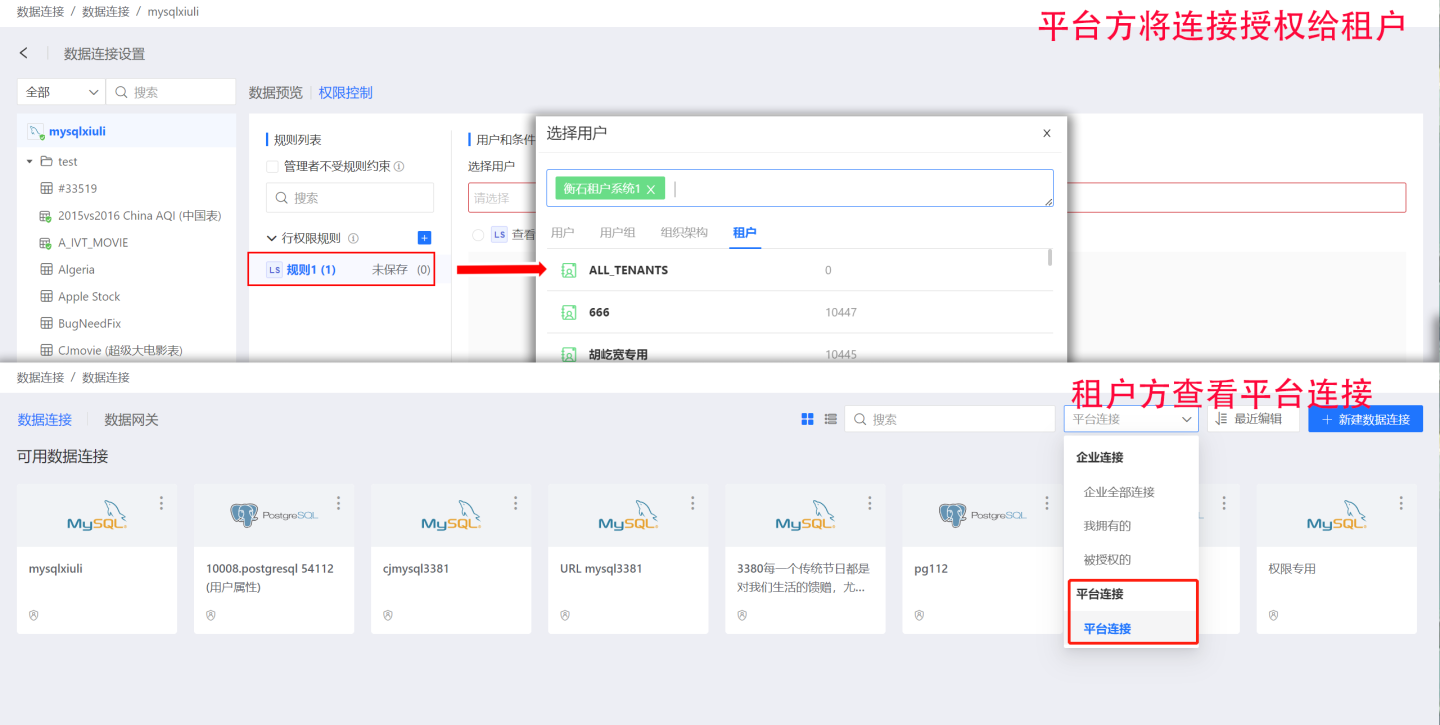
Data Filling Sharing
The platform's forms can be shared with tenants for filling. Tenant administrators can manage secondary authorization of these forms, sharing them with users within the tenant system for filling. For detailed content, please refer to Tenant Filling.
Data Mart Sharing
The platform authorizes data packages in the data mart to tenants, allowing them to view and use the data in these packages. Shared data packages are stored in the platform data folder under the tenant system's data mart. 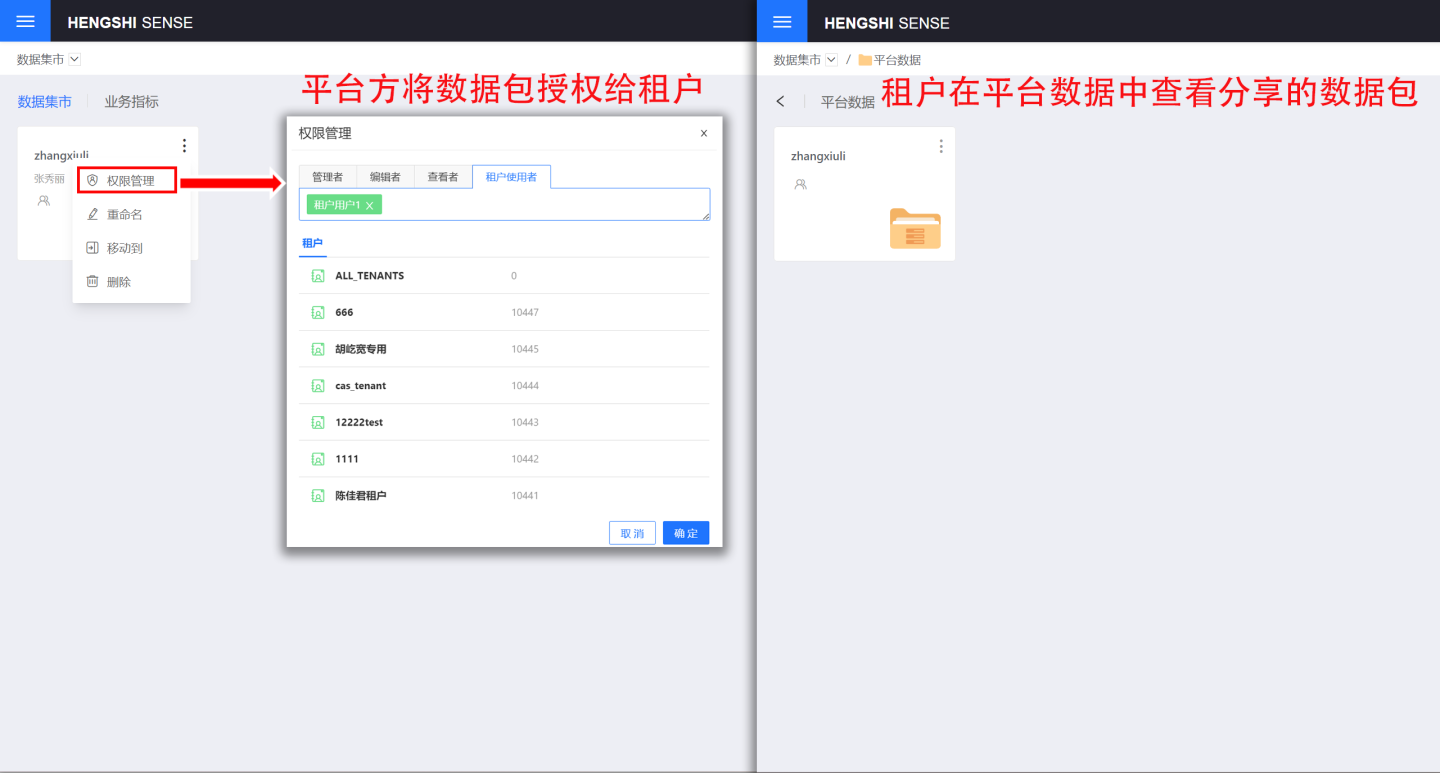
The platform can also control which data in the data packages is visible to tenants by setting data permissions.
App Creation Sharing
Applications in team spaces during app creation can be shared with tenants, who can perform operations such as viewing, copying, and exporting templates for the applications. The applications shared by the platform are stored in the platform data folder under the app creation section of the tenant system.
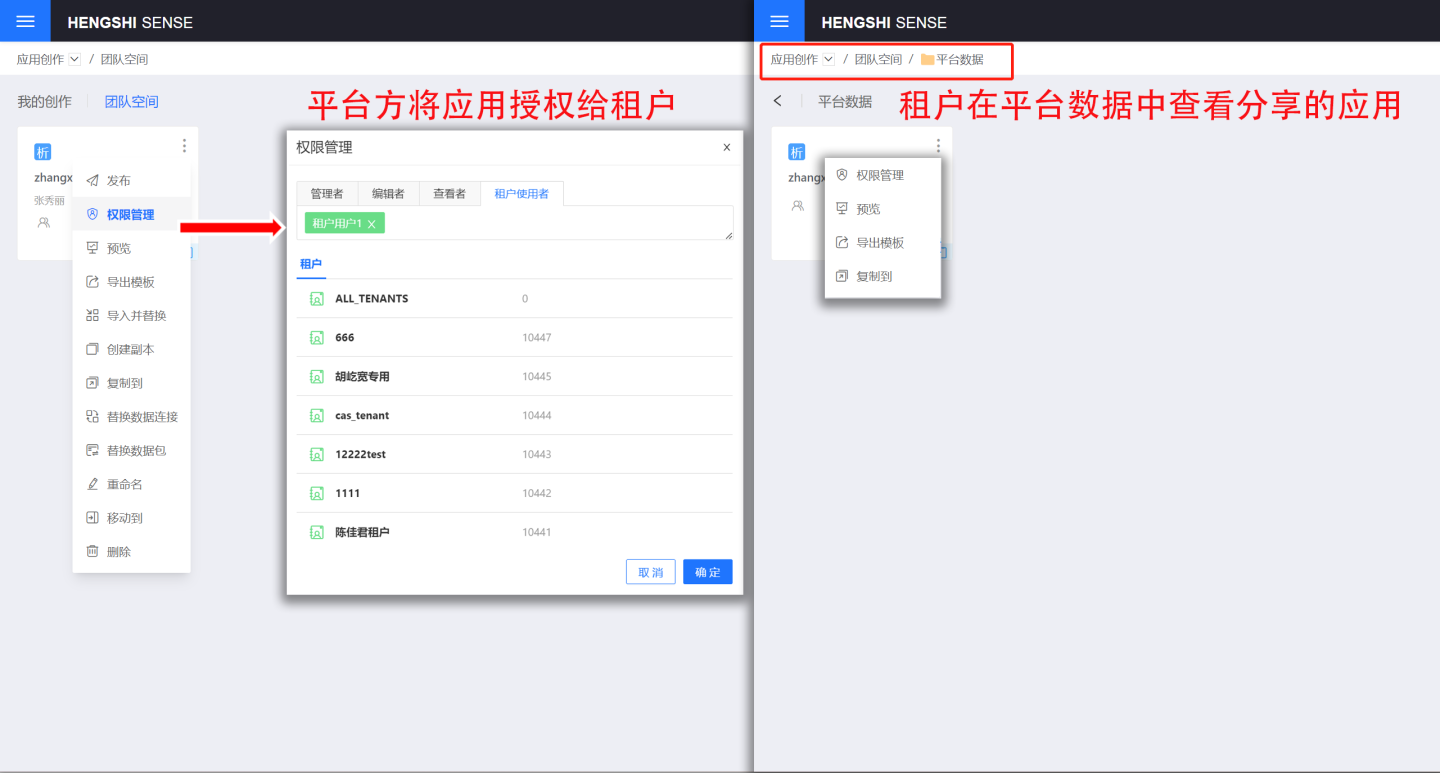
Tip
- Only applications in team spaces can be shared with tenants. Applications in My Creations cannot be shared. If sharing is necessary, please move the application to the team space first, and then share it.
- The platform can control which data in the application is visible to tenants by setting Data Permissions.
- Administrators in the tenant system can reauthorize the shared applications, granting viewing permissions to other users within the tenant system.
Marketplace Sharing
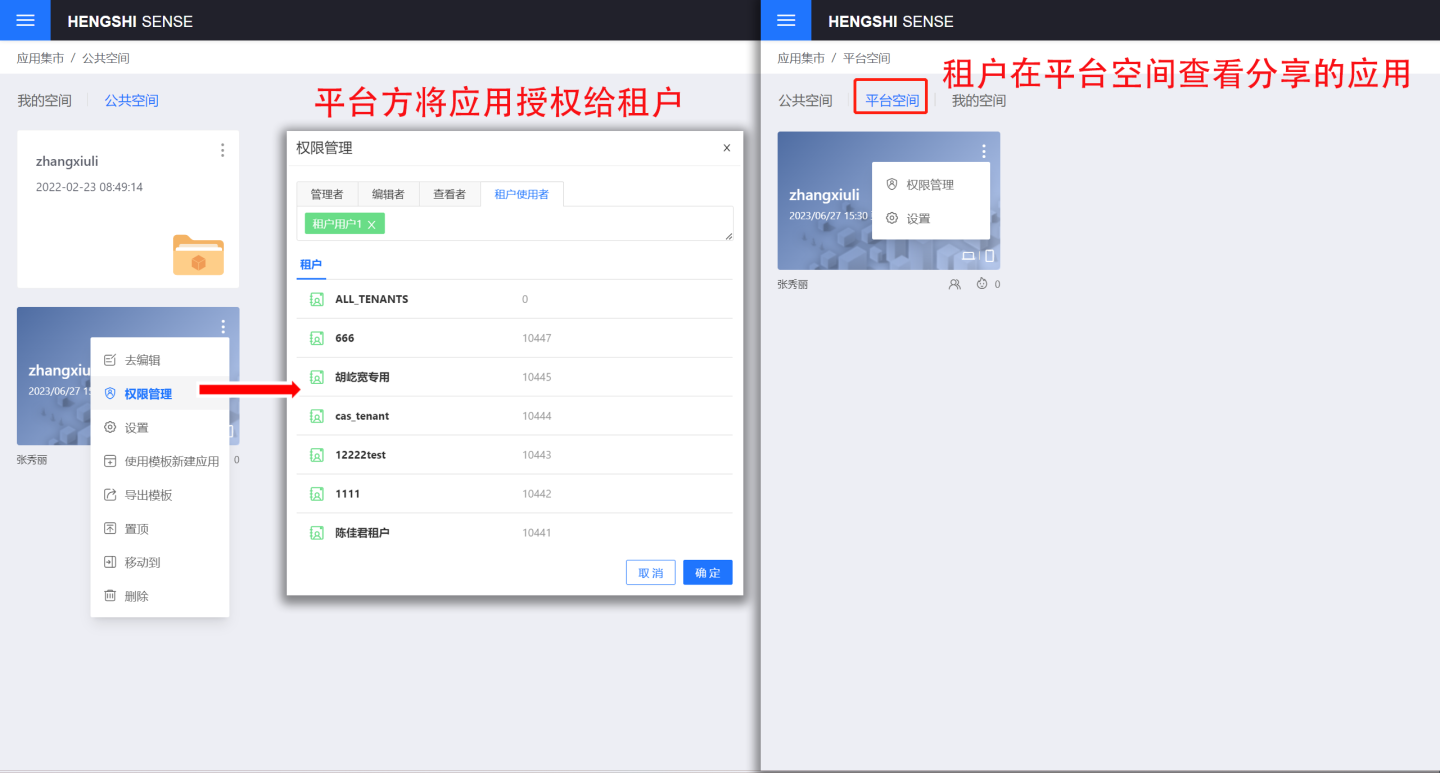
Applications in the public space of the marketplace can be shared with tenants, who can perform operations such as viewing, copying, and exporting templates for the applications. The applications shared by the platform are stored in the platform space under the marketplace section of the tenant system.
Tip
- Only applications in the public space can be shared with tenants. Applications in My Space cannot be shared. If sharing is necessary, please move the application to the public space first, and then share it.
- The platform can control which data in the application is visible to tenants by setting Data Permissions.
- Administrators in the tenant system can reauthorize the shared applications, granting viewing permissions to other users within the tenant system.