Field Management
Fields are a reprocessing of existing fields, calculating the data row by row in the original table to generate new fields. Fields are suitable for various segmentation scenarios, such as dividing age groups or consumption levels, which can be achieved by creating new fields.
Open the dataset and click Field Management to enter the field management page.
 Users can perform the following operations on this page:
- Create new fields
- Modify field types
- Rename fields
- Batch rename fields
- Set numeric display formats
- NULL replacement
- Set visibility
- Field sorting
- Field grouping
- Batch operations
Create Field
There are three ways to create a field:
- Expression
- Column Value Grouping
- JSON Splitting
Expression
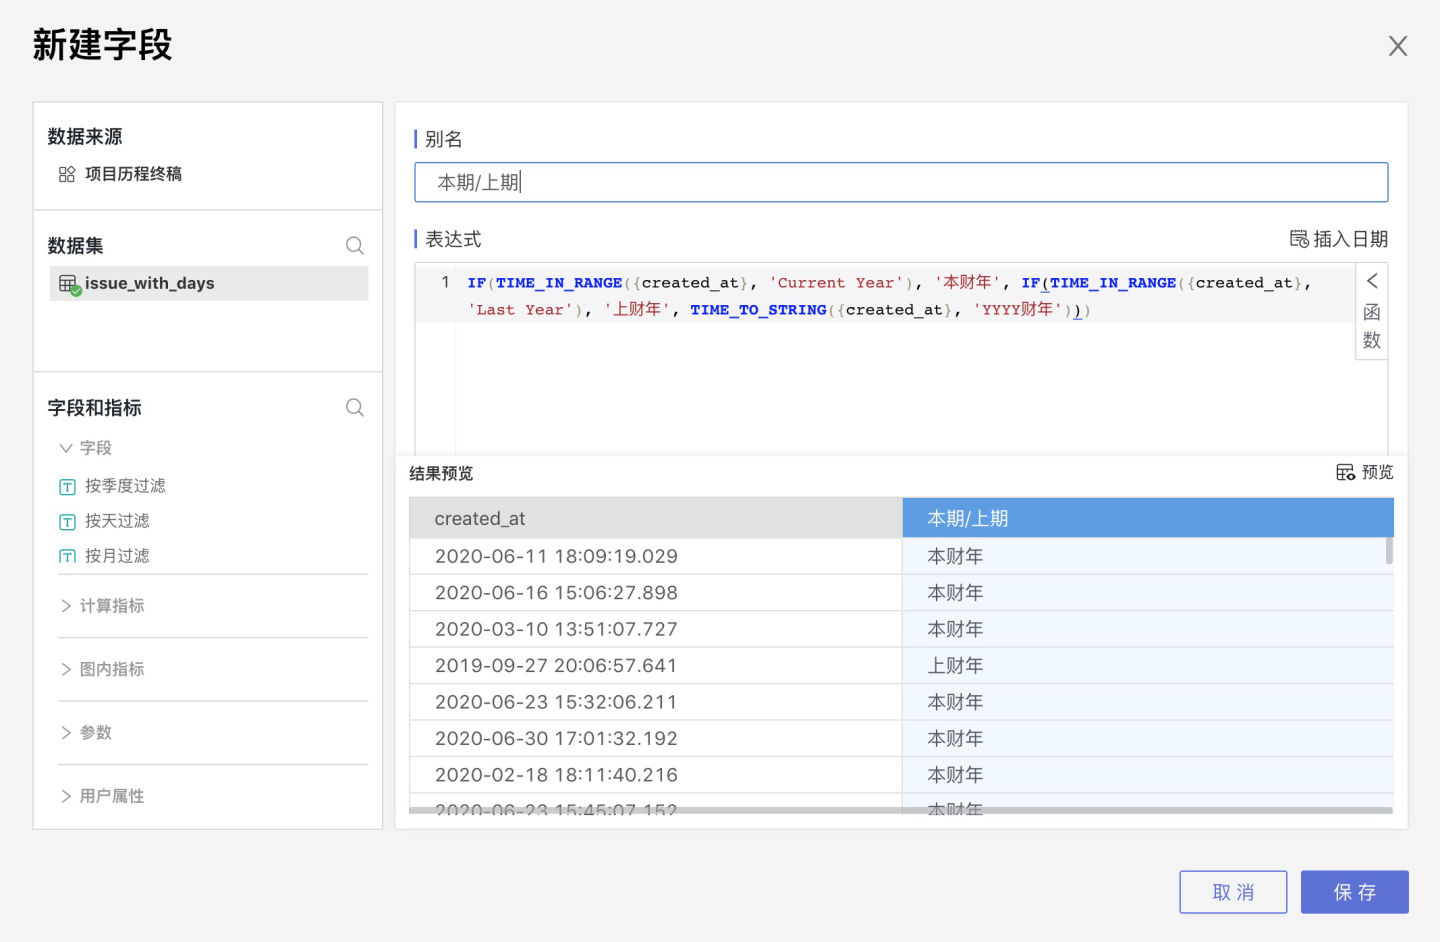
Open the dataset, switch to the Field Management tab, and click Create Field.
Enter the field Alias. In the expression, you can input a fixed value or use various functions to write complex expressions. The field type is automatically determined by the return type of the expression.
While entering the expression, click on the fields/parameters/user attributes on the left. The selected field/parameter/user attribute will automatically jump to the cursor position in the expression.
Expand the function list in the top-right corner of the expression area. Hover over a function and click the "i" help icon to view the function description. Clicking on a function will insert it into the expression window.
After entering the expression, click Preview in the bottom-right corner to preview the expression result. You can drag the middle separator bar to adjust the size of the upper and lower windows.
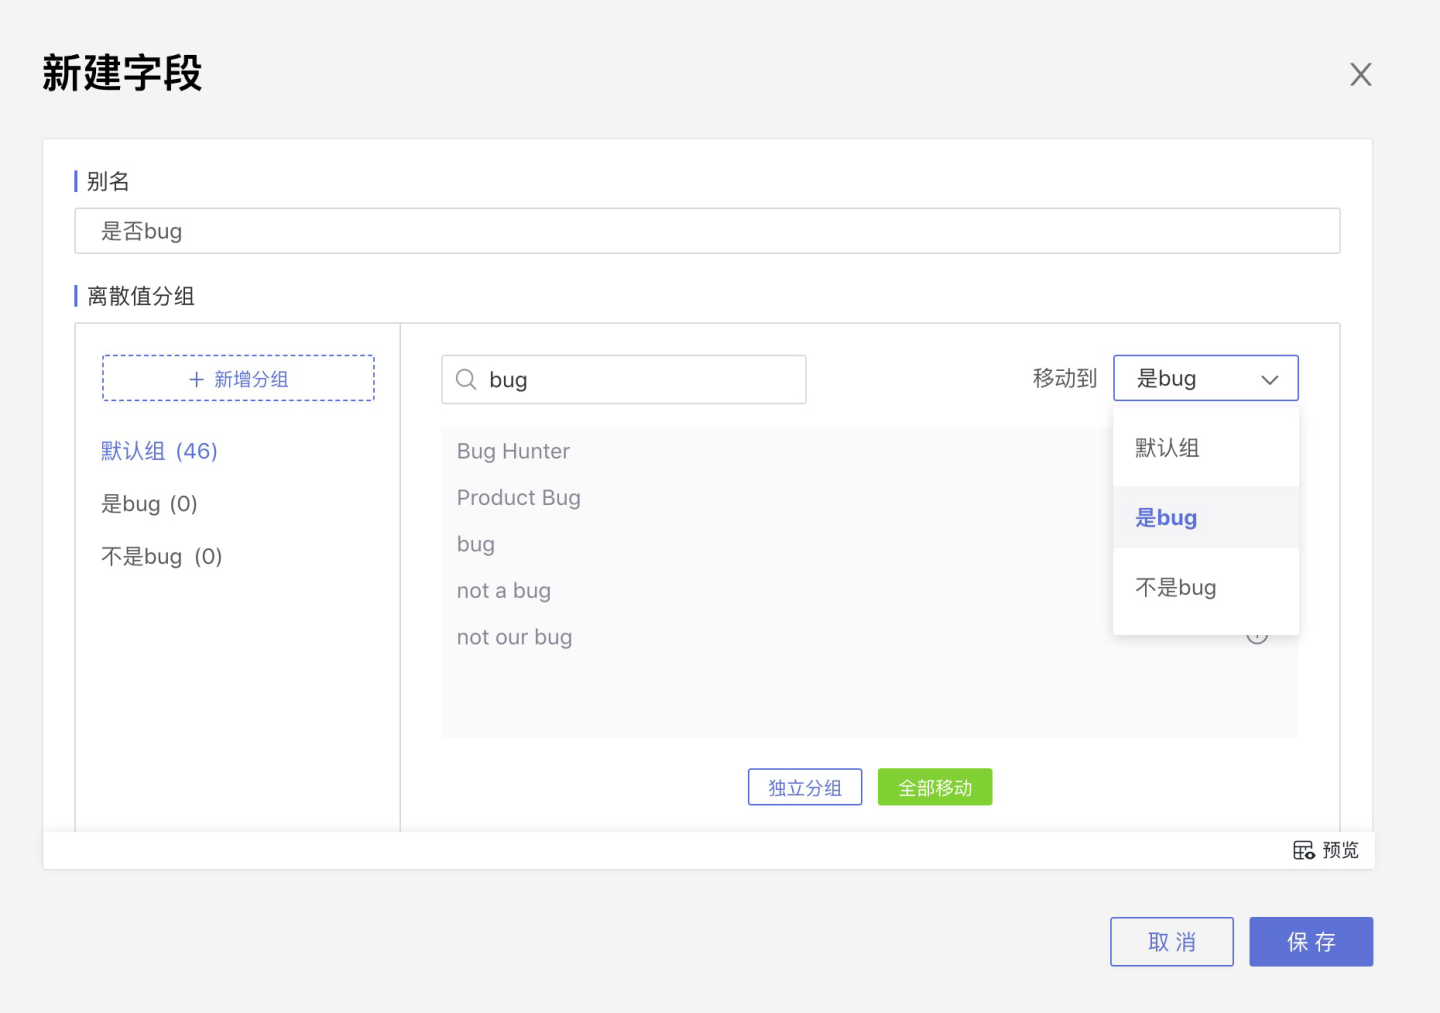
Column Value Grouping
In the field management, click the three-dot menu for field operations to bring up Column Value Grouping.
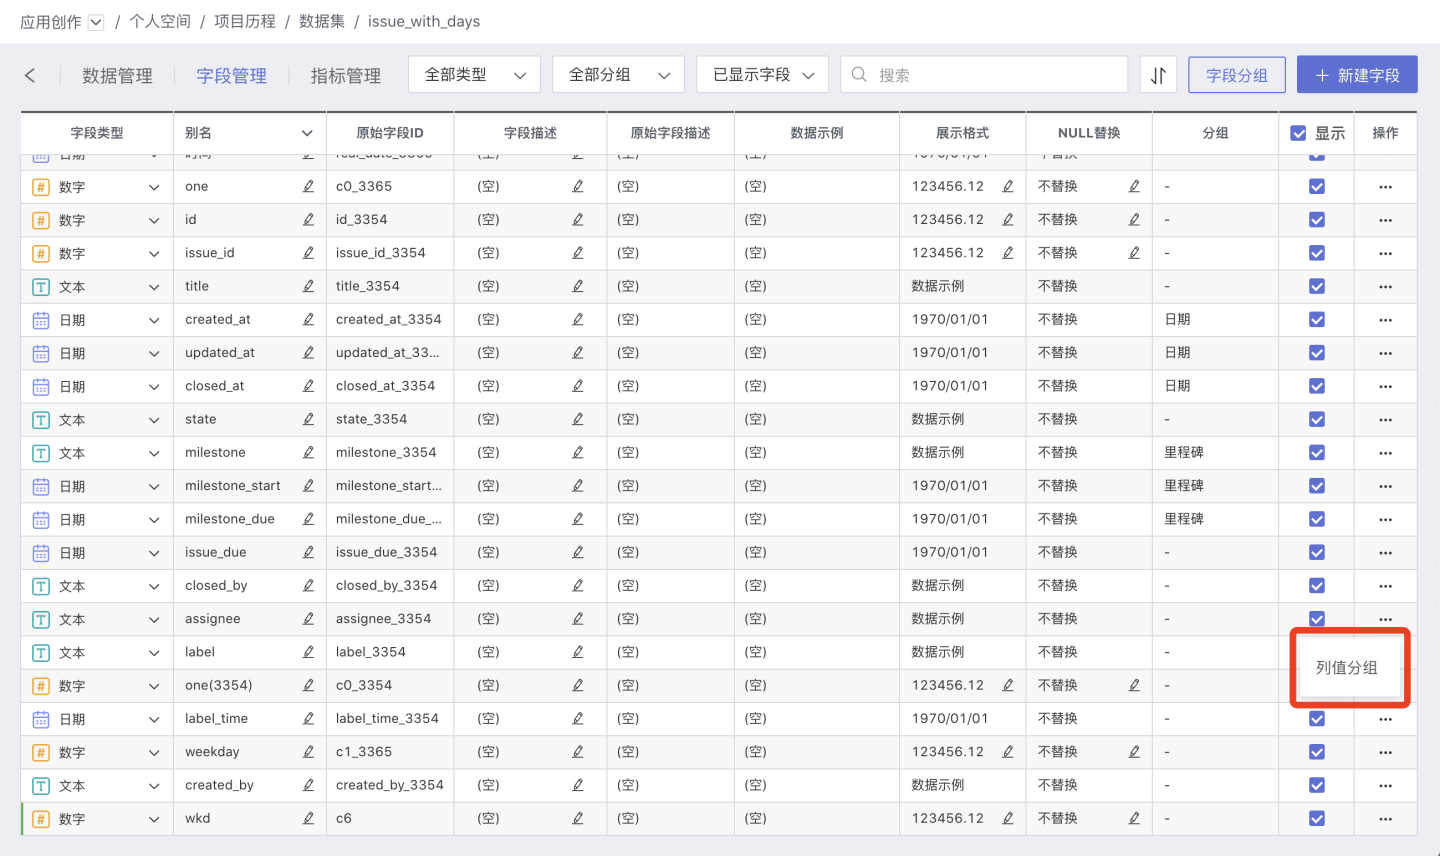
Click Column Value Grouping to open the column value grouping window.
Column value grouping is divided into "Discrete Value Grouping" and "Continuous Value Grouping." The selectable parameters include text, numbers, and dates. Currently, text only supports discrete value grouping, dates only support continuous value grouping, and numbers support both.
Discrete Value Grouping
Discrete value grouping requires creating a new group.
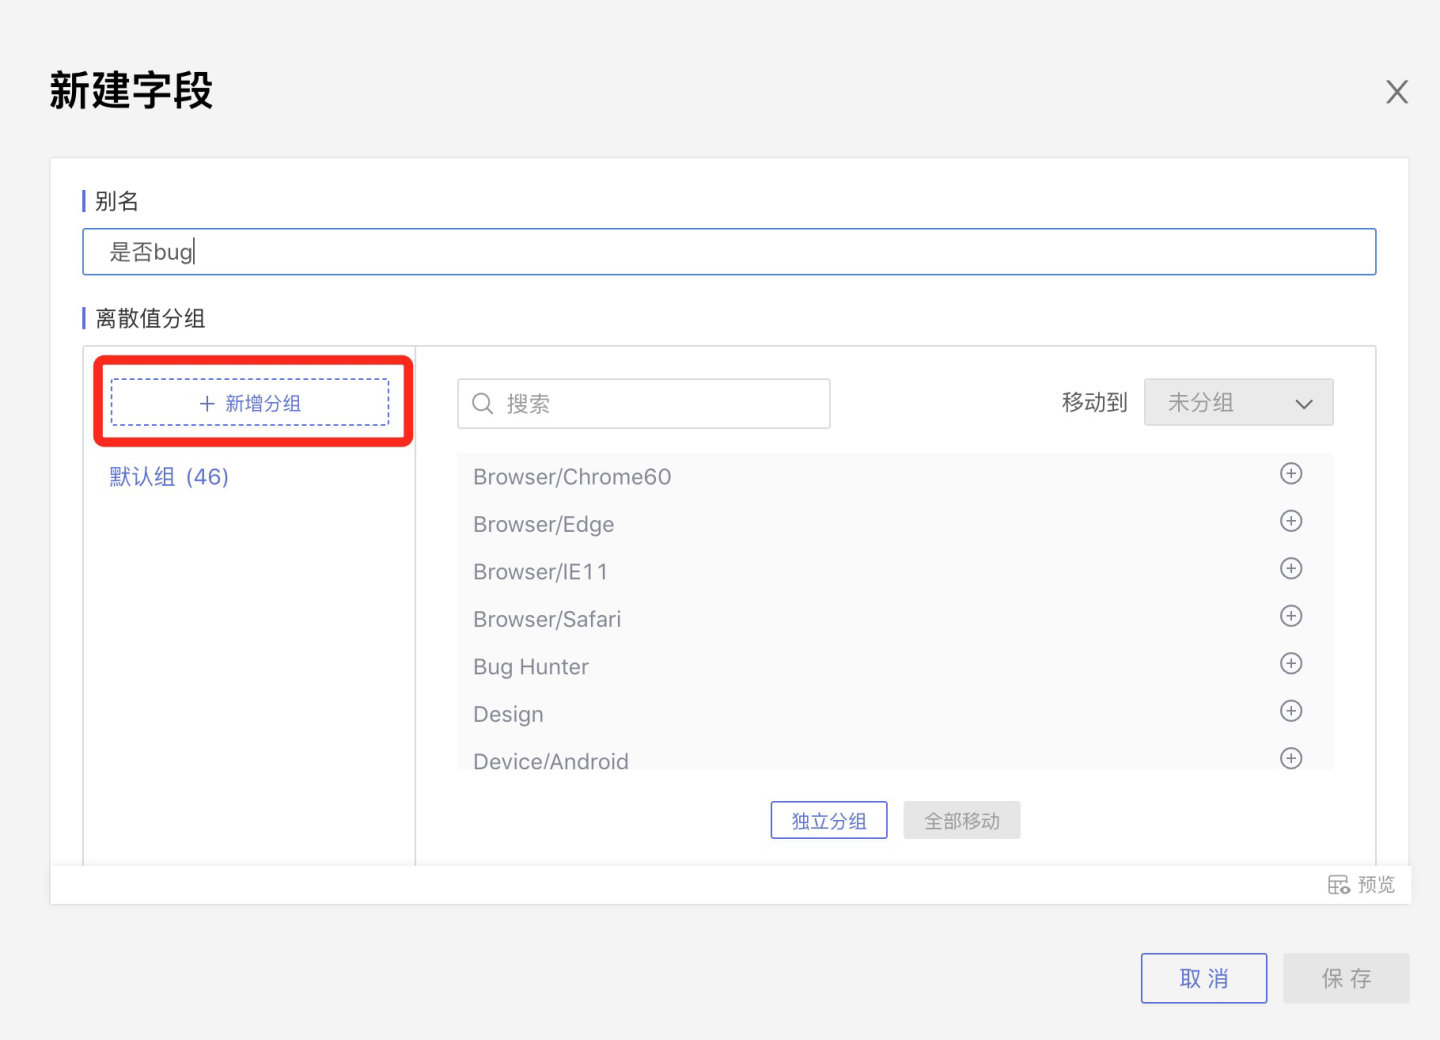
After creating a new group, select the target group from the Move to dropdown list in the upper right corner. In the middle field value area, select a field value and click the "+" icon to move field values one by one to the target group.
Move All: Click Move All at the bottom to move all field values in the field area to the target group.
Independent Grouping: Click Independent Grouping to make each field value in the field area an independent group.
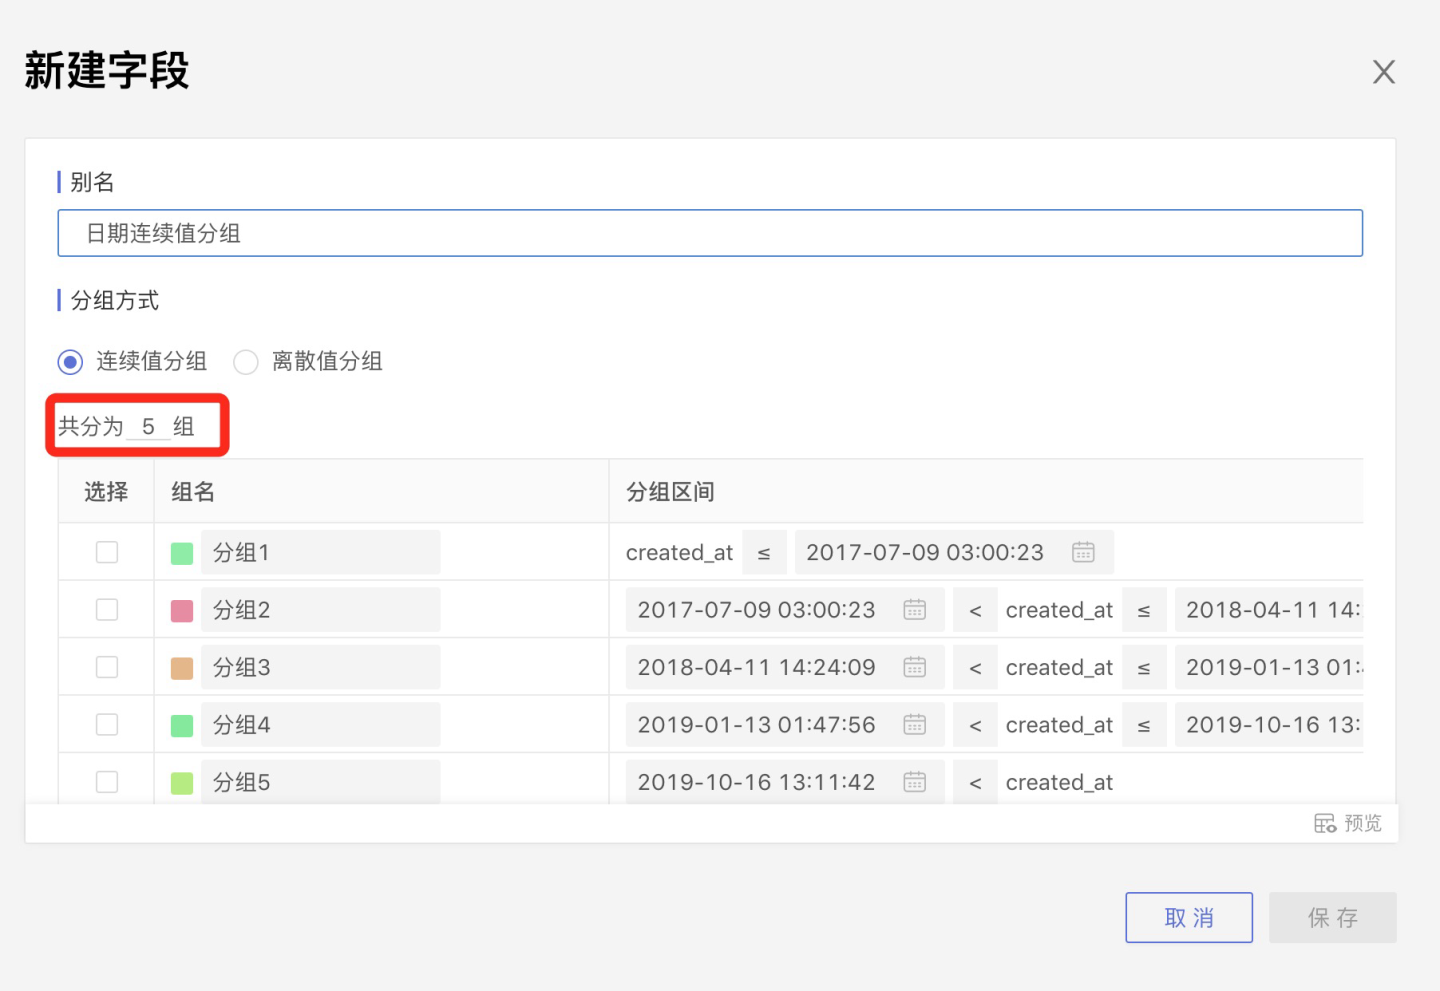
Continuous Value Grouping
Select date or numeric fields to group column values, with continuous value grouping as the default.
The system will default to dividing into 3 groups. You can modify the number of groups in Divided into x groups, rename the groups in the group name section, and adjust the range values for each group in Grouping Interval.
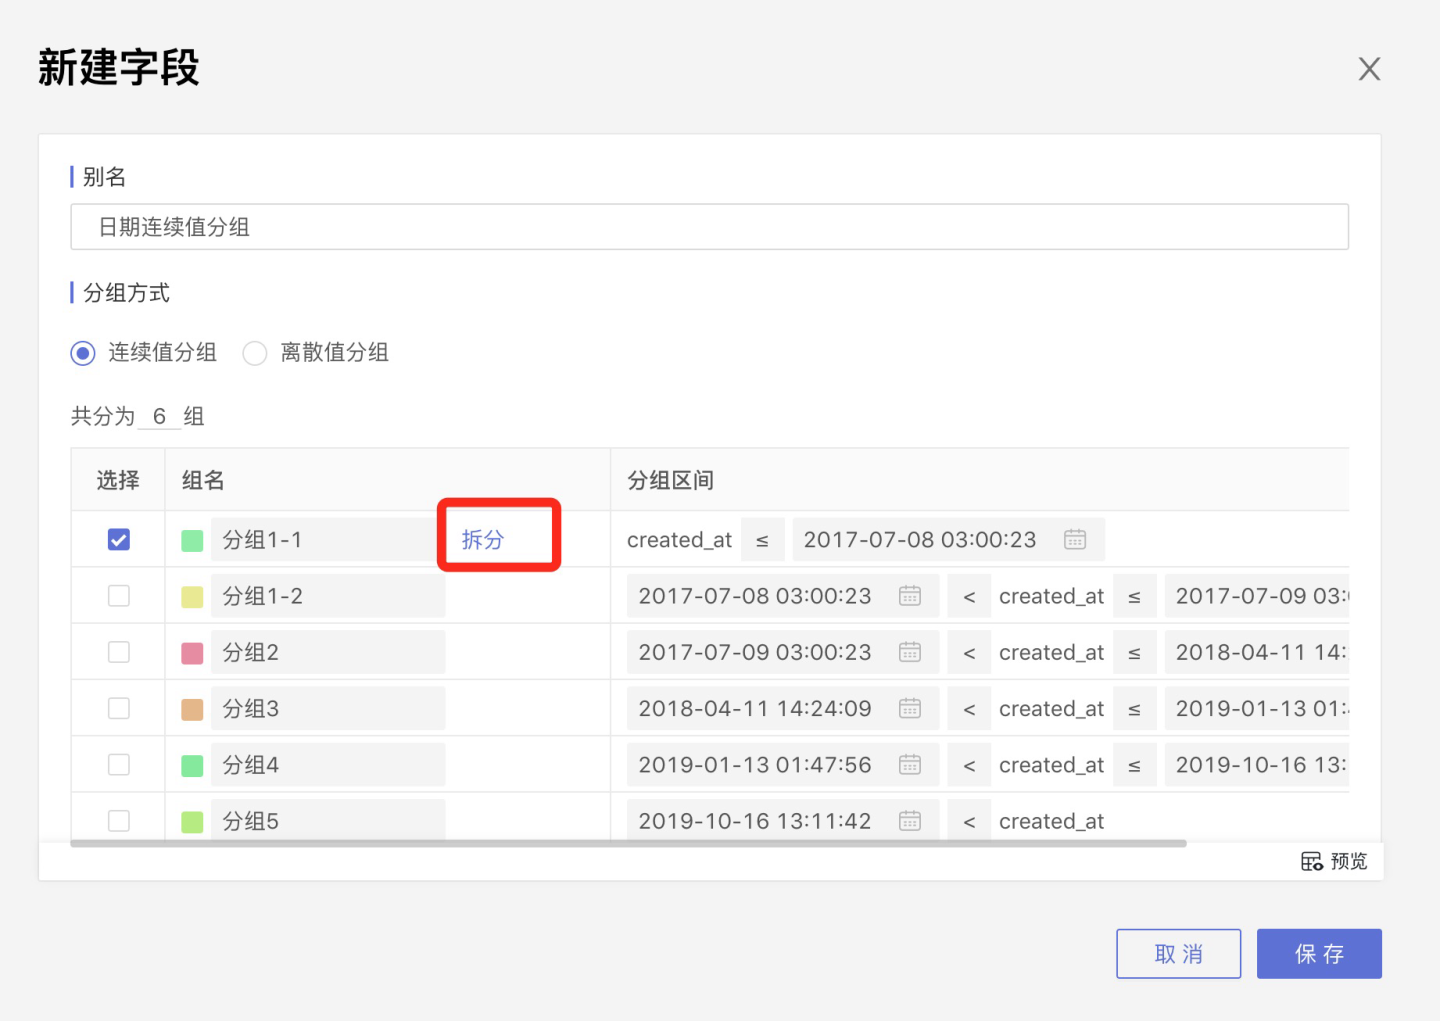
Split
Select a row, and the Split option will appear on the right side of the group name. Click Split, and the group will be divided into two groups.
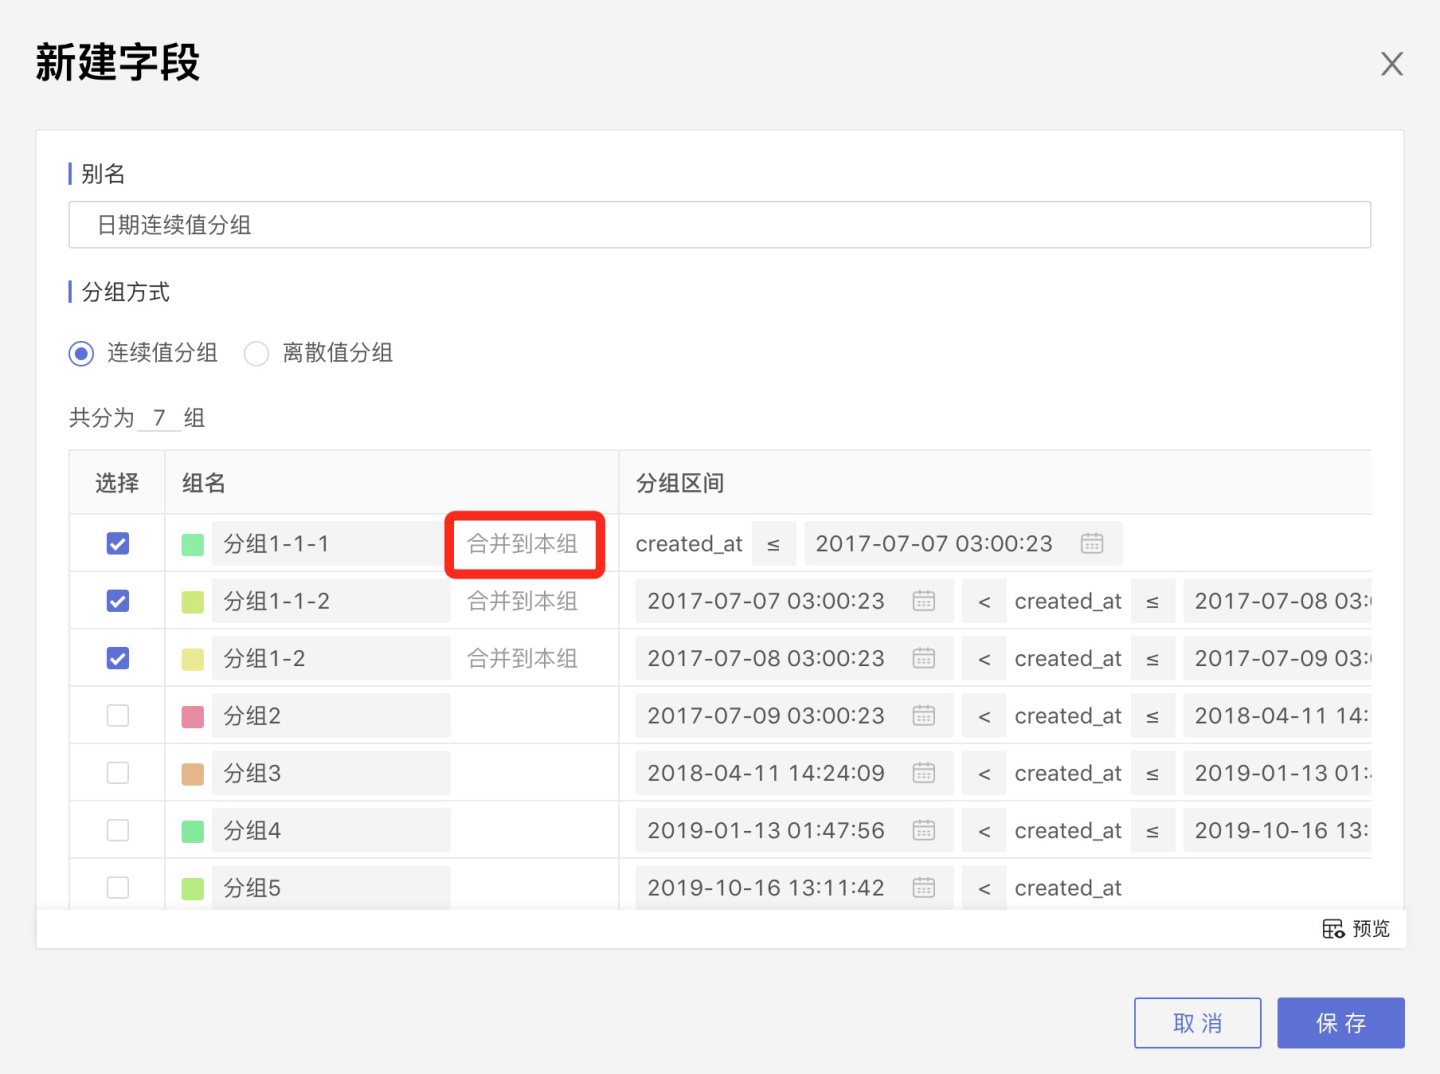
Merge
Select multiple groups, and the option Merge into this group will appear on the right side of the group name. After clicking it, the other selected groups will be merged into this group.
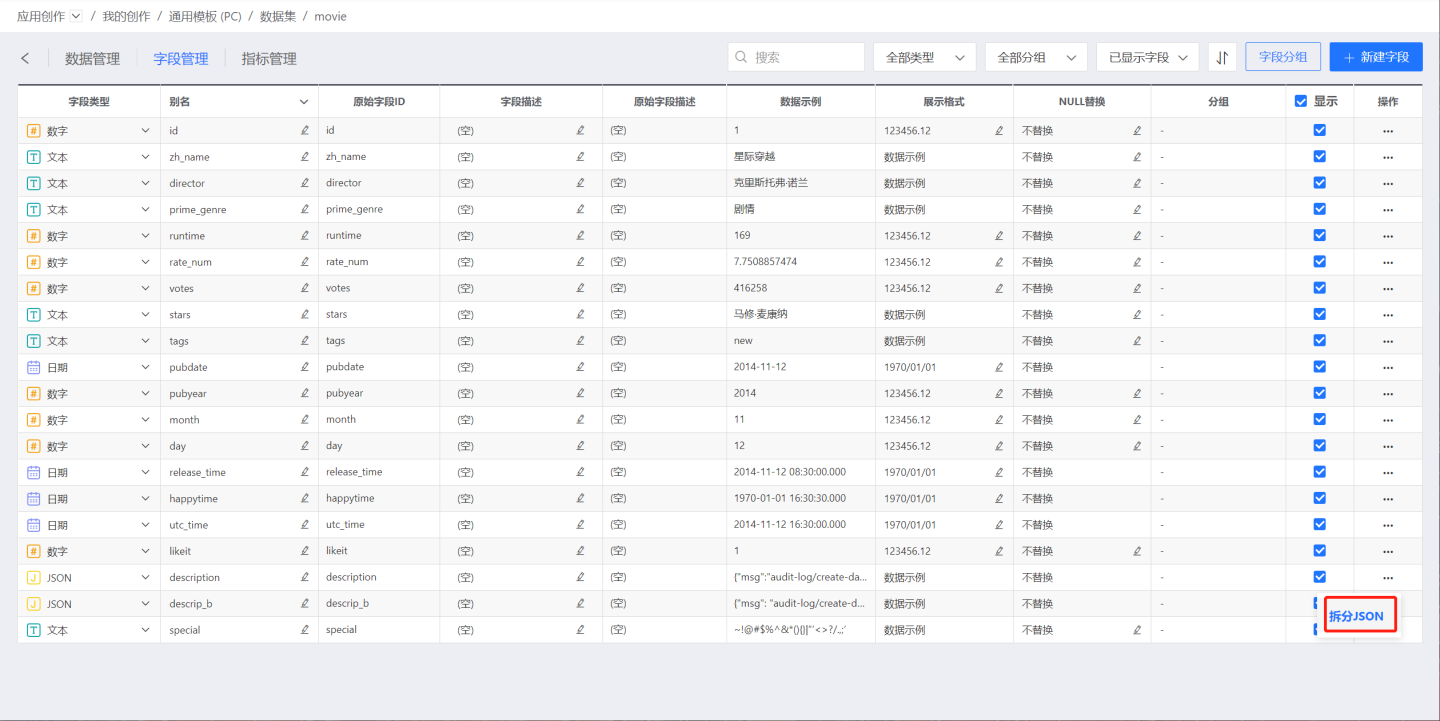
JSON Split
For data sources that support the JSON type, JSON fields will be recognized as JSON type. Open the dataset, switch to the Field Management tab, and open the three-dot menu of the JSON field. The option JSON Split will appear.
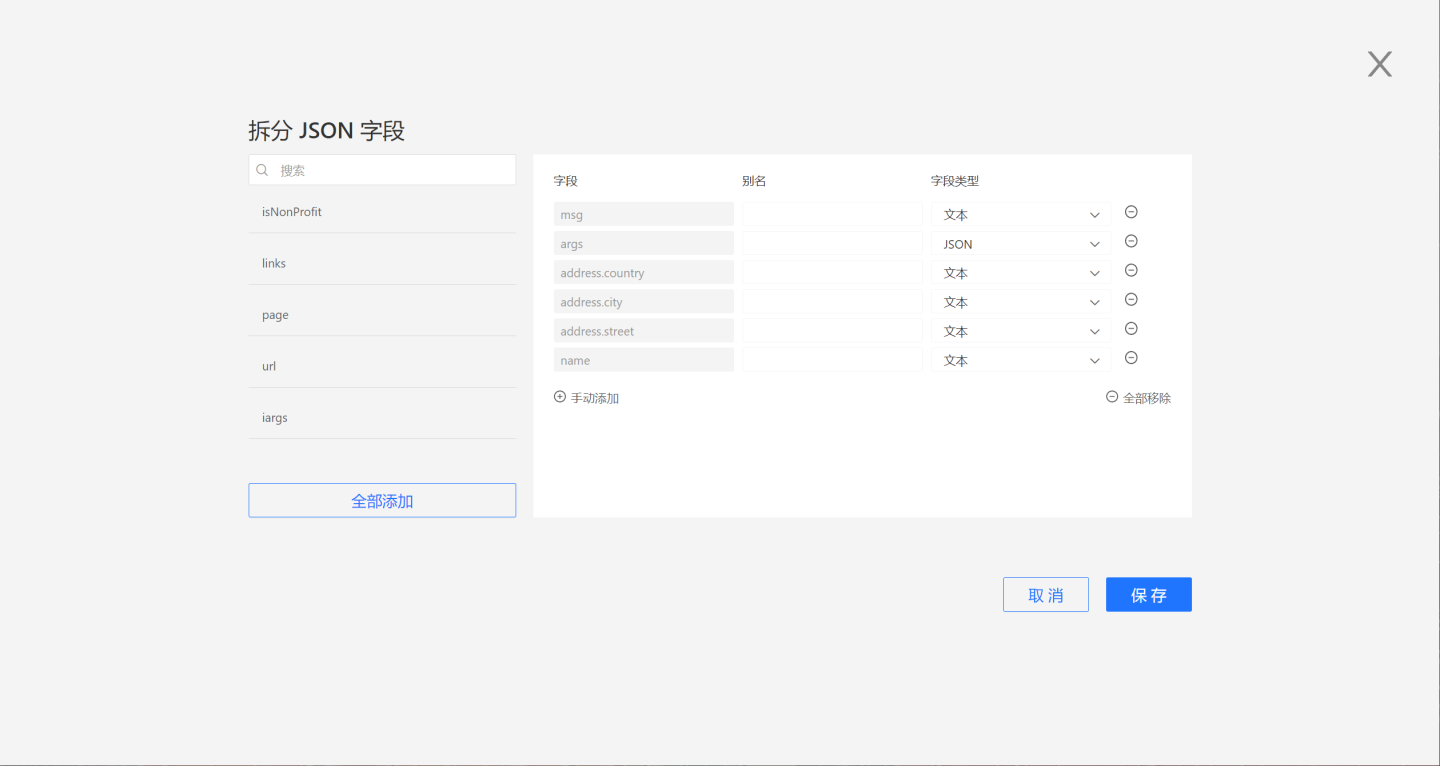
Click JSON Split, and the system will automatically identify the fields that can be split. You can click to add them individually to the right side or click Move All at the bottom to move all fields to the right side. On the right side, you can modify the field alias and field type.
If you do not want to split a specific field, you can click the minus sign to cancel the split.
Click Manual Add to manually input the JSON path for custom splitting.
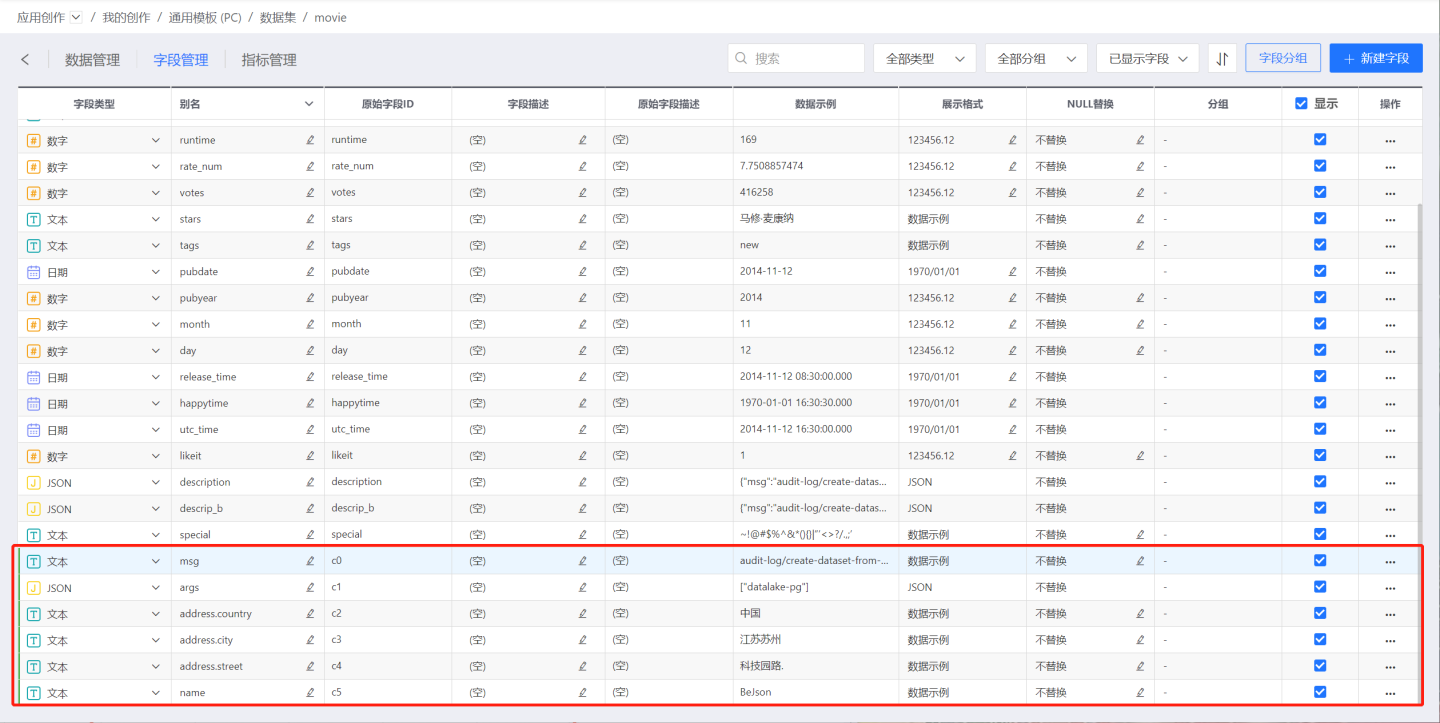
Click Save, and the split fields will appear in the field management list. Open the dataset to view the split results.
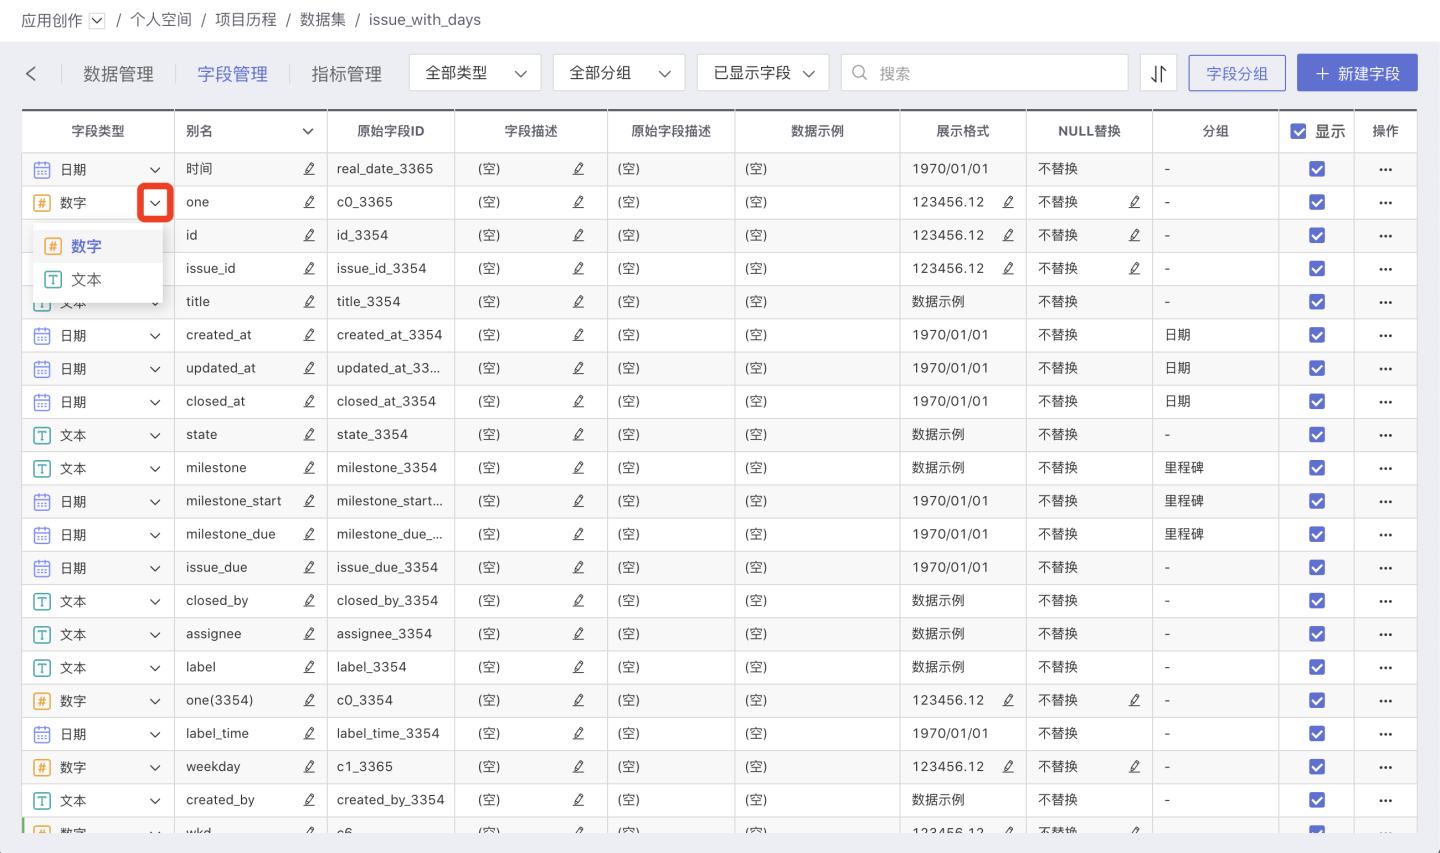
Modify Field Type
Click the dropdown menu next to the field name, select a compatible numeric type, and save. The field type will be changed to the selected type. Date fields can specify a date format.
Please Note
You can only change the type of a data column if it is not referenced elsewhere; otherwise, the modification will fail. (Referenced means the data column is used in charts, dashboards, new fields/metrics, or other datasets).
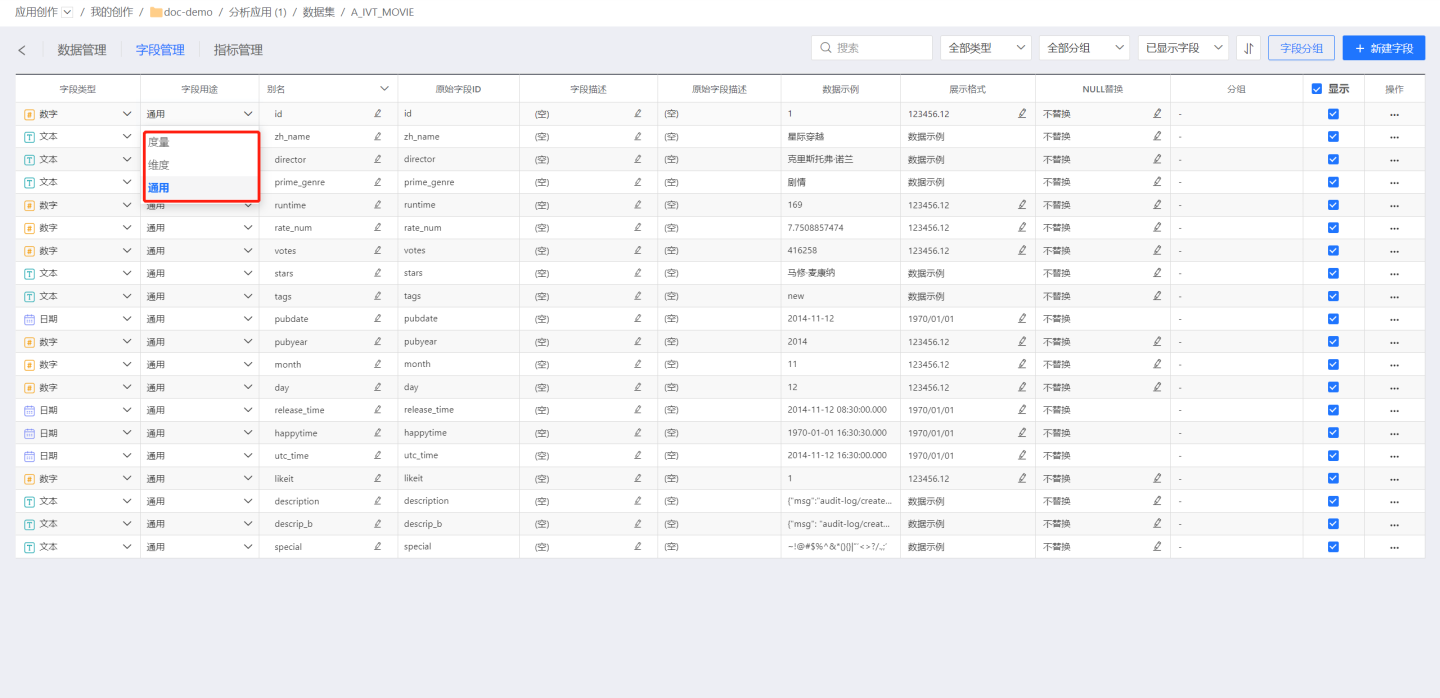
Field Usage
Field usage allows you to set fields as General, Dimension, or Measure, primarily for use in chart analysis with dimensions and measures.
- General indicates that the field can be used as either a dimension or a measure.
- Dimension indicates that the field can only be used as a dimension, and a dimension label will appear on the right side of the field during chart creation.
- Measure indicates that the field can only be used as a measure, and a measure label will appear on the right side of the field during chart creation.
Field Description
Add some field descriptions for each field. These descriptive annotations can be displayed in the chart's annotation details. Additionally, for AI features, field descriptions can be used to provide auxiliary explanations of industry terminology to large models, enhancing the accuracy of AI functionality.
Modify Field Name
Click the edit button next to the current field name, enter the new name in the input box that appears, and save to apply the changes.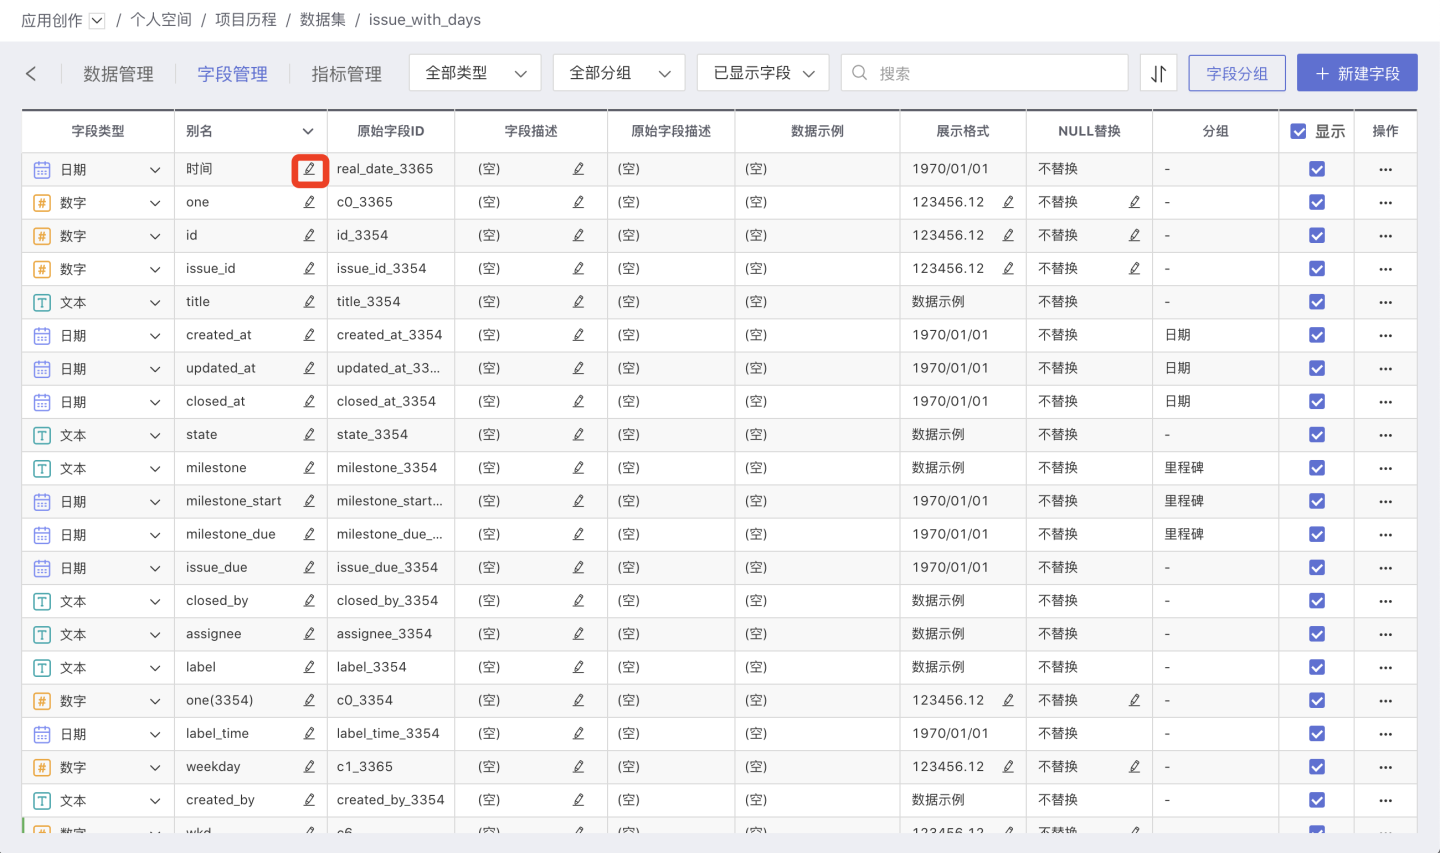
Batch Rename Field Names
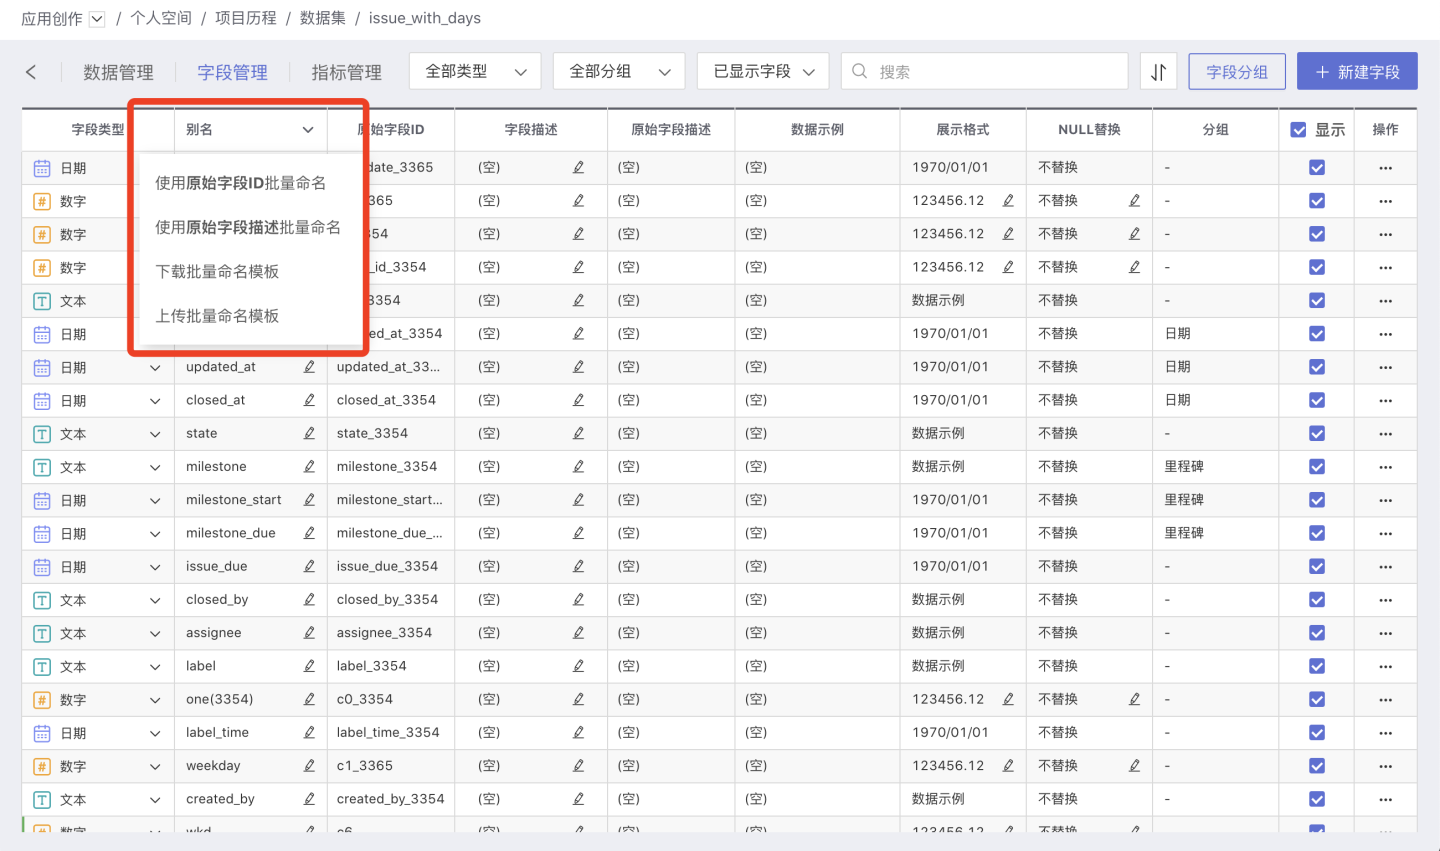
Use Original Field ID for Batch Naming
Click Use Original Field ID for Batch Naming, the Original Field ID value will be filled into the Alias. It will take effect after clicking save.
Use Original Field Description for Batch Naming
In Field Management, the Original Field Description column displays the comments added to the fields in the original database. Click Use Original Field Description for Batch Naming, and the Original Field Description values will be populated into the Alias. Click Save to apply the changes.
Download Batch Rename Template
Click Download Batch Rename Template to download the Excel template file locally. You can enter new names in the New Field column and then upload it.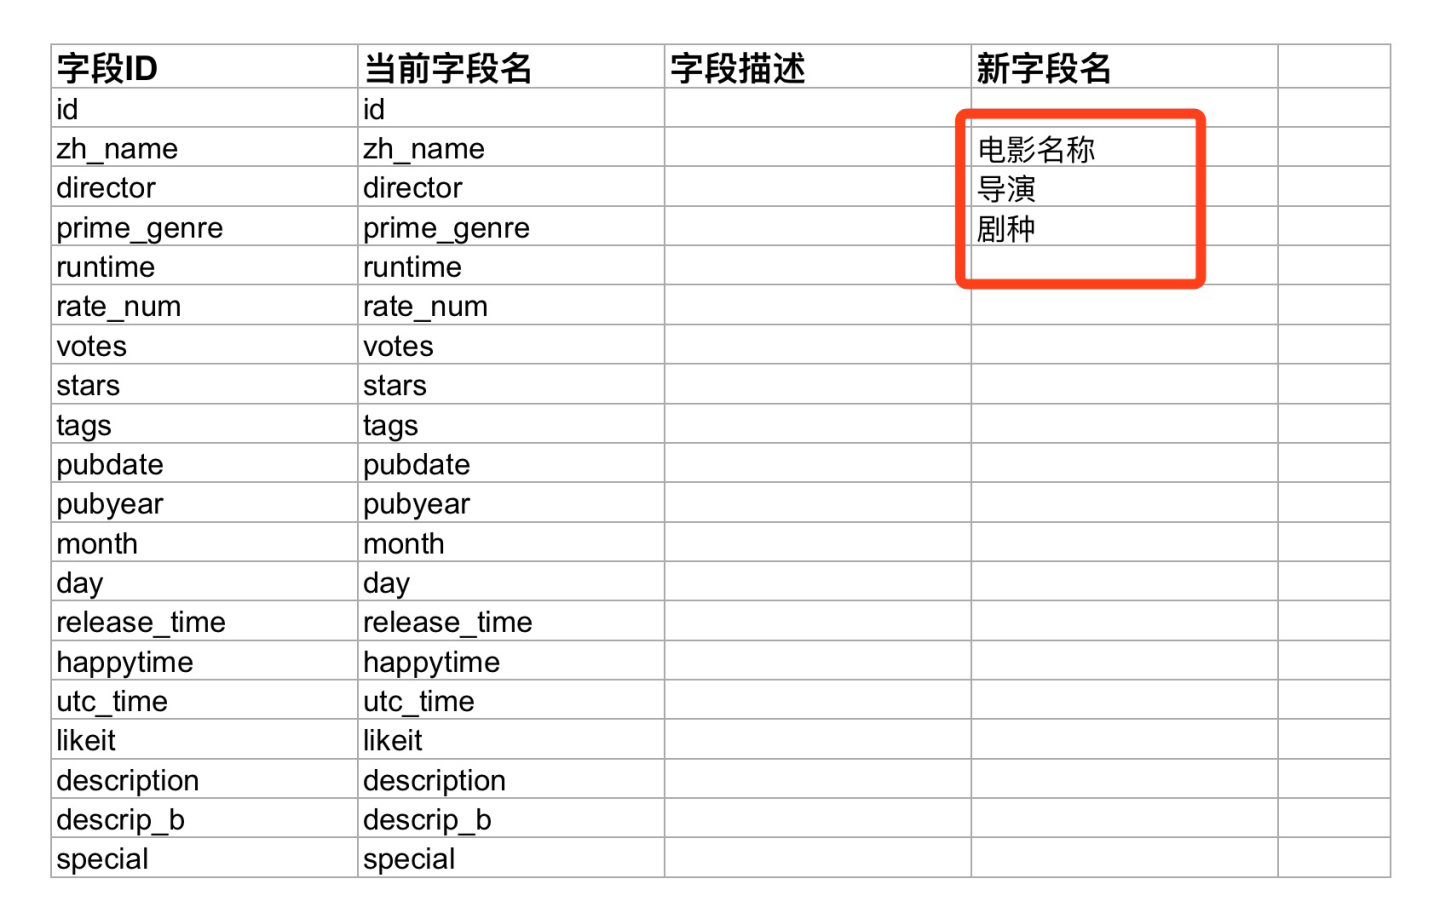
Upload Batch Naming Template
Click Upload Batch Naming Template to upload the modified template file. Once the upload is successful, the field names will take effect immediately.
Number Display Format
Click the edit button in the Display Format of the numeric field to open the display format popup. You can configure various settings for the numeric format, which will affect how field values are displayed in the dataset and chart.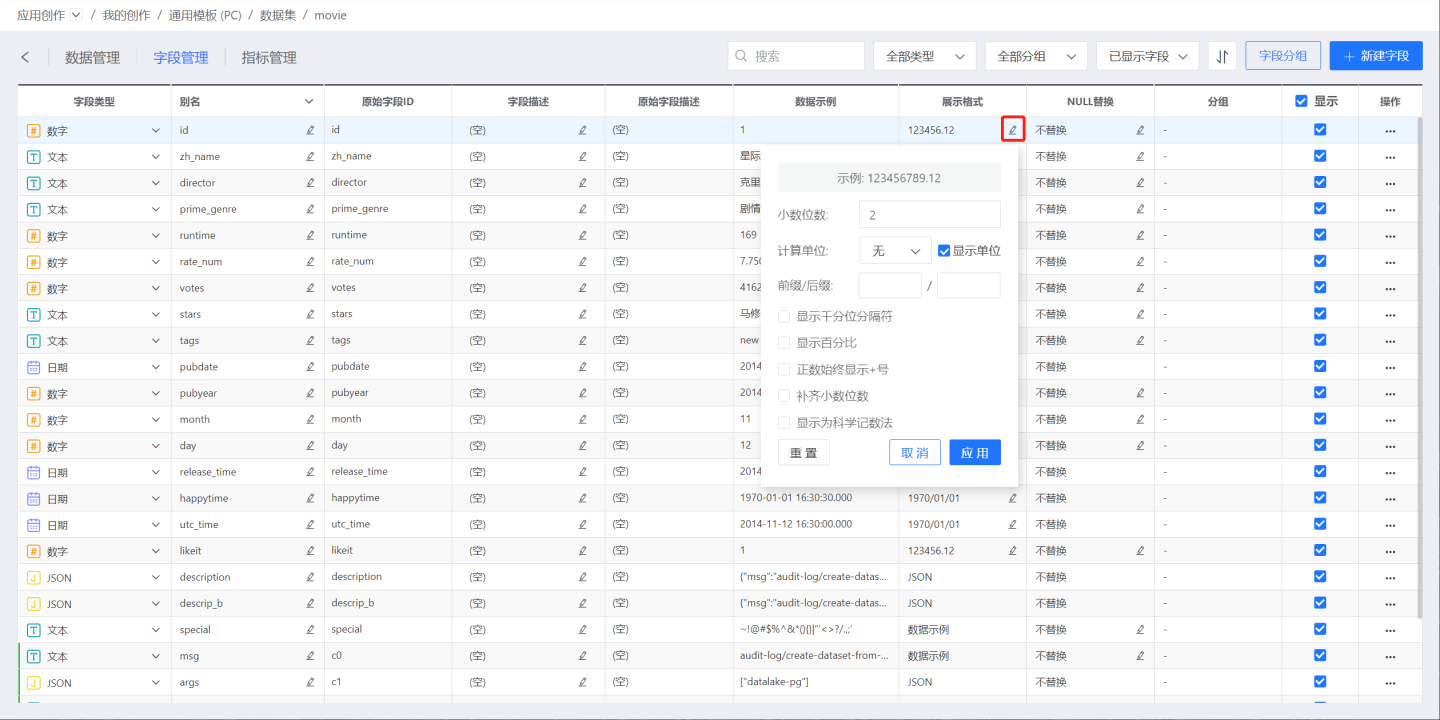
Decimal Places
The default setting is 2 digits, and you can click the up or down arrows to increase or decrease.
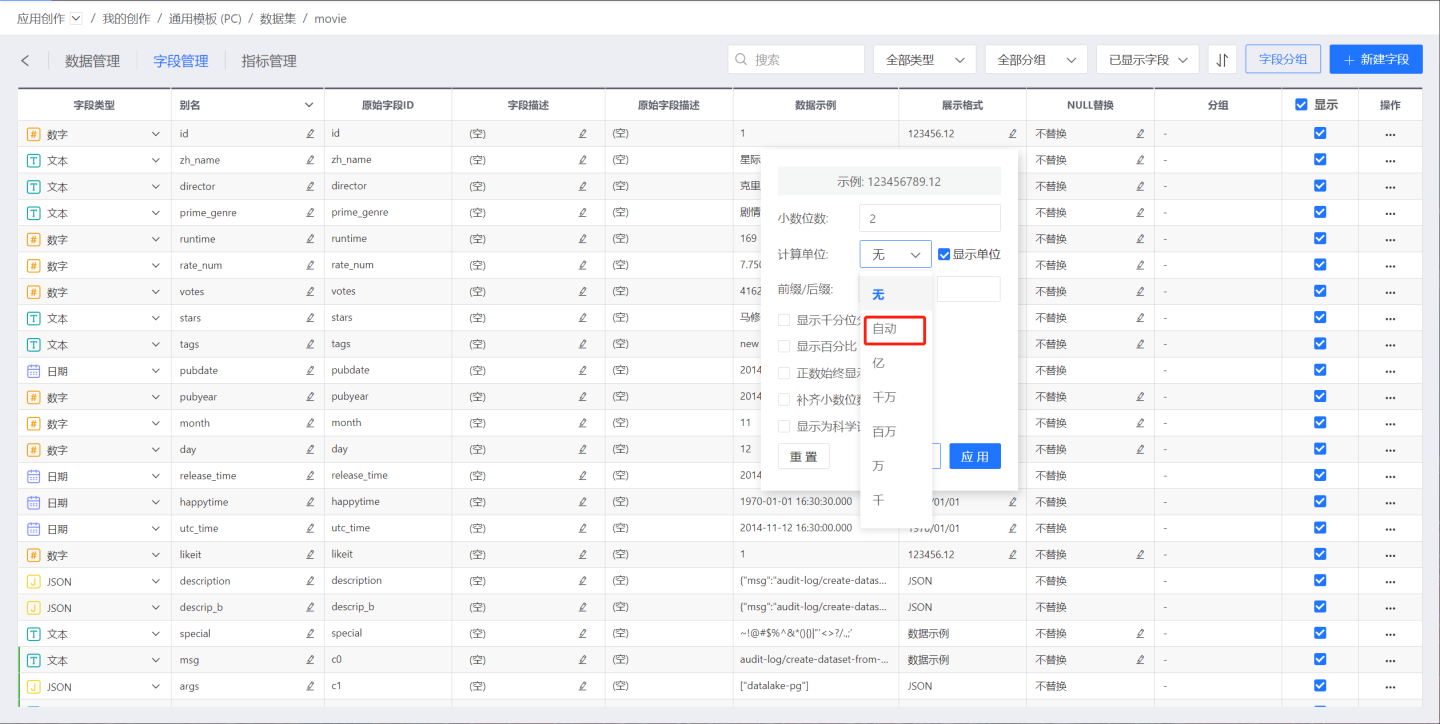
Numeric Units
Users can select fixed units such as thousand, ten thousand, billion, etc., as needed. Alternatively, they can choose Auto, and the system will automatically display the appropriate unit based on the size of the number.
Prefix/Suffix
Enter a prefix/suffix to add it before or after the field value.
Display Thousand Separator
When selected, numbers will be displayed with a thousand separator, such as: 1,000,000.123.
Display Percentage
Display numbers in % format, for example, 0.54 is shown as 54%.
Display as Scientific Notation
Display numbers in scientific notation.
Reset
Click the Reset button to clear all the formats that have been set and reset to the initial default format. Then click Apply -> Save to take effect.
App
Click the App button to temporarily save the set format in the display format. If you do not click App, reopening the Display Format will still show the original format.
NULL Replacement
You can set NULL values in numeric columns to be replaced with 0, 1, or other custom values. Once set, NULL values will be displayed as the specified value in all places where the column is used, such as in datasets/charts, and the specified value will also be used in calculations. This is to bypass the issue where any calculation involving NULL in the database results in NULL.

Field Hiding
Field hiding serves two main purposes:
- To help users focus on the data they care about. For example, if a new column is generated from an original column, users may only need to view the new column, allowing the original column to be hidden.
- To improve performance. When processing datasets through multiple layers of linkage, unnecessary fields can be hidden, reducing the number of fields used in generating new datasets and speeding up processing.
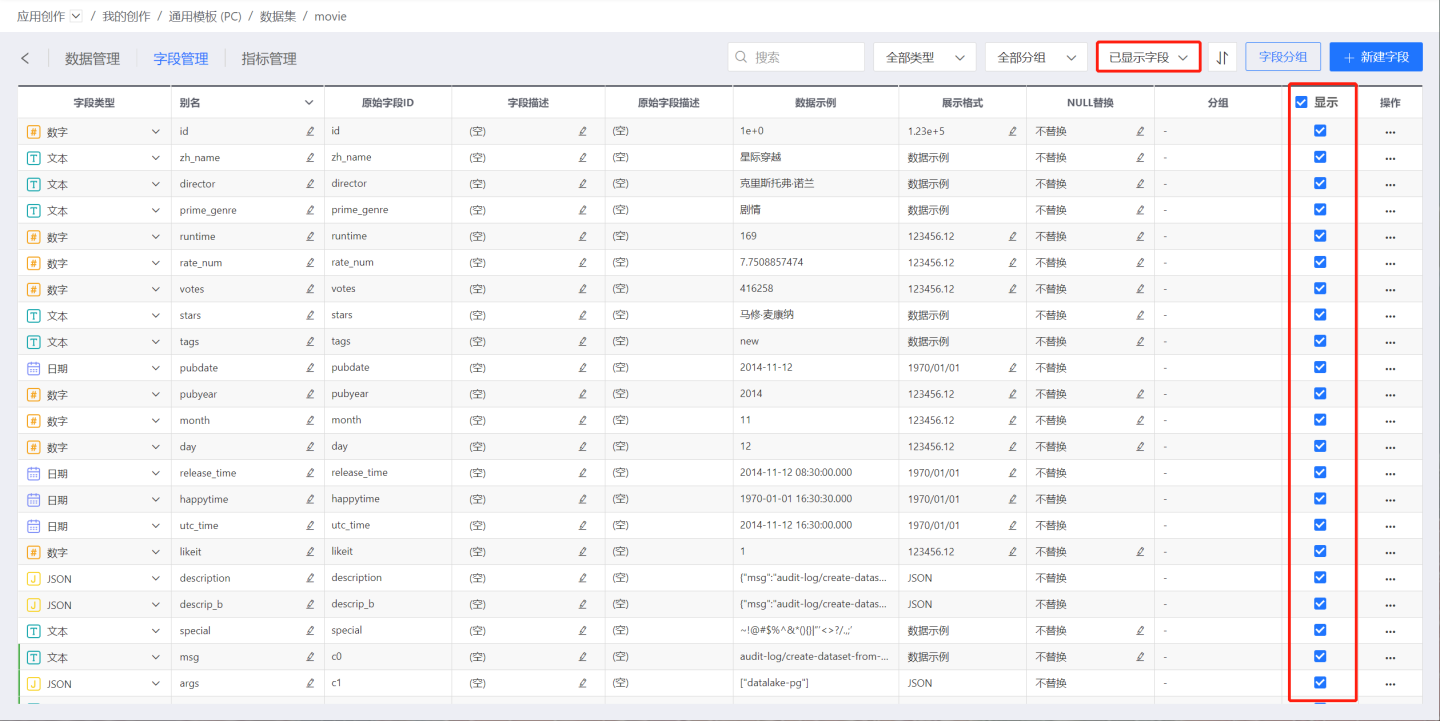 As shown in the image above, deselect the fields you want to hide, and save to complete the field hiding process.
In addition to field management operations, field hiding can also be performed on the data structure settings page when creating a dataset.
Please Note
Important considerations for hiding fields:
- Hidden fields cannot be used for charting but can be used for adding new fields and calculating metrics.
- Fields used in filters during dataset creation can be hidden.
- Fields with row-level permissions set in access control cannot be hidden.
- Fields used in charts cannot be hidden.
- Fields used in dashboard filters cannot be hidden.
- Fields used for creating multi-table union datasets, aggregated datasets, or merged/appended datasets cannot be hidden.
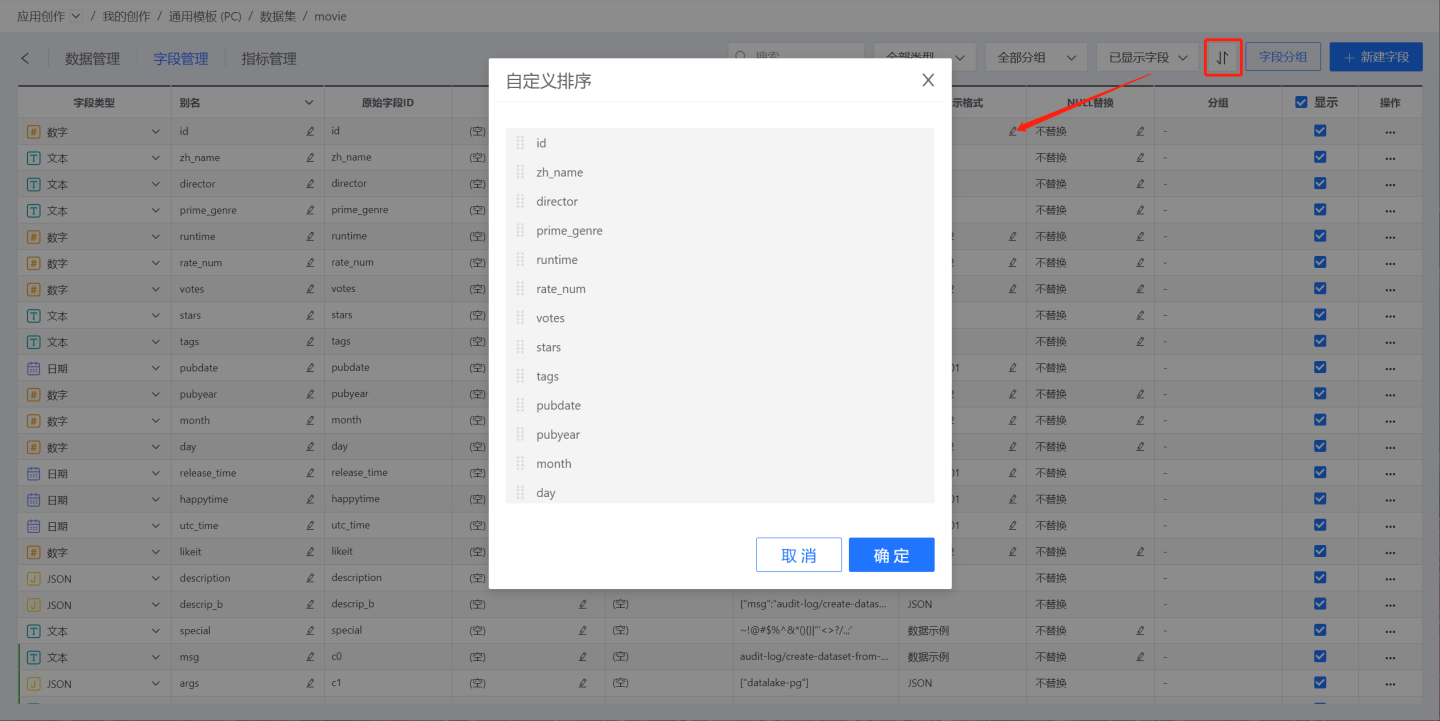
Field Sorting
Click Sort, and the Custom Sort window will pop up. You can drag fields to sort them. After sorting, the fields will be displayed in the set order in both Field Management and Data Management.
Tip
Sorting can only be applied to visible columns; hidden columns are not included in the sorting.
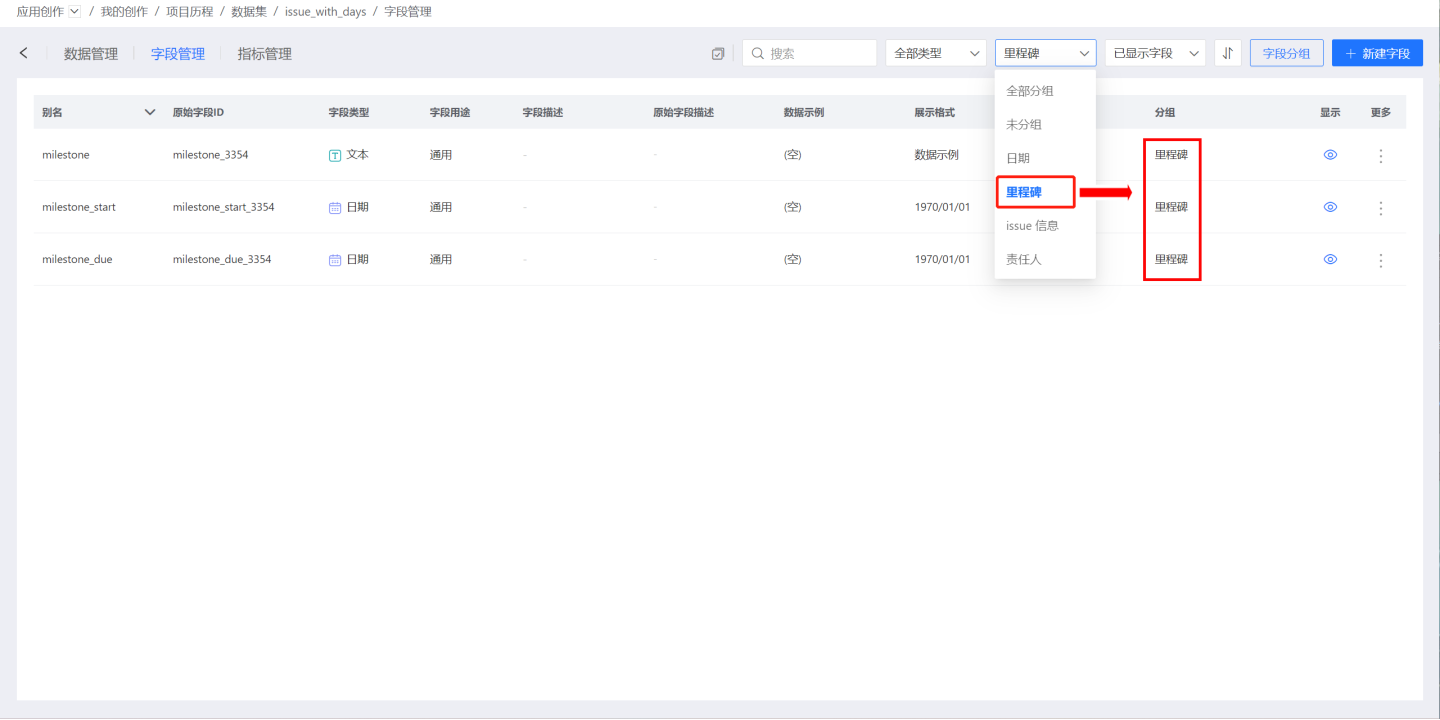
Field Grouping
Fields support grouped display, allowing fields with the same business meaning to be grouped together for easier search and location during data analysis.
Click Field Grouping to open the Field Grouping window.
Click "Create Group," enter the group name, and press Enter to create a field group. Select the field group, add fields to the group on the right side, and finally click the Confirm button to complete the field grouping.
On the field management page, you can see the grouping information for each field. A field may belong to multiple groups and have multiple group tags.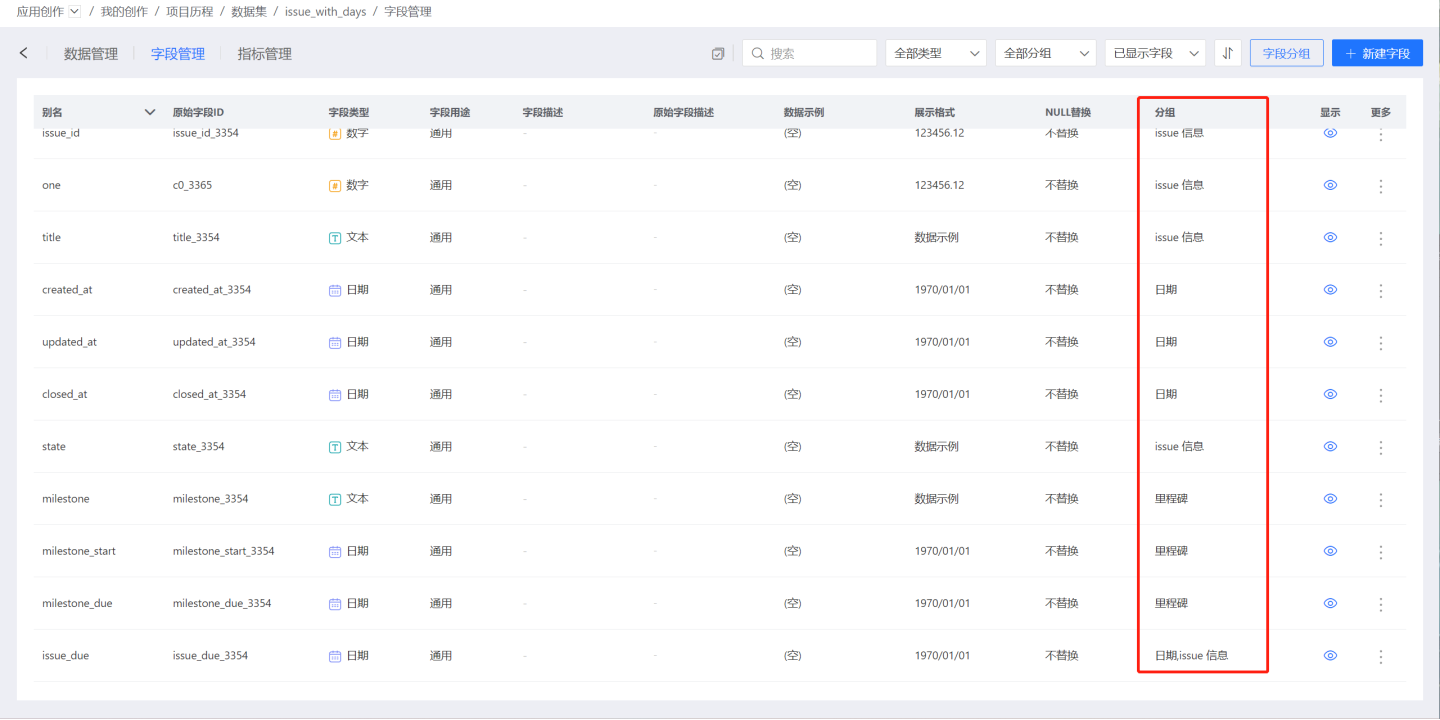
When searching for fields, you can quickly locate fields with the same business meaning through grouping.
Tips
- Hidden fields must also be set within the group.
- The grouping feature does not affect the current field order or the field order in the dataset table.
- When deleting a dataset, the field grouping settings must also be deleted accordingly.
- When creating a copy of a dataset, the field grouping settings must be retained.
- When replacing a dataset, the field grouping settings must be retained.
Field Display Value
Fields support setting display values. When using the field for business analysis, the display value of the field can be used for presentation, achieving a scenario where analysis and presentation are inconsistent.
In the example, a store analyzes the order situation of users over the past month. The username of the buyer is dragged in to display information for each order. However, the goal is to see whether the buyer is a member or a non-member. If the dimension is directly dragged in as "Member," it will be aggregated, only showing orders for members and non-members, without displaying detailed information for each order. Therefore, the field display value feature is used. When creating the chart, the buyer's username is dragged in first, and then the membership information of the buyer is displayed.
First, set the display value of the username field to the membership field. 
Next, when creating the chart, drag in the username as the dimension. After completing the data analysis, set the dimension field to use the display value. The chart will then display the membership information. 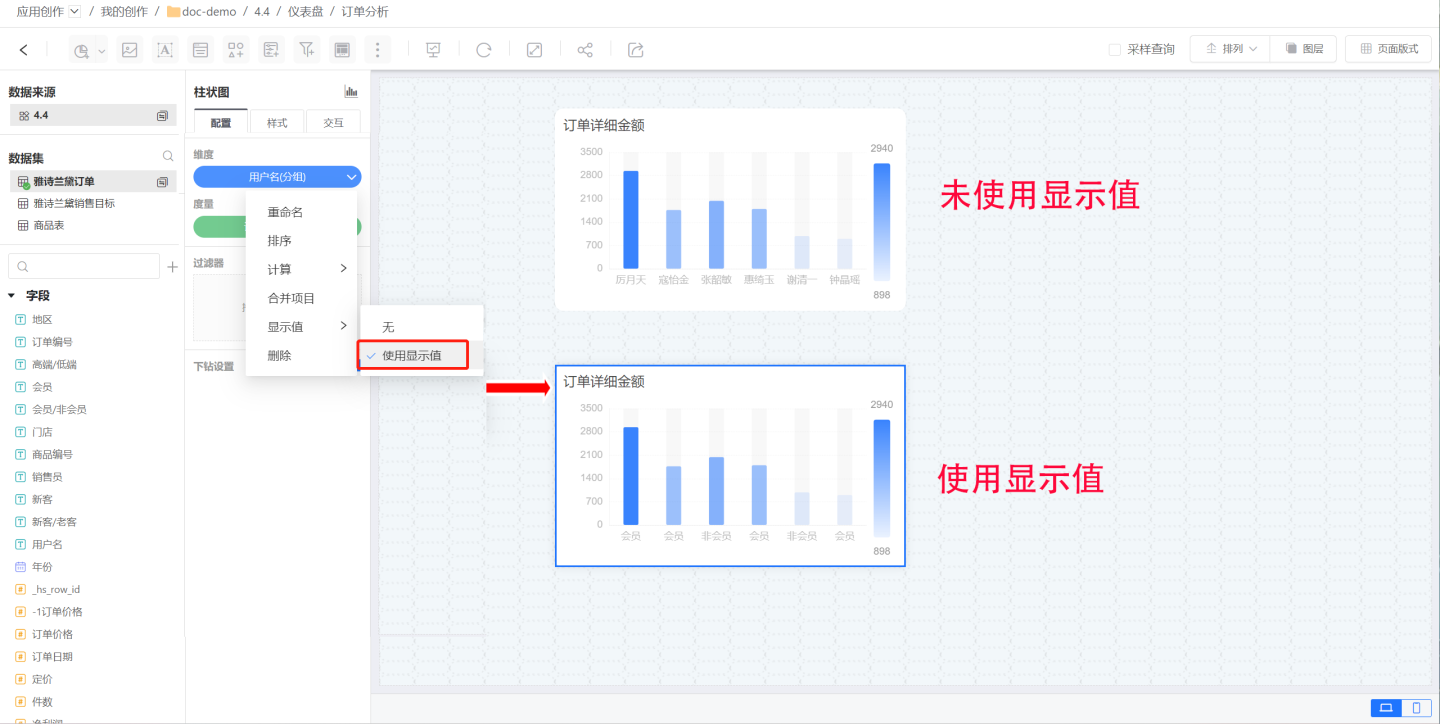
Date Parsing
For fields that the system cannot automatically recognize as date types, you can manually change the field from text type to date type and then manually specify the format.
For a complete description of format strings, please refer to the documentation Date-Time Parsing Format

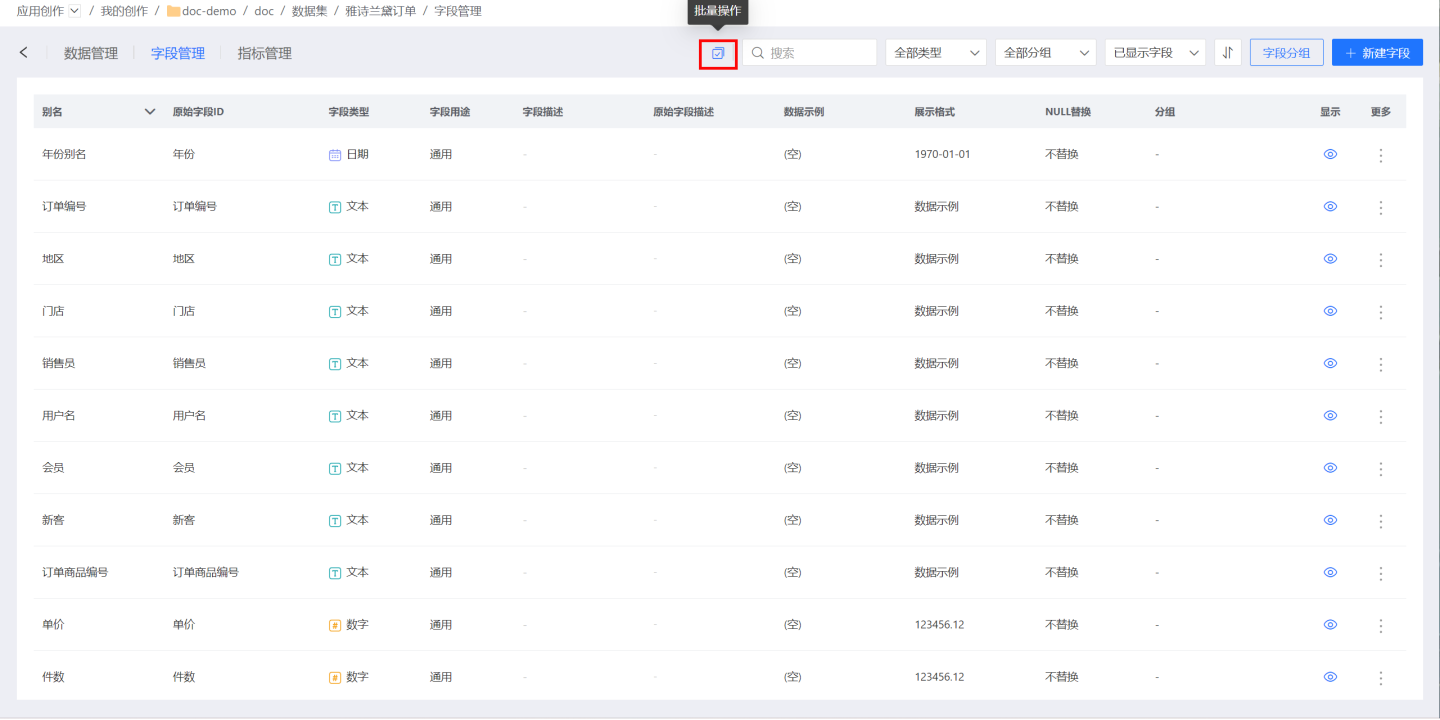
Batch Operations
Field management supports batch operations, allowing you to edit field Display Format in bulk, perform NULL Replacement, set field Visibility and Hidden, and delete fields (only newly created fields can be deleted).
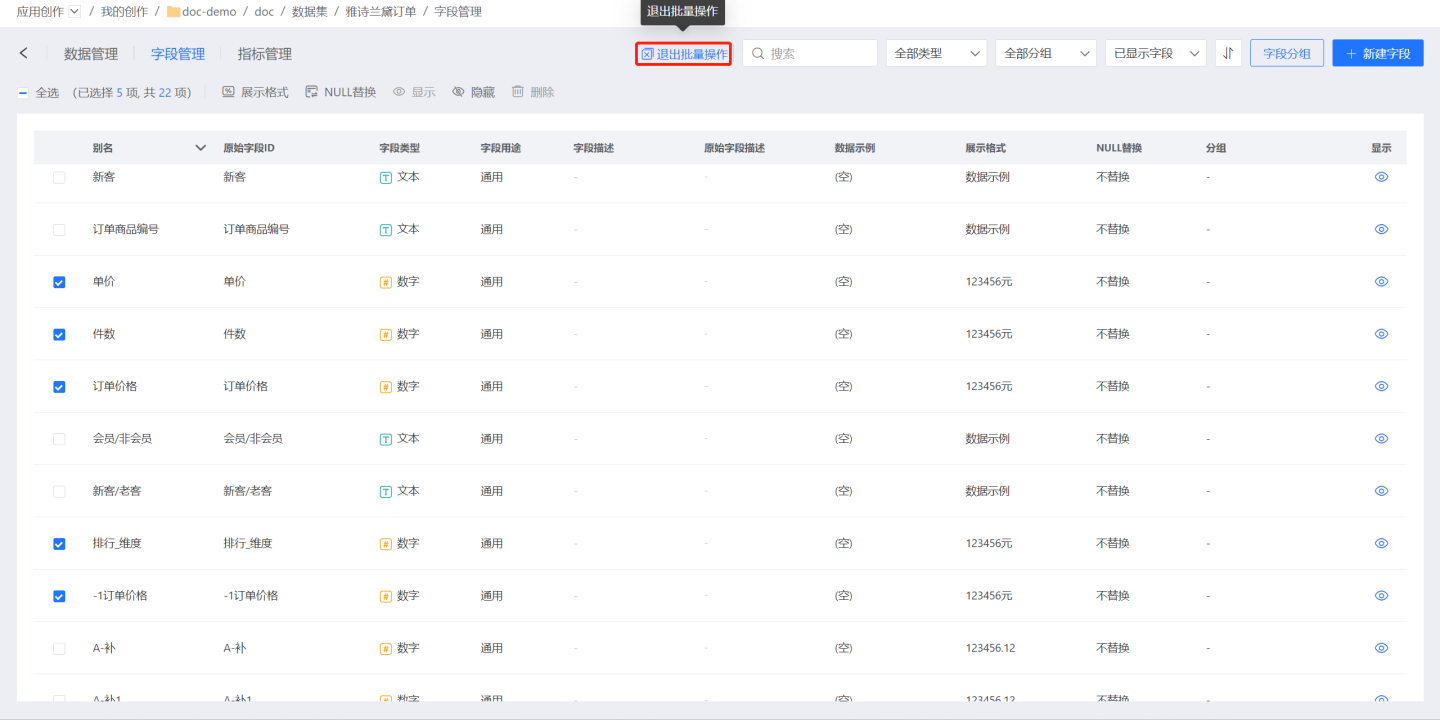
First, click the batch operation button to enter batch operation mode.
Then select the fields you want to operate on. The available batch operations for the selected fields will be displayed at the top of the page. As shown in the figure, when selecting four numeric fields such as "Count" and "Order Price," you can perform batch operations like display format and hiding on these fields. Operations that cannot be performed, such as visibility and deletion, will be grayed out. 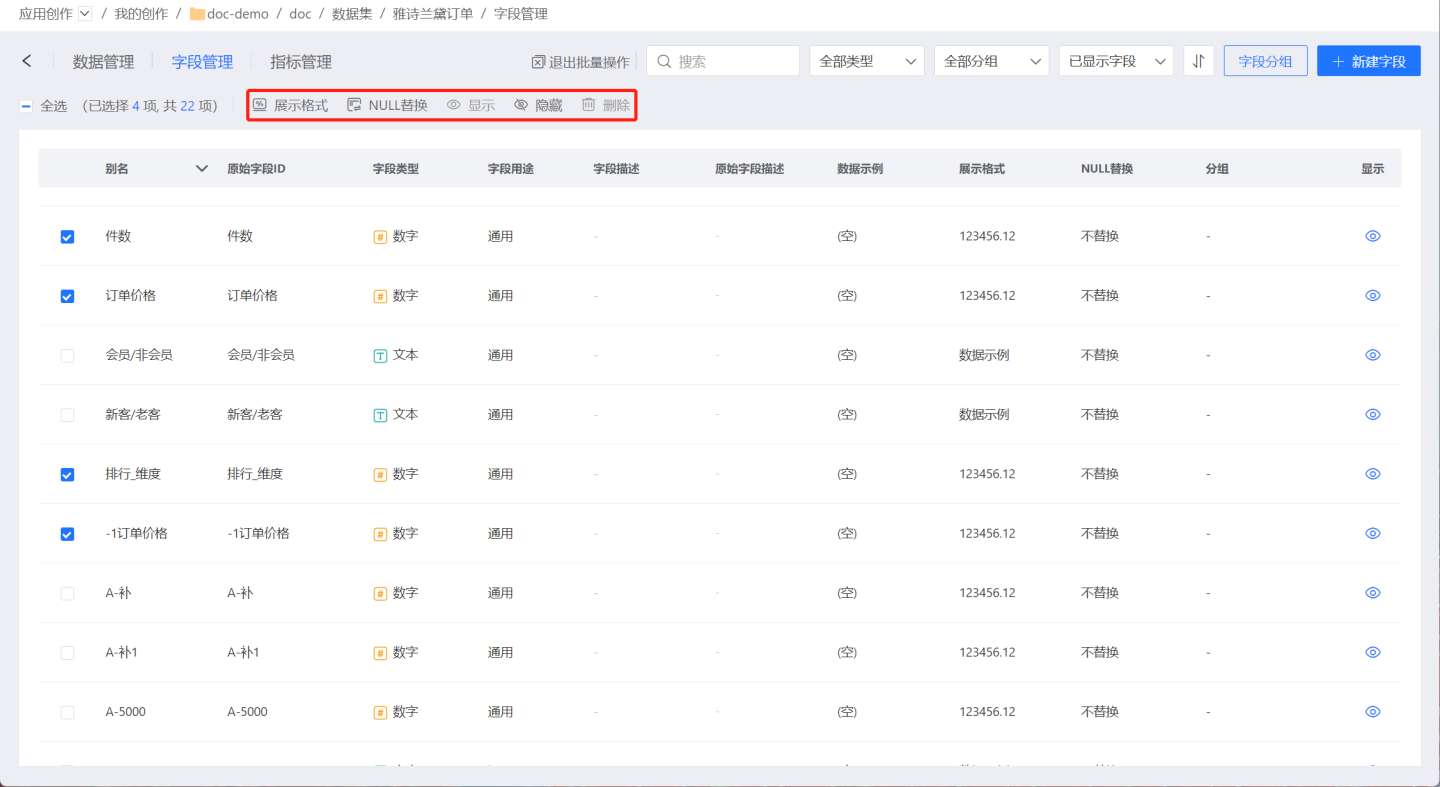
Perform batch operations on the selected fields again. Only one batch operation can be performed at a time. As shown in the figure, display format settings are applied to data type fields, modifying the display style of the selected fields in bulk. 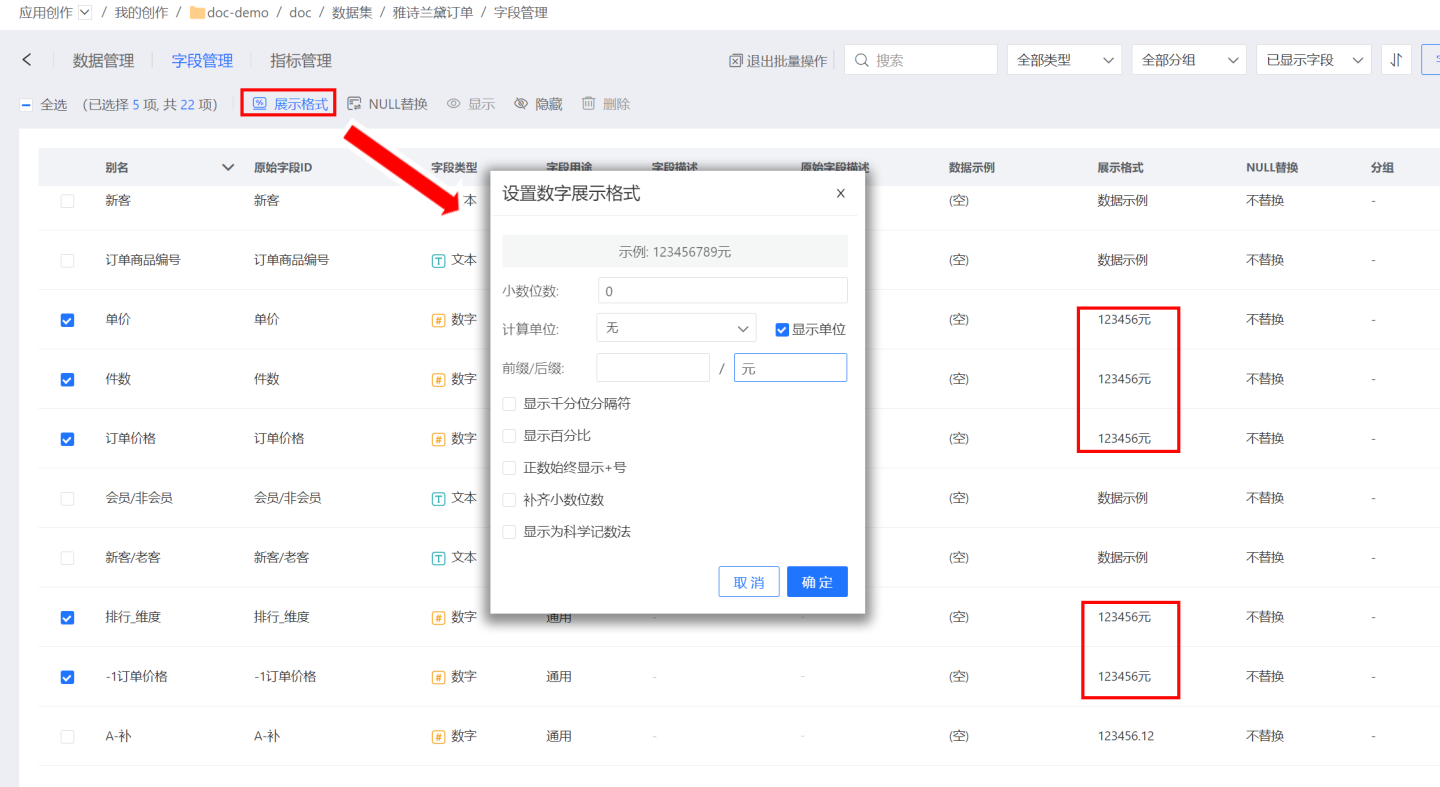
Finally, after completing all batch operations, click to exit batch operation mode and return to normal operation mode.