API Service
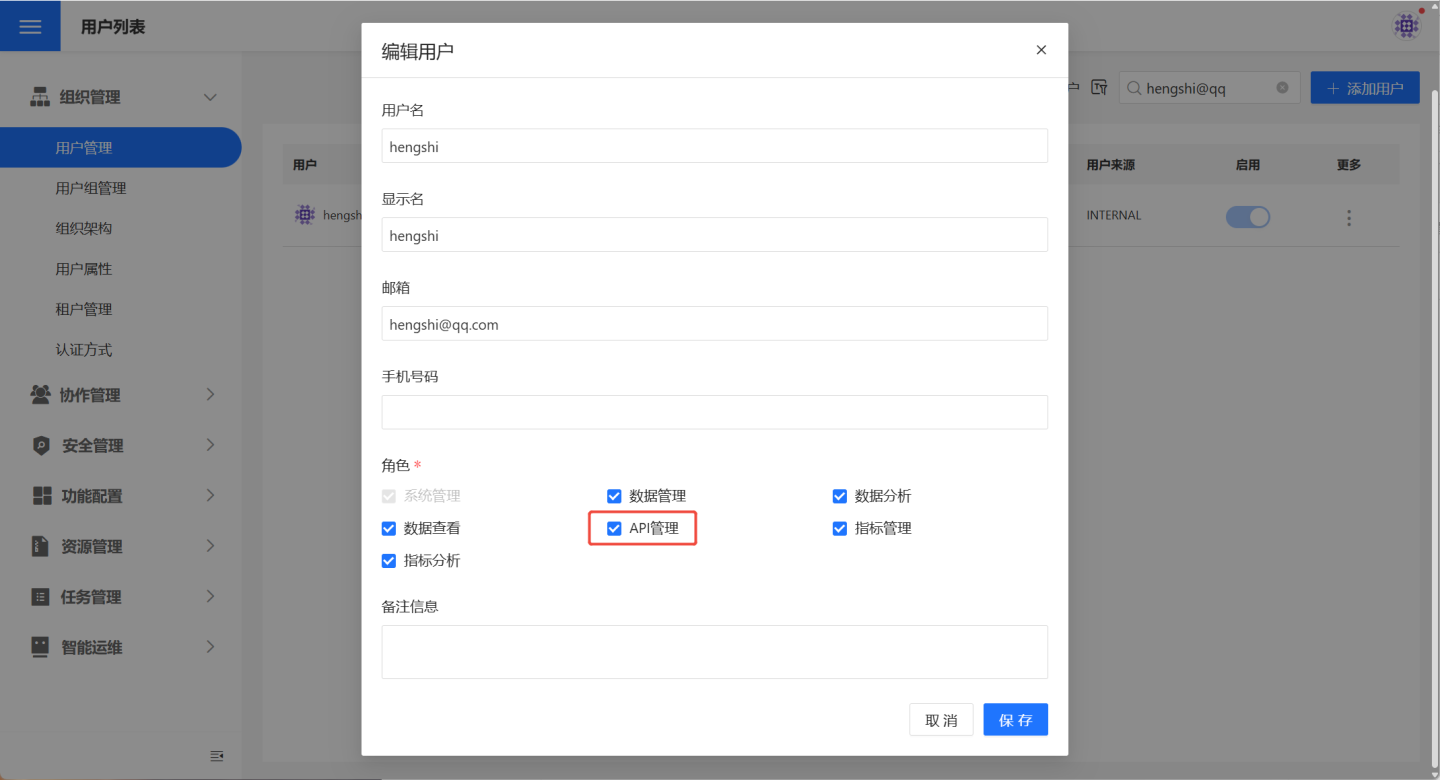
The API Service module can provide data from data connections ,datasets, charts in HENGSHI to users via A REST API. You can grant users the API Management role to authorize them with the management permissions for the API service.
API Service
The API Service page is designed to display the APIs within the system. Here, users can view the list of APIs available for service (in a published state) and quickly locate the desired API using the search and type filter options in the upper-right corner of the page. 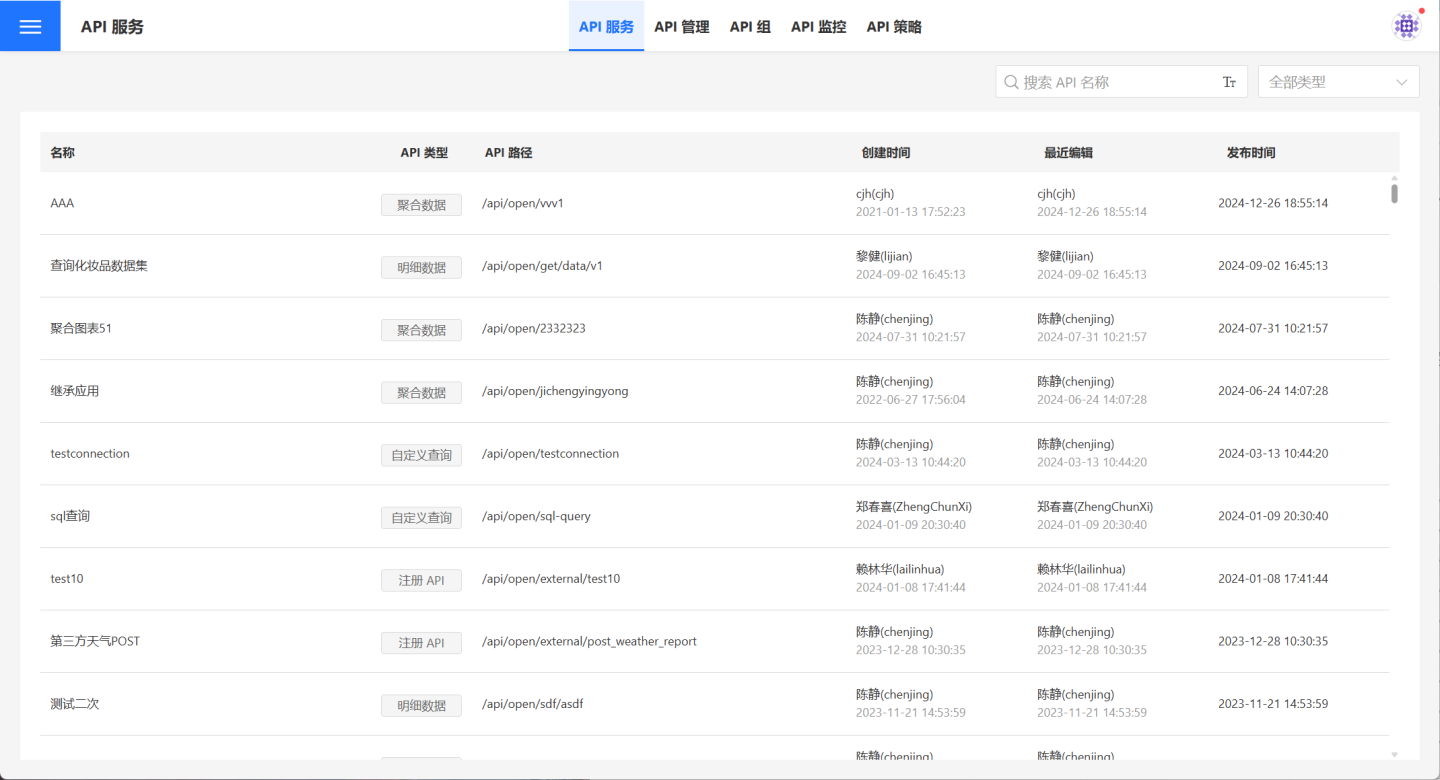
On the API Service page, users can click on an API to view its detailed information. The details page provides the API's basic information, call URL, and request parameters. Users can also test the API and observe its functionality. 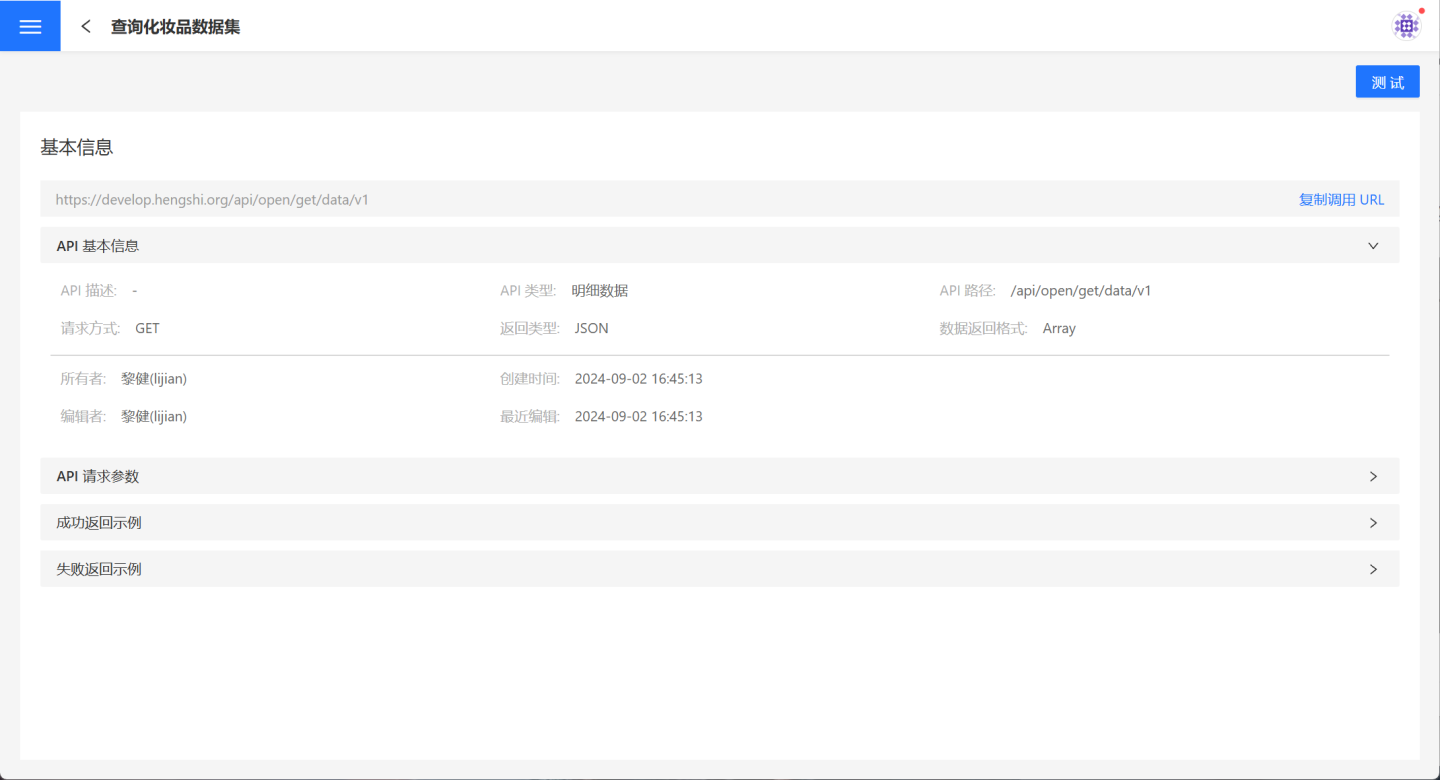
Tip
The API Service page displays all APIs created by users that are in a published state.
API Management
On the API management page, users can manage their own APIs. It supports the creation or import of four types of APIs: aggregated data APIs, detailed data APIs, custom query APIs, and registered APIs. Users can perform related operations such as publishing, authorization, rate limiting, and monitoring for the created APIs.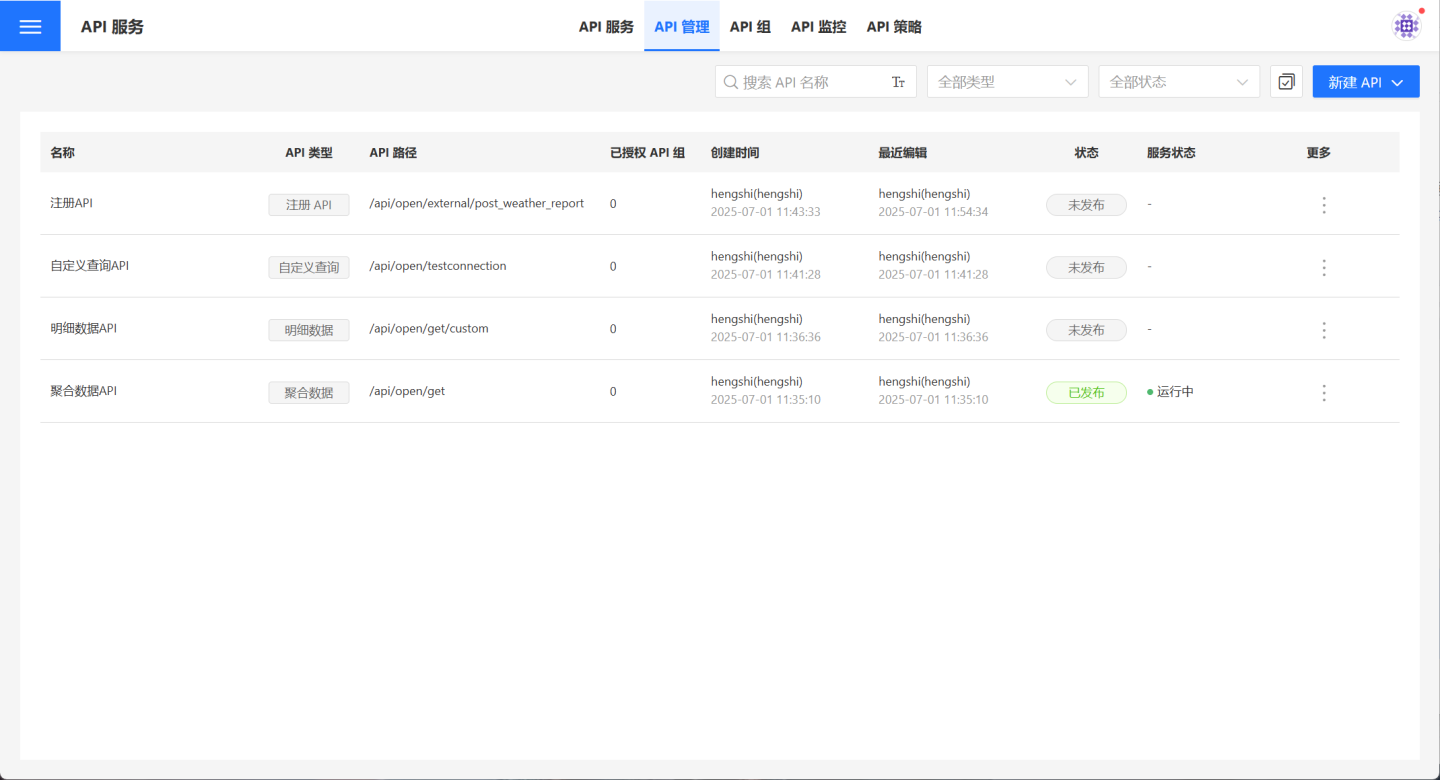
Tip
The API management page only displays the user's own APIs and does not show APIs from any other users.
Aggregated Data API
The Aggregated Data API is used to obtain the aggregated result data of a single chart after data analysis during application creation, including all types of charts supported by the system.
Create Aggregated Data API
Follow the steps below to create a new aggregated data API.
1. Create a new API.
On the API management page, click "Create API," select "Aggregated Data," and the "Create API (Aggregated Data)" page will pop up.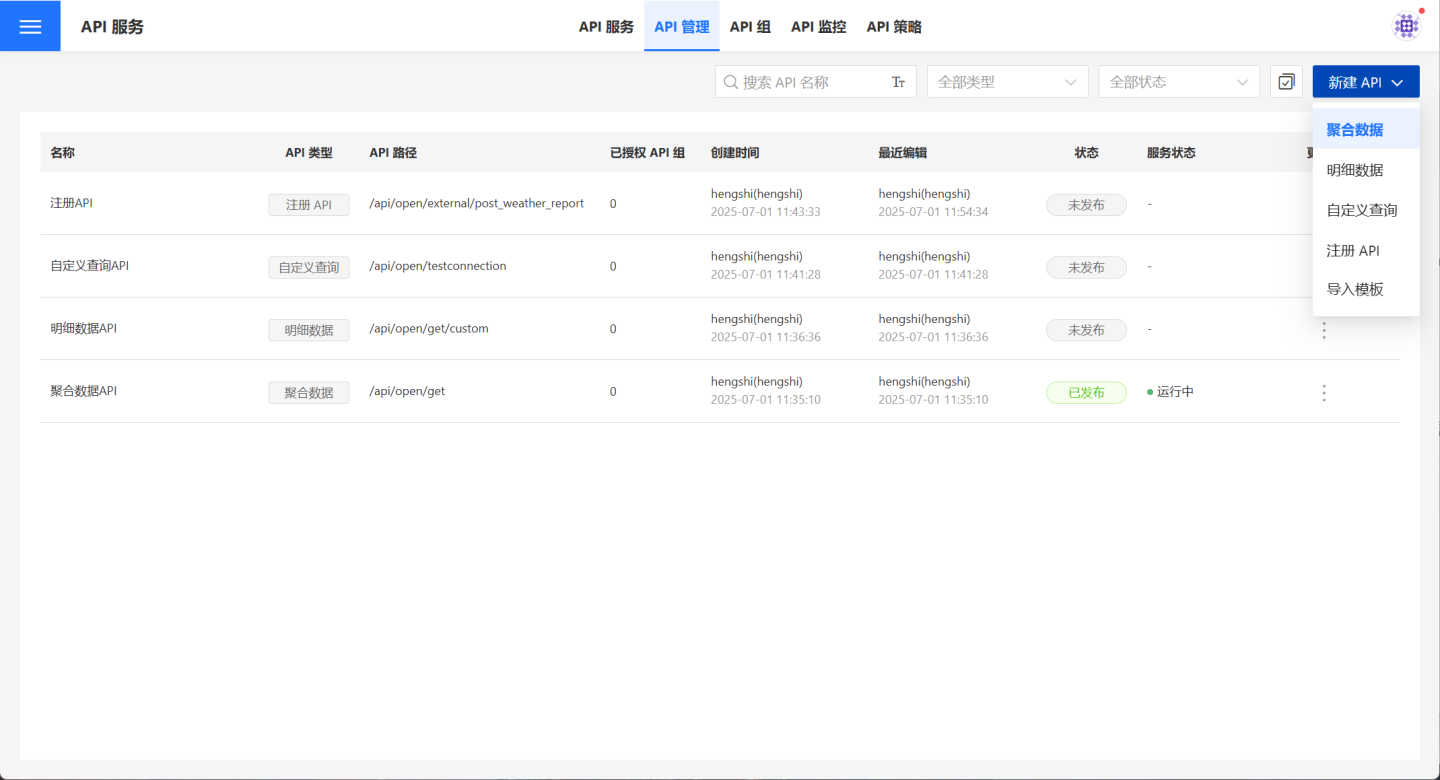
2. Fill in basic information.
On the page, fill in the required basic information such as API Name, API Path, Request Method, and select Chart. Detailed requirements for the basic information are listed in the table below.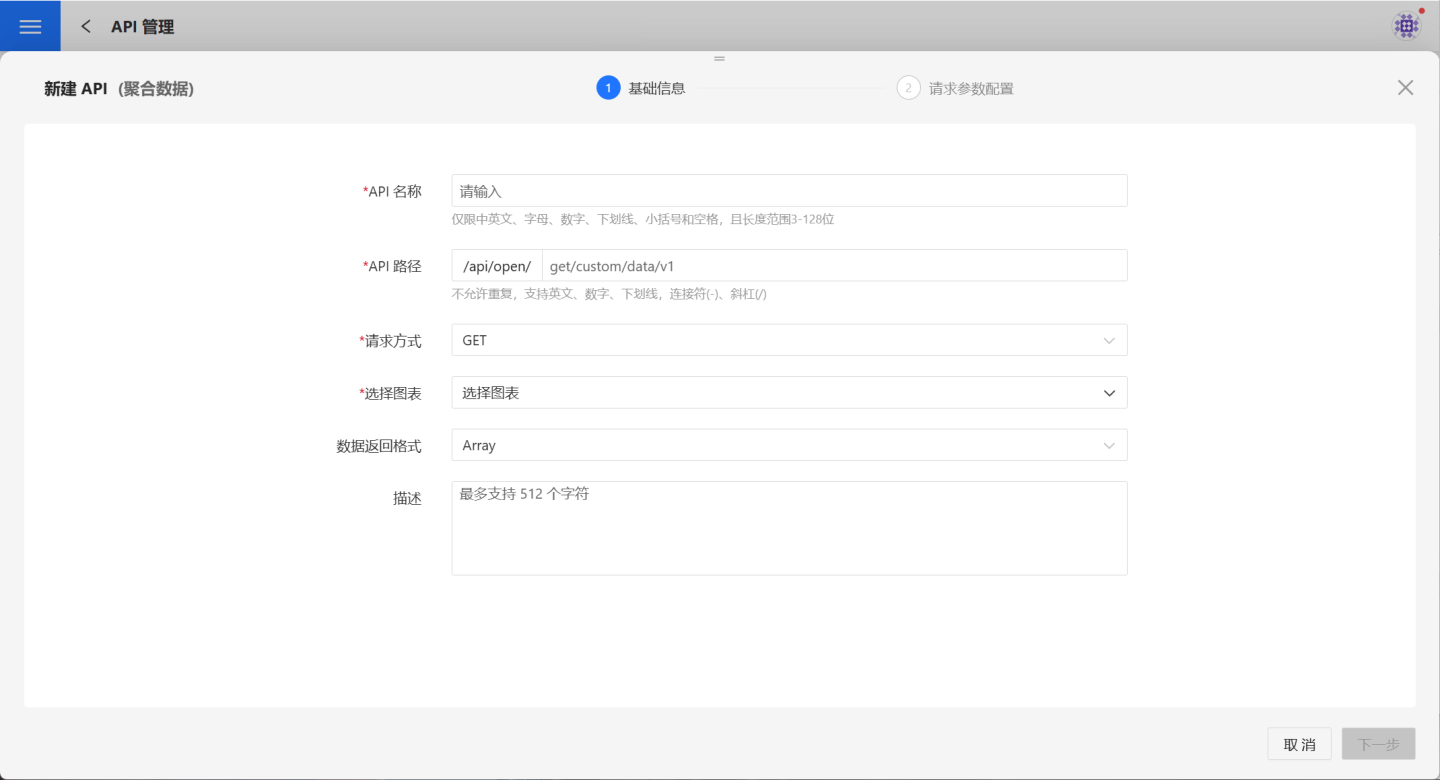
| Parameter | Description |
|---|---|
| API Name | Enter the API name. The name can only contain English, Chinese, letters, numbers, and underscores, with a length between 3-128 characters. API names must be unique within the current user's system. Once published, API names must be unique across all users in the system. |
| API Path | Enter the API path. Paths must be unique and support English, numbers, underscores, hyphens (-), and slashes (/). API paths must be unique within the current user's system. Once published, API paths must be unique across all users in the system. |
| Request Method | Supports GET and POST methods. |
| Select Chart | Choose the chart the API will access. The API will return aggregated data for the selected chart. Only charts accessible by the current user can be selected. |
| Data Return Format | Supports Array and Object formats. |
| Description | Provide a brief description of the API to help users quickly understand its query scope. |
3. Configure request parameters.
- GET request method parameter configuration.
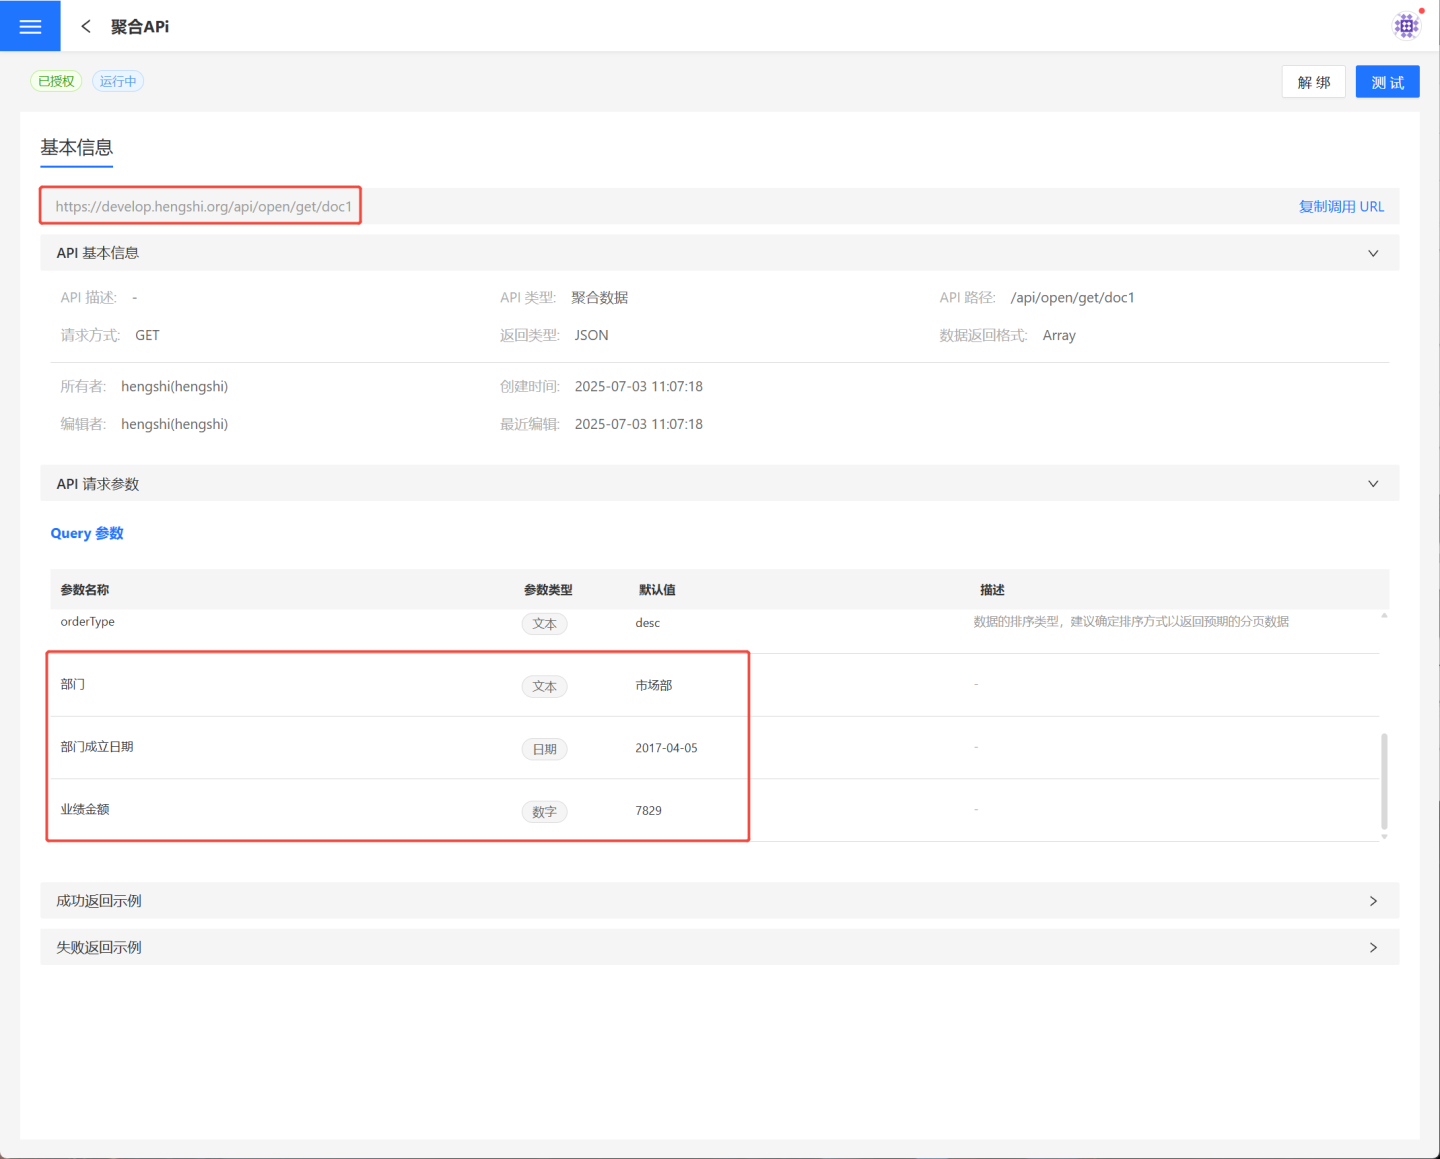
The data source refers to the chart operated by the API. You can view or modify the chart through a new exploration. In the dataset related to the chart, select the fields to be used as parameters and drag them into the Query Parameters area on the right. Users can define parameter names, default values, and descriptions for easy identification later. Fields of type bool and json are not supported as parameters. When there are multiple datasets, the dataset name will be displayed in the Source field. For a single dataset, the Source field will not be displayed.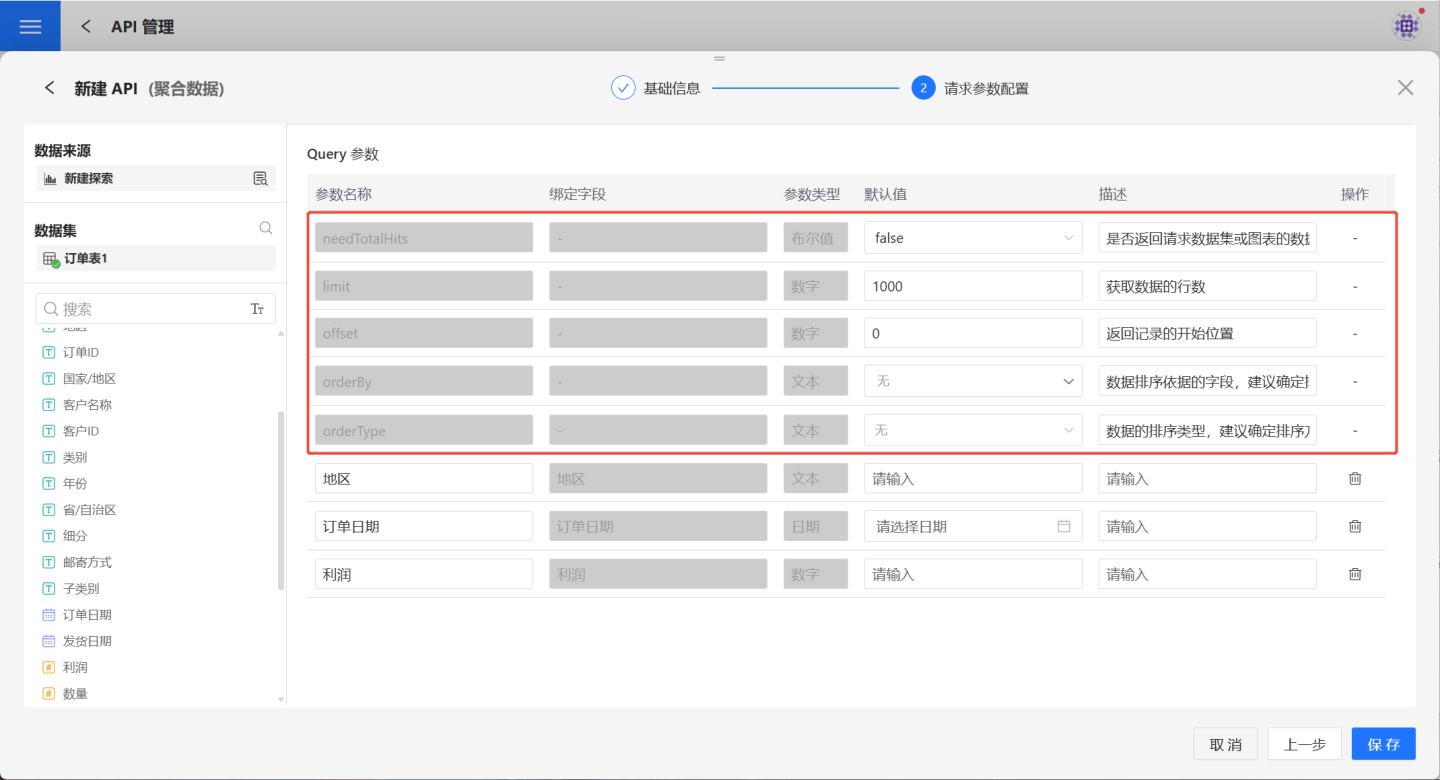
The red box contains system default parameters, which are unrelated to the dataset, have no bound fields, and cannot be deleted. However, their default values and descriptions can be modified. The specific functions of the parameters are as follows:
| Parameter | Parameter Type | Description |
|---|---|---|
| needTotalHits | Boolean | Whether to return the total number of rows in the requested data. Defaults to false, meaning the total row count is not returned. |
| limit | Numeric | Specifies the total number of records to retrieve. Default value is 1000, meaning 1000 records will be retrieved. |
| offset | Numeric | Specifies the starting position of the returned records. Default value is 0, meaning records will be retrieved starting from the first record, up to the limit. |
| orderBy | Text | Specifies the field used for data sorting. It is recommended to set this parameter. |
| orderType | Text | Specifies the sorting method for orderBy. Supports ascending, descending, and no sorting. |
| orderByFrom | Text | Specifies the dataset where orderBy is located. It is recommended to set this parameter. This parameter is displayed when the aggregated chart has multiple datasets. |
- POST request method parameter configuration.
Supports both request parameters and JSON parameter configurations. The POST method's request parameter configuration is the same as the GET method and will not be elaborated here. When choosing JSON parameter configuration, you can provide a JSON example for API callers to reference during actual usage.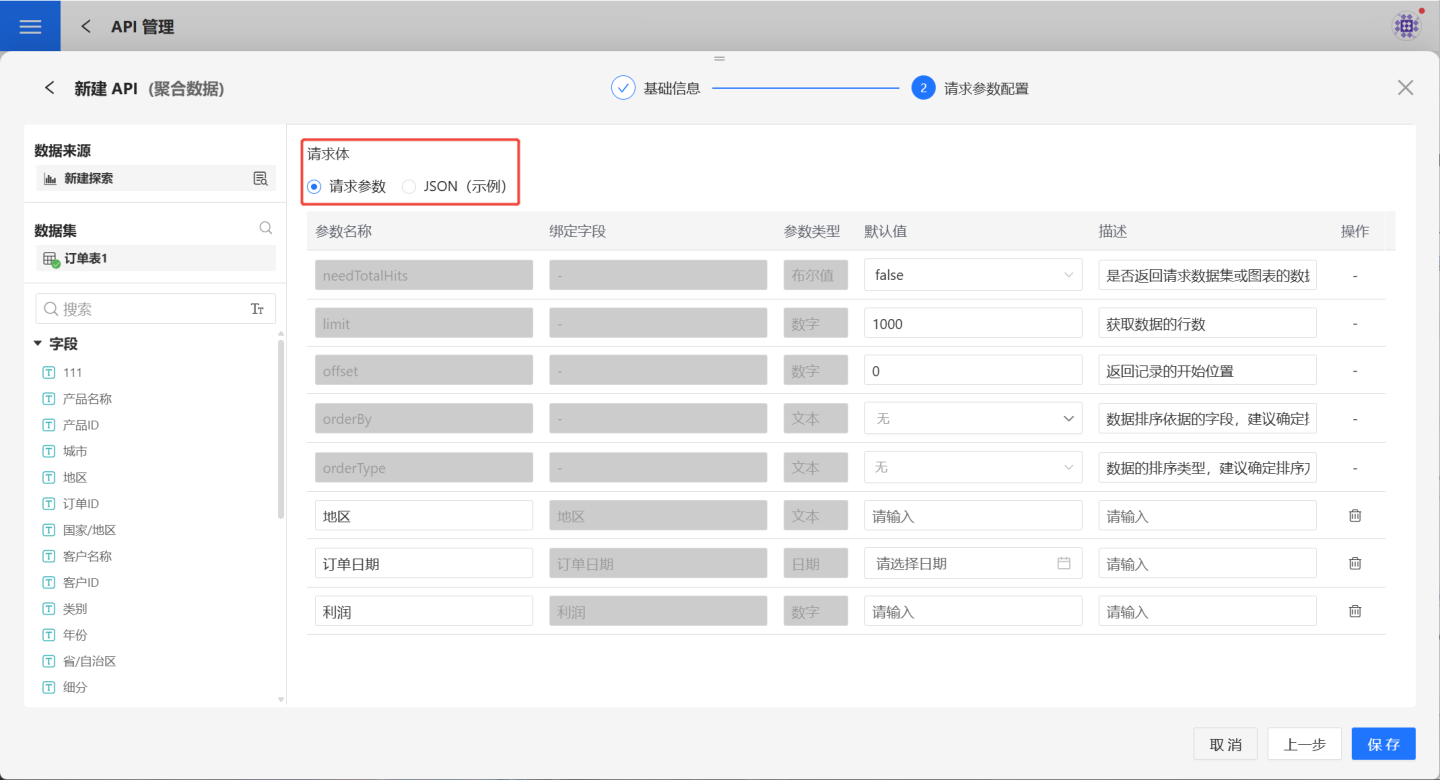
4. Verify API information.
After saving the parameter configuration, the API is successfully created with a status of "Unpublished." Users can verify the API information on the API details page. If there are any issues, click Edit on the right to make modifications.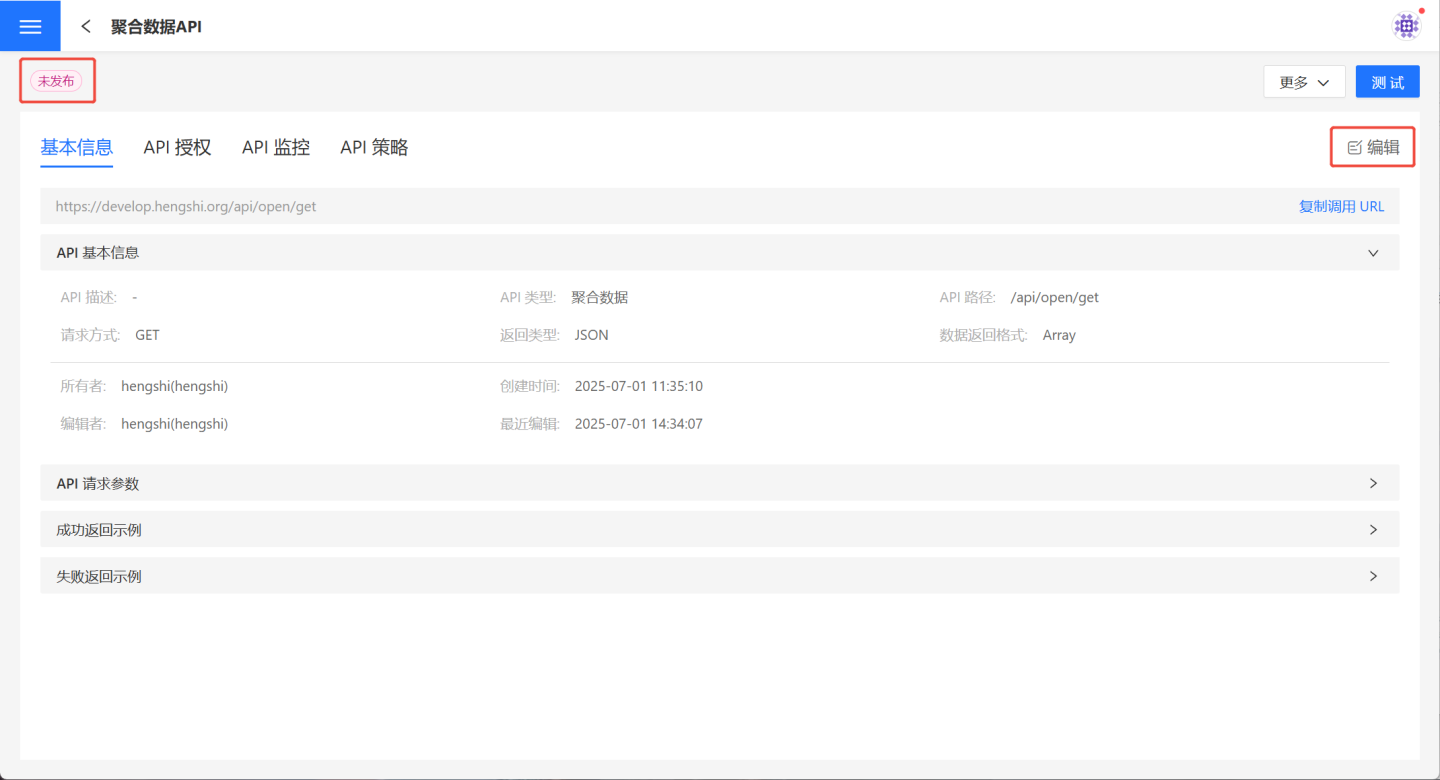
Aggregated Data API Testing and Publishing
After creating the Aggregated Data API, it needs to be tested to ensure its functionality meets the requirements. Navigate to the API details page and click the test button at the top right to enter the testing page. 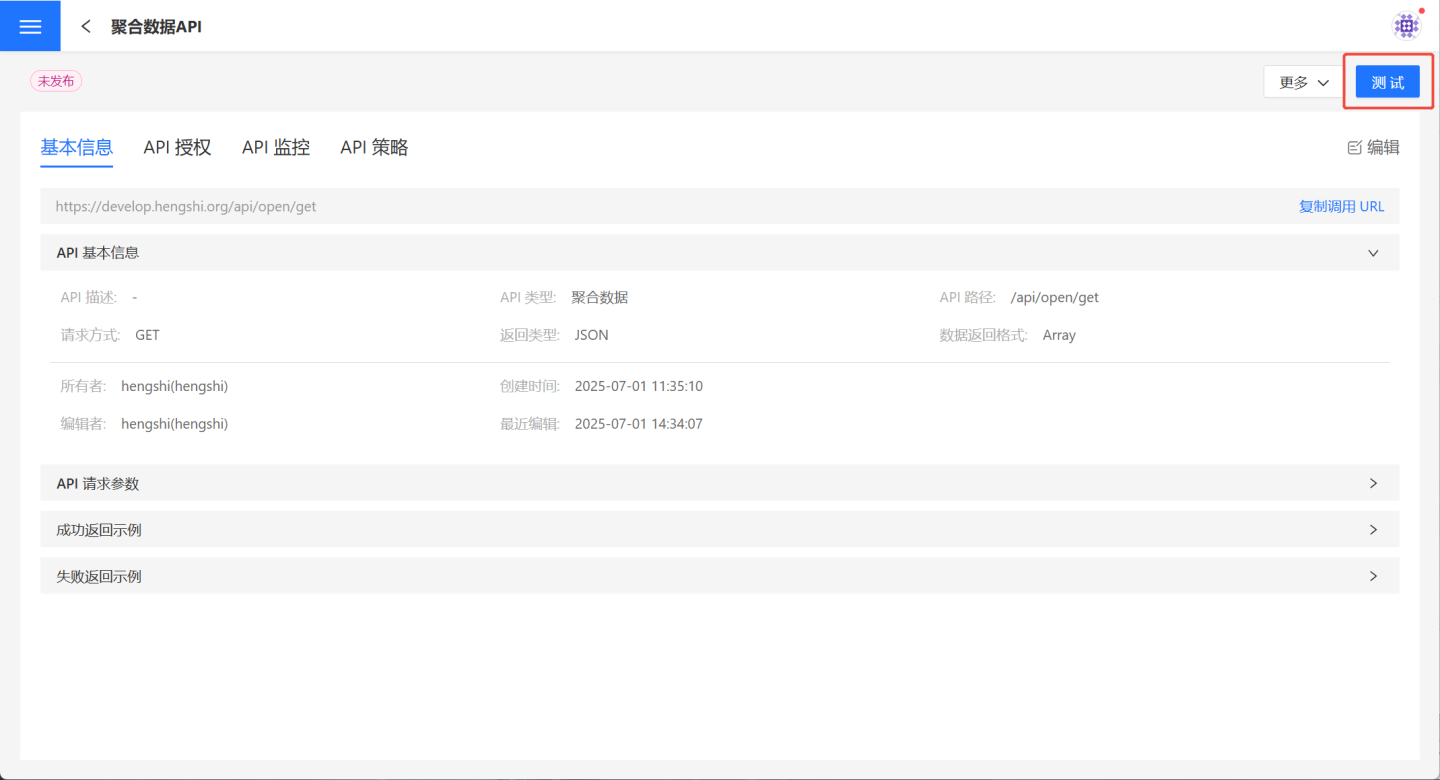
API Test for Configuring Request Parameters
To test the API for setting request parameters, you can select all parameters to view the returned results.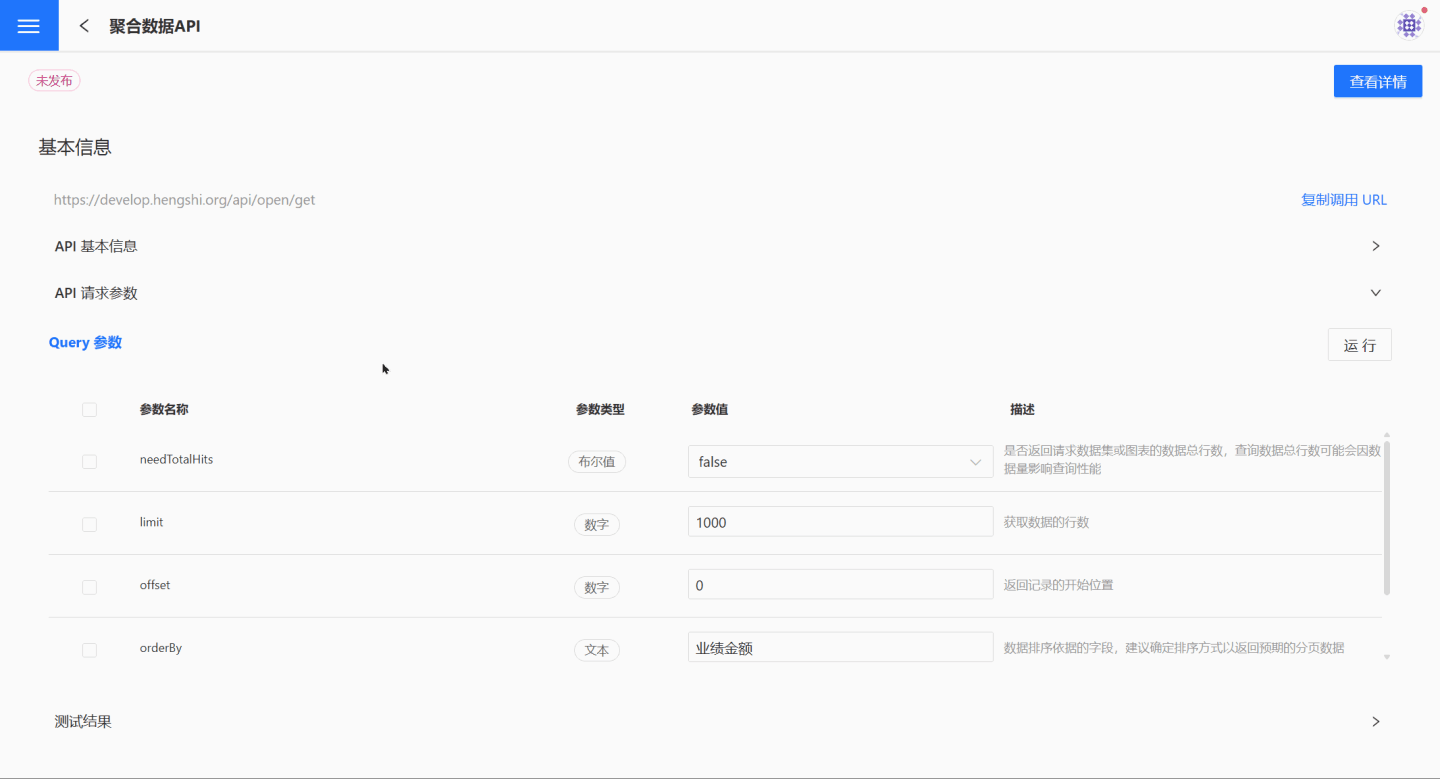
You can also select some parameters or leave them unselected to view the returned results.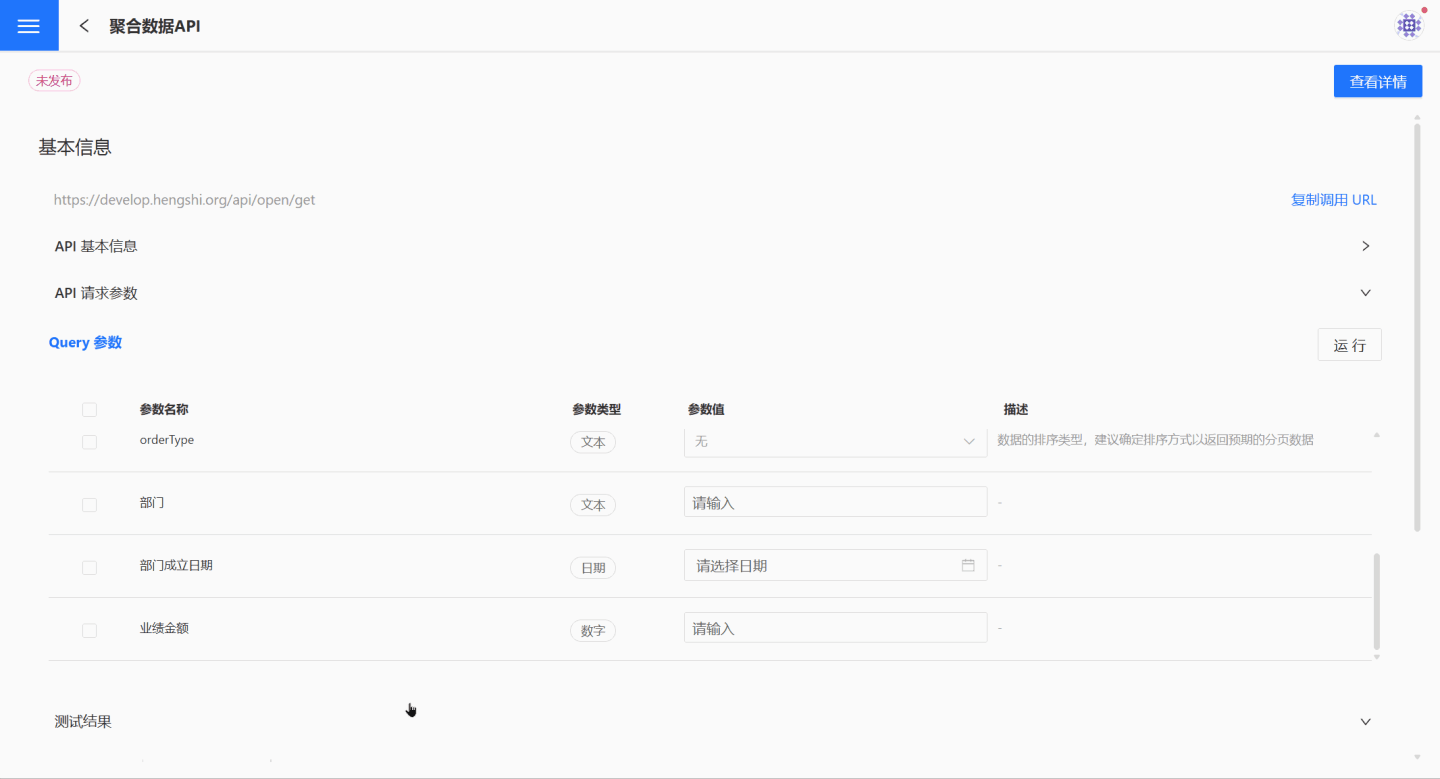
Tip
It supports selecting any query condition (parameter) or all query conditions to execute the query.
When no query conditions are selected, the full set of query results will be returned.
The test example only demonstrates the testing process. For actual testing, please conduct thorough tests based on the scenario to ensure the API meets the requirements.
API Testing Using JSON
The POST request method supports using JSON configuration parameters. During the API creation process, a JSON example is provided, and callers can refer to the example to compose JSON and send requests. The following test example demonstrates how to refer to the JSON example to send requests during the invocation process.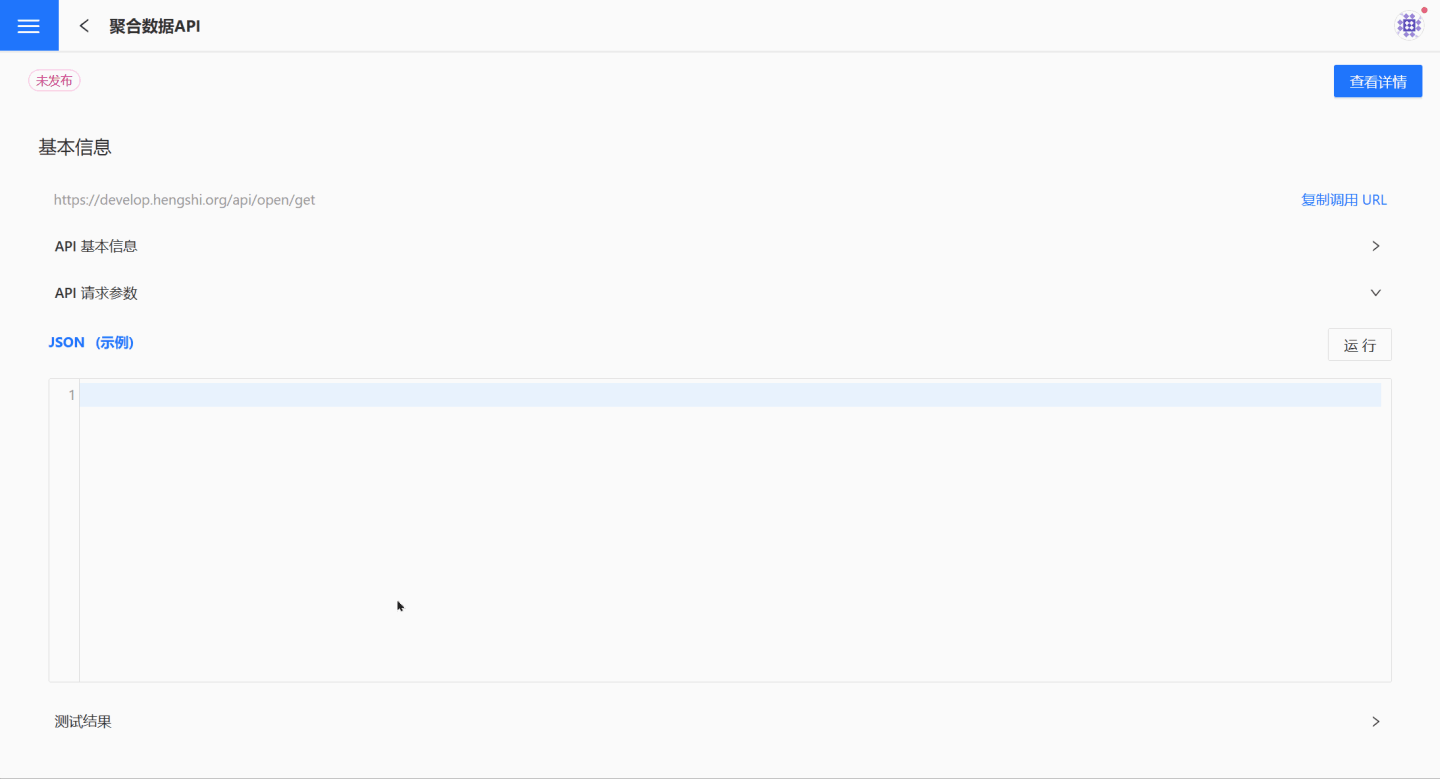
API Release
After the API has undergone thorough testing, it will be released. Once released, the API status changes to Published and Running, and it will be displayed in API Service for callers to use.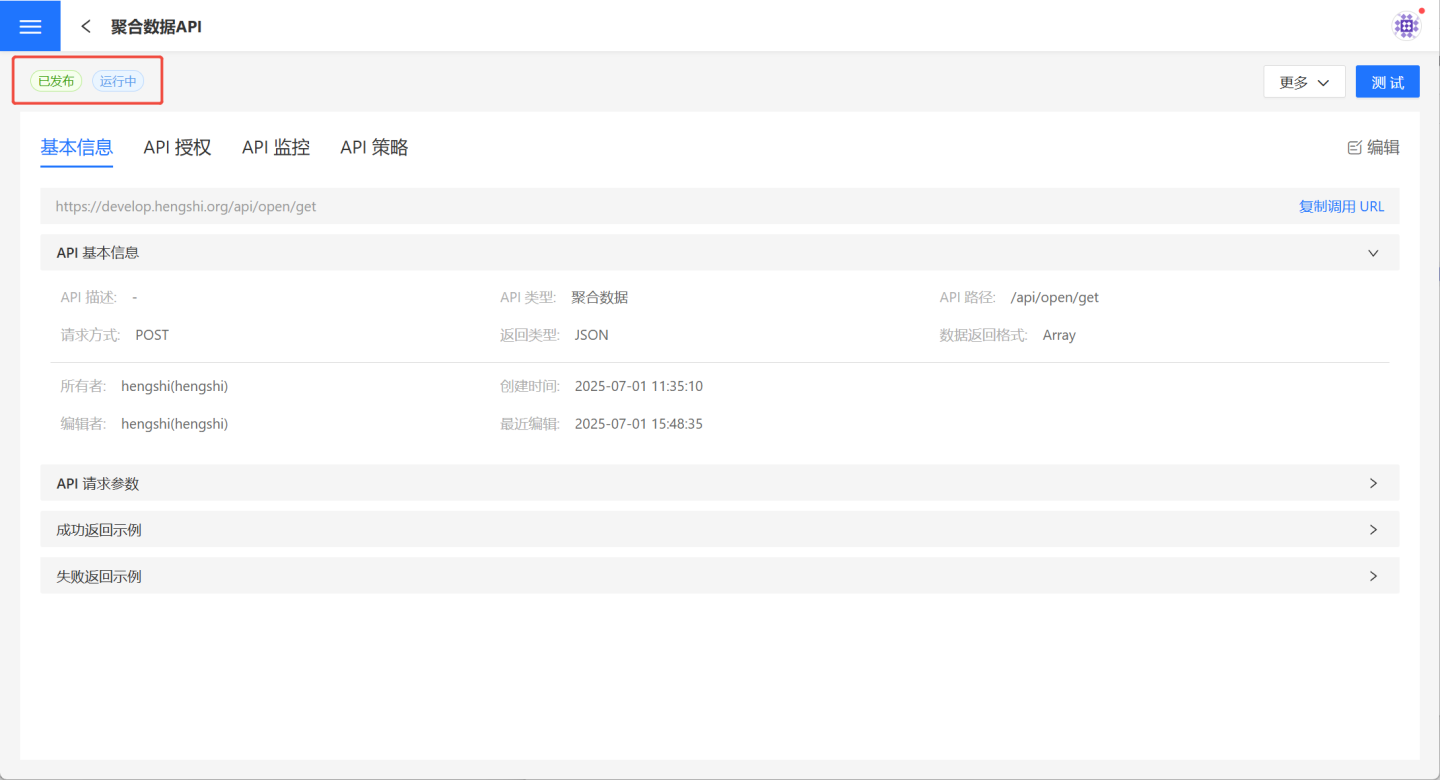
Detailed Data API
The Detailed Data API is primarily used to retrieve information about relevant fields within available datasets in the system, including datasets from the data mart and datasets created in applications.
Create Detailed Data API
Follow the steps below to create a new Detailed Data API.
1. Create a new API.
On the API management page, click "Create API" and select "Detailed Data." The "Create API (Detailed Data)" page will pop up.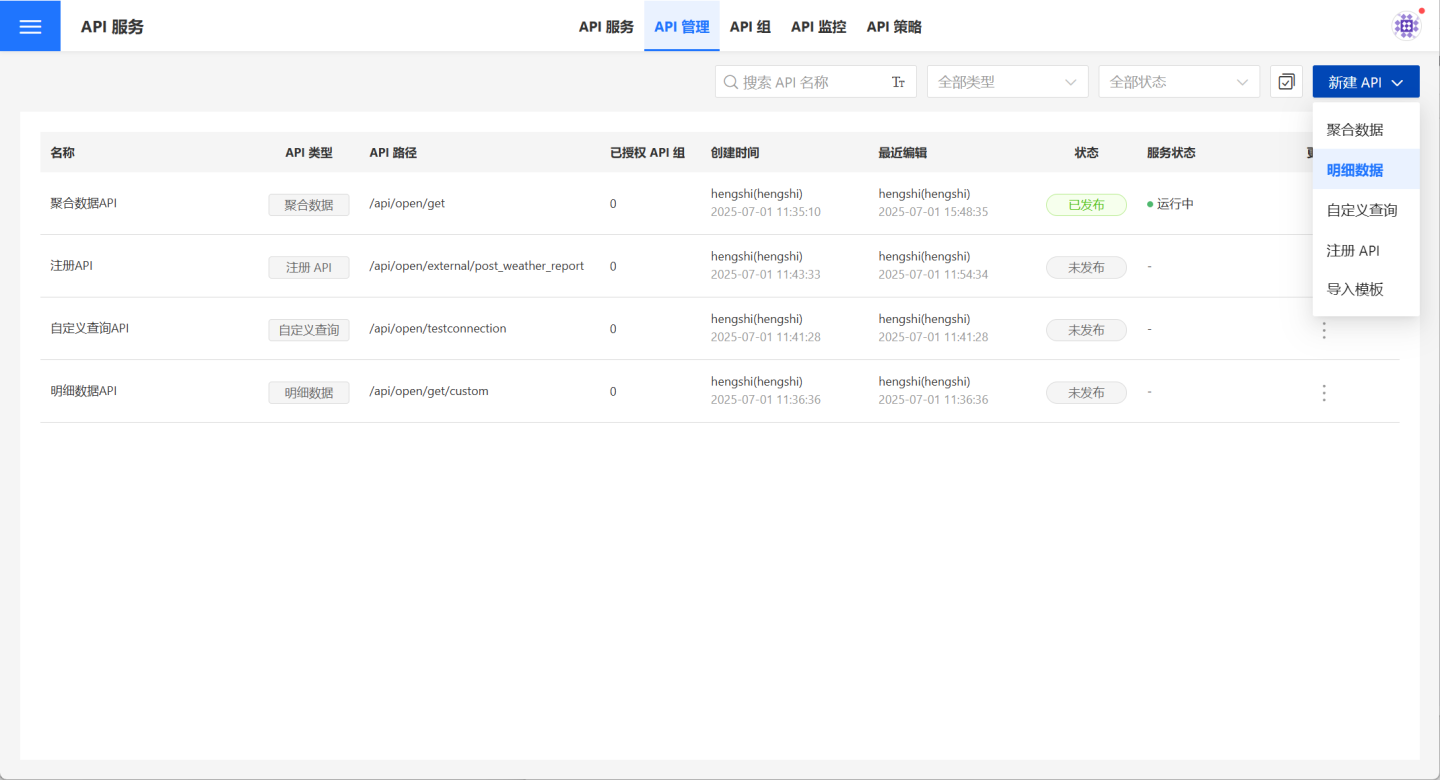
2. Fill in basic information.
On the page, fill in the required basic information such as API Name, API Path, Request Method, Dataset, etc. Detailed requirements for the basic information are listed in the table below.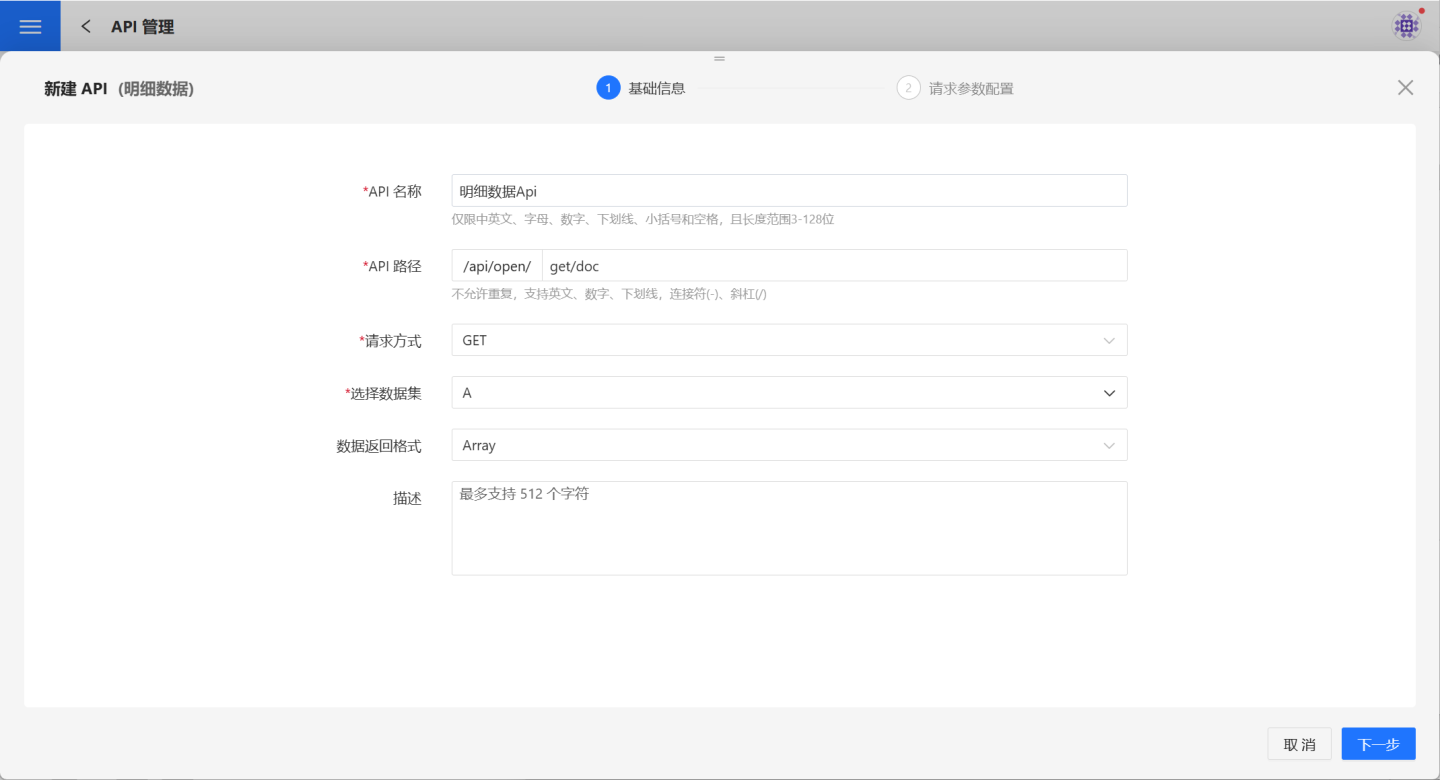
| Parameter | Description |
|---|---|
| API Name | Enter the API name. The name can only contain English, Chinese, letters, numbers, and underscores, with a length between 3-128 characters. The API name must be unique within the current user's APIs. Once published, it must be unique across all users' APIs in the system. |
| API Path | Enter the API path. Paths must be unique and support English, numbers, underscores, hyphens (-), and slashes (/). The API path must be unique within the current user's APIs. Once published, it must be unique across all users' APIs in the system. |
| Request Method | Supports GET and POST methods. |
| Select Dataset | Choose the dataset the API will access. Supports datasets from App creation and the Dataset Marketplace. |
| Data Return Format | Supports Array and Object formats. |
| Description | Provide a brief description of the API to help users quickly understand its query scope. |
3. Configure request parameters.
- GET request method parameter configuration:
The dataset displayed in the API operation shows the dataset being used. You can click on the dataset to perform operations such as viewing or adding fields. Then, select the fields in the dataset that will be used as parameters and drag them into the Query Parameter area on the right. Users can define parameter names, default values, and brief descriptions for easier identification later. Fields of typeboolandjsonare not supported as parameters.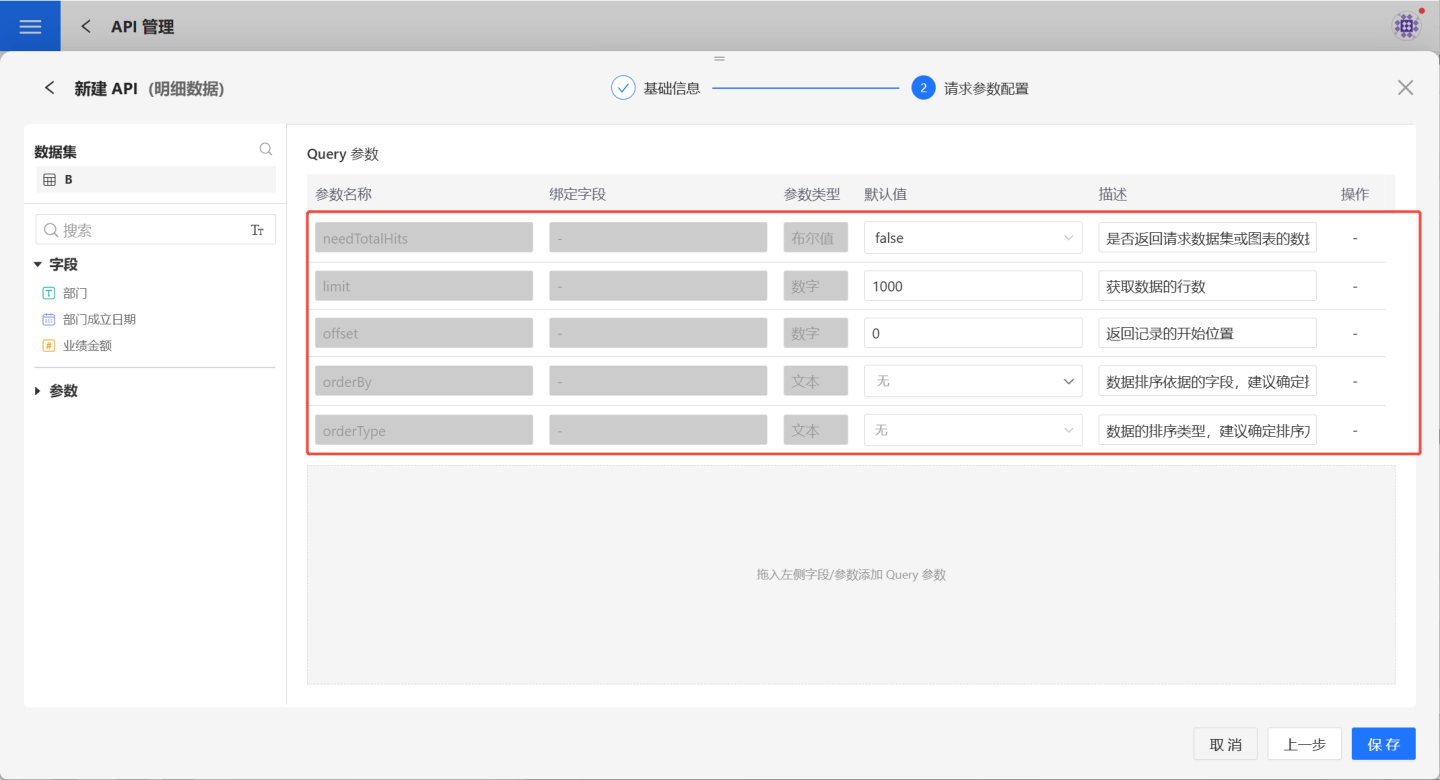
The red box indicates system default parameters, which are not bound to fields and cannot be deleted. However, their default values and descriptions can be modified. The specific functions of these parameters are as follows:
| Parameter | Parameter Type | Description |
|---|---|---|
| needTotalHits | Boolean | Indicates whether to return the total number of rows in the requested data. Default is false, meaning the total row count is not returned. |
| limit | Numeric | Specifies the total number of records to retrieve. Default is 1000, meaning 1000 records will be retrieved. |
| offset | Numeric | Specifies the starting position of the returned records. Default is 0, meaning records will be retrieved starting from the first record, up to the limit. |
| orderBy | Text | Specifies the field used for data sorting. It is recommended to set this parameter. |
| orderType | Text | Specifies the sorting method for orderBy. Supports ascending, descending, and no sorting. |
- POST request method parameter configuration:
Supports both request parameters and JSON parameter configuration. The request parameter configuration for POST is identical to that of GET, so it will not be elaborated here. When choosing JSON parameter configuration, you can provide a JSON example for API callers to reference during actual usage.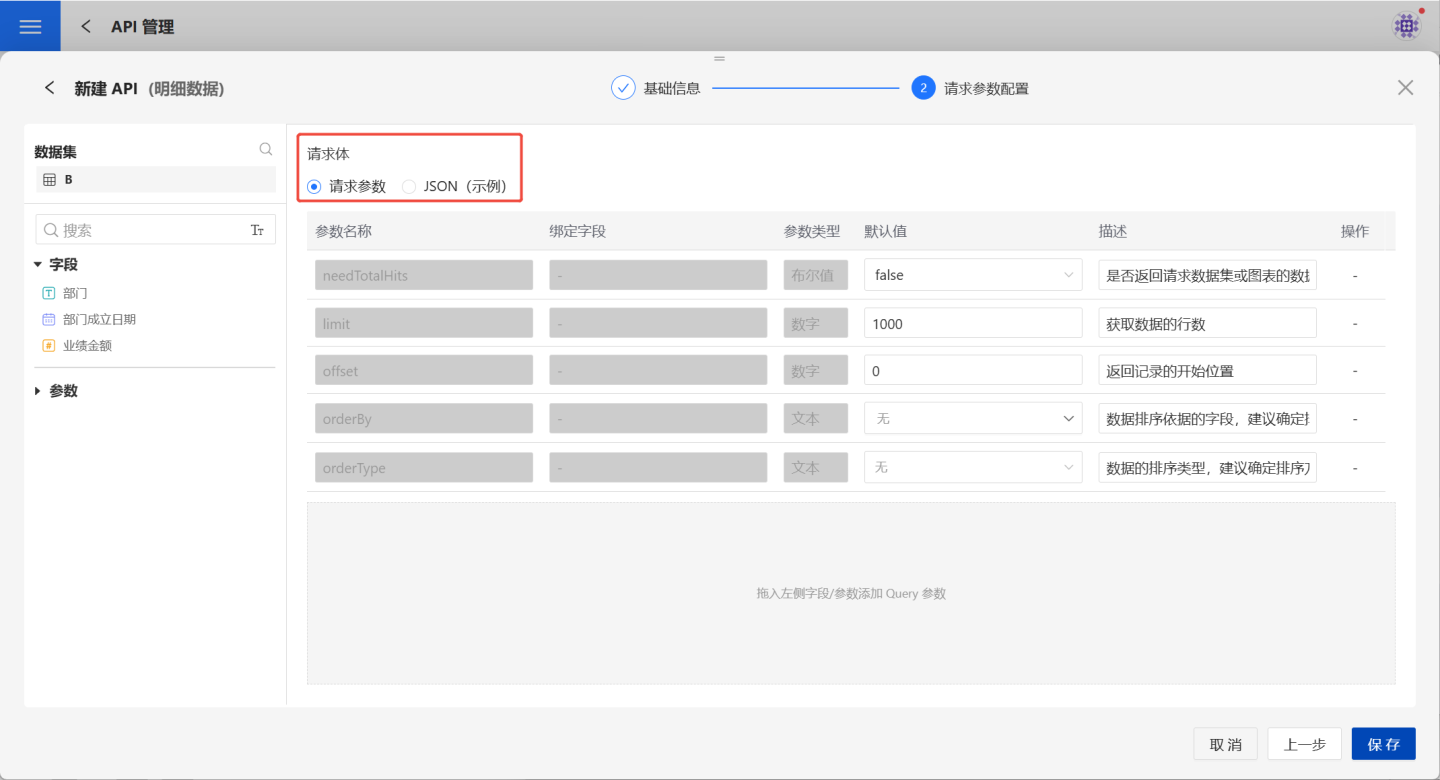
4. Verify API information.
After saving the parameter configuration, the API is successfully created with a status of "Unpublished." Users can verify the API information on the API details page. If there are any issues, click Edit on the right to make modifications.
Testing and Publishing of Detailed Data API
The testing and publishing of the Detailed Data API are the same as those of the Aggregated Data API. Please refer to the testing examples of the Aggregated Data API for testing.
Custom Query API
The Custom Query API retrieves relevant information about available data connections in the system through custom query statements. The API supports flexible use of language to view the data content within data connections.
Create Custom Query API
Follow the steps below to create a custom query API.
1. Create API.
On the API management page, click "Create API," select "Custom Query," and enter the "Create API (Custom Query)" page.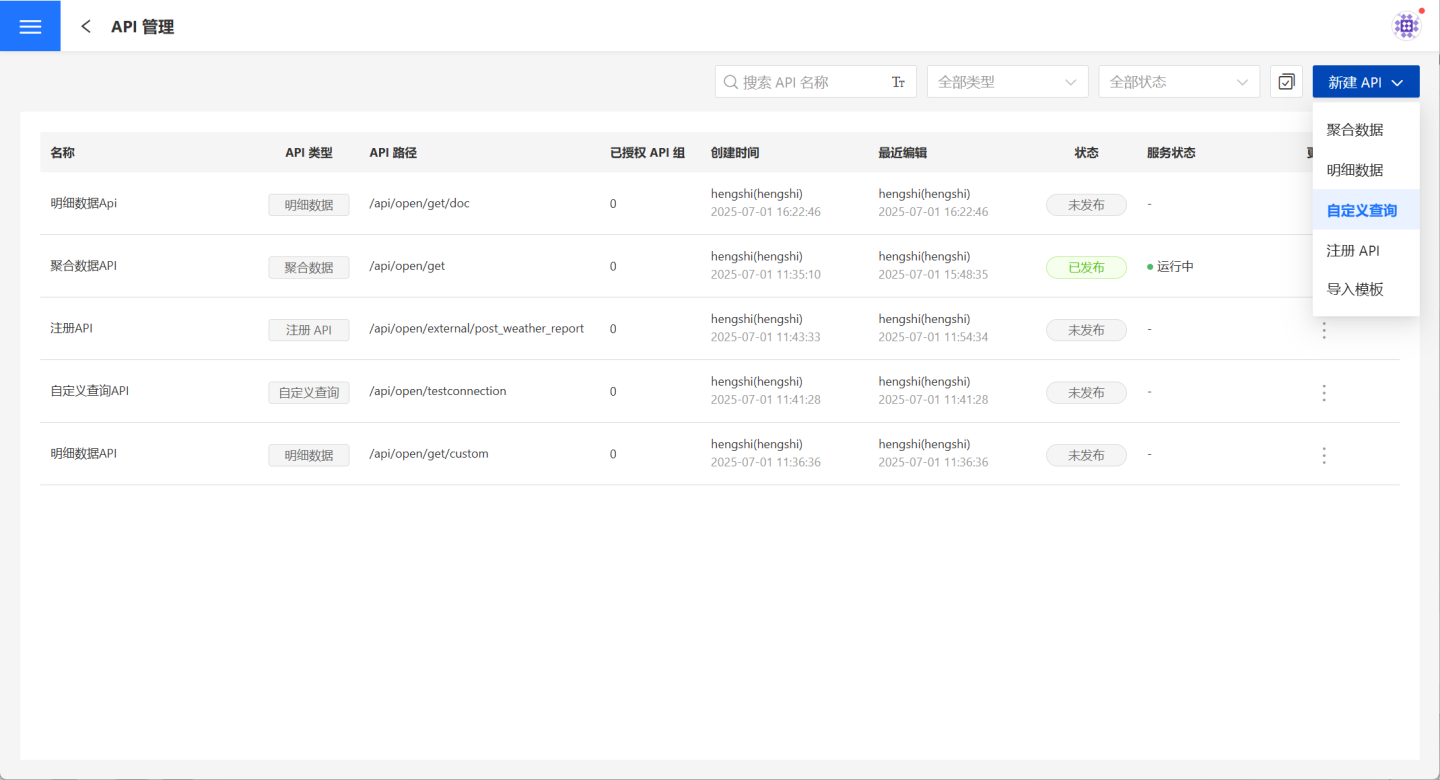
2. Fill in basic information.
On the page, fill in the required fields such as API Name, API Path, Request Method, Data Return Format, and Description. Both POST and GET request methods are supported.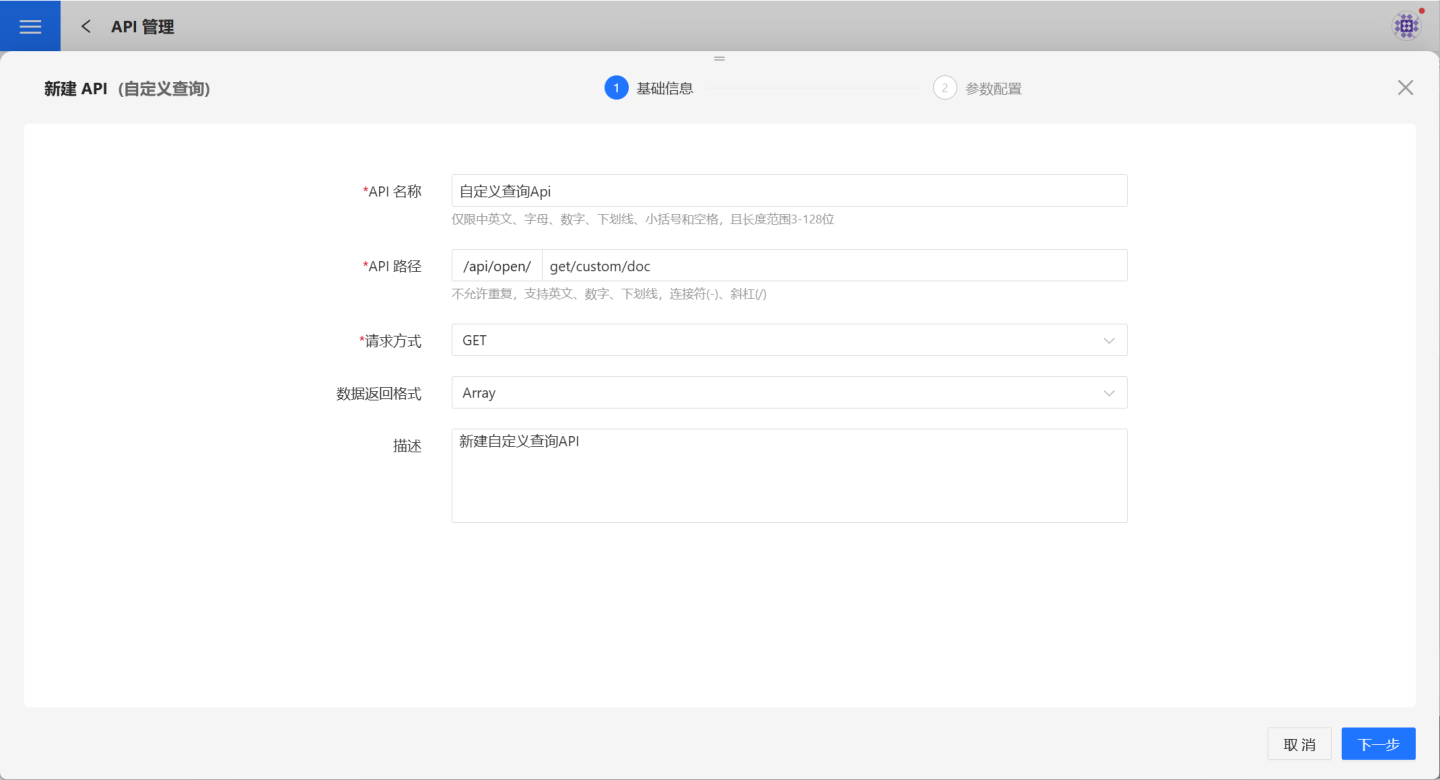
3. Configure parameters.
Introduction to each section of the parameter configuration page.
| Name | Description |
|---|---|
| Data Connection | Select the data connection that the current user has access to. |
| Data Table | Displays the schema and data tables of the selected data connection. Users can click to view the data of any table. |
| Query Statement | Edit the custom query statement. The statement must comply with the syntax of the selected connection on the left. |
| Default Schema | When running the query statement: - If all queried tables are under the public path, no default schema selection is required. - If queried tables are in different schemas, the table paths must be explicitly stated in the query statement. - If queried tables are only in a single schema, you can directly specify the default schema to execute the query. |
| Request Parameters | Define the request parameters for the custom query, including parameter name, type, default value, and description. Request parameters must match the parameters in the query statement. |
| Default Request Parameters | These are system-provided request parameters that cannot be modified or deleted. - needTotalHits: Indicates whether to return the total number of rows in the requested data. Default is false, meaning the total number of rows is not returned. - limit: Specifies the total number of records to retrieve. Default value is 1000, meaning 1000 records will be retrieved. - offset: Specifies the starting position of the returned records. Default value is 0, meaning records are retrieved starting from the first record, up to the limit. - orderBy: Specifies the field for data sorting. It is recommended to set this. - orderType: Specifies the sorting method for orderBy. Supports ascending, descending, or no sorting. |
| Table Data Preview | To facilitate writing query statements, users can click on any data table on the left to preview its data. |
| Execute | Click the "Execute" button on the right or press Shift+Enter to view the feedback results of the query statement under the "Execution Results" tab. |
The example below demonstrates the process of parameter configuration and usage.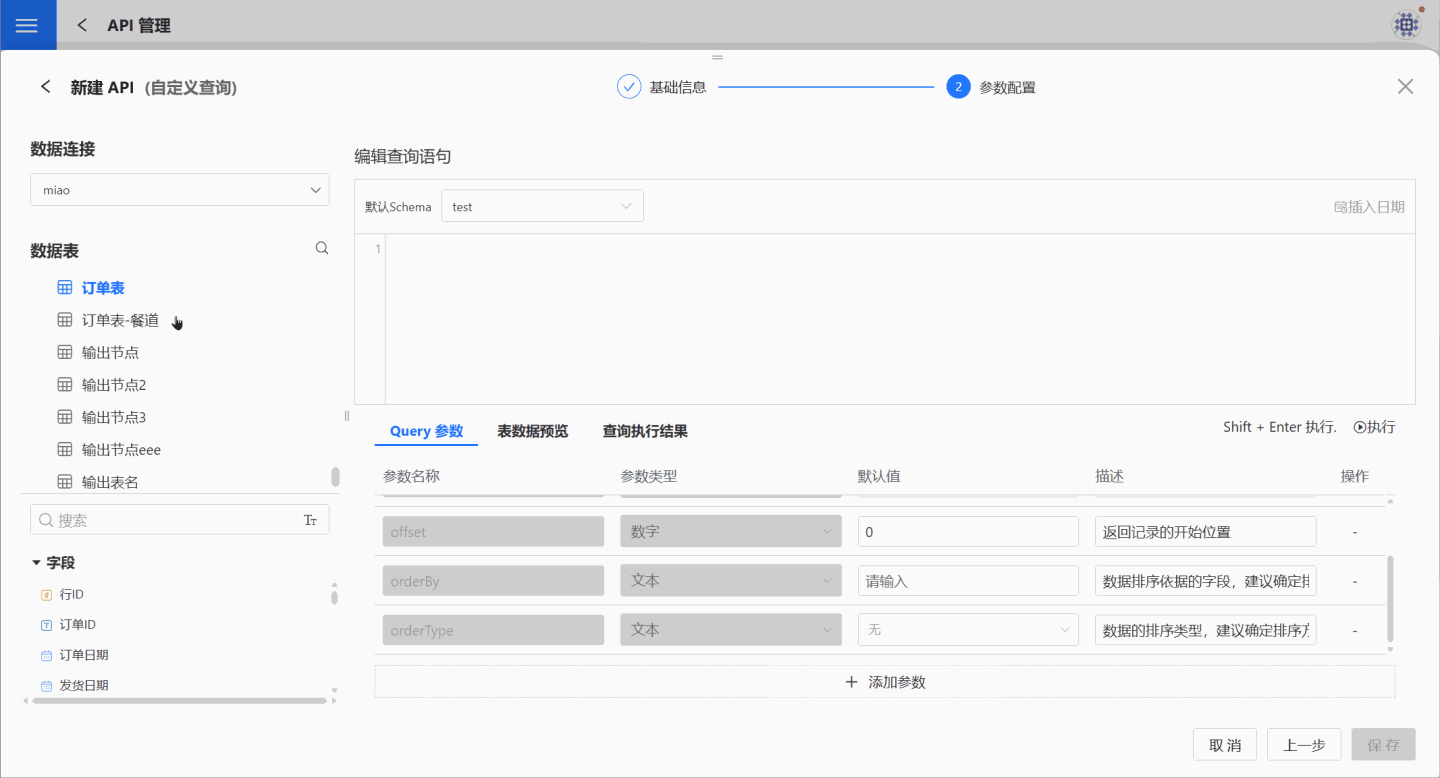
4. Verify API Information.
After saving the parameter configuration, the API is successfully created with a status of "Unpublished." Users can verify the API information on the API details page. If there are any issues, click Edit on the right to make modifications.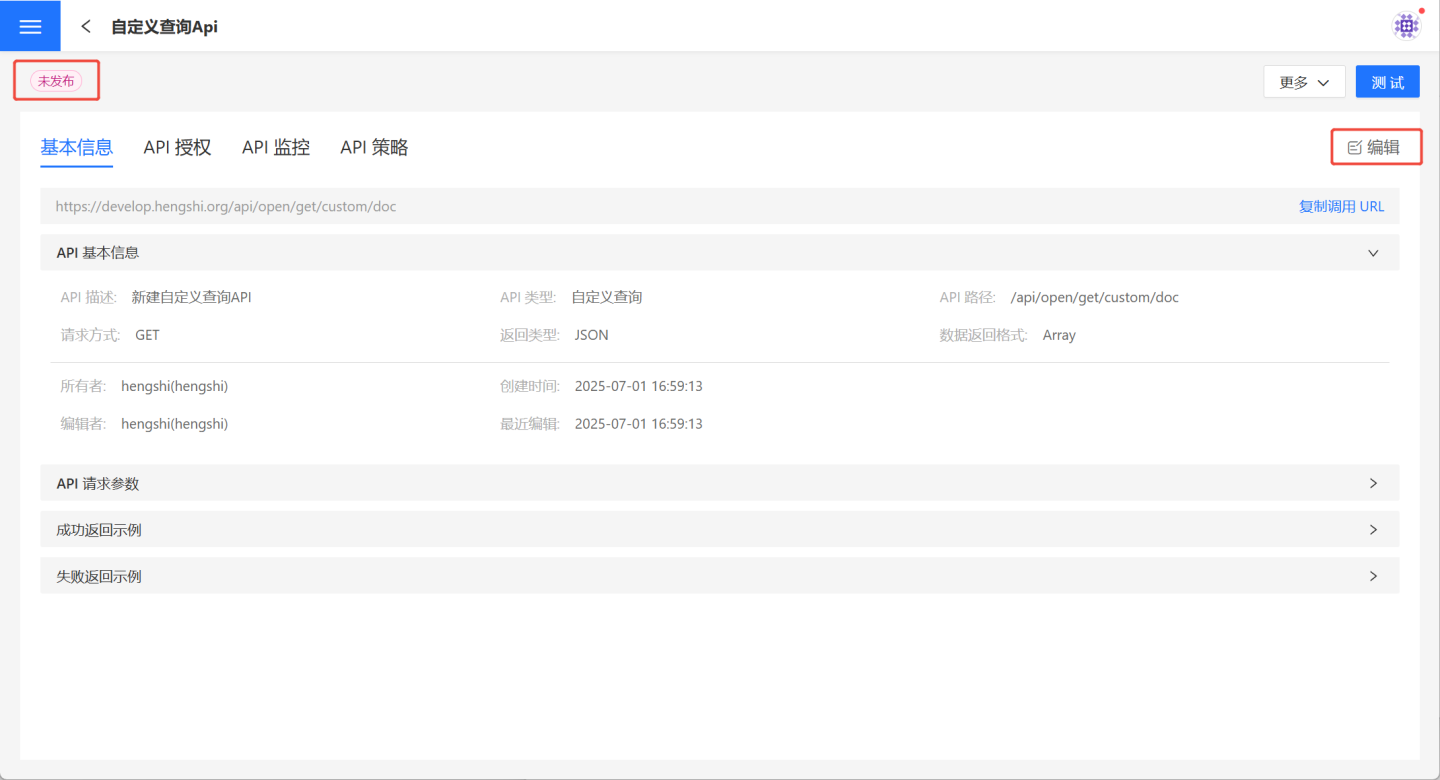
Custom Query API Testing and Publishing
For APIs of the custom query type, only the default parameters take effect when selected. Other parameters will execute queries based on the logic defined in the query statement, regardless of whether they are selected or not. 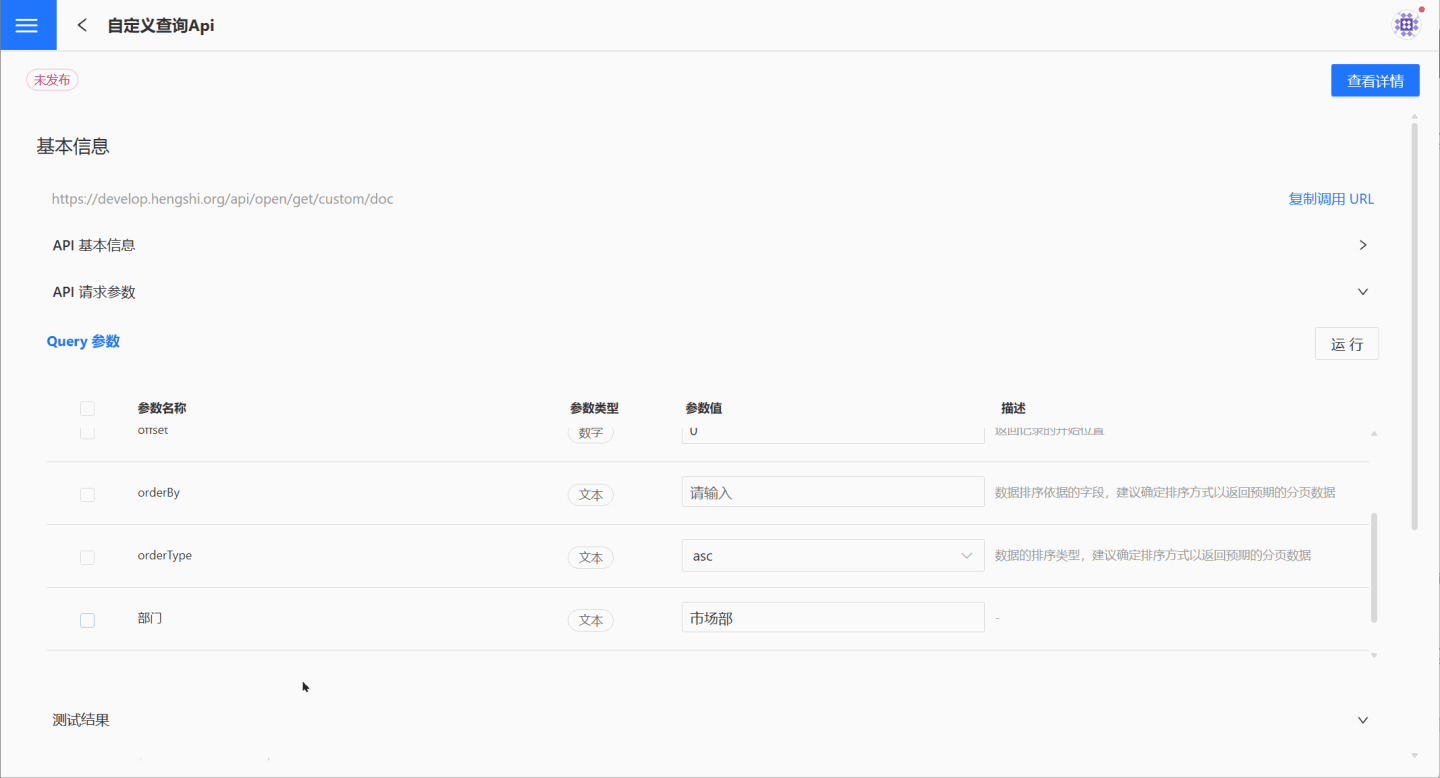
Register API
The Register API is an API provided by HENGSHI SENSE that encapsulates third-party APIs and offers standardized interfaces externally. The Register API supports four request methods: GET, POST, PUT, and DELETE. Parameter passing methods include fixed parameter passing and original parameter passing.
Create Registration API
Below is a detailed introduction on how to create a registration API, including the testing and publishing process.
Create a New API.
On the API management page, click "Create New API," select "Registration API," and enter the "Create New API (Registration API)" page.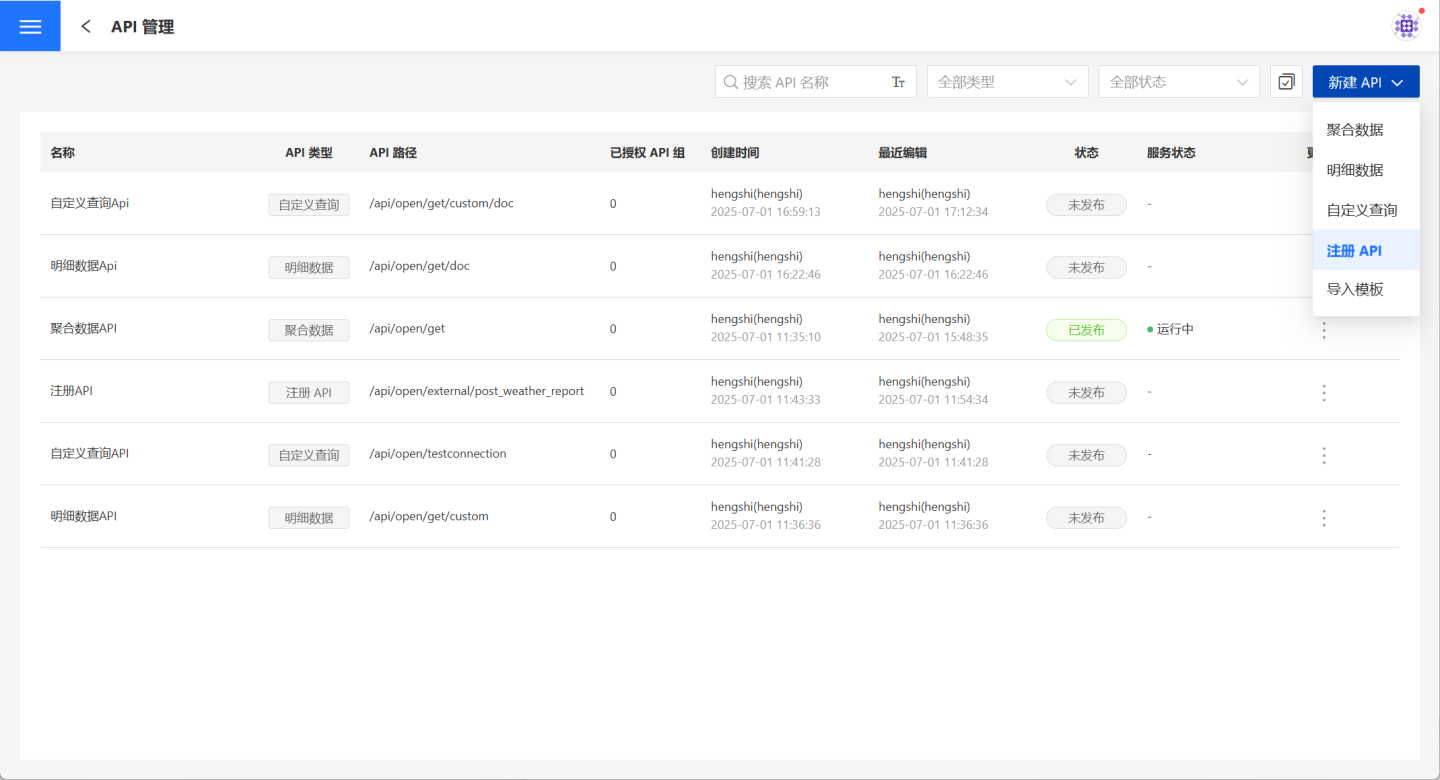
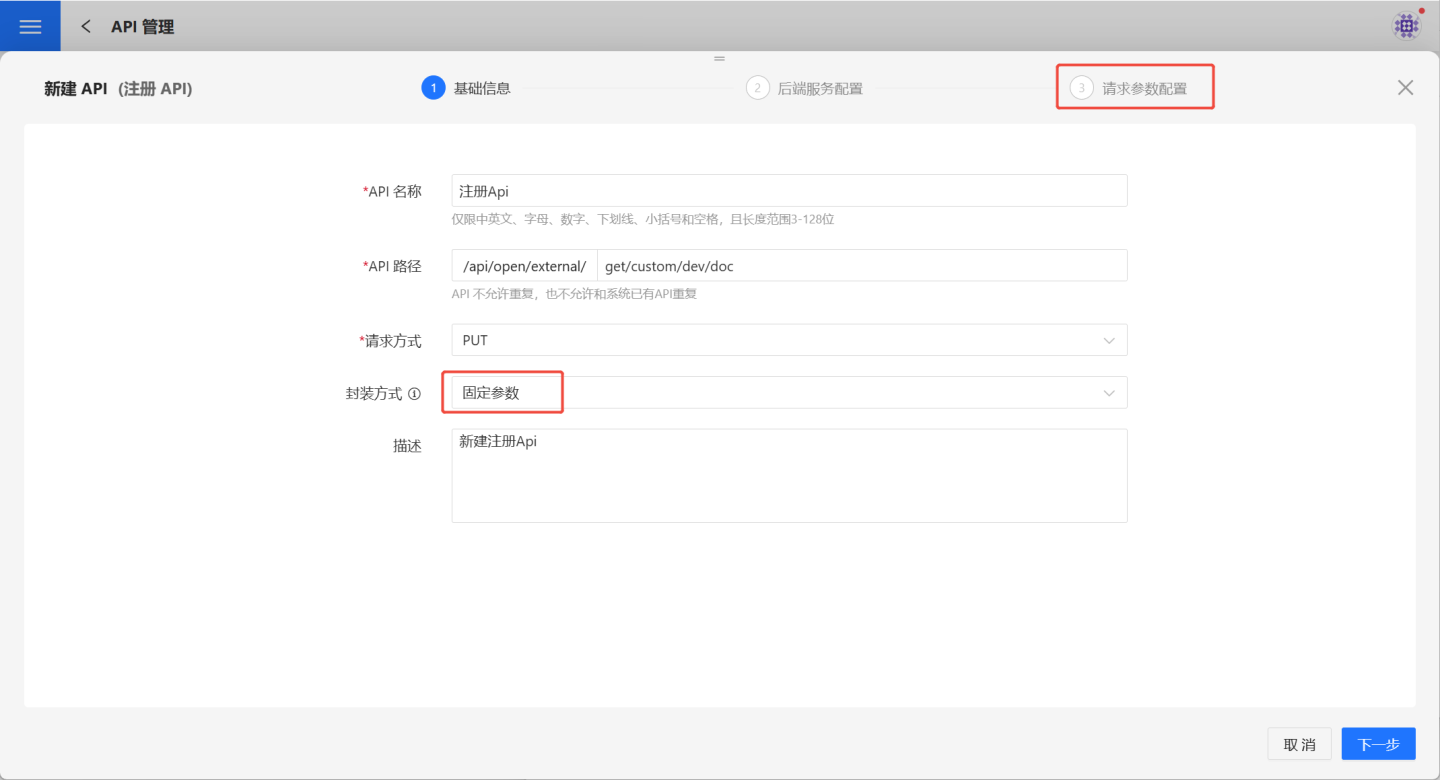
Fill in Basic Information.
On the basic information page, fill in the API name, API path, request method, and encapsulation method as required, and add a description for the API.- Request methods support GET, POST, PUT, and DELETE.
- Encapsulation methods support "Pass-through Parameters" and "Fixed Parameters." Only "Fixed Parameters" require request parameter configuration (highlighted in the red box in the image).
Backend Service Configuration.
On the backend service configuration page, fill in theThird-party Service URLas required.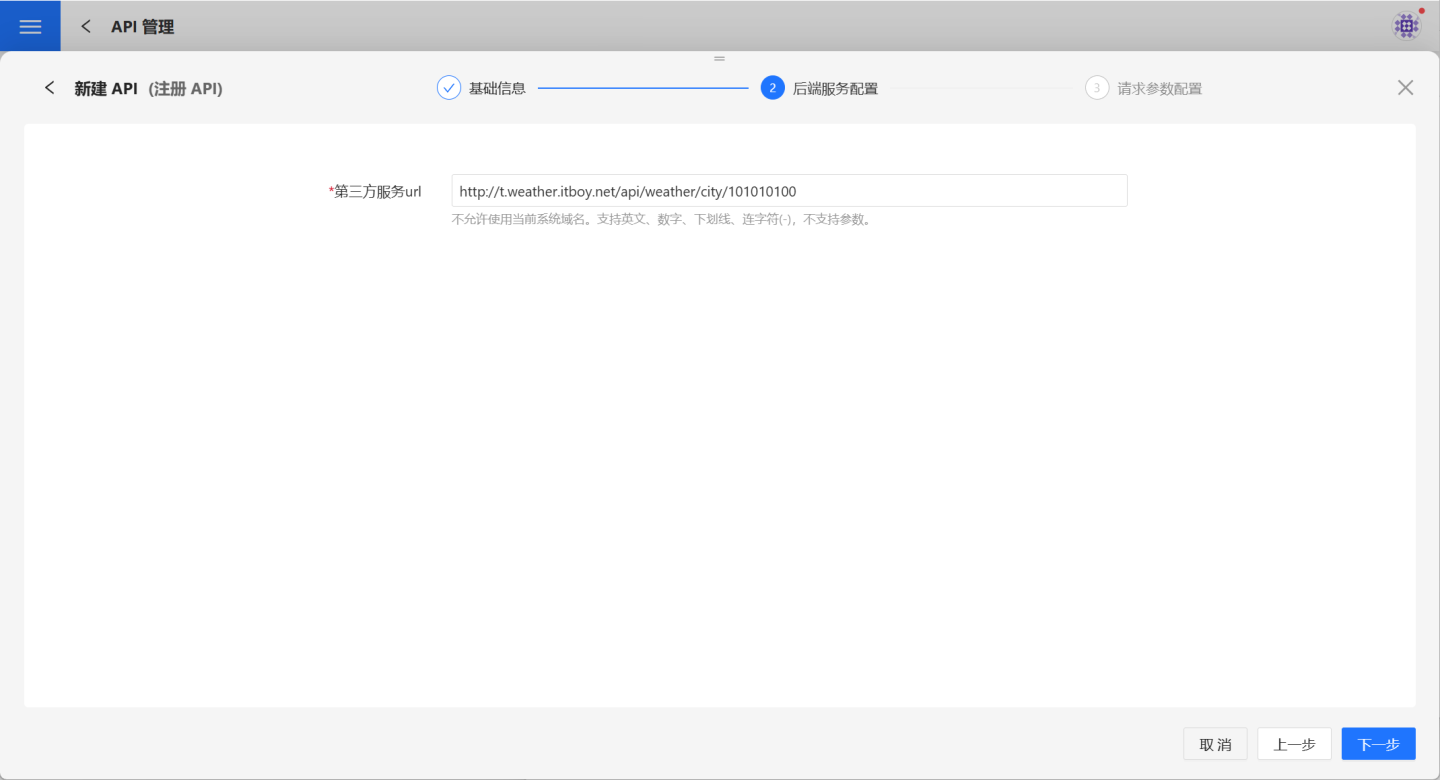
Request Parameter Configuration.
When the encapsulation method is "Fixed Parameters," request parameter configuration is required. Add parameters in the Query Parameters and Request Headers sections as needed.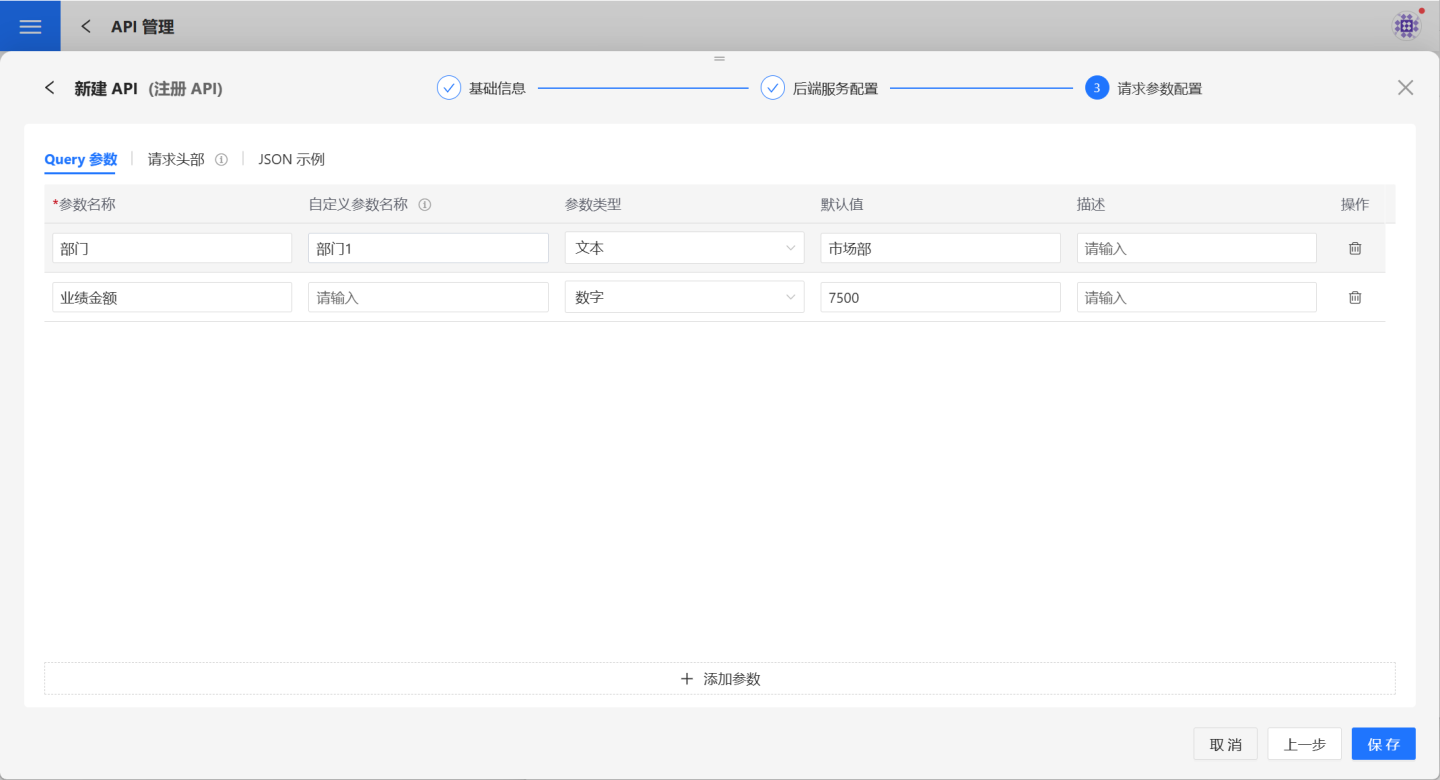
Additionally, POST requests support JSON for parameter configuration. You can provide examples for reference by the caller.Tip
When adding parameters to the request header, the Content-Type can only include the
application/jsonformat tag value; other formats are not supported.Verify API Information.
After saving the parameter configuration, the API is successfully created with a status of "Unpublished." Users can verify the API information on the API details page. If there are any issues, click Edit on the right to make modifications.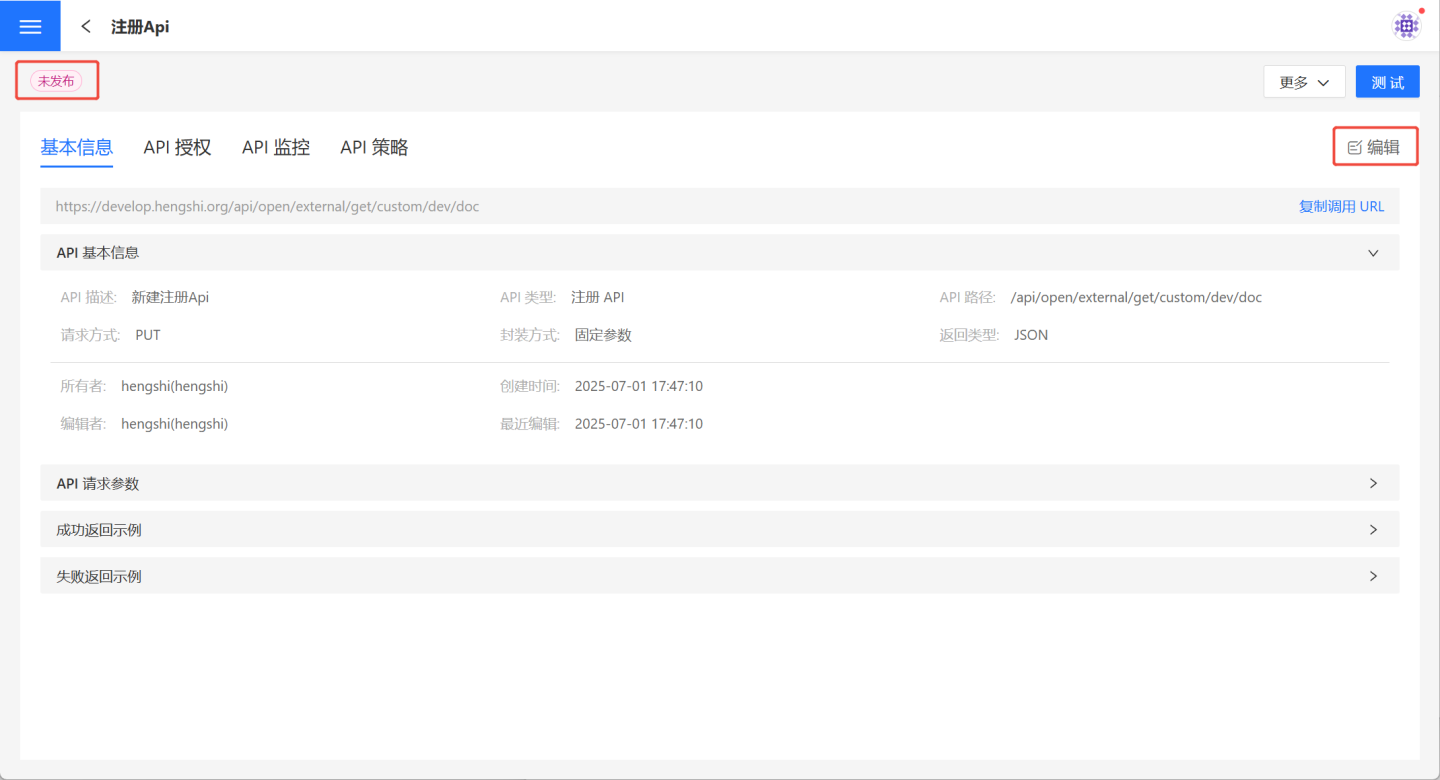
Register API Publishing and Testing
The Register API differs from other APIs, as its request parameters include both Query parameters and request headers. When sending API requests, you need to pay attention to both parts of the parameters. 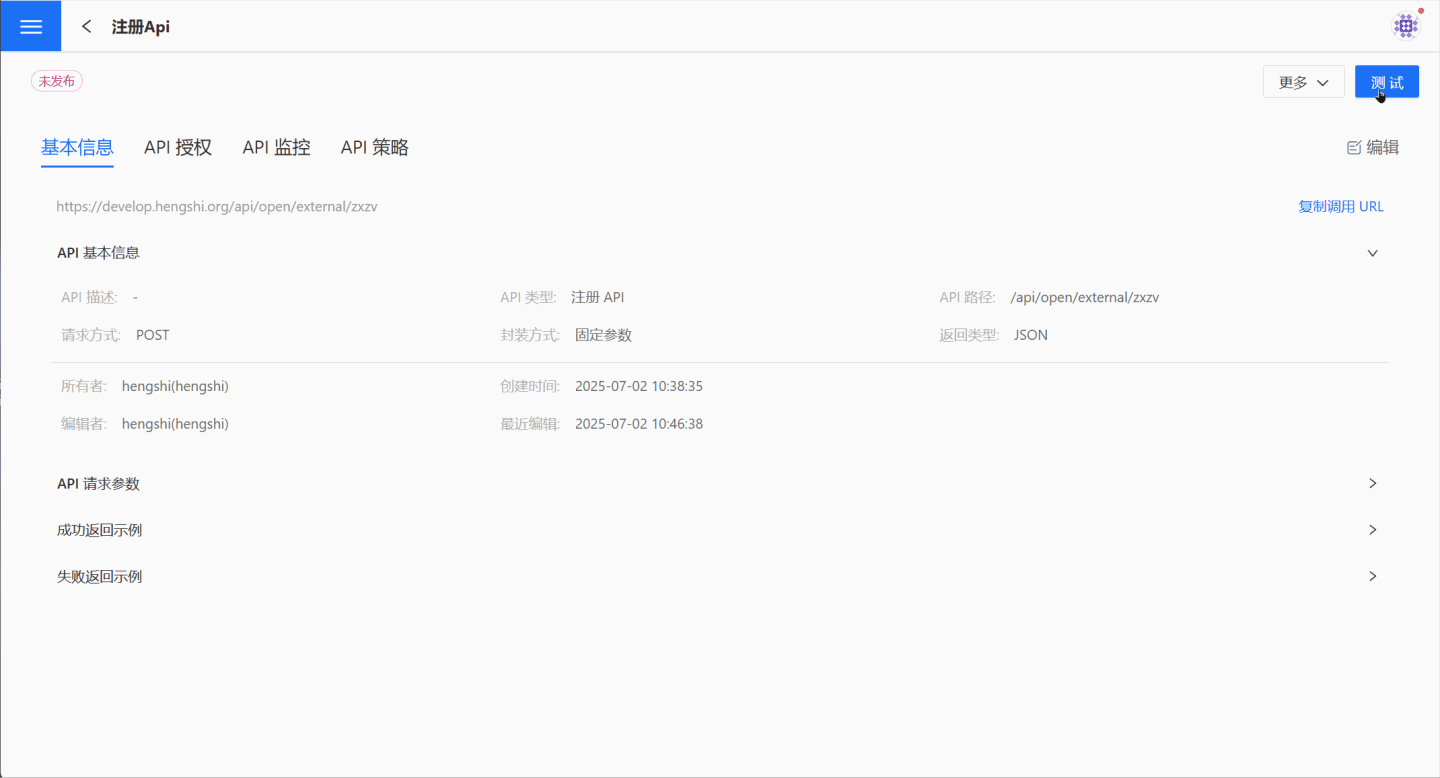
Publish/Republish/Unpublish
Once the API is created and successfully tested, you can select …Menu -> Publish to publish it to the API service.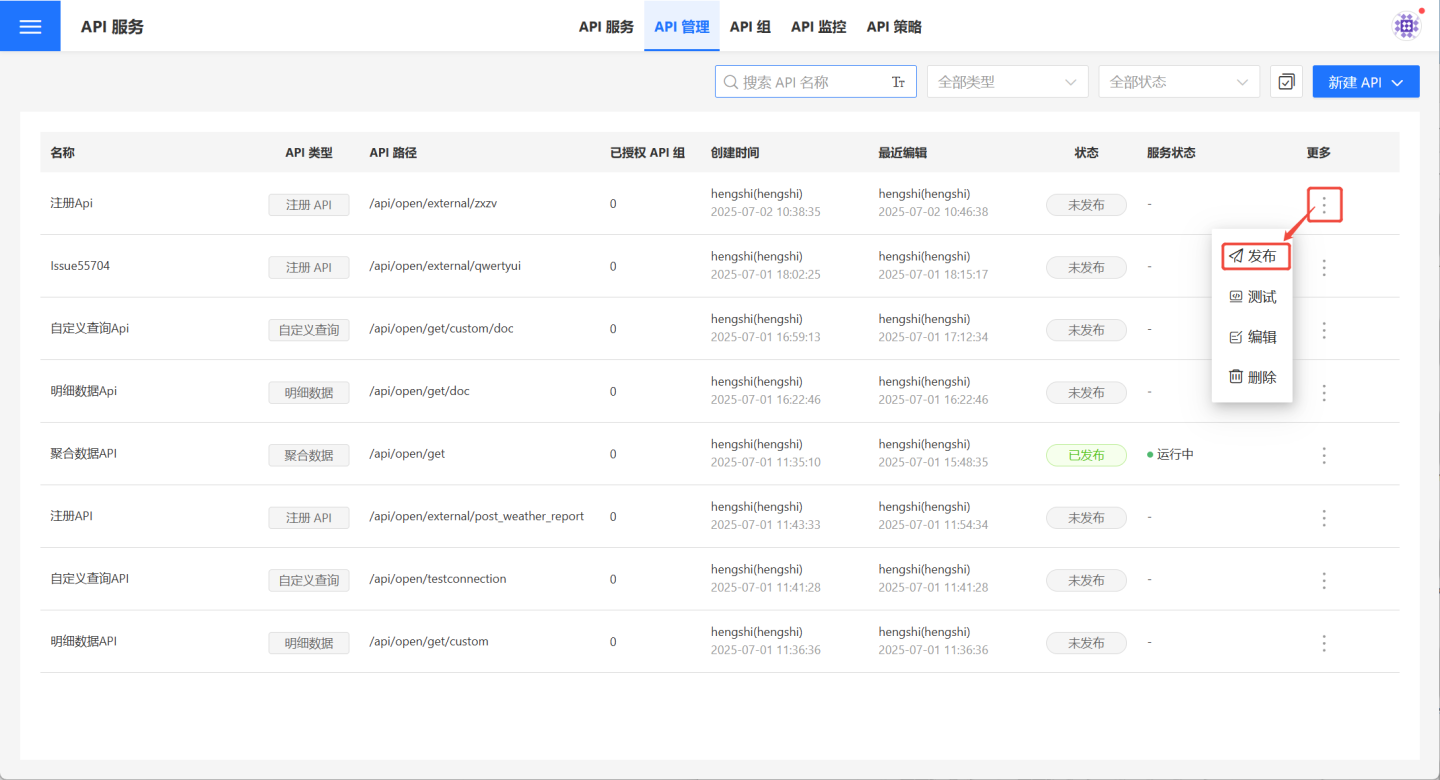
For APIs in the published state, you can start or pause API operations based on data update conditions to ensure the API retrieves the latest data. When the API service is started, the corresponding API service status will be Running. When the service is paused, the API service status will be Under Maintenance.
After the API is published, editing operations are still supported on the API management page. The published state and editing state of the API are independent of each other until the user selects …Menu -> Republish to publish the API again. In this case, the results of the latest edits will overwrite the published state of the API. When users with permission to call the API execute queries, the queries will be performed using the new query conditions.
If the API has not been authorized to any API group, users can select …Menu -> Unpublish to unpublish it, thereby stopping the query service. If the API has already been authorized to certain API groups, authorization must first be revoked before performing the Unpublish operation.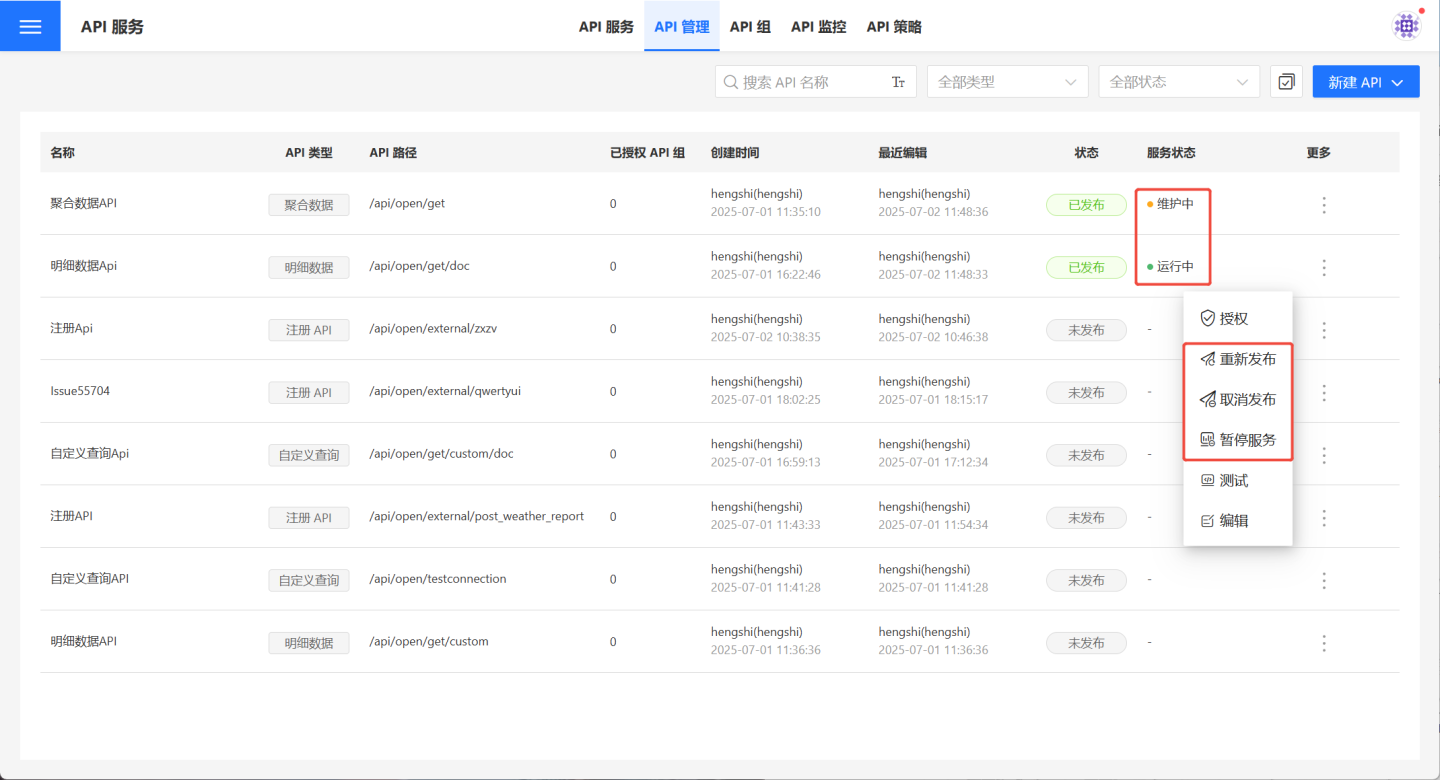
Edit
After the API is created, you can click the … menu -> Edit or the Edit button on the details page to modify the relevant information.
- When the API is in the
Unpublishedstate, modifications will take effect immediately after clicking the save button. - When the API is in the
Publishedstate, modifications will not take effect immediately after clicking the save button. You need toRepublishthe API for the changes to take effect.
API Authorization
Published APIs can be authorized to API groups by selecting …Menu -> Authorize, allowing the API group to handle unified authentication and authorization. Authorization supports time-based and usage-based options, depending on the needs of different API groups. 
After authorization, users can go to the API details page and click API Authorization, then select …Menu -> Revoke Authorization to cancel the authorization for the API group. Once authorization is revoked, the API group will no longer have permission to call the current API. 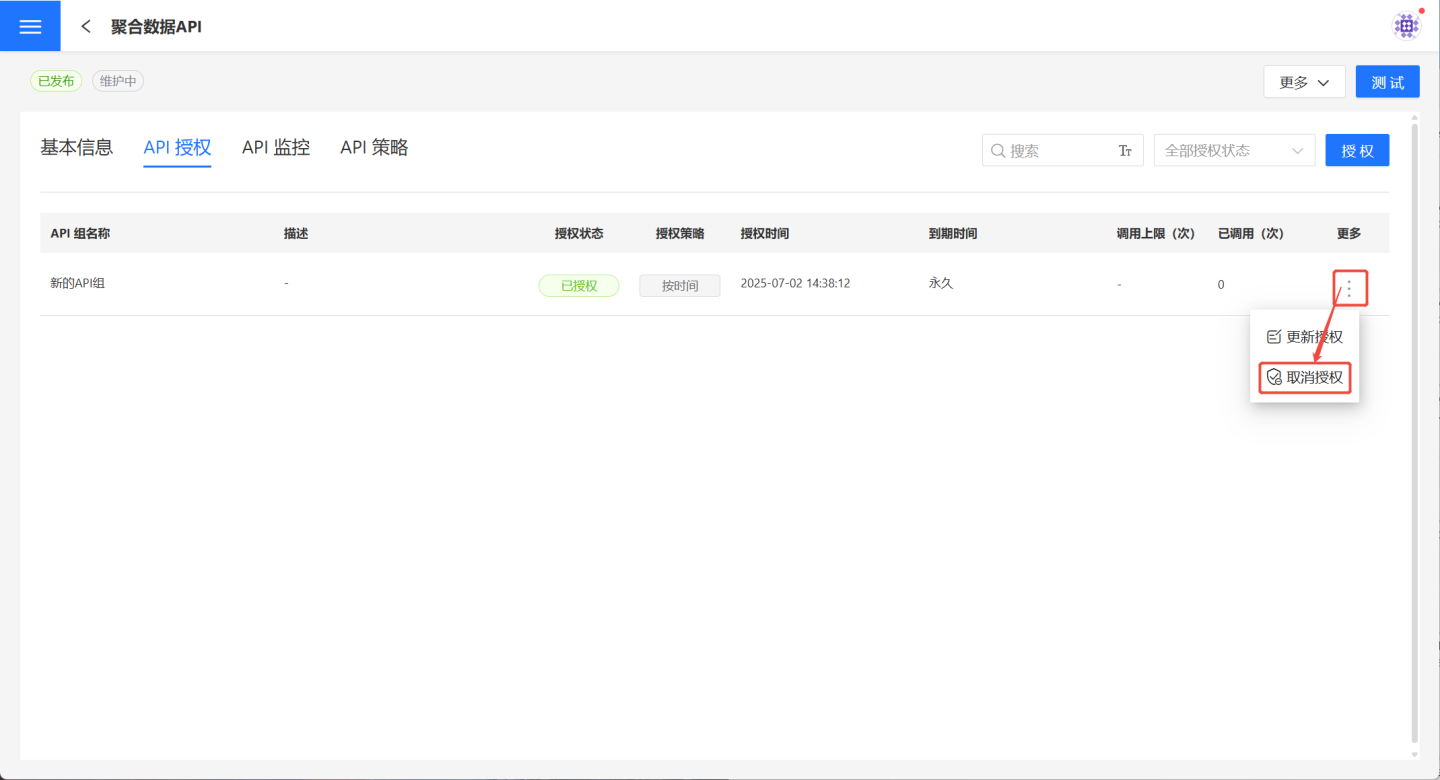
Note
Unpublished APIs cannot be authorized as they do not provide API services.
API Monitoring
Click API Monitoring on the API details page to view the current API call status.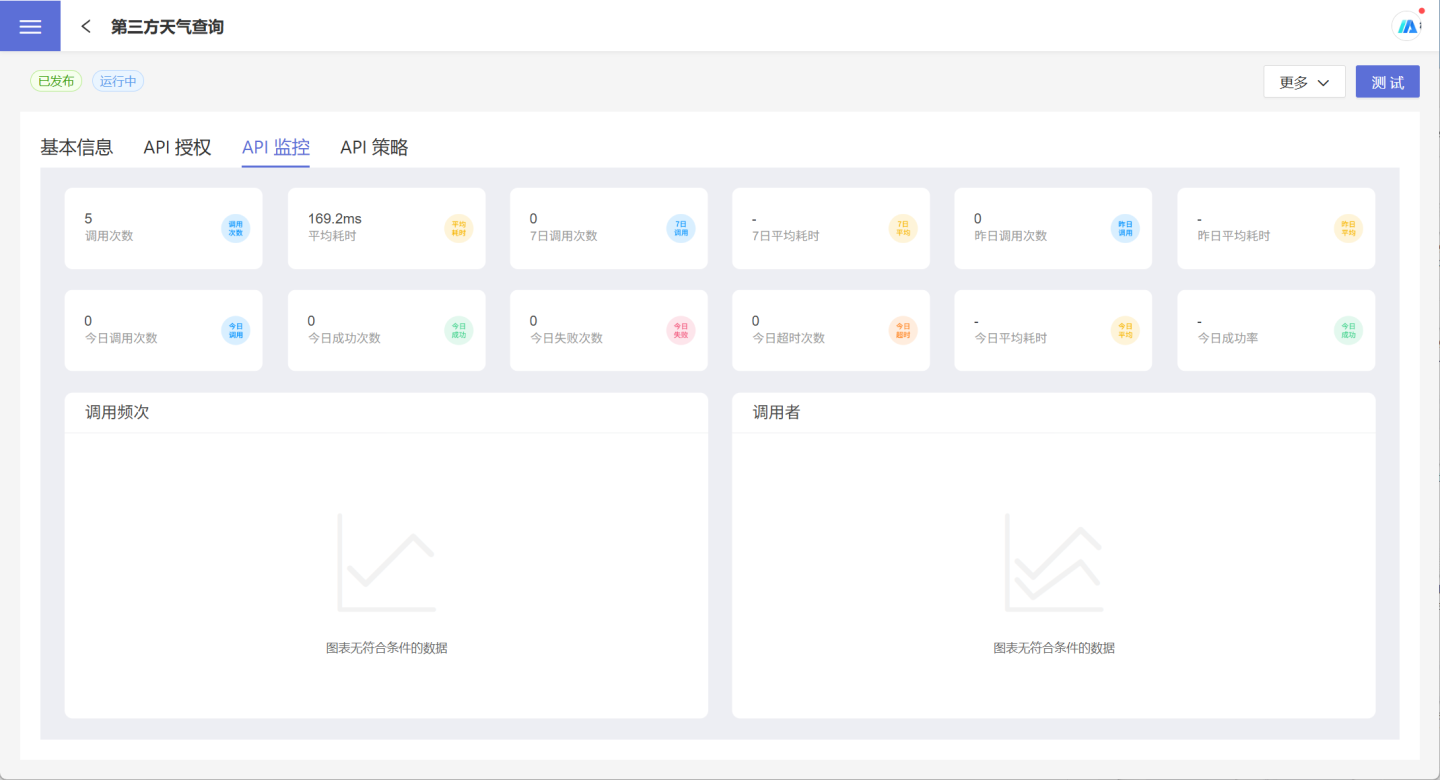
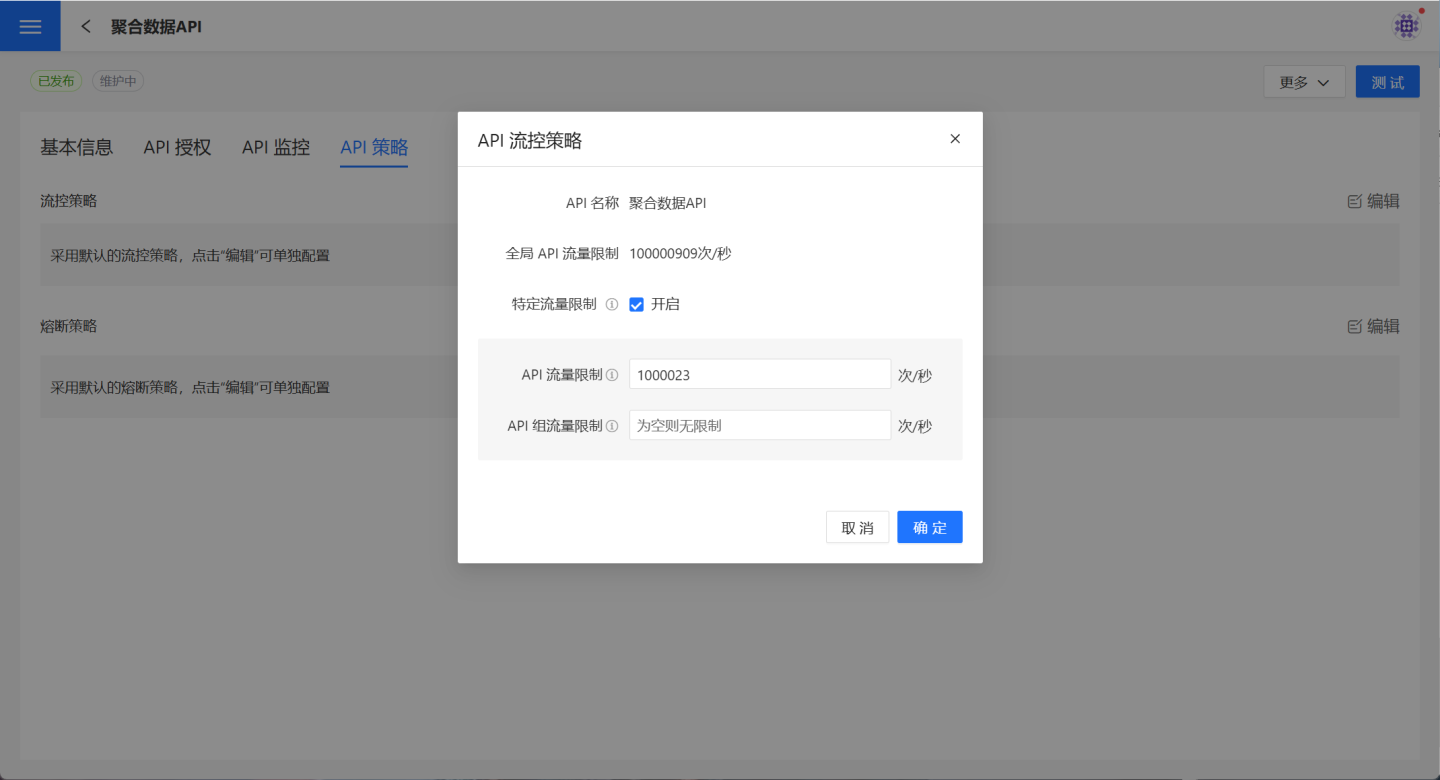
API Flow Control
In API management, it is possible to set restrictions on the call frequency of APIs. Navigate to API Management -> API Strategy, click the edit button on the right side of the flow control strategy to display the rate-limiting information related to the API. After checking the Enable button, you can edit the call frequency.
API Traffic Limit refers to the maximum traffic allowed for accessing the API. The default value is the system-defined default traffic limit for a single API.
API Group Traffic Limit refers to the restriction on API group access to a single API. All API groups bound to this API are subject to this traffic limit.
API Circuit Breaker
In API management, it supports setting up API circuit breakers. Before configuring the circuit breaker, please read Circuit Breaker Strategy to understand the usage scenarios of API circuit breakers.
On the API Management -> API Strategy page, click the edit button on the right side of the circuit breaker strategy to open the API Circuit Breaker Strategy page. After checking the Enable button, you can set the circuit breaker rules. For the meaning and function of circuit breaker parameters, please refer to Circuit Breaker Parameter Description. 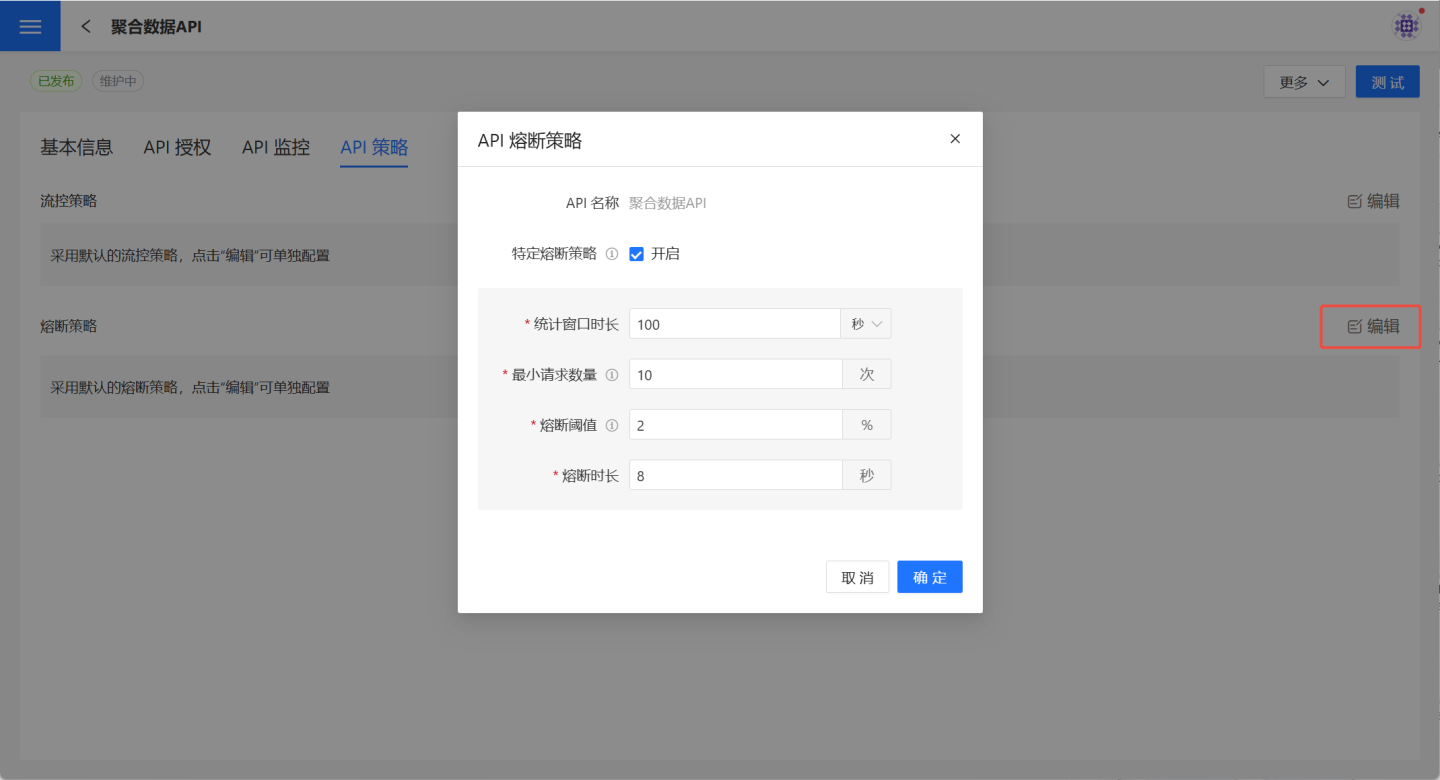
Note
- The API circuit breaker rule only applies to this API and does not affect other APIs.
- After setting this API circuit breaker rule, modifications to the Global API Circuit Breaker Rule will not affect the circuit breaker rule of this API.
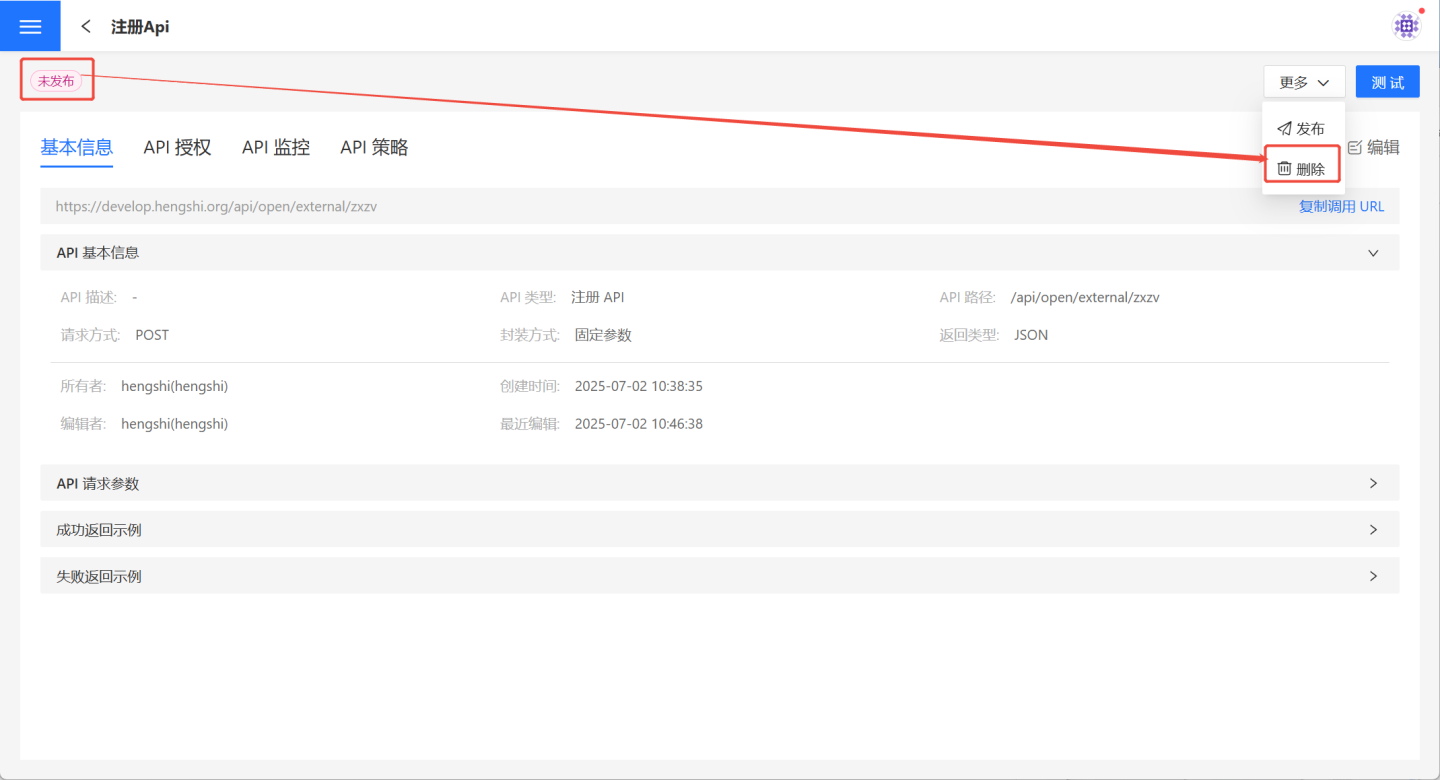
Delete
On the API Management page, users can select the … menu -> Delete to remove a specific API. The Delete button on the API details page can also be used to perform the deletion operation.
- Published APIs cannot be deleted as they are actively providing services. Users must select
… menu->Unpublishbefore proceeding with theDeleteoperation. - APIs in an unpublished state can be deleted normally.

API Group
Add APIs from the same business domain into a group, and provide users with authorization to call the APIs based on the group. Members within the group use the same authentication information, allowing them to access the APIs within the group and obtain the same data, aligning with scenarios where data consistency is required within the same business domain.
API Group List
Click API Service -> API Group to open the API group list, displaying all API groups that the current user has access to, including those created by the user and those authorized to them.
This page provides operations for creating, viewing, editing, and deleting API groups. 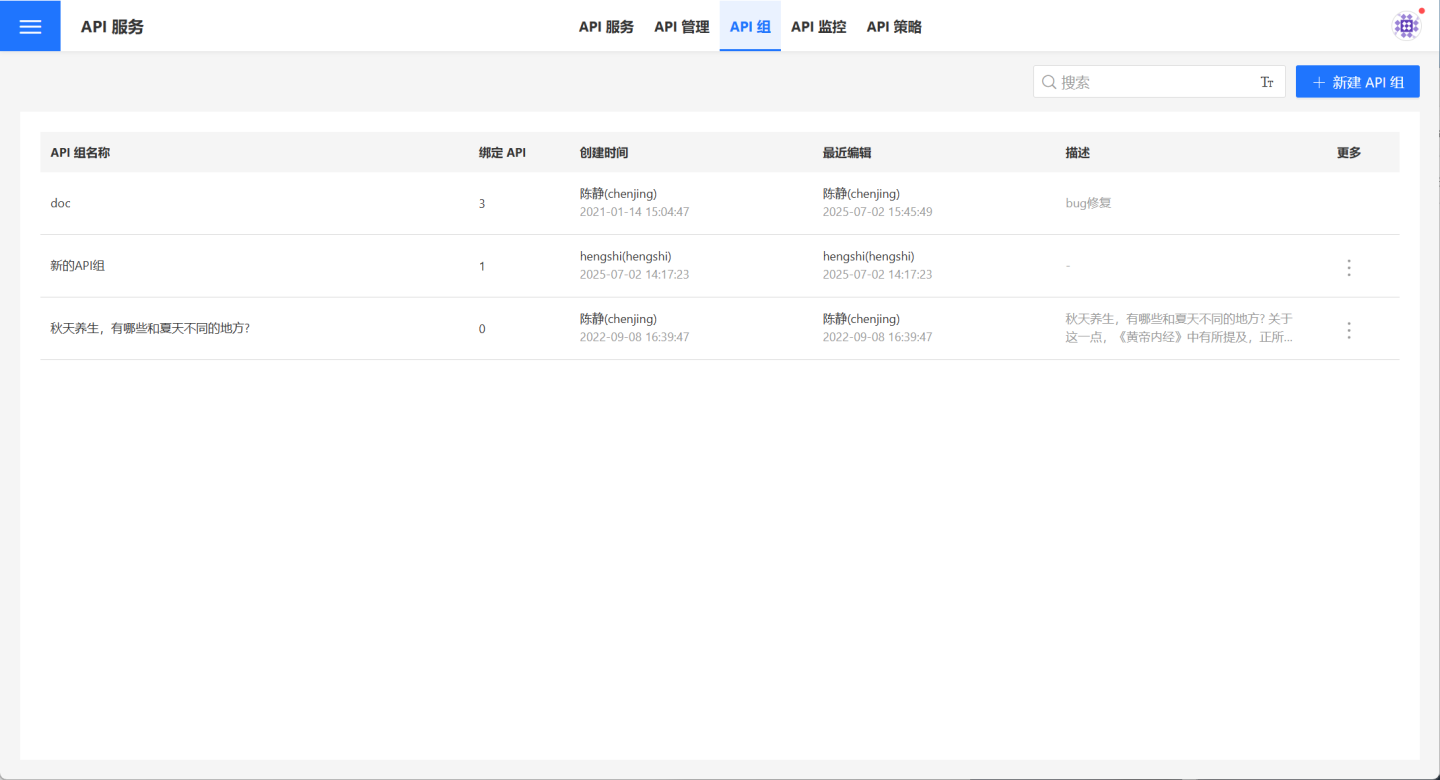
Create API Group
Users with the API management role can create API groups. Click API Service -> API Group -> + Create API Group to open the creation popup. Enter the API group name and description, and the API group will be successfully created.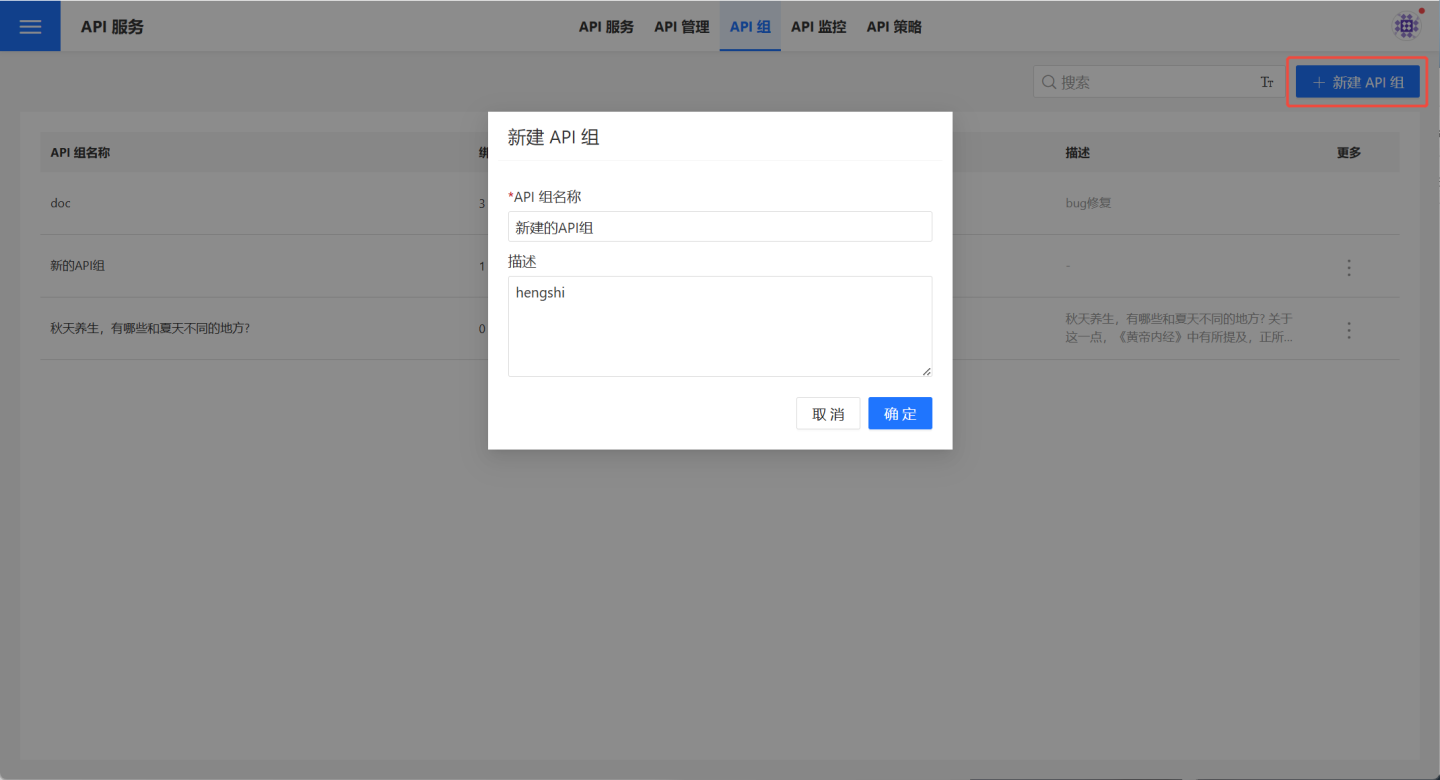
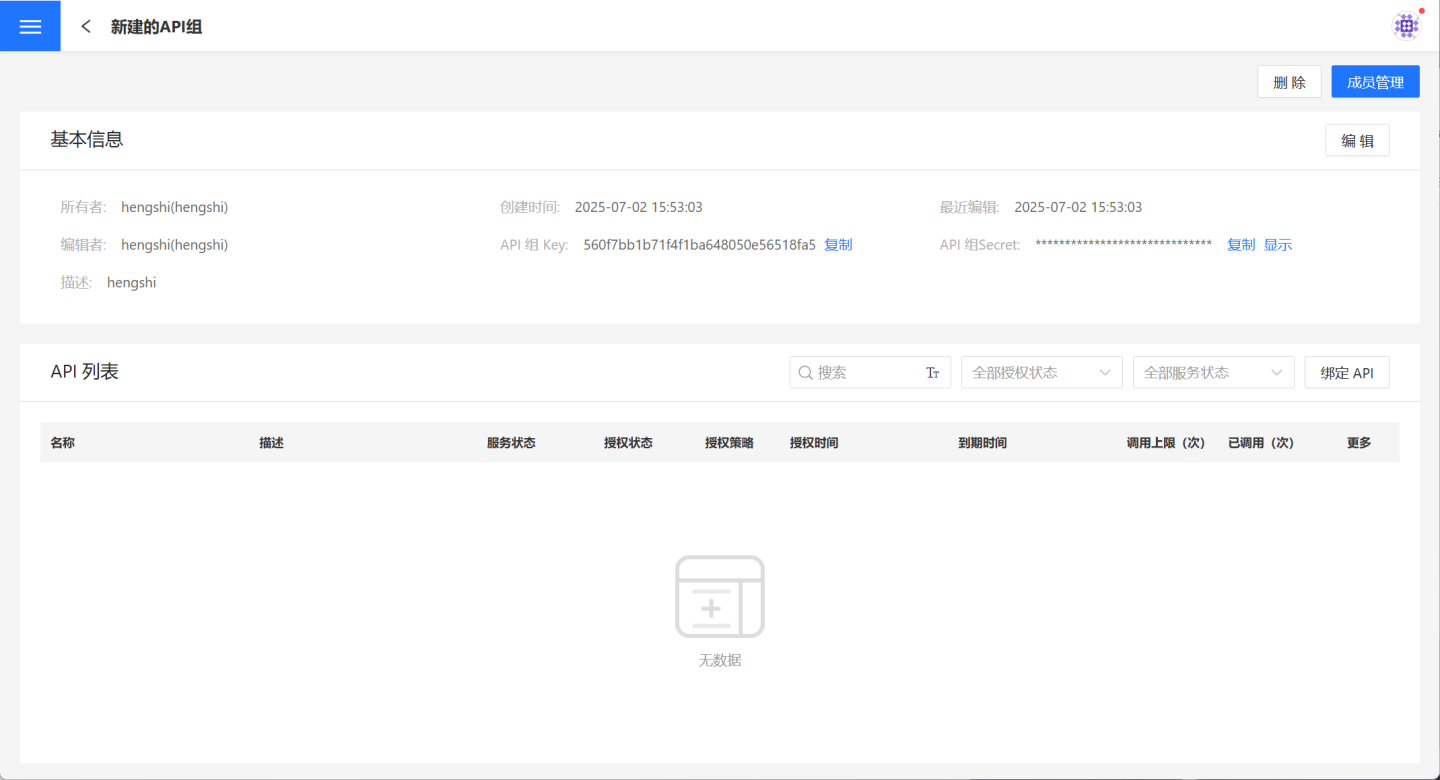
View API Group
Once the API group is created, the page will refresh to display its details page. Authorized users can also click API Service -> API Group and select a specific API group to open its details page.
The page displays the basic information, authentication details, and the list of bound APIs for the API group. The owner and administrators of the API group can perform a series of management operations such as editing, authorizing, binding APIs, and deleting. Regular users are not allowed to perform the aforementioned management operations. 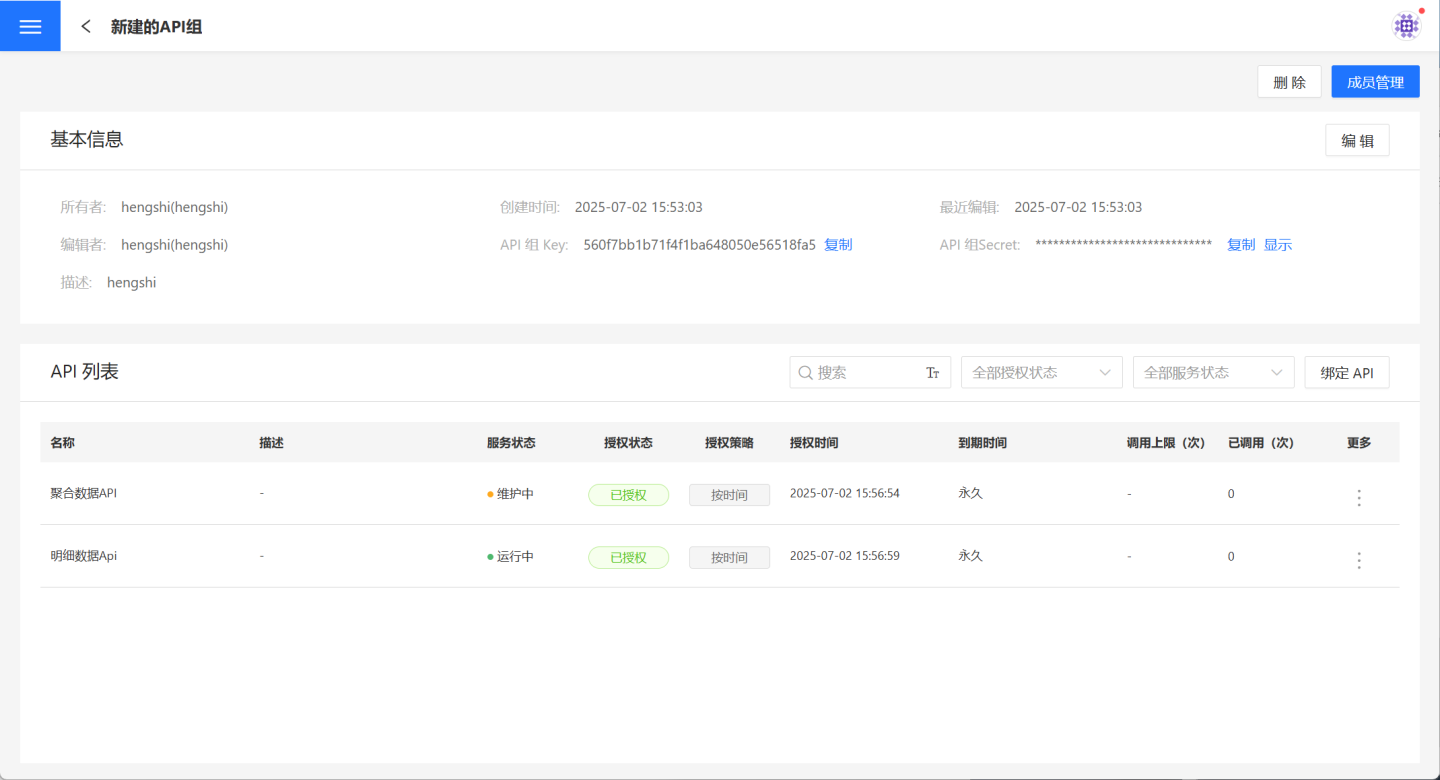
Member Management
The API group owner can click API Service -> API Group -> API Group Details Page -> Member Management to add members who need to jointly access the data in this business domain to the group. Managers can perform all management operations, including deletion, for the API group, while users can only view the information of the API group to obtain authentication information for accessing the group's APIs and the necessary URL information for calling each API. 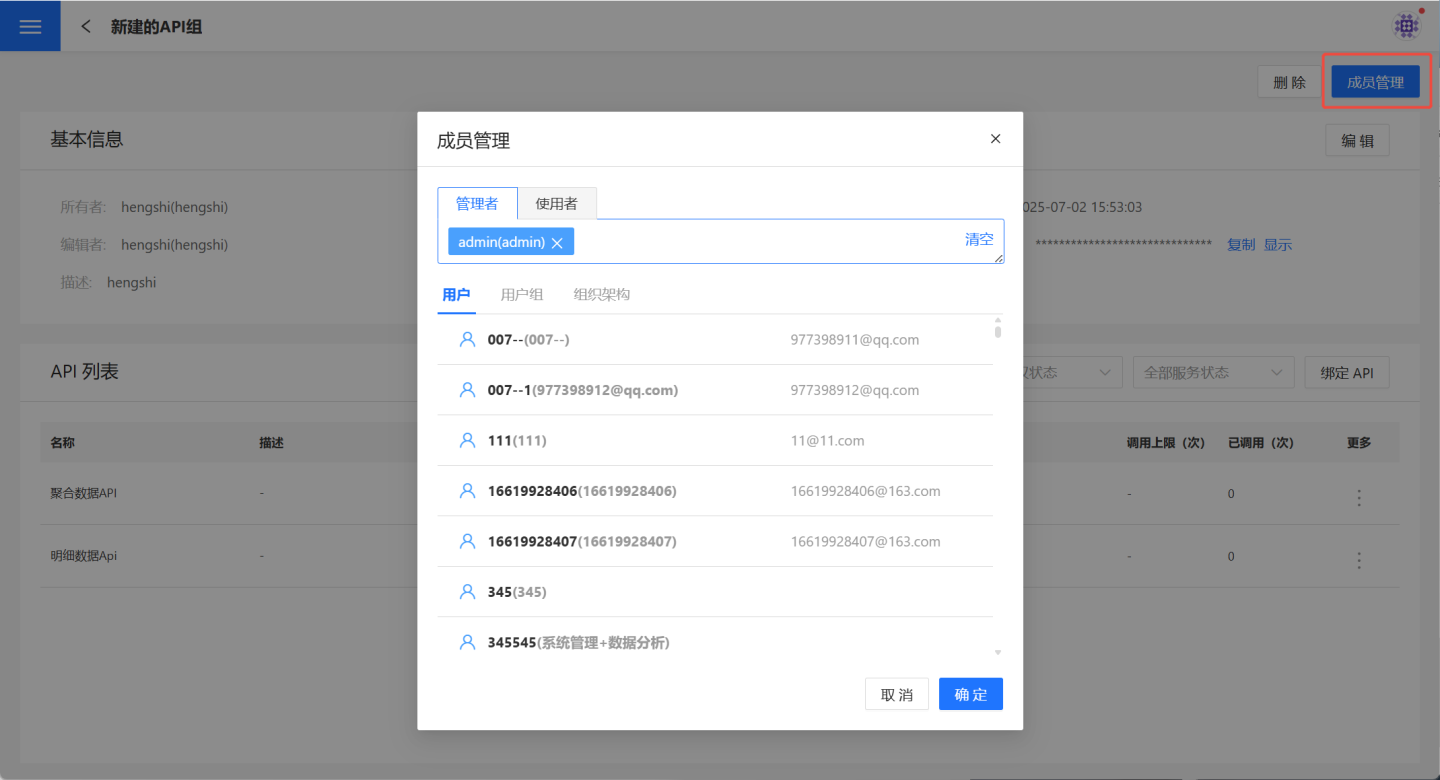
View API Group Details
Members of the API group can click API Service -> API Group -> API Group Details Page -> select an API to open the API details page within the group.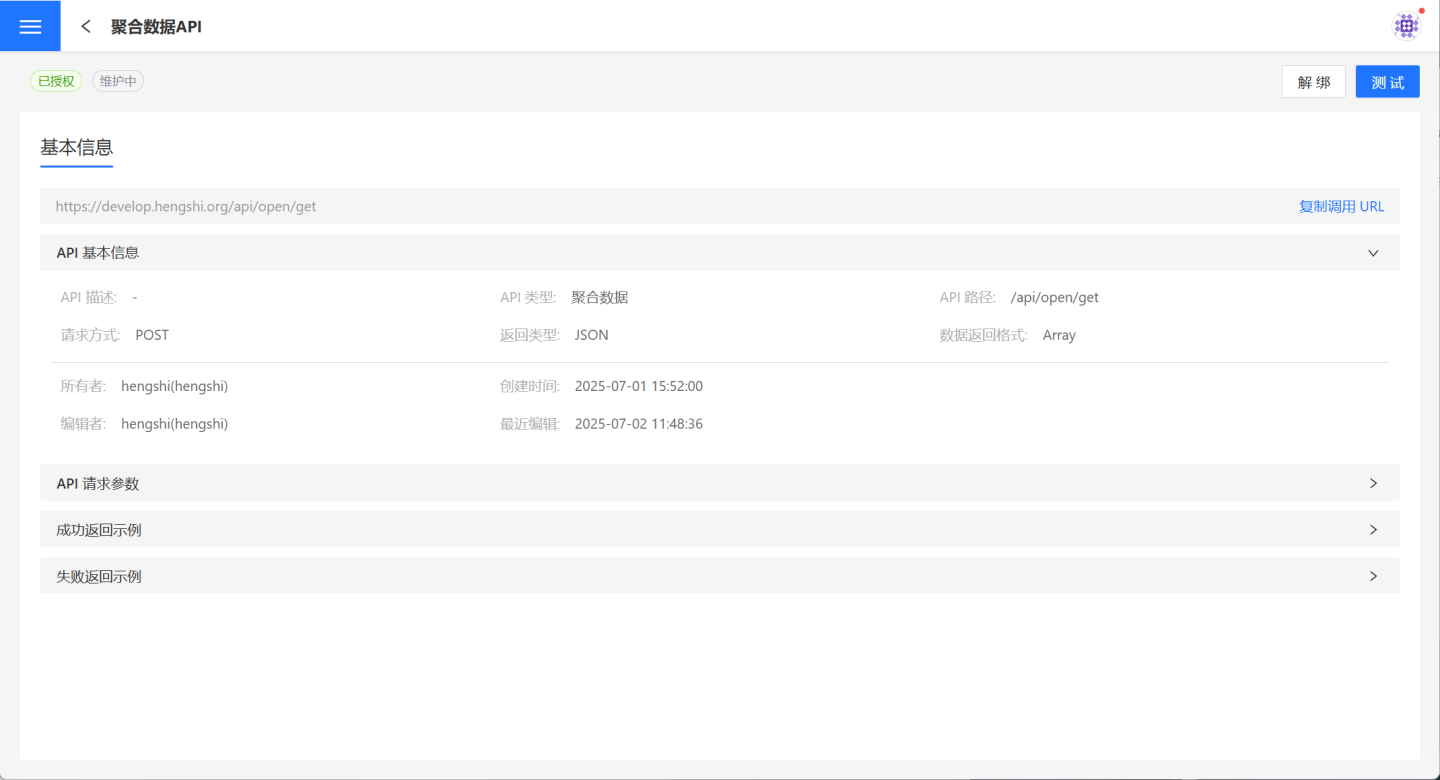
Here, API group members can test the API, view the API's URL information, and use the group's authentication details to complete the API call.
It supports unbinding the API. Once unbound, the API group will no longer be able to call the API.
Request API
The above section introduced how to create an API and bind it to the corresponding group. The following section explains how to request an API.
Apply for Token
Each API must be bound to an API group to be accessed. In the API group, you can find the Key and Secret, which are used to obtain the token. The URL for obtaining the token is http://{host}/api/oauth2/server/tokens?grant_type=client_credentials&client_id={key}&client_secret={secret}, where host is the host address.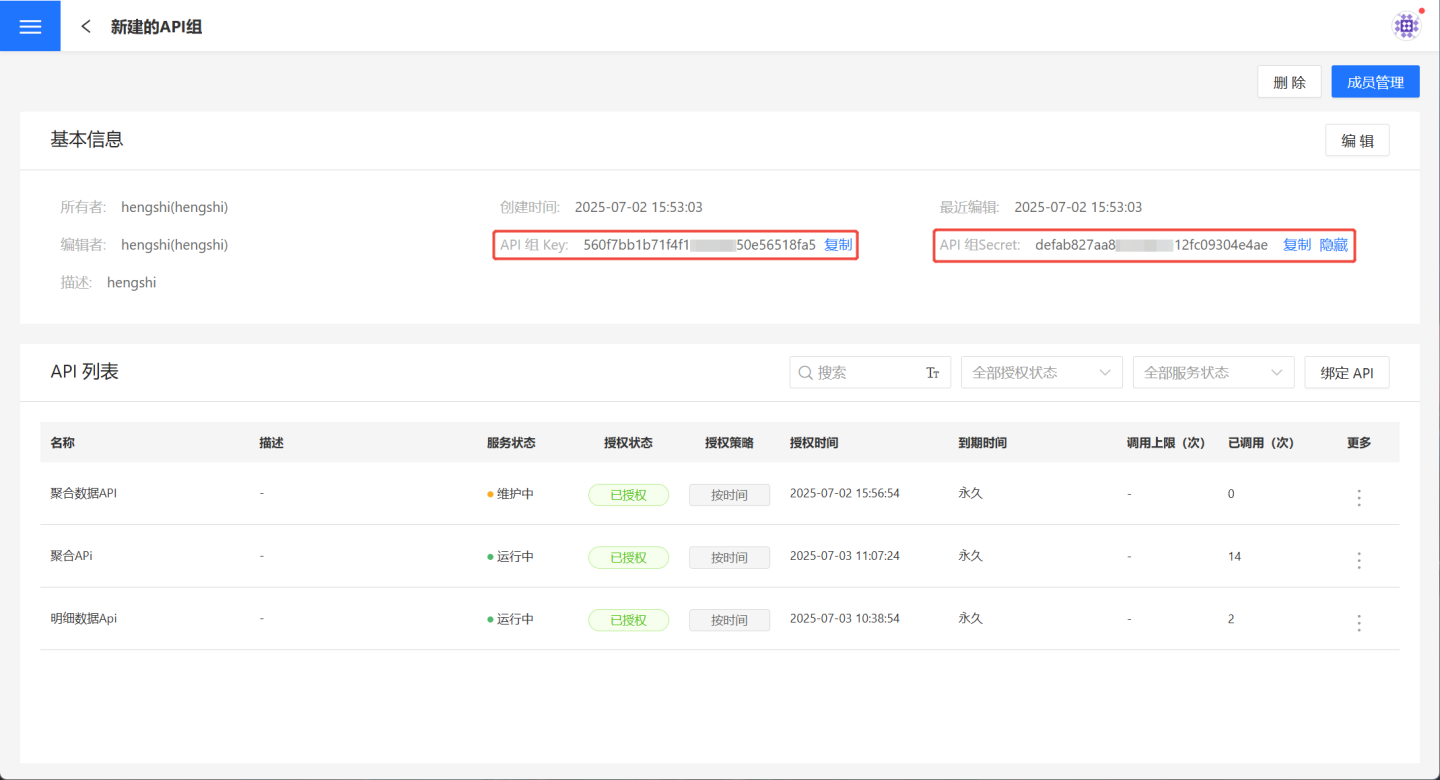
When the host is https://develop.hengshi.org, the URL constructed using the Key and Secret from the API group in the image above is https://develop.hengshi.org/api/oauth2/server/tokens?grant_type=client_credentials&client_id=560f7bb1b71f4f1******50e56518fa5&client_secret=defab827aa8********12fc09304e4ae. This URL can be used in Apifox to obtain the access_token. (Note: Apifox extracts the parameters from the URL.)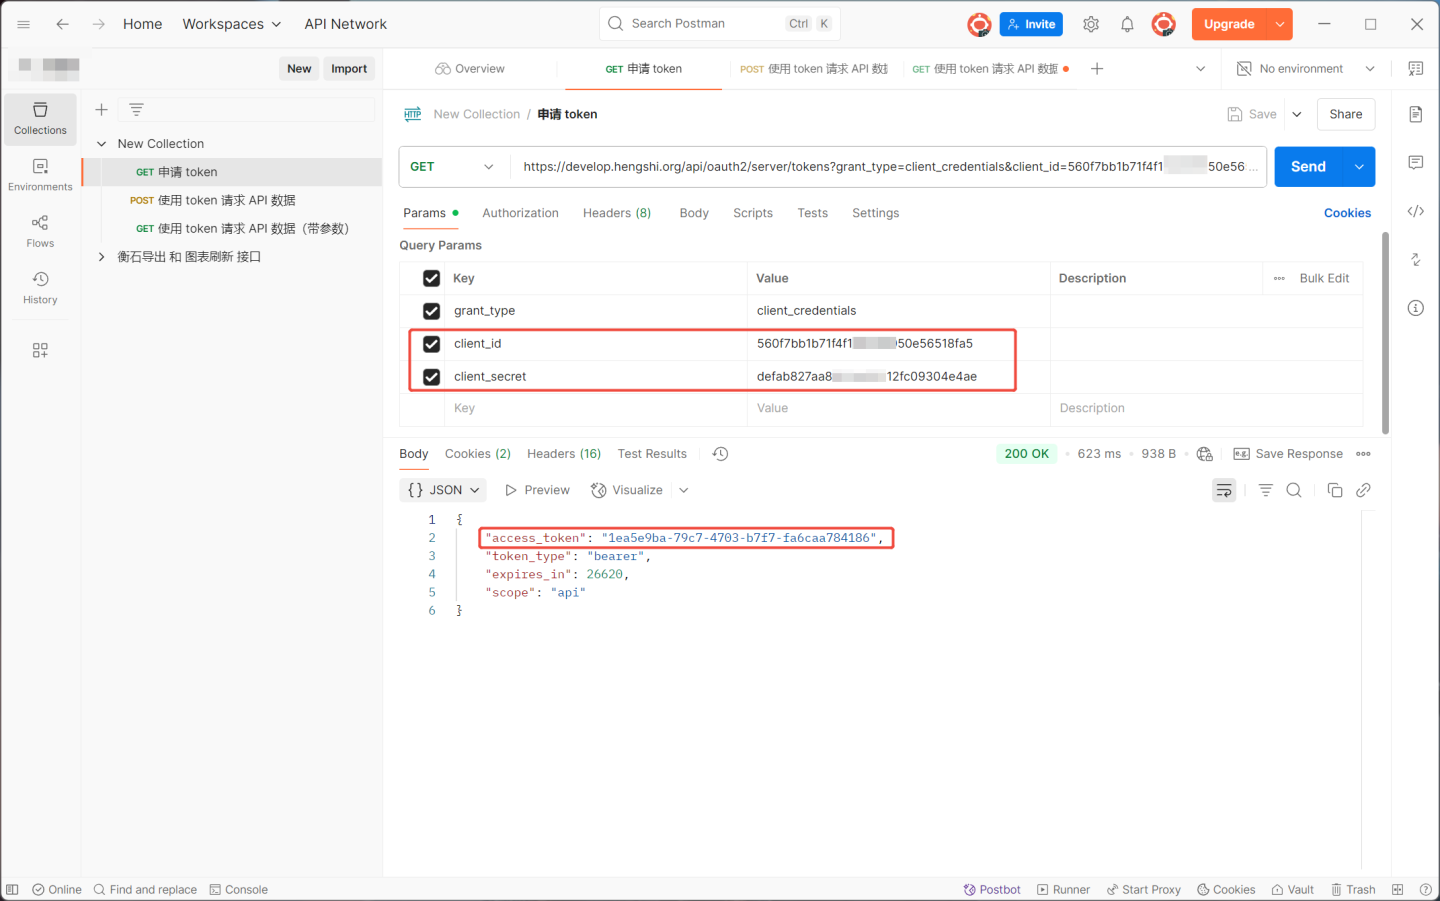
Using Token to Request API Data
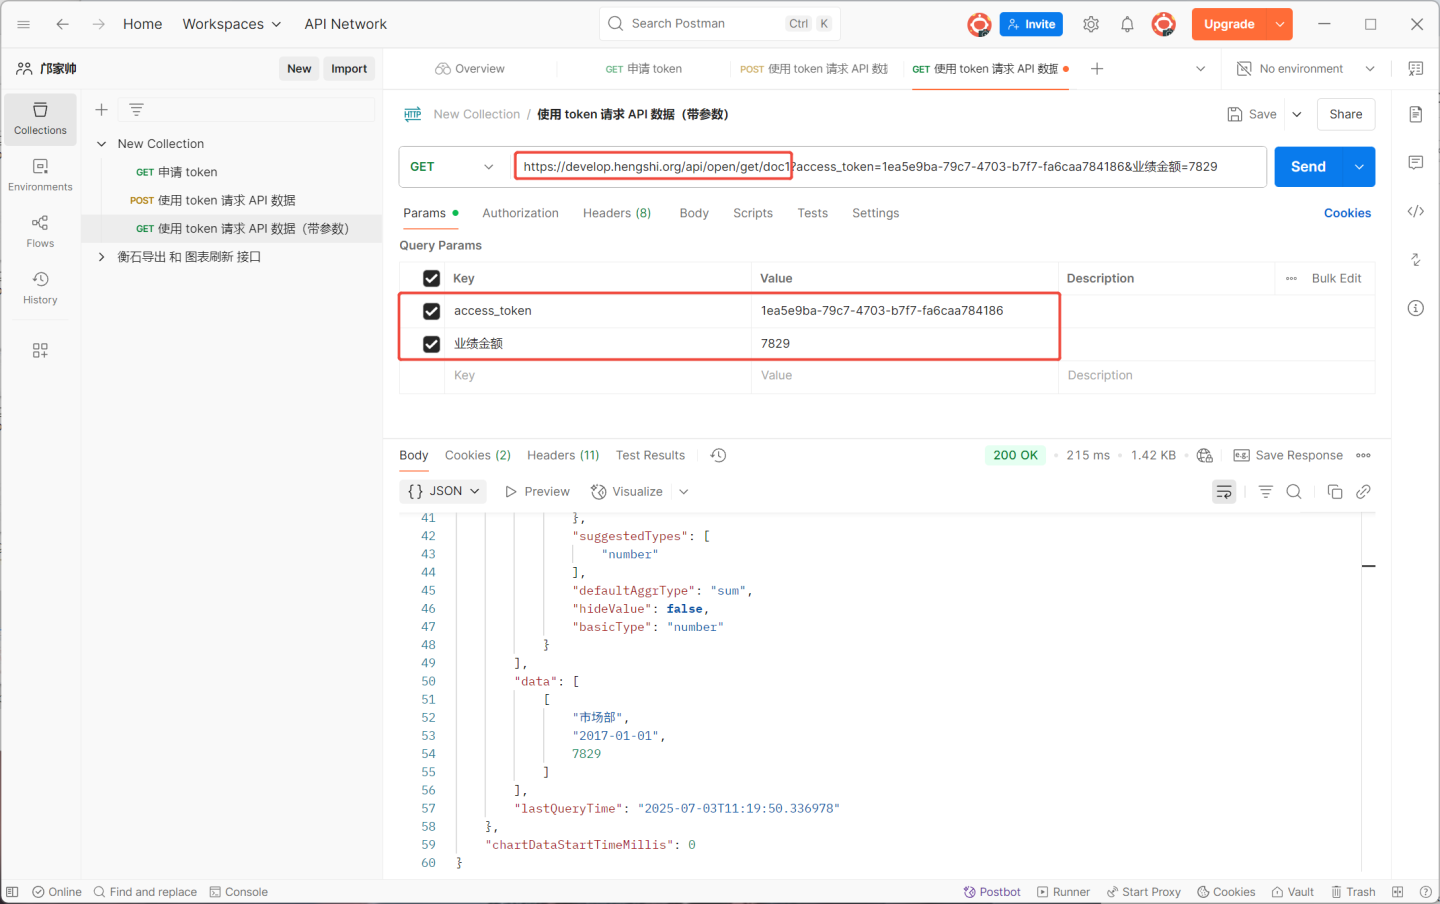
After obtaining the token, you can request the API. The API request URL is http://{host}/{path}?access_token={token}, where host is the host address and path is the API path.
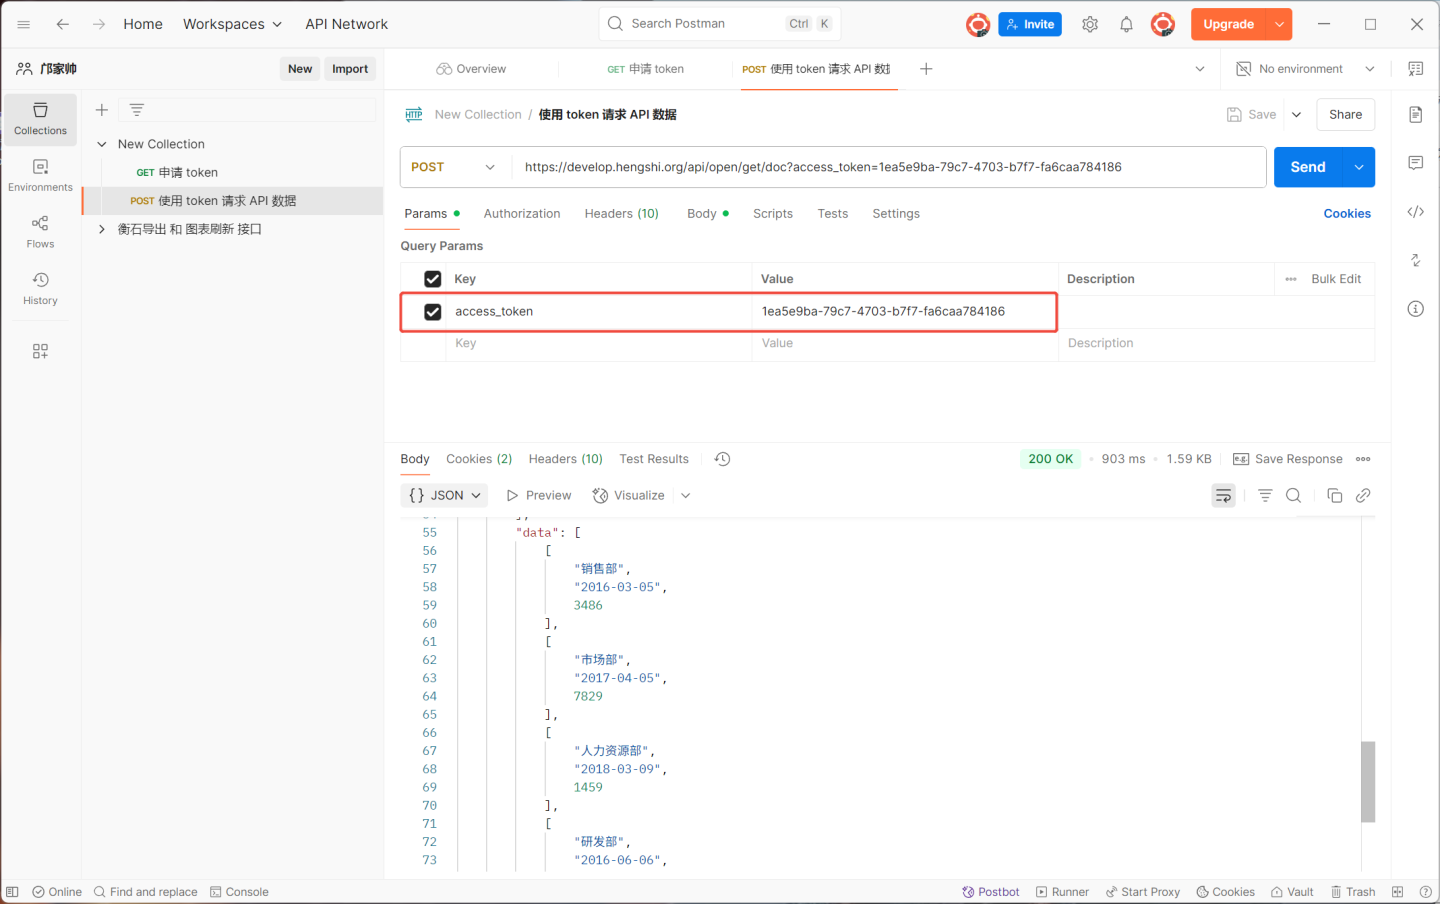
When the host is https://develop.hengshi.org and the path is /api/open/get/doc, the API request URL becomes https://develop.hengshi.org/api/open/get/doc?access_token=1ea5e9ba-79c7-4703-b7f7-fa6caa784186. Accessing the API via Apifox to retrieve data is shown in the figure below. (Note: Apifox extracts the parameters from the URL.)
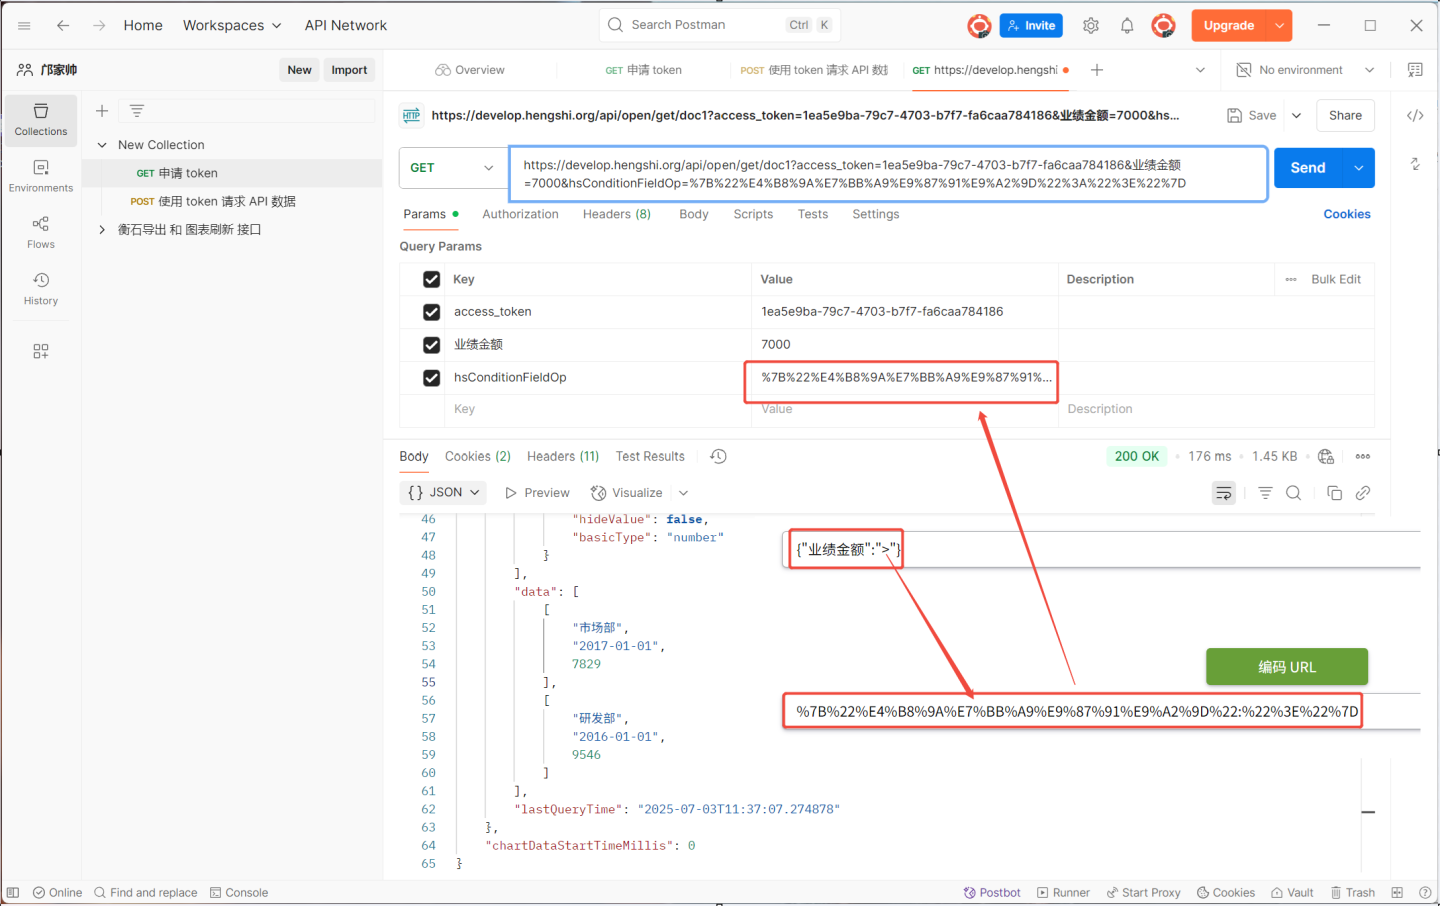
When requesting the API with parameters, the URL format is http://{host}/{path}?access_token={token}&{param}=....&hsConditionFieldOp={"{param}":"{op}"....}&hsConditionConnector=and/or. The URL needs to include parameter values and operators. In the example above, to view information where 业绩金额>7000, the URL becomes https://develop.hengshi.org/api/open/get/doc1?access_token=1ea5e9ba-79c7-4703-b7f7-fa6caa784186&业绩金额=7000&hsConditionFieldOp={"{业绩金额}":"{>}"}. When accessing the URL, the value of the connector hsConditionFieldOp must be URL-encoded. Therefore, the final URL used is https://develop.hengshi.org/api/open/get/doc1?access_token=1ea5e9ba-79c7-4703-b7f7-fa6caa784186&业绩金额=7000&hsConditionFieldOp=%7B%22%E4%B8%9A%E7%BB%A9%E9%87%91%E9%A2%9D%22%3A%22%3E%22%7D.
Tip
- Custom query API parameters use the format {{##apiParam}}.
- Configuration parameters available for API requests:
hsConditionFieldOp(not available for custom query APIs):{"{param}":"{op}"....}. This allows specifying the operator{op}for the custom parameter{param}, e.g.,{"director":"!="}is equivalent towhere director != xxx.hsConditionConnector(only available for detail APIs):and/or. This allows specifying the connector between parameters asandoror.
API Monitoring
Users can also view the overall status of all API services through the API Monitoring tab page.
API Strategy
Flow Control Strategy
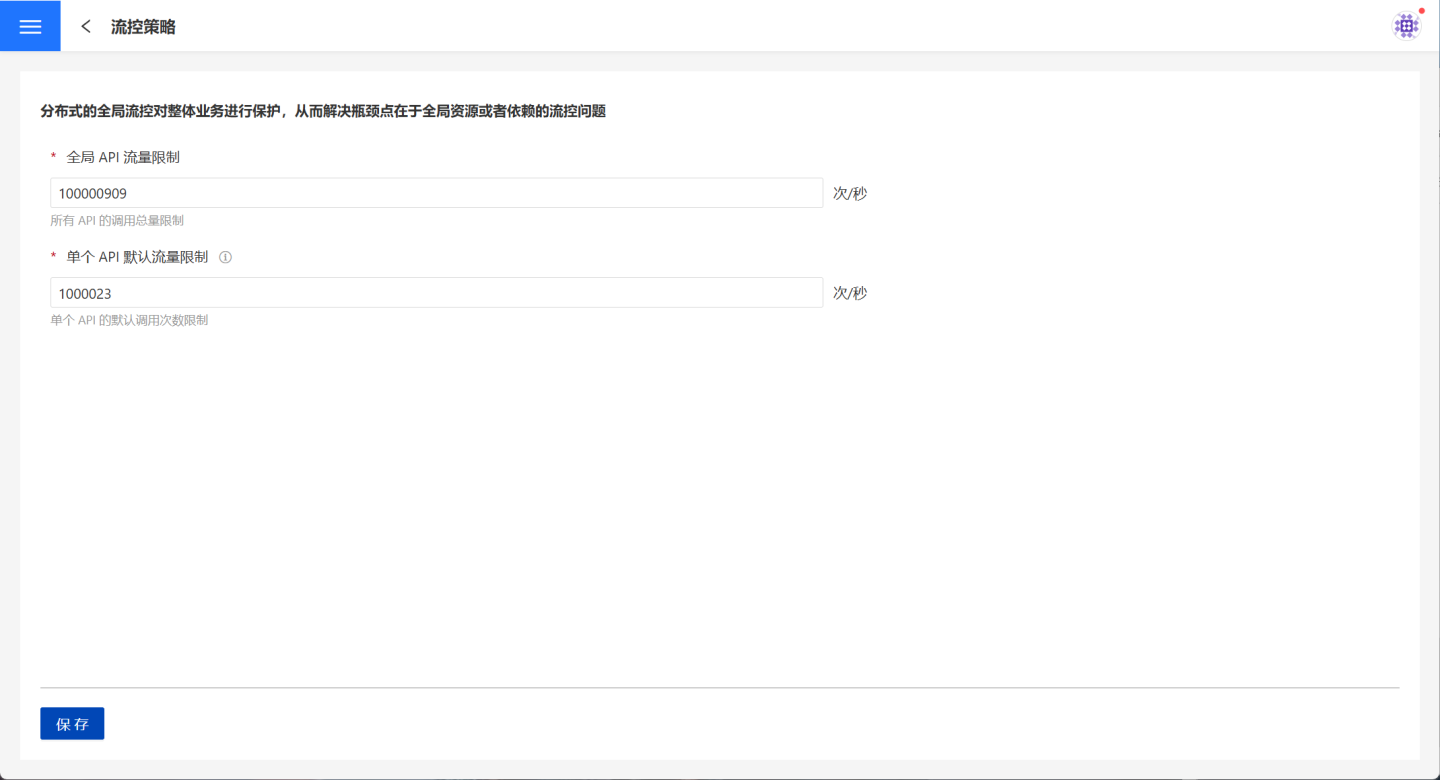
The API flow control strategy refers to limiting API traffic, including restrictions on overall API traffic and individual API traffic, to prevent excessive API scheduling from affecting the normal operation of the system and to protect system resources.
In the flow control strategy, you can set global API traffic limits and default traffic limits for individual APIs.
Global API Traffic Limit: This controls the total traffic of all APIs in the system, ensuring that the total traffic does not exceed the global API traffic setting. APIs exceeding this limit will be denied access.
Default Traffic Limit for Individual APIs: This sets the default maximum access traffic for a single API in the system, which applies to all APIs.
API Traffic Limitation
The flow control strategy limits API traffic from a global perspective. Each API can individually control its own traffic. For detailed instructions, please refer to API Flow Control.
API Traffic Control Description
Each API is controlled by three traffic metrics: Global API Traffic Limit, API Traffic Limit, and API Group Traffic Limit. The relationship among these three is as follows: 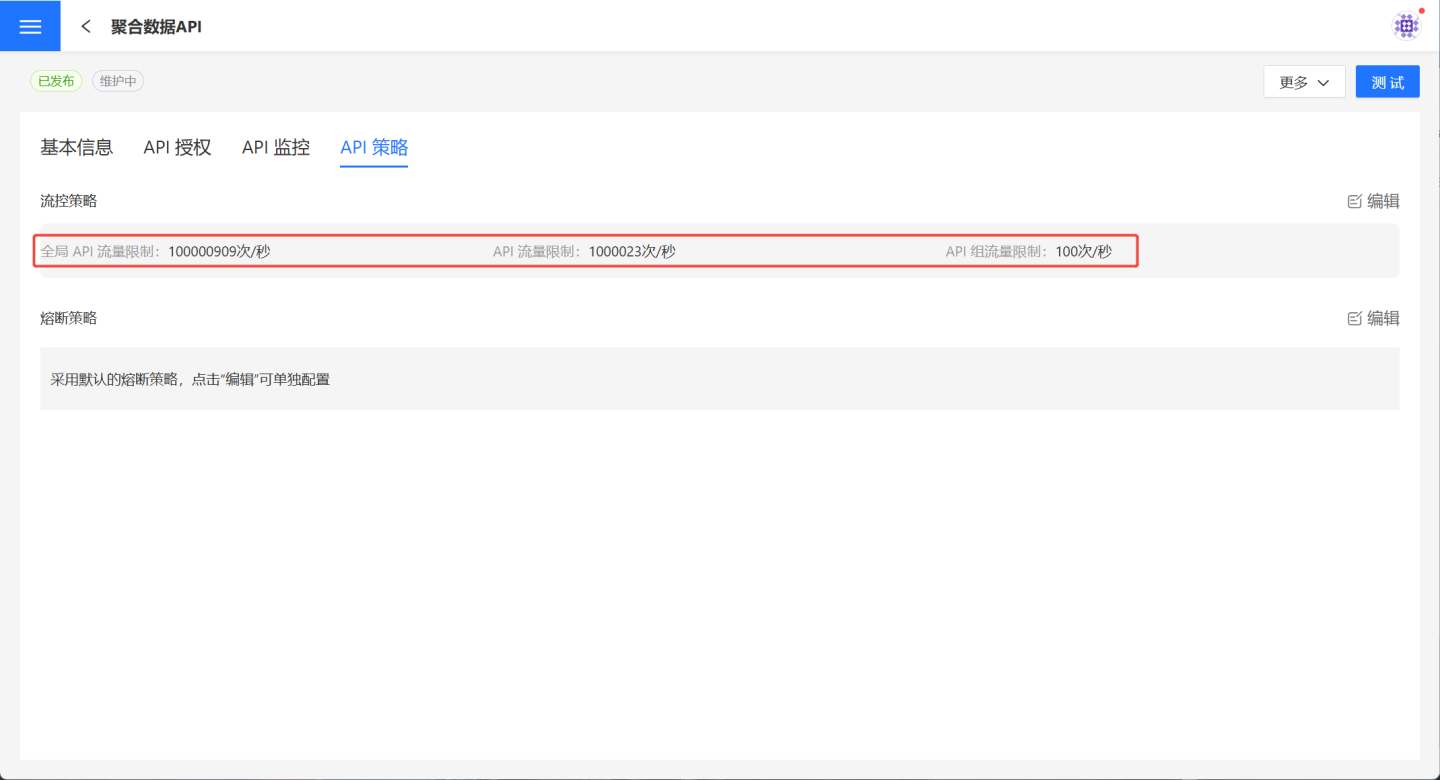
- The API Traffic Limit value cannot exceed the Global API Traffic Limit value.
- The API Group Traffic Limit value cannot exceed the API Traffic Limit value.
The API may be denied access under the following circumstances:
- An API Group has not reached the traffic limit for API access frequency, but the specific API's access frequency has reached its traffic limit. In this case, the API Group cannot continue accessing the API.
- A specific API's access frequency has not reached its traffic limit, but the total value of all APIs combined has reached the traffic limit. In this case, the API cannot continue to be accessed.
Circuit Breaker Strategy
During API calls, environmental factors may cause request failures. Upon receiving failure messages, the requester might continuously send requests, leading the system to frequently process request messages. When multiple APIs in the system encounter similar situations, the system may process a large number of request messages in a short period, potentially causing system crashes in extreme cases. To address this issue, the API circuit breaker functionality has been introduced, allowing requests to fail quickly within a certain period to prevent system disruptions and protect system stability.
Users can configure the system's APIs uniformly through Global API Circuit Breaker or set up circuit breaker rules for individual APIs via Single API Circuit Breaker. Below is a detailed introduction to the API circuit breaker rules.
Circuit Breaker Rules
When the API circuit breaker is enabled, within the statistical duration, if the number of requests exceeds the minimum request threshold and the proportion of abnormal requests exceeds the circuit breaker threshold, all requests will fail quickly during the circuit breaker duration. After the circuit breaker duration, attempts will be made to resume requests. 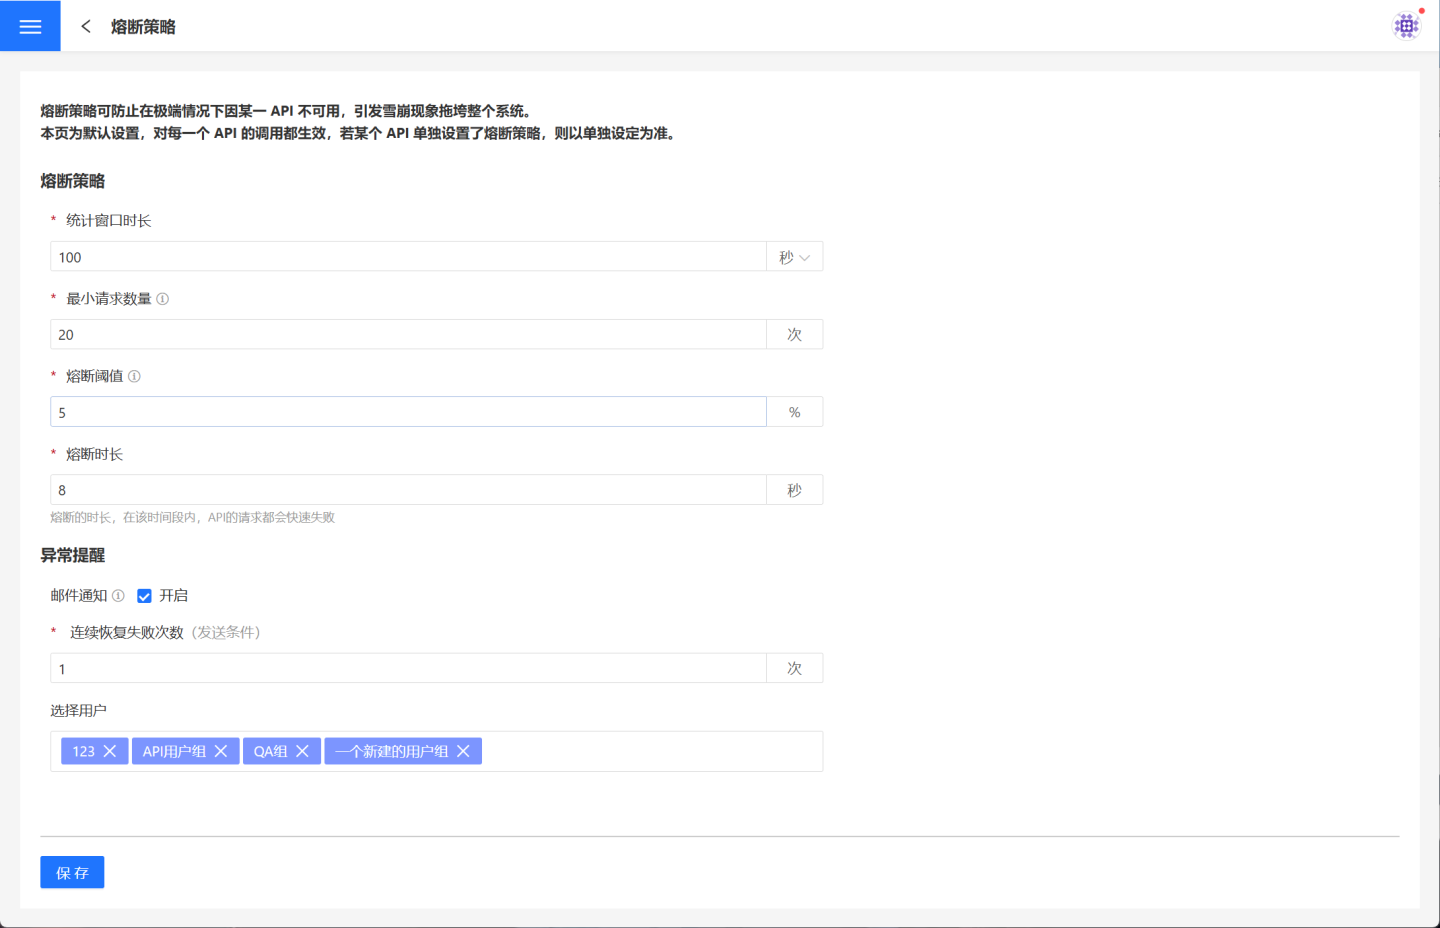
The information required for circuit breaker configuration is shown in the table below.
| Parameter Name | Parameter Description |
|---|---|
| Statistical Window Duration | The time window within which API request counts are calculated, measured in seconds or minutes. |
| Minimum Request Threshold | The number of requests required to trigger the circuit breaker. The circuit breaker will not be enabled if the number of requests within the statistical window duration is less than the minimum request threshold. |
| Circuit Breaker Threshold | The abnormal request ratio that triggers the circuit breaker. |
| Circuit Breaker Duration | The duration of the circuit breaker, measured in seconds. During this time, API requests will fail quickly. |
When the API is in a circuit breaker state, all API requests will fail quickly. After the circuit breaker duration, attempts will be made to resume API request processing. If the API request processing succeeds, the circuit breaker ends; otherwise, it returns to the circuit breaker state.
Global API Circuit Breaker Settings
Global API circuit breaker settings refer to the overall configuration of circuit breaker rules for APIs, which take effect for all APIs once set. The circuit breaker rules can be configured under API Service -> API Strategy -> Circuit Breaker Strategy, and these rules apply to all APIs.
Single API Circuit Breaker Settings
Single API circuit breaker settings refer to configuring circuit breaker rules for a specific API. Once the rules are set, the API will not be subject to the global API circuit breaker rules. For detailed settings, please refer to API Circuit Breaker.
Circuit Breaker Exception Notification
When the API is in a circuit breaker state, requests to the API will fail quickly. After the circuit breaker duration is reached, subsequent API requests will attempt to recover. If the request fails, the circuit breaker will be reactivated. If multiple consecutive attempts to recover the API fail, the API can be considered to be in an abnormal state, and an email notification can be sent to alert users of the exception.
Exception notifications can be configured with the number of consecutive recovery failures and email recipients. When the number of consecutive recovery failures reaches the set threshold, an email notification will be sent to the corresponding users.
API Import and Export
In practical use, users may deploy multiple environments, and each environment requires the creation of numerous API services for the same business processes, leading to a lot of repetitive work. To address this situation, the API import and export functionality is introduced, allowing users to easily import APIs from one environment to another, saving the effort of repeated development. Below is a detailed introduction to the API import and export process.
API Export
API export allows you to export APIs in JSON format for easy import into other environments. Please follow the instructions below to complete the API export.
In API Management, click the red box in the image to enter the batch operation page.
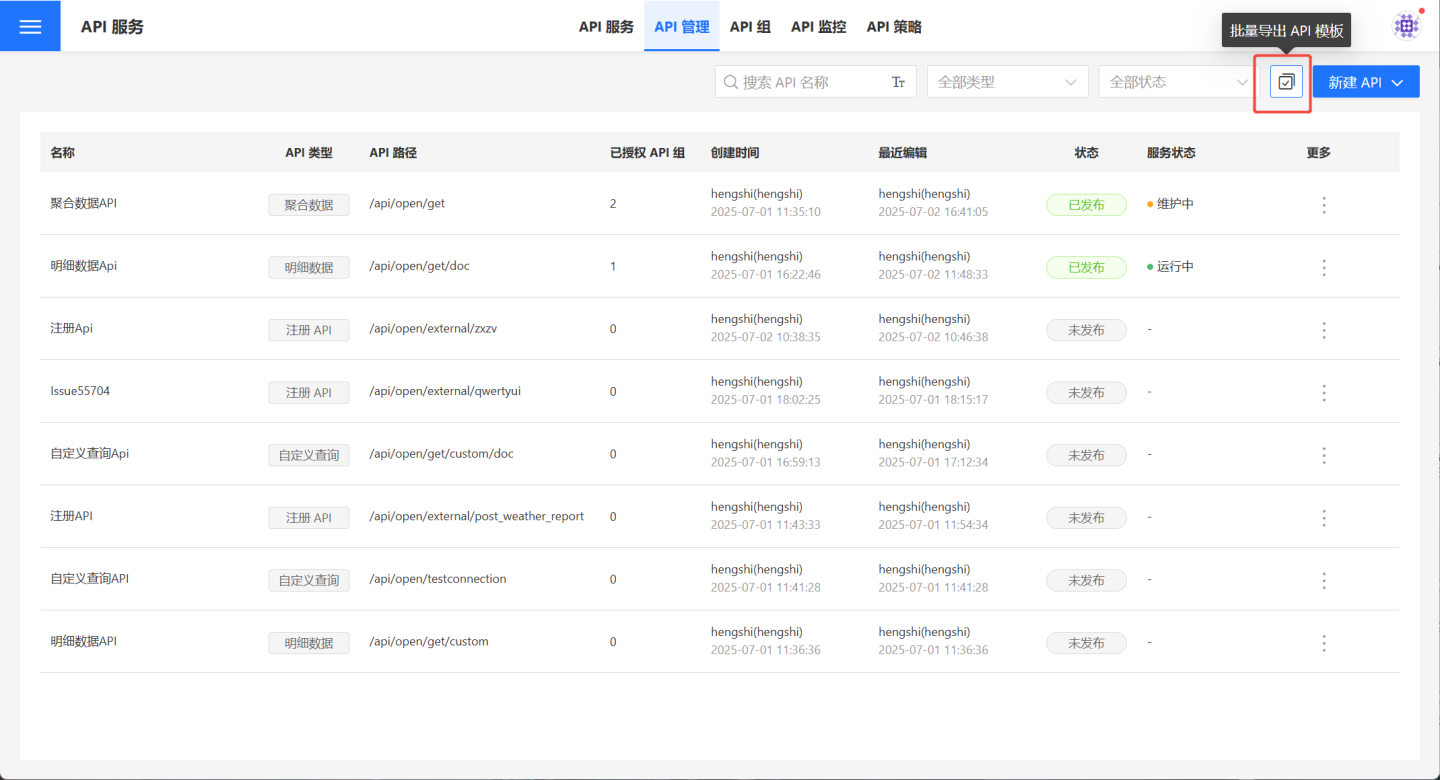
On the batch operation page, you can quickly filter APIs using
Search,API Type, andPublish Statusin the upper right corner. Then, select the APIs you want to export from the filtered results. Selecting all is supported.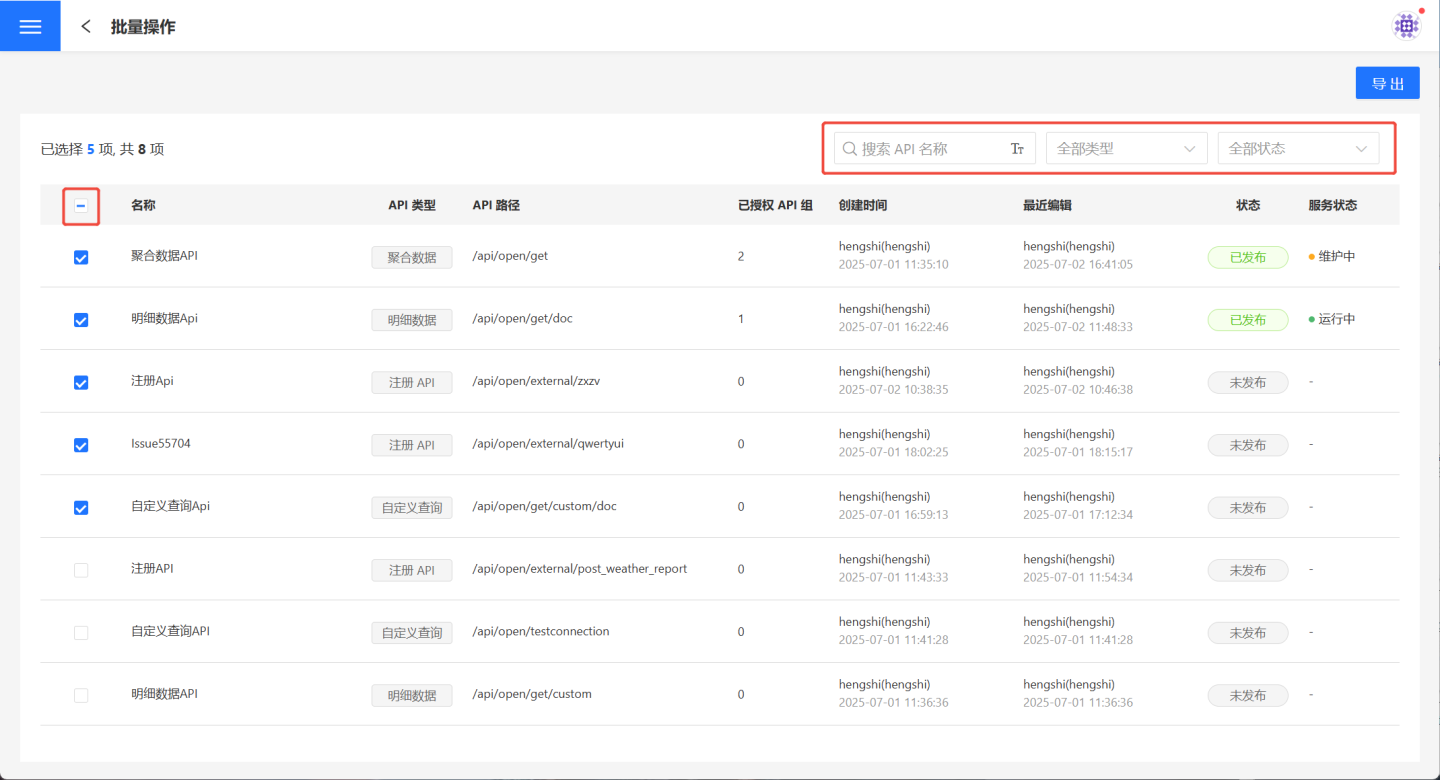
Click Export, and the selected APIs will be exported in JSON format.
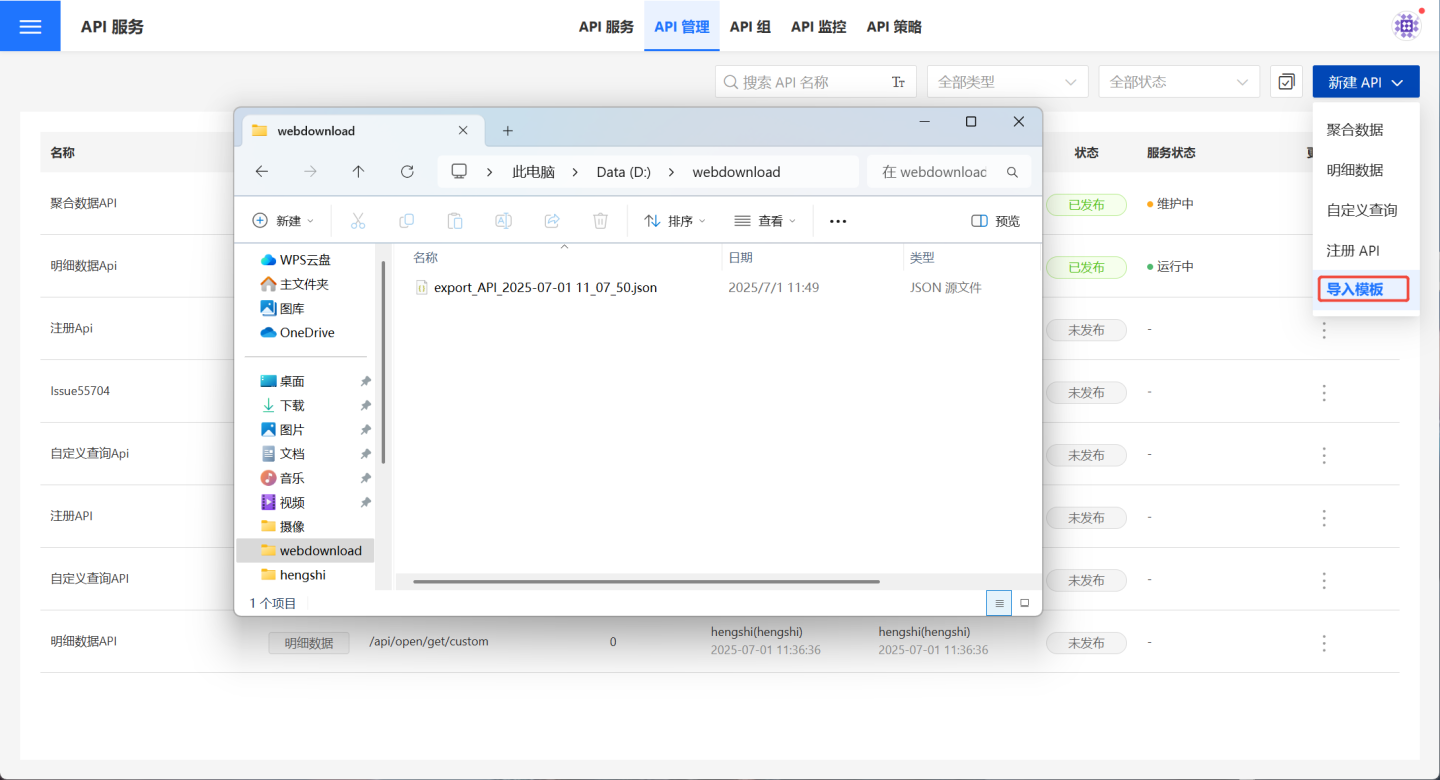
API Import
API Import allows you to import the exported API JSON file into the system. Follow the steps below to complete the API import process.
In API Management, click New API -> Import Template, then select the API template file.
After importing the template file, three import results will be displayed:
Import Successful,Import Failed, andImported with Configuration Issues.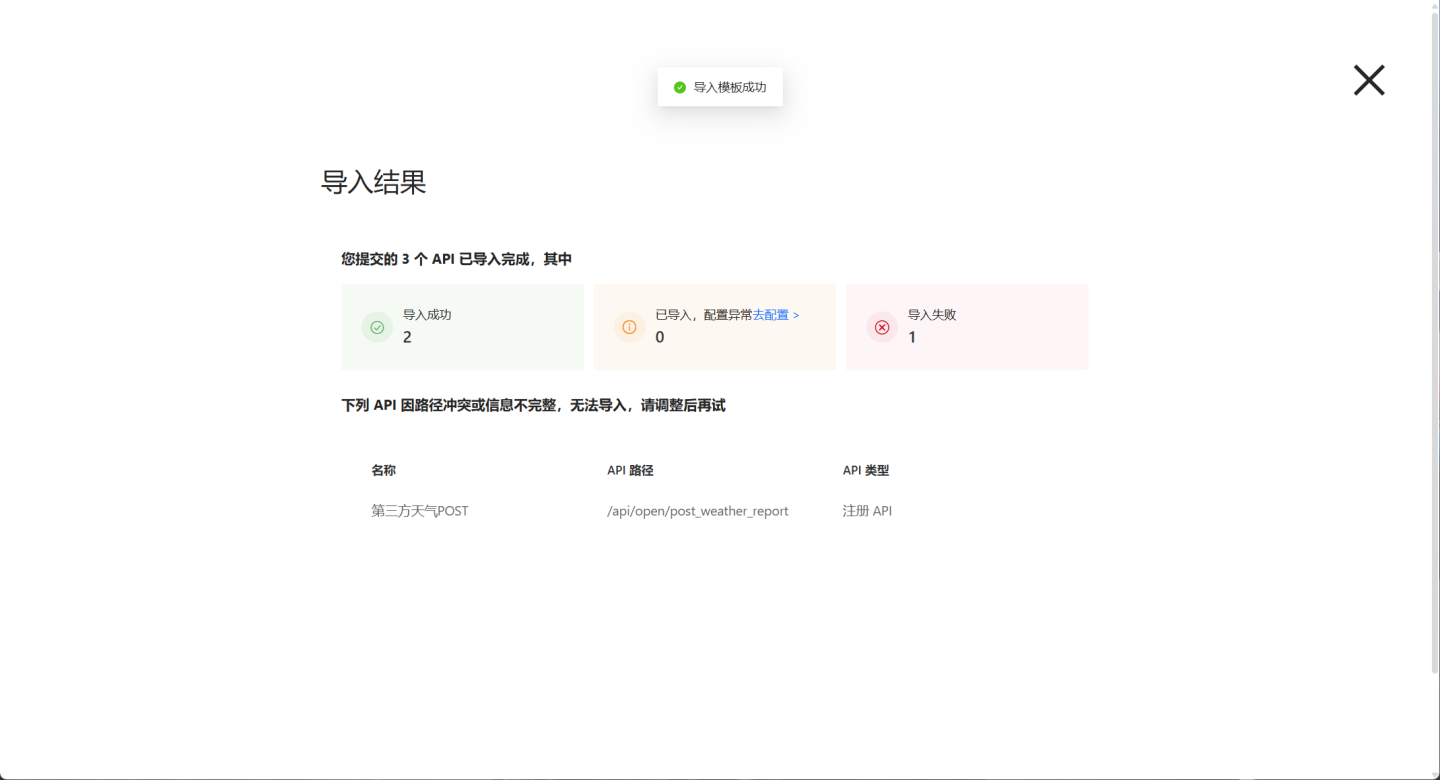
APIs marked as
Import Successfulare in an unpublished state and require testing before being published for use.APIs marked as
Import Failedmay have issues such as API path conflicts or incomplete information. Please modify and re-import them.APIs marked as
Imported with Configuration Issuesmay have certain configuration errors that need to be resolved. For example, as shown in the image, the API import may display configuration issues due to missing original charts or datasets. You need to reconfigure the problematic items. After modification, the API will remain in an unpublished state and requires testing before publishing.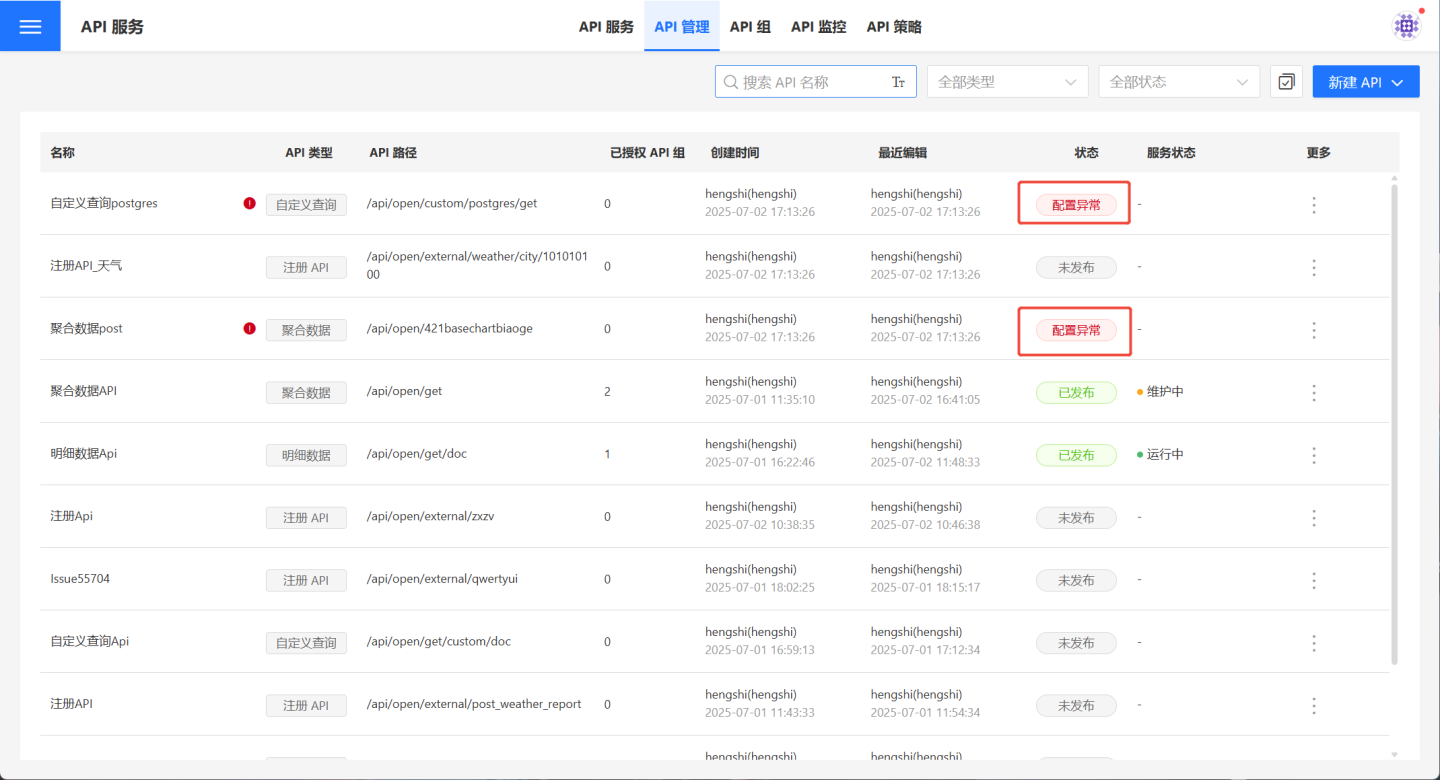
Note
API Import helps users avoid creating duplicate APIs. However, imported APIs are in an unpublished state and require users to test and publish them for use.
Execute Query
Members of the API group can call APIs within the group using the unified authentication information through the group's API URL. Follow these steps:
Click
API Service->API Group->API Group Details Pageto open the API group details page and retrieve the authentication information of the API group.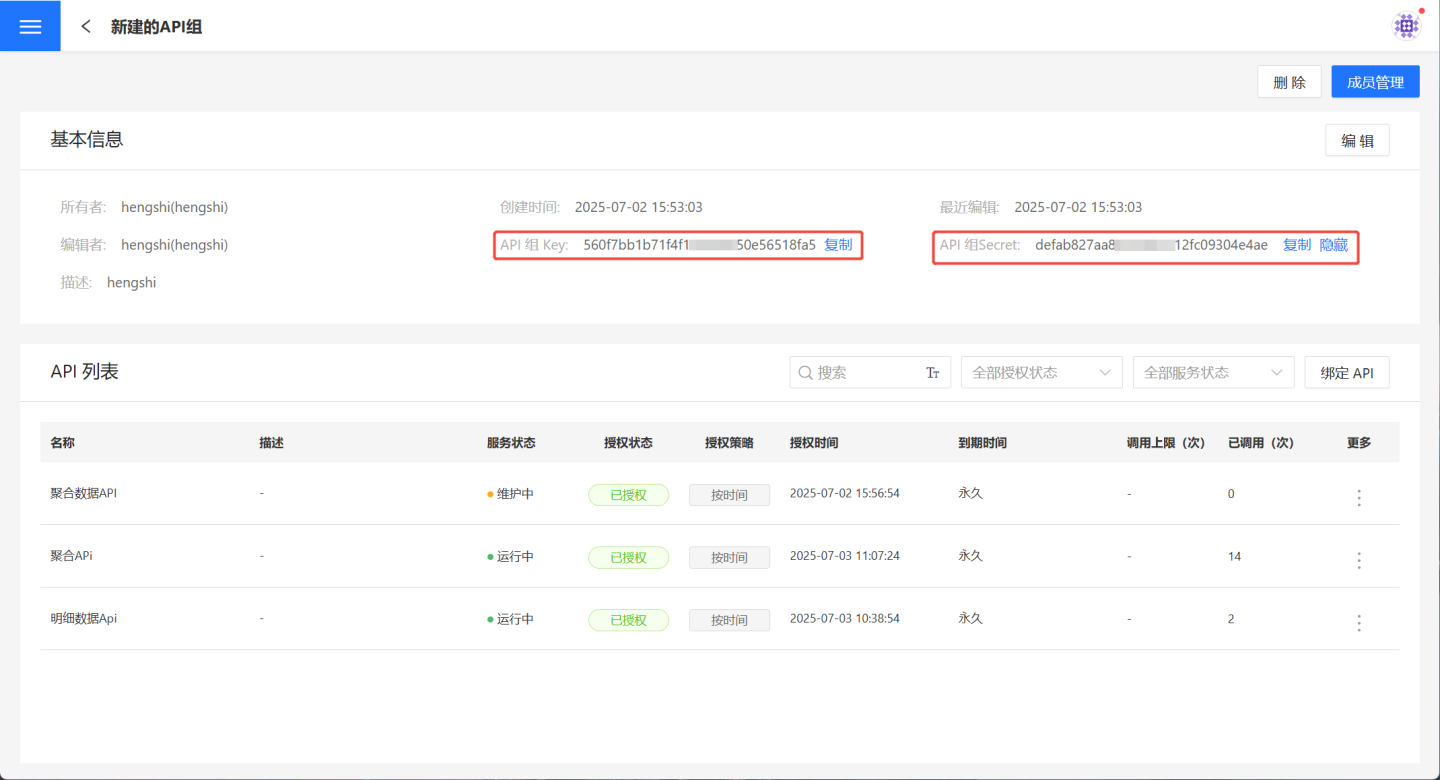
Use the API group's key and secret to generate a token.

On the API group details page from step 1, select the API you intend to call, open the API details page, and copy the URL address.
Append the token from step 2 to the API's URL address. If request parameters need to be defined, they should also be appended to the URL address.
Complete the API call.
Please Note
The authentication information of the API group cannot be used to call Open API interfaces within the HENGSHI SENSE system; it can only be used to call APIs within the API group.