App Creation
Users can create apps in various ways, depending on different scenarios.
Create a Blank App
Creating a blank app means creating an empty app without any datasets or dashboards.
Click App Creation at the top right of the page and select New App. You can create three types of blank apps: Analysis App, Query App, and Report App. The newly created blank app will be empty, requiring users to add their own Dataset and create corresponding content. 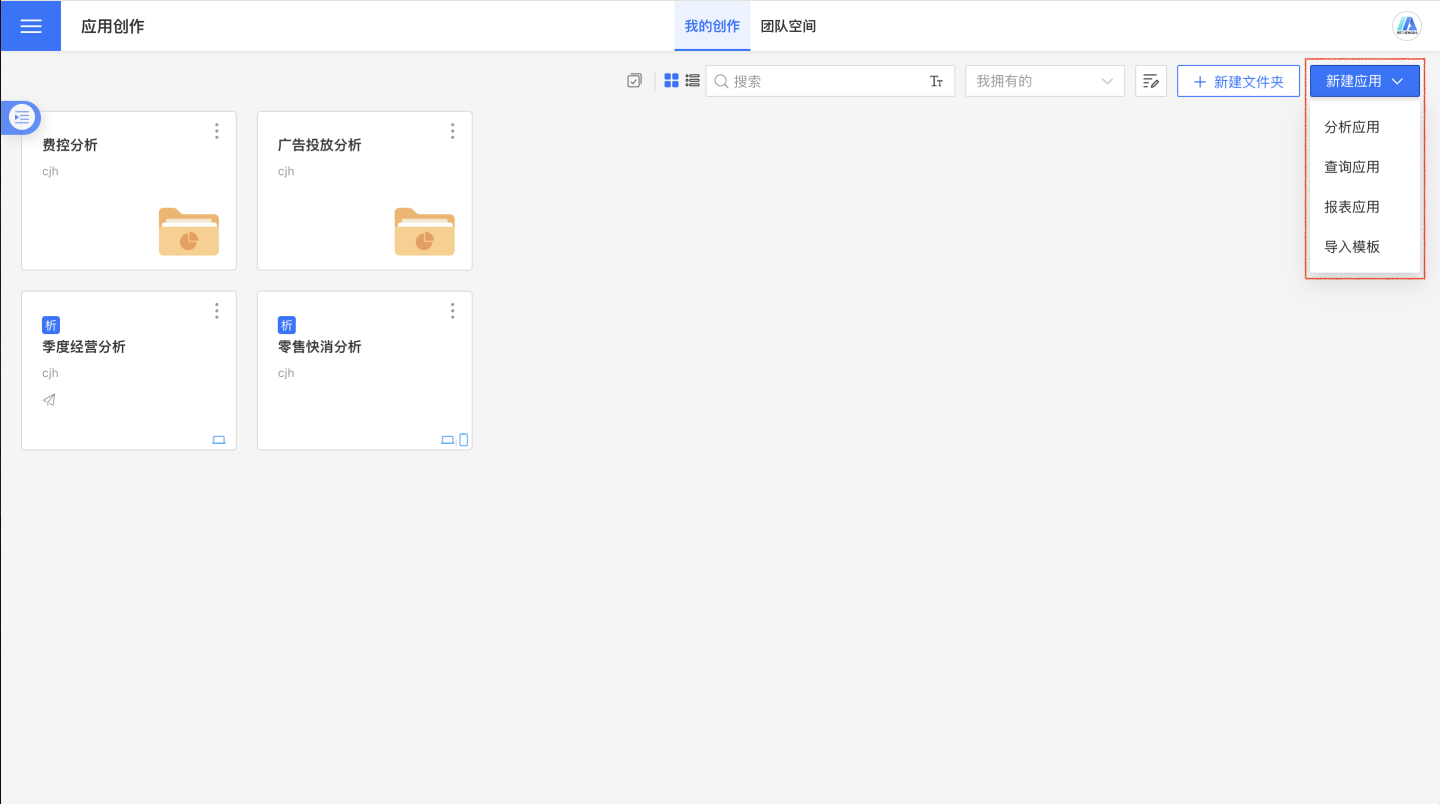
Analysis App
The Analysis App is a commonly used tool for analysts, enabling users to create datasets, process data, build various data models, create different types of charts, and analyze business situations. Users need to add a Dataset and create a Dashboard.
Query App
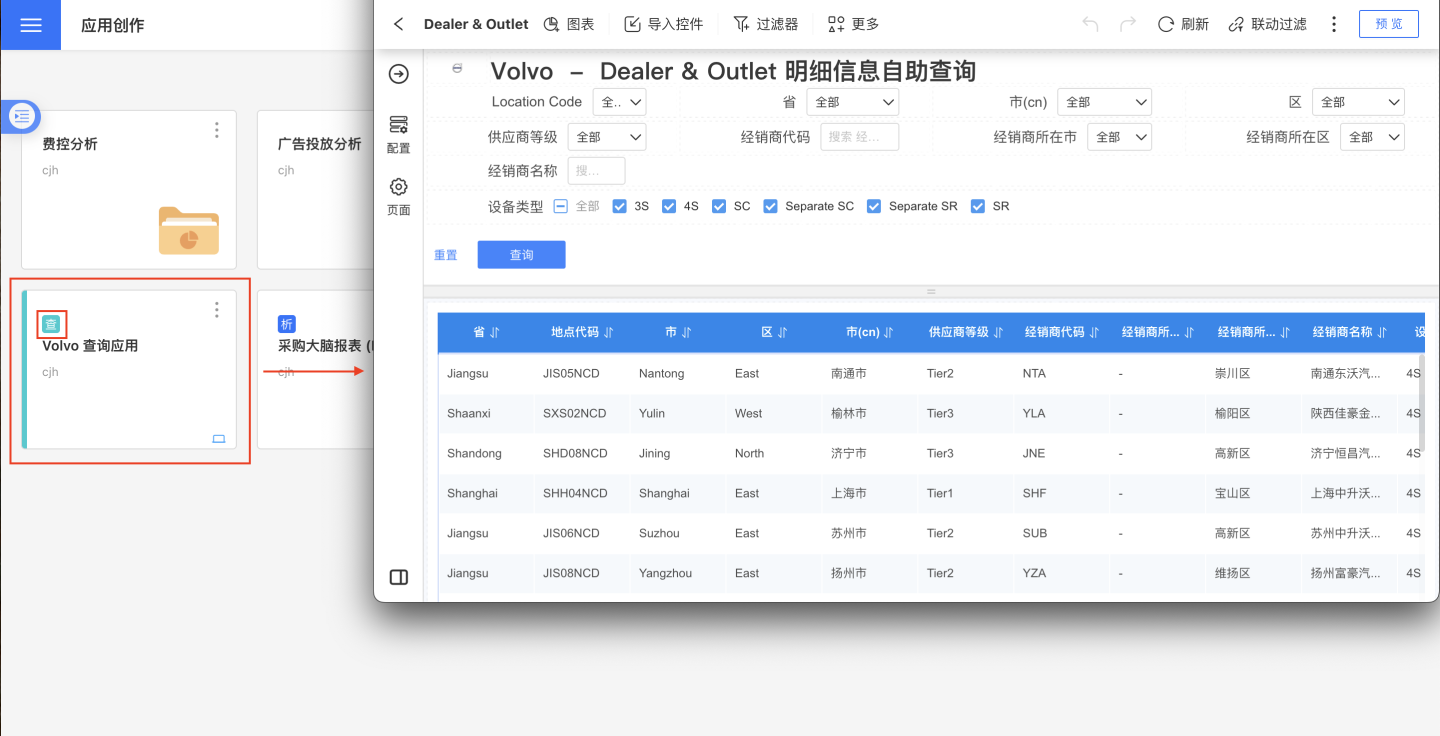
The Query App is primarily used for self-service business query scenarios. Users can flexibly drag and drop to set up the condition settings area and data display area, dynamically modify and save query configurations, enabling different users to display different query interfaces.
Unlike the Analysis App, the display format of the Query App is fixed and divided into two areas: the upper area displays query fields and corresponding filter conditions, while the lower area displays the corresponding data. To distinguish it from the Analysis App, each Query App is marked with a "Query" icon.
The editing interface of the Query App page is as follows, divided into four areas: 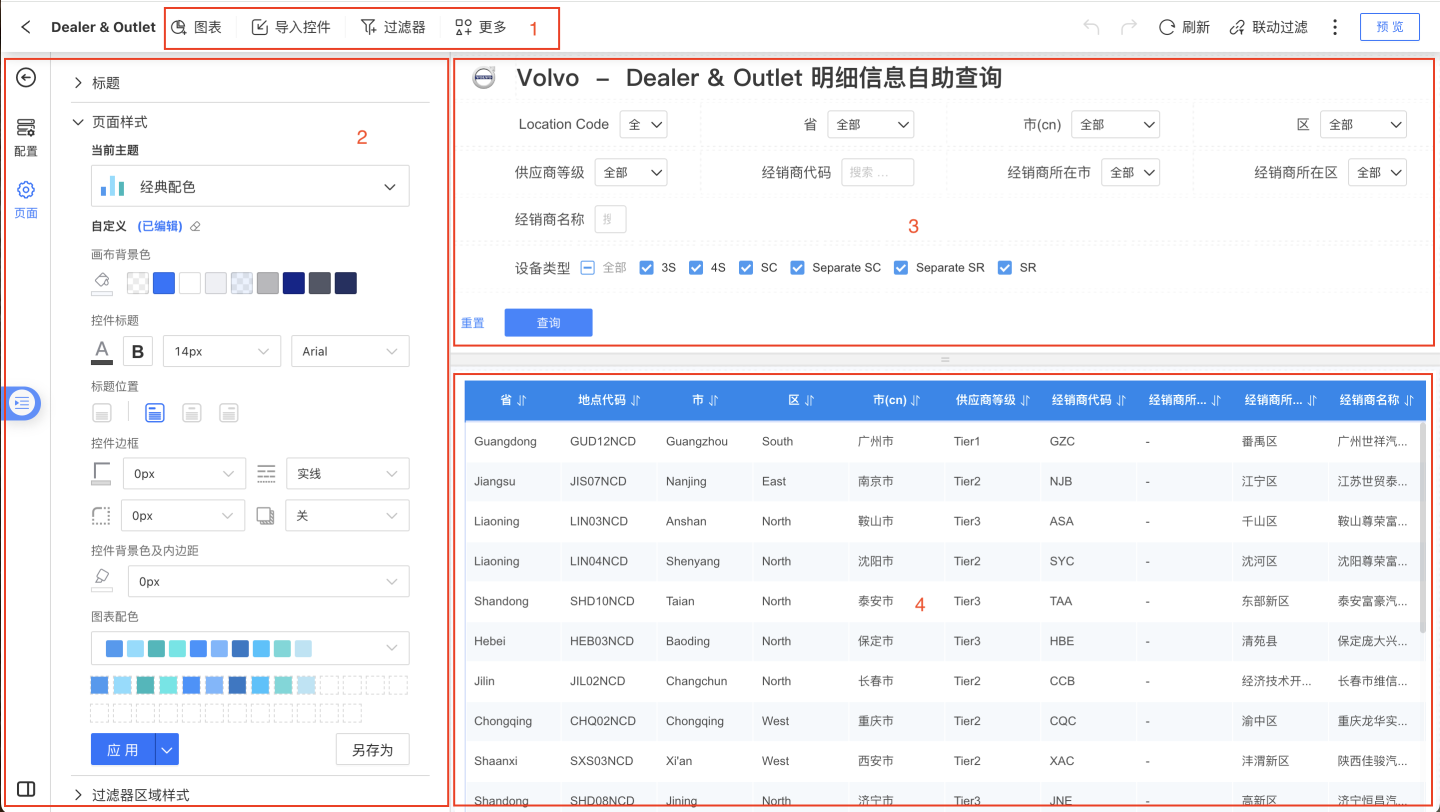
- Area 1: Displays the types of controls supported by the app page, including Table Control, Image Control, Rich Text Control, Chart Control, Parameter Control, Filter Control, and Button Control.
- Area 2: Page and control settings area. You can set the page title, page style, background canvas, page layout, and control settings.
- Area 3: Filter area, used to display filter conditions and parameter filters.
- Area 4: Data display area. Supports tables and dataset tables.
Notes
- When creating Image Control, Rich Text Control, and Chart Control, they will be displayed in the data area but can be moved to the upper filter area.
- The Table Control, Image Control, Rich Text Control, Chart Control, Parameter Control, Filter Control, and Button Control in the Query App are used in the same way as in the Analysis App. Click the corresponding links to view specific usage methods, which will not be described here.
- The filter area and display area can freely adjust the size of the display area, facilitating editing and app layout.
Query Application in Published State
Below is the state of the query application after publication. Compared to the editing state in the creation area, several additional parts are introduced, as shown in the figure. These added parts enable the query application to dynamically display filter conditions and data fields, save user query configurations, and set default query configurations, thereby allowing the same application to present different query interfaces for different users.
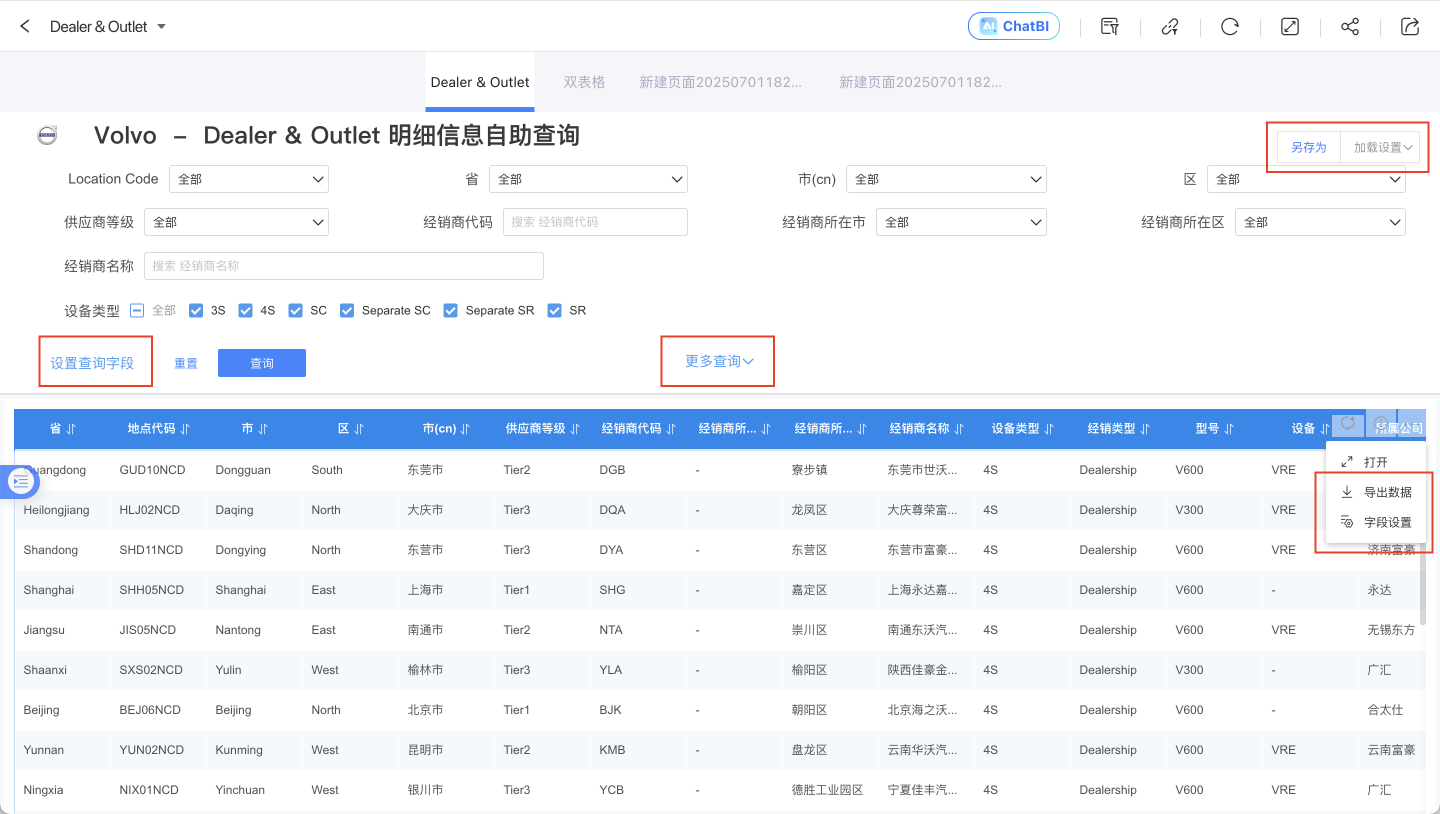
The query application in the published state supports:
- Save As: Save the configuration of all filters in the filter area and the configuration of all field displays in the data display area for the entire application.
- Load Settings: Load previously saved user configurations and support setting default configurations.
- Set Query Fields: Control the display status of filters in the filter area and adjust the display order of filters.
- More Queries: When there are too many filter controls in the filter area, they will be collapsed to save screen space. All filter controls can be displayed through "More Queries."
- Field Settings: Control the visibility of data fields and adjust the display order of fields.
- Export Data: Export table data. If the application is set to allow users to export data during publication, this button will be displayed.
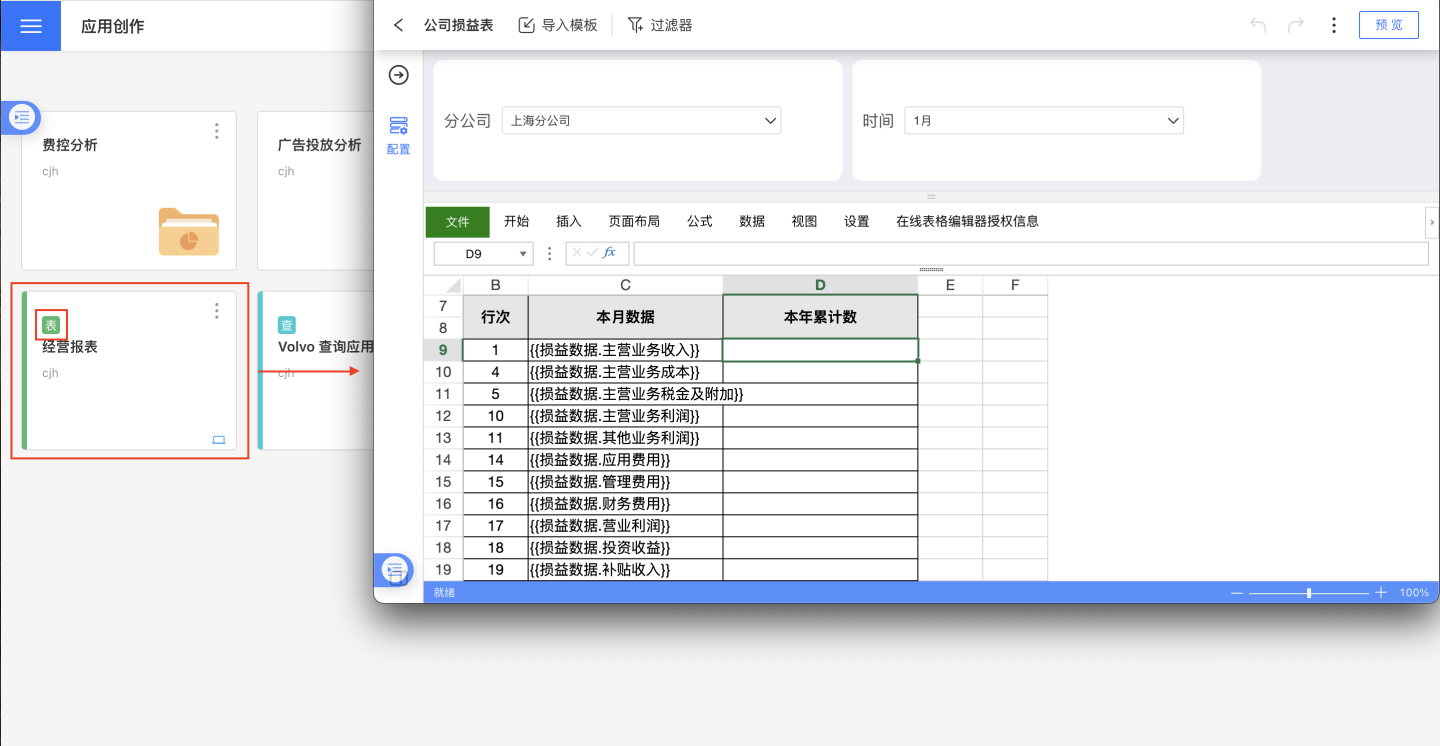
Report Application
The Report Application integrates Excel's rich and powerful report editing features, enabling the creation of complex layouts and calculations for Chinese-style reports, meeting the needs of heavy report users. The Report Application consists of modules such as reports, datasets, and data models. The editing interface for each report serves as the operation interface for complex reports. For detailed information, please refer to Report Application.
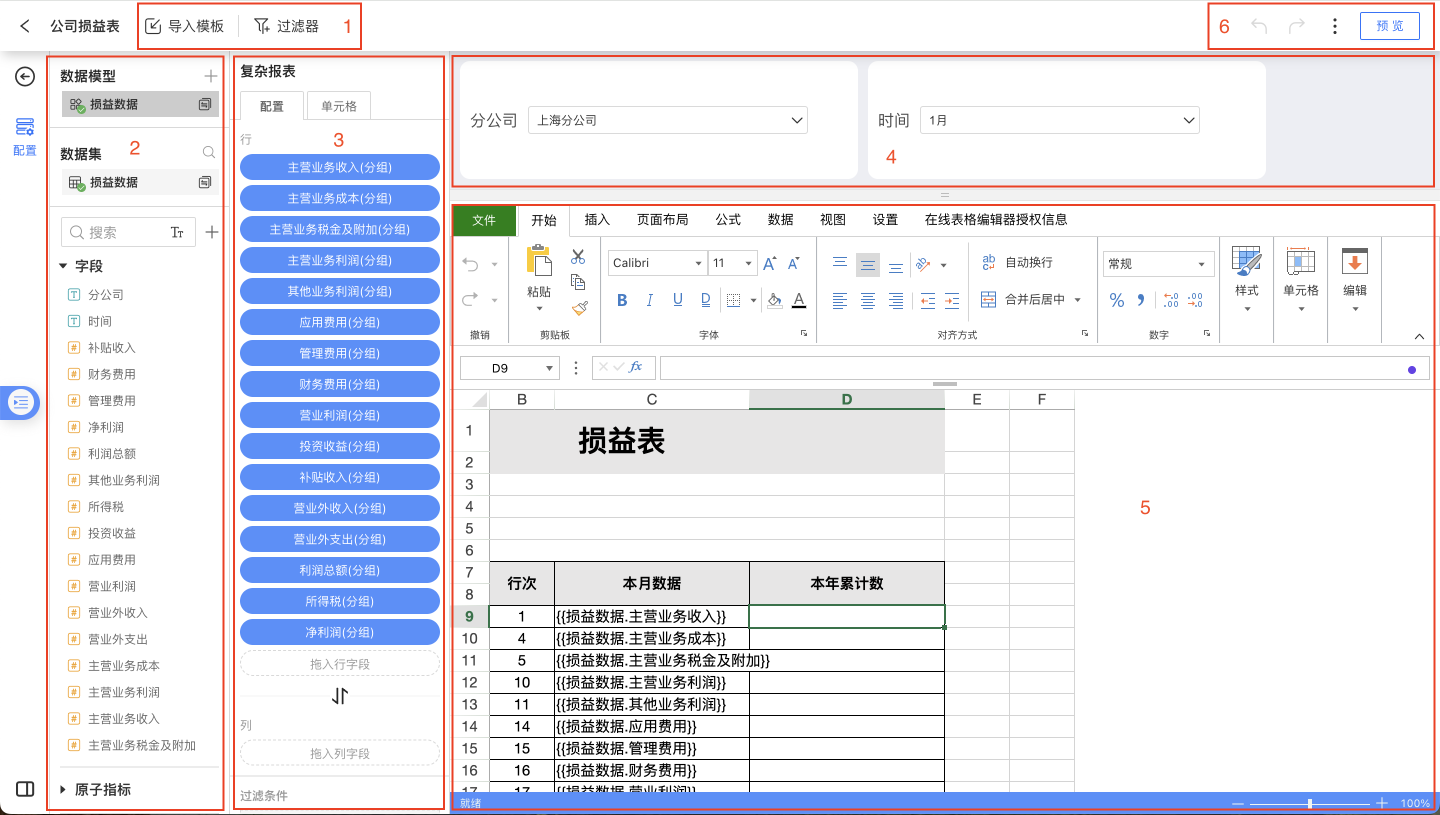
The editing interface of the Report Application is shown below and can be roughly divided into six areas:
- Area 1: Operation bar area, where you can import templates, add parameter controls, and filter controls. Importing templates allows for quick editing of complex reports based on templates. Parameter controls and filter controls can be added to the condition filtering area (Area 4) for filtering report data.
- Area 2: Data model and dataset field display area. Complex reports support adding multiple data models.
- Area 3: Complex report configuration area, including the data and related settings used by the complex report, as well as configurations for report cells.
- Area 4: Condition filtering area, used to display filters and parameter filters for filtering conditions.
- Area 5: Complex report data presentation area.
- Area 6: Forward and backward functionality for convenient report creation. Embed allows for quick sharing of reports. Additionally, the preview button enables previewing the report's effects.
Tip
- Parameter Controls and Filter Controls can only be added within the report and are not supported at the application level.
- The condition filtering area and data presentation area can freely adjust the display area size for convenient editing and layout. When there are many controls in the condition filtering area, they can be collapsed for display and expanded when filtering data.
Report Application in Published State
Below is the state of the report application after publication. Compared to the editing state in the creation area, several additional parts are included as shown in the image. These added parts enable the report application to dynamically display filter conditions, save user query configurations, and set default query configurations. When the same application is presented to different users, it can display different query interfaces.
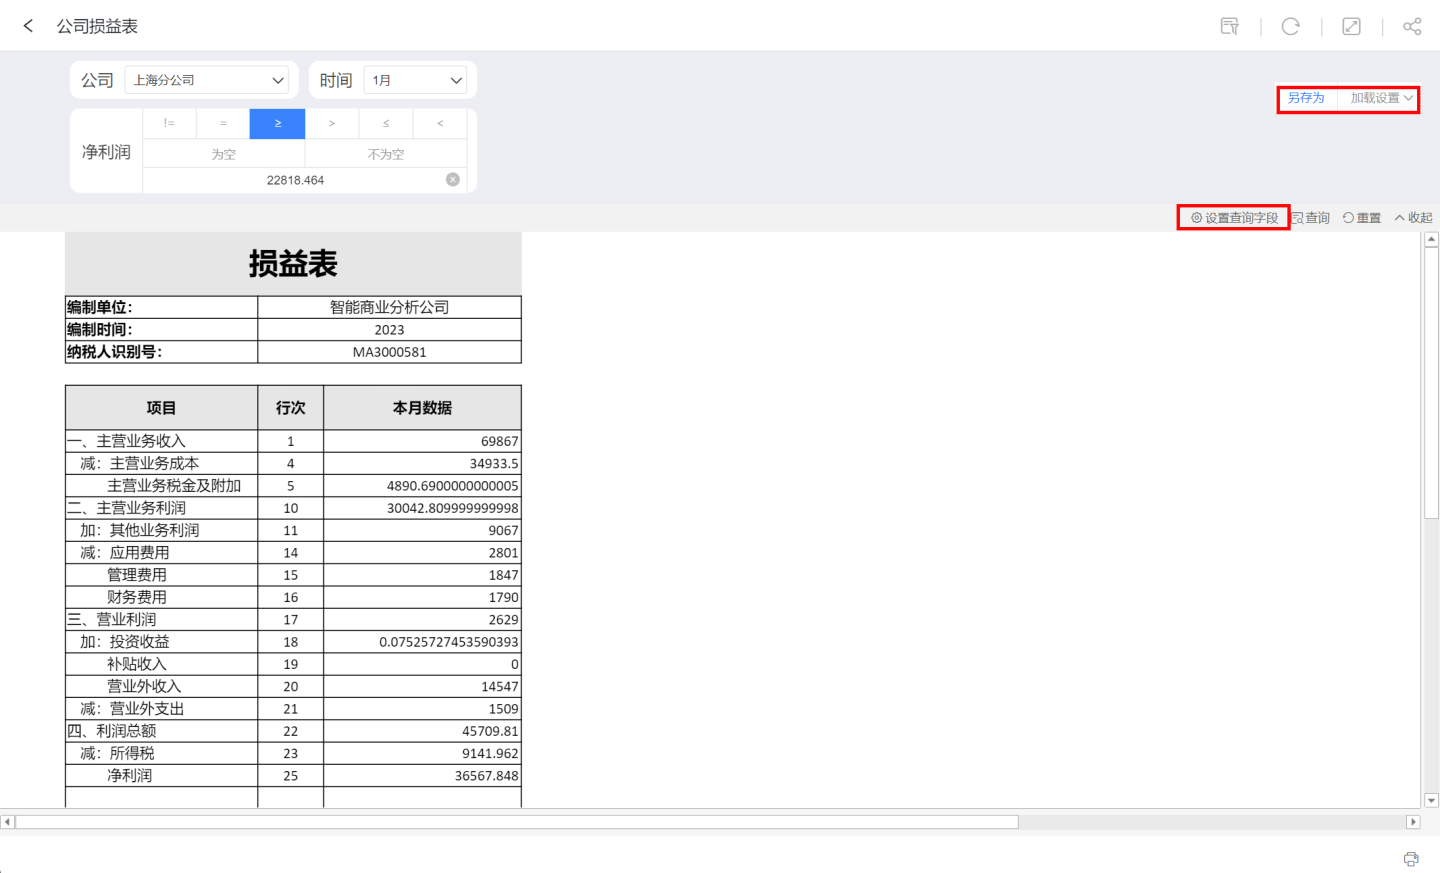
- Set Query Fields: Controls the display status of the filter area controls and dynamically adjusts the display order of the controls. For example, in the case shown, there are three filters. You can hide filters or adjust their display order by setting query fields.
- Save As: Saves all the information of filters and parameter controls in the filter area under the current business scenario. During the next display, you can directly select the saved configuration from the load settings.
- Load Settings: Loads previously saved configurations by the user and supports setting default configurations.
Create an App Using an App Template
During app creation, it is supported to create an app using an app template, which includes two scenarios: importing a template and creating a new app using a template. App templates retain the app dashboard styles, model relationships, and related settings, allowing users to perform analysis and exploration based on the template, thereby reducing creation costs.
Import Template
Click App Creation at the top right of the page, then select Import Template from the dropdown menu. Choose an app template and click Confirm to generate a new app. 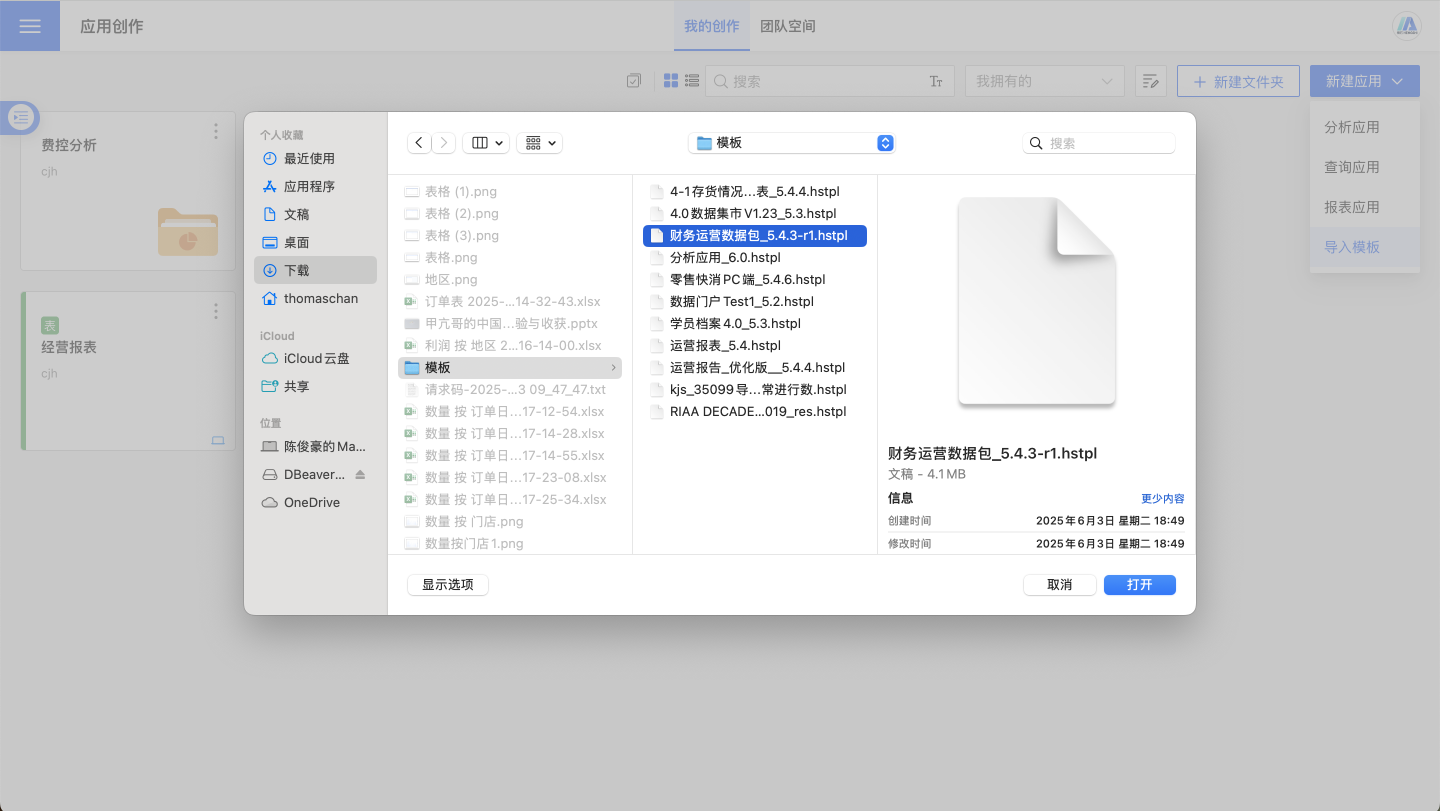
Importing templates is commonly used for scenarios involving resource sharing among different users or resource migration across different environments.
Create an App Using a Template
Creating an app using a template is a quick way to reference already published apps within the same system. Newly created apps are stored in the App Creation -> My Creations root directory, and if the name is duplicated, a numeric suffix is automatically added to the app name for differentiation. The following two scenarios support the "Create an App Using a Template" feature:
- If Export Template is selected during App Publishing, the app will support the
Create an App Using a Templatefeature after publishing. Using this feature, a new app with the same name can be generated in the My Creations root directory.
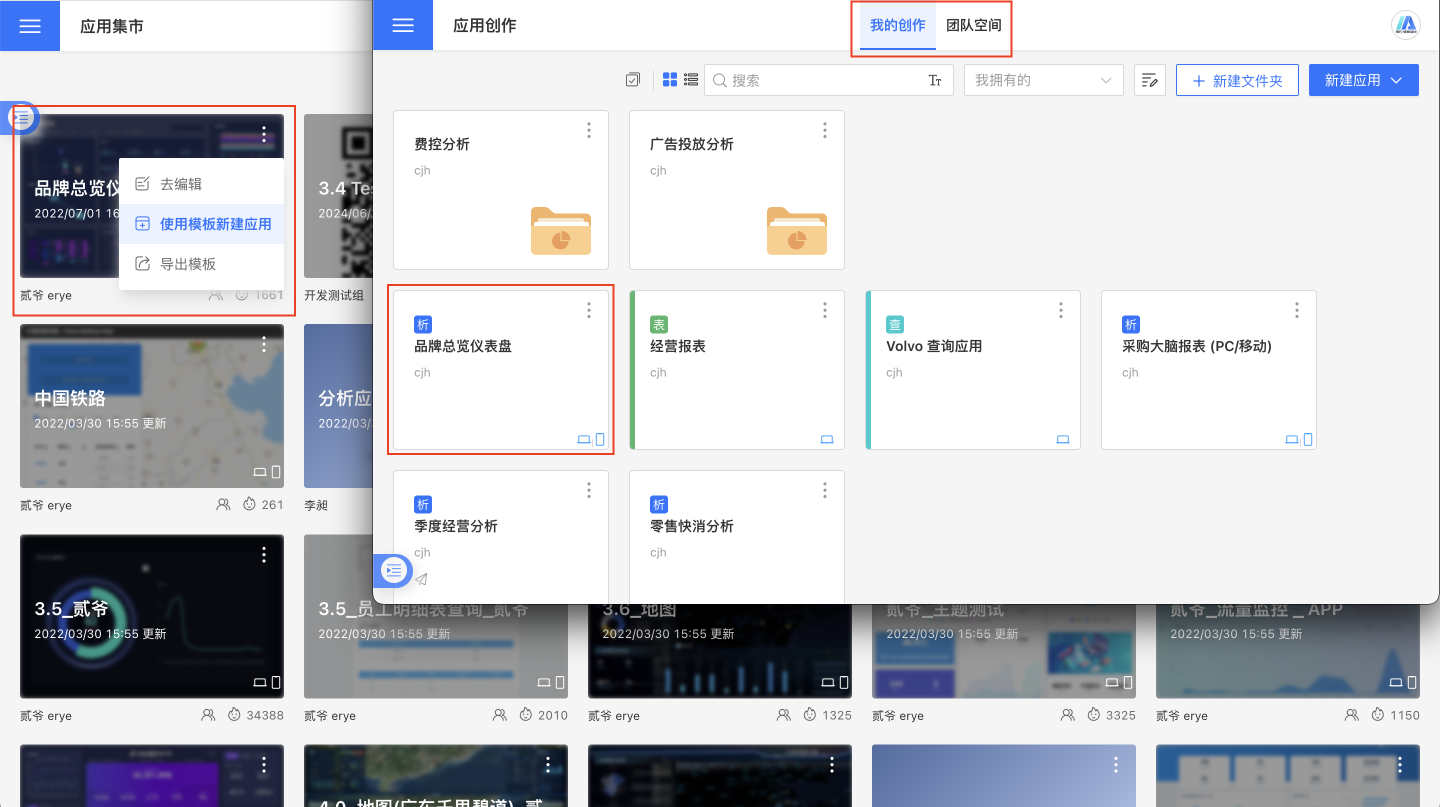
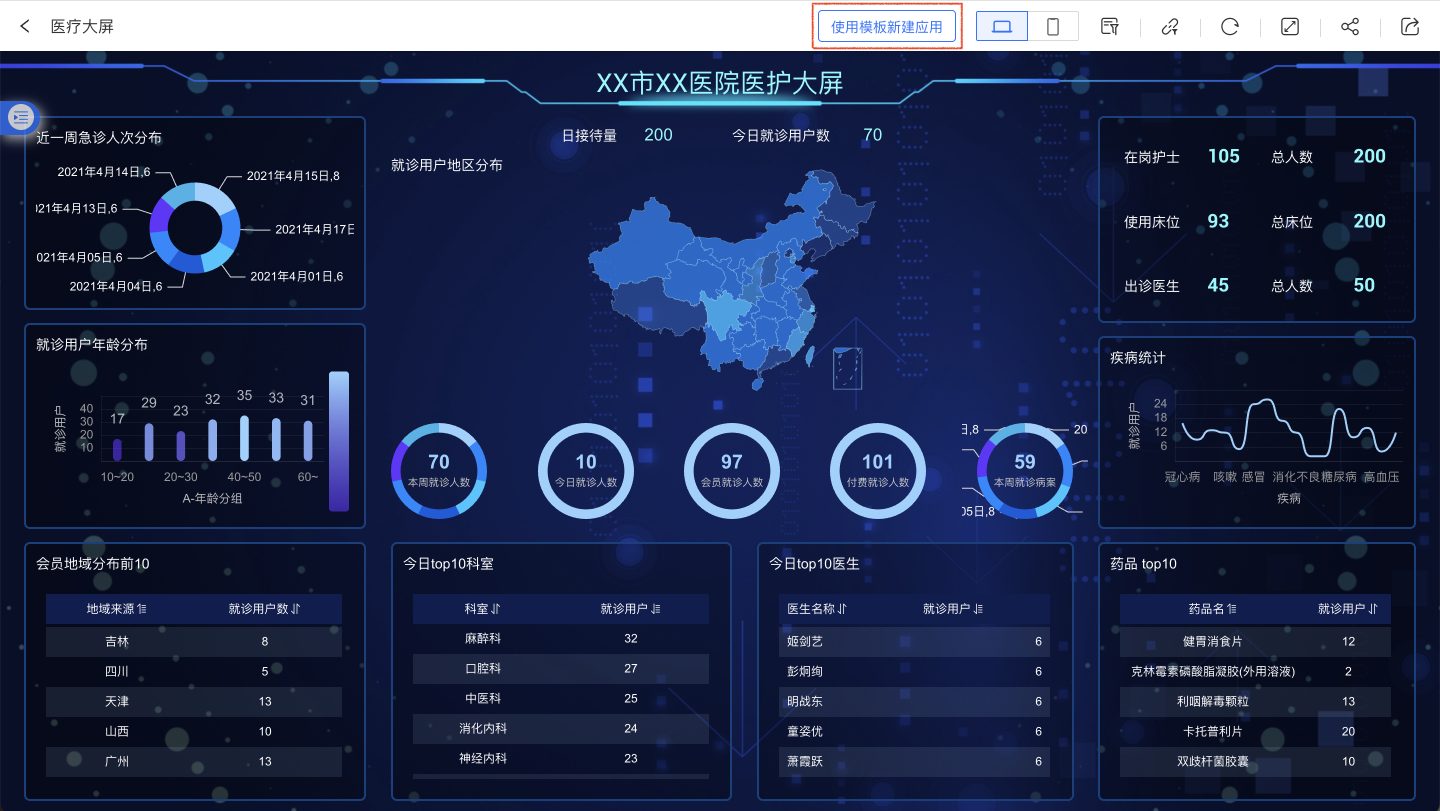
- Home Example Template In the card menu, click
Create App with Templateor theCreate App with Templatebutton in the upper right corner after the template is opened, which will generate an application with the same name in the root directory of My Creations.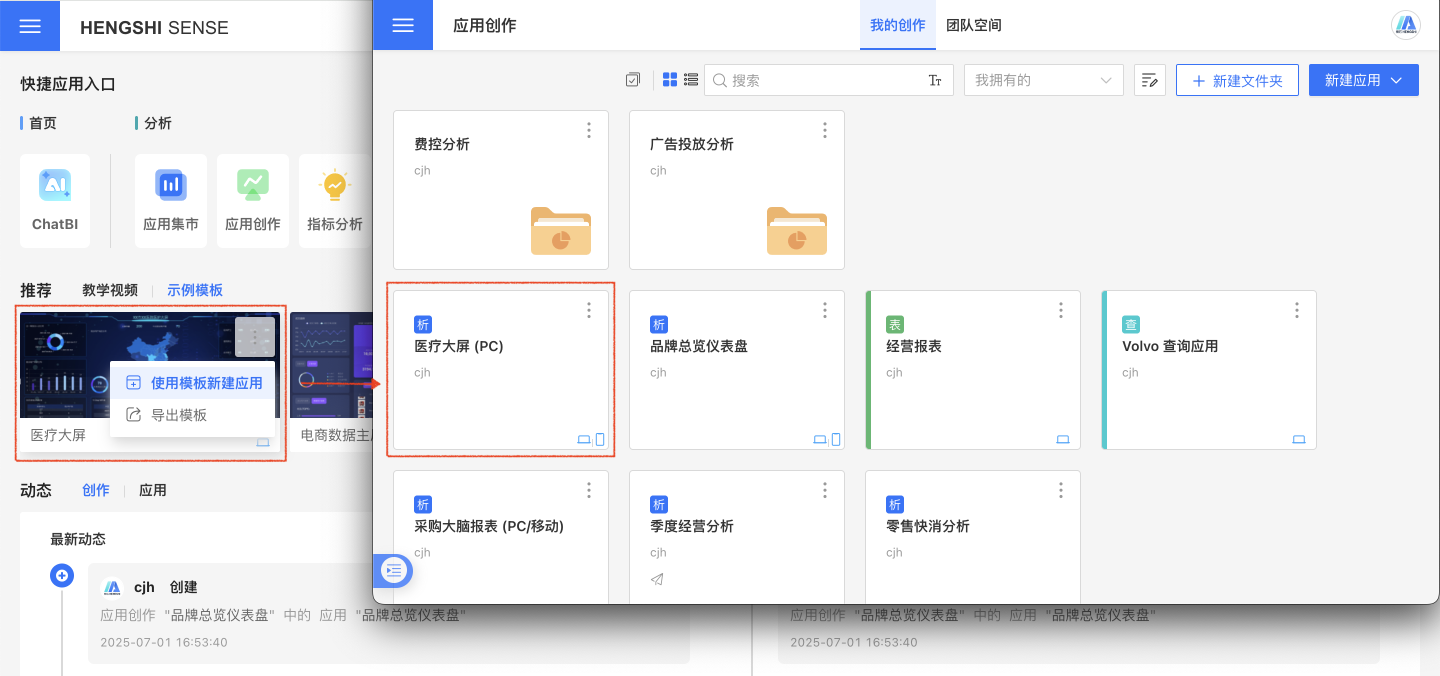
Create by Copying an Existing App
In app creation, you can create a new app by copying an existing app. Copying an app will duplicate all its contents, including dashboards, models, and data.
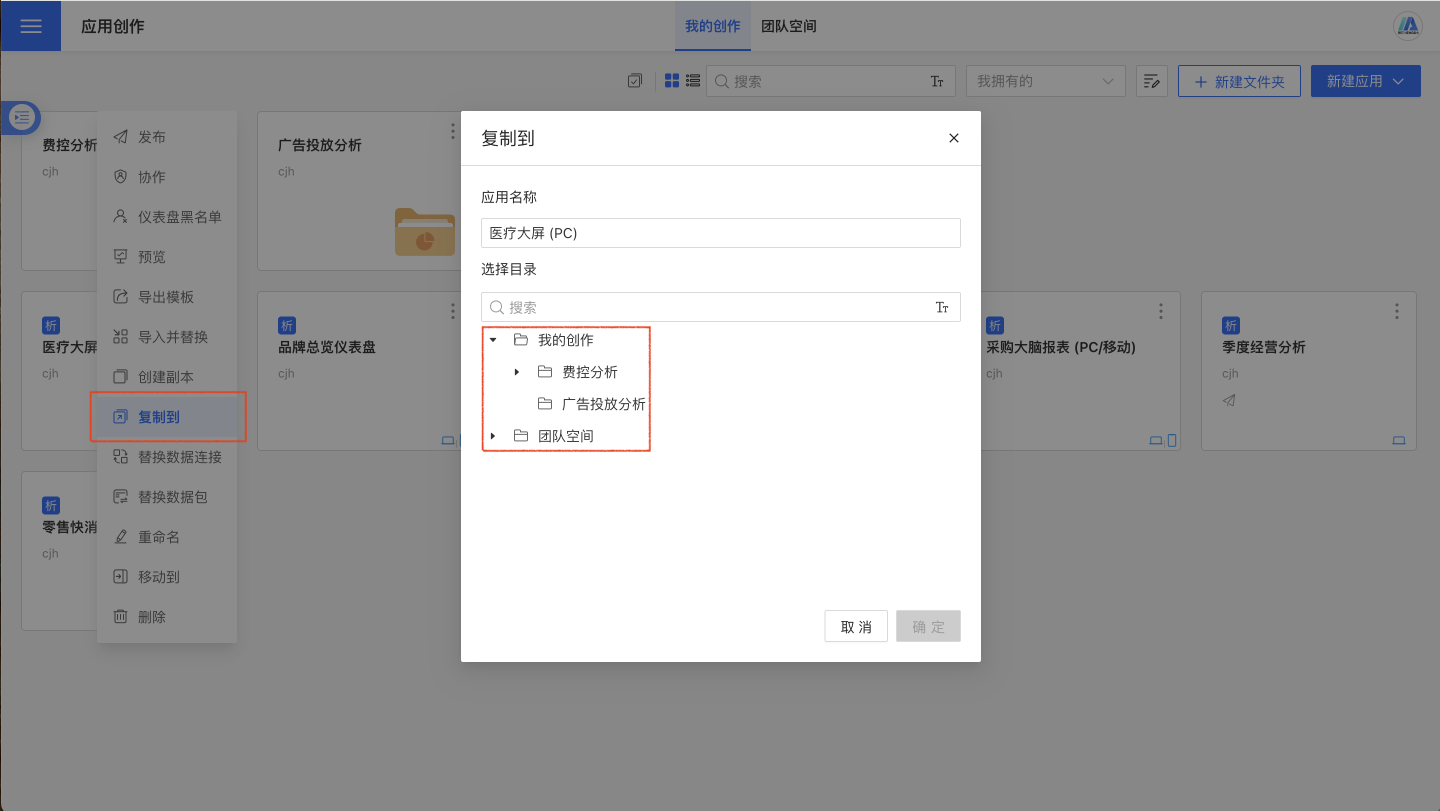
Copy to Specified Directory
When users copy an app to a different directory (where the current user has edit permissions), they can use the "Copy to" feature to select the target folder. Click "Copy to" in the app's three-dot menu, select the directory in the popup window, and click "Confirm" to generate an app with the same name in the new directory. If a file with the same name already exists in the new directory, the copy operation will fail.
The "Copy to" feature allows users to copy apps from My Creations to the Team Space, or from the Team Space to My Creations.
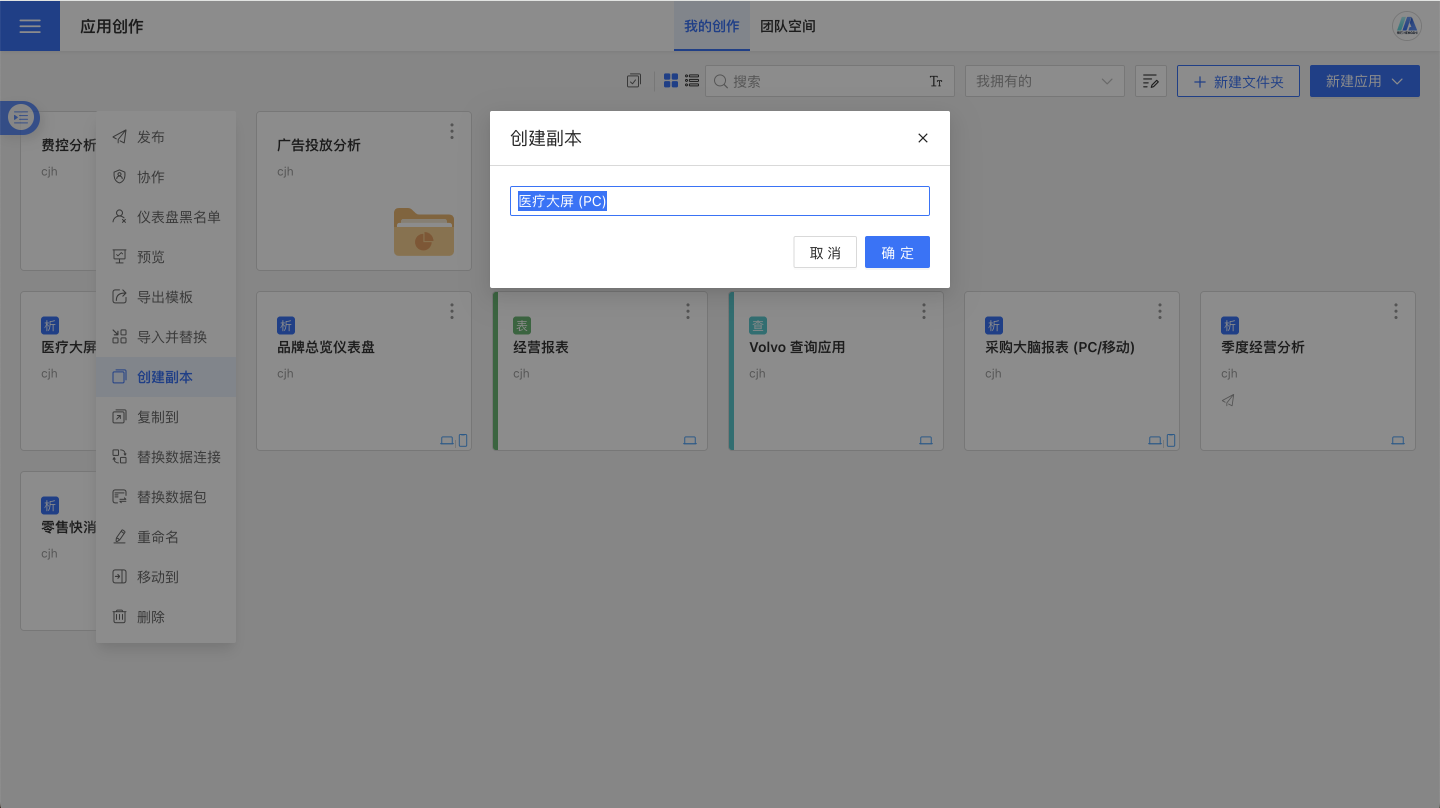
Create a Copy in the Current Directory
Creating a copy will duplicate the app in the current directory. If the user does not have edit permissions for the current directory, the copy creation will fail. After clicking, enter a new app name in the rename popup. If the name conflicts with an existing app, the copy cannot be saved.
Tip
- After copying the app, the new app is not associated with the original app.
- Copying the app does not duplicate the app's permission management settings.
Application Template
Application Template is the "blueprint" file of an application. It stores the complete structure and configuration information of the application but does not include actual business data. Just like a building blueprint preserves the architectural design without containing specific materials, the application template saves the design scheme of the application, allowing users to quickly build applications with the same structure based on this blueprint.
Contents of the Application Template
- Visualization Design Blueprint: Design plans for all visual elements, including dashboard layout, page organization, chart styles, control configurations, etc.
- Data Architecture Blueprint: Design of the data layer, including dataset definitions, field structures, data model relationships, calculated fields, etc.
- Interaction Logic Blueprint: Design of user interaction logic, including parameter definitions, filter linkage, control interactions, etc.
- Application Configuration Blueprint: Design of application-level settings, including theme styles, navigation settings, portal configurations, etc.
- Permission Rules Blueprint: Design of the permission system, including row and column data permissions, functional permissions, user roles, etc. (optional inclusion)
Value of Application Templates
- Standardized Replication: Ensure the use of unified analysis standards and design specifications across different environments and users.
- Rapid Deployment: New users can obtain a complete analytical application simply by connecting to the data source after importing the template.
- Knowledge Inheritance: Solidify business experts' analytical methods and best practices into reusable templates.
Export Application Template
Applications created and those in the Application Marketplace can both be exported as application templates.
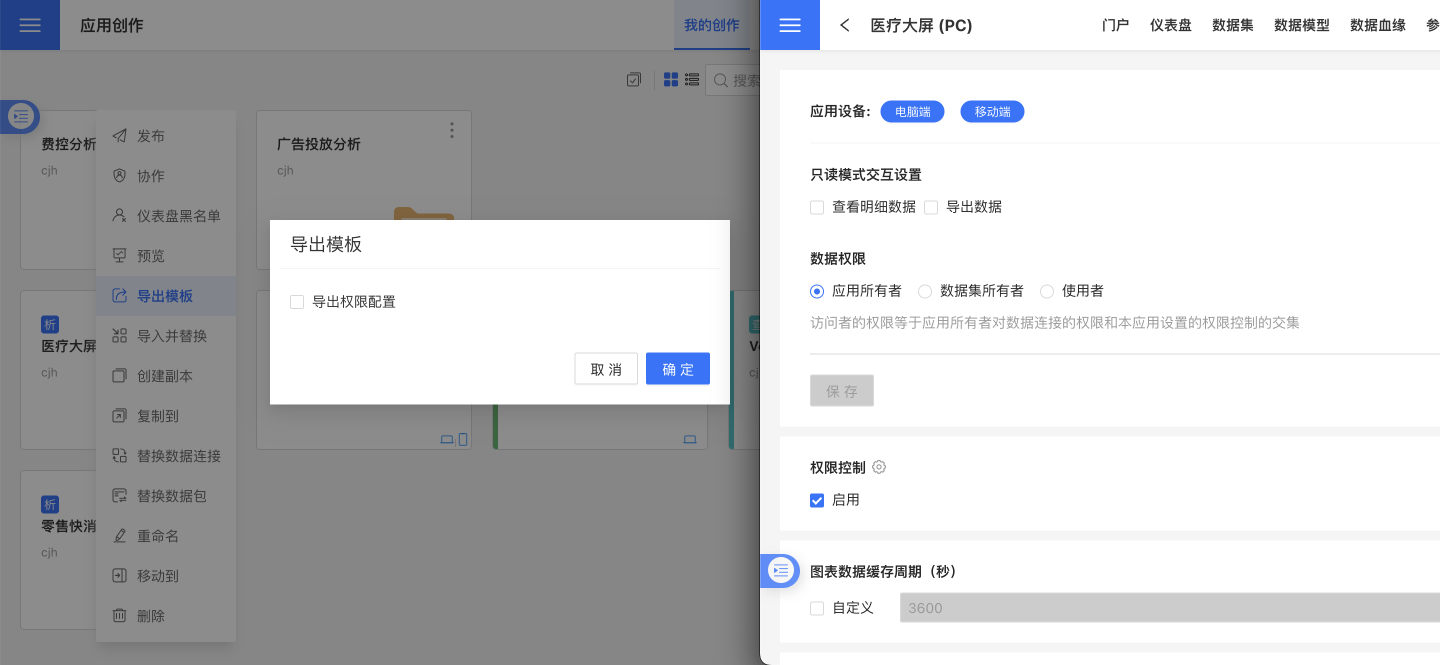
Exporting from App Creation
Click on the three-dot menu in the app and select "Export Template." Then choose the type of template to export, and click "Confirm" to export the template file.
When exporting a template, you can choose to export permission configurations. In this case, all permission-related configurations in the app will be exported together, including management permissions and data permissions. Exporting permission configurations is only visible to app administrators and creators, and not to other users.
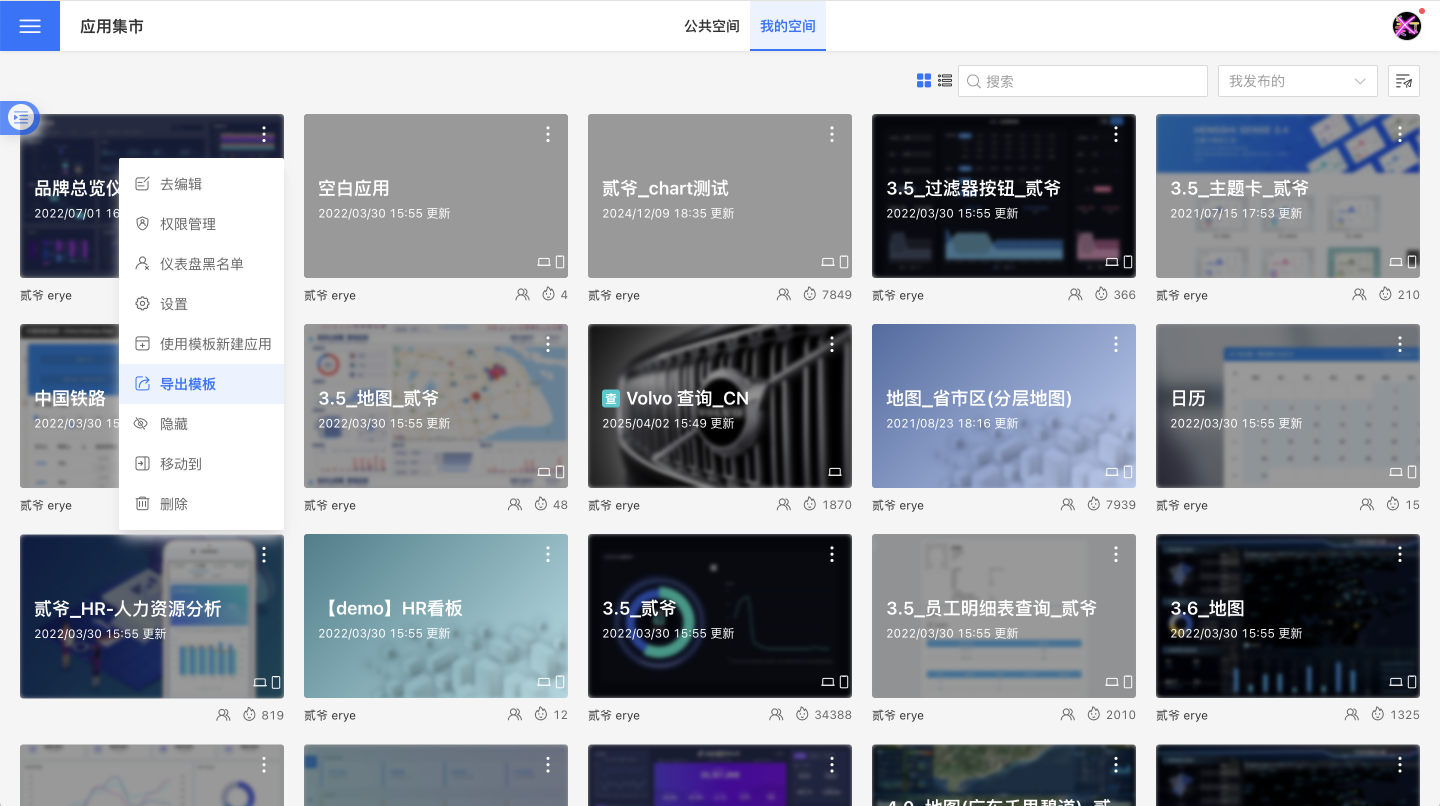
Export from App Marketplace
When publishing an app, set the Export Template. Published apps can also export templates, and the method for exporting templates is the same as during app creation.
Import Application Template
Import When Creating a New App
As mentioned above in Creating an App Using an App Template, after importing the template, the new app will include dashboard styles and data models. Users can build upon this foundation to process data, create new charts, and explore data.
Imported Template Application Name
The name of the imported template application is the same as the template name. If there is an application with the same name in the directory, the naming convention for the imported template application will be: "Exported Template Name" + "(1)". Users can also customize the application name.
Import Template Application Data
Importing template applications requires users to reconfirm the data.
If the datasets in the template are local files, these datasets will be emptied and contain no data. Data can only be added by replacing the dataset.
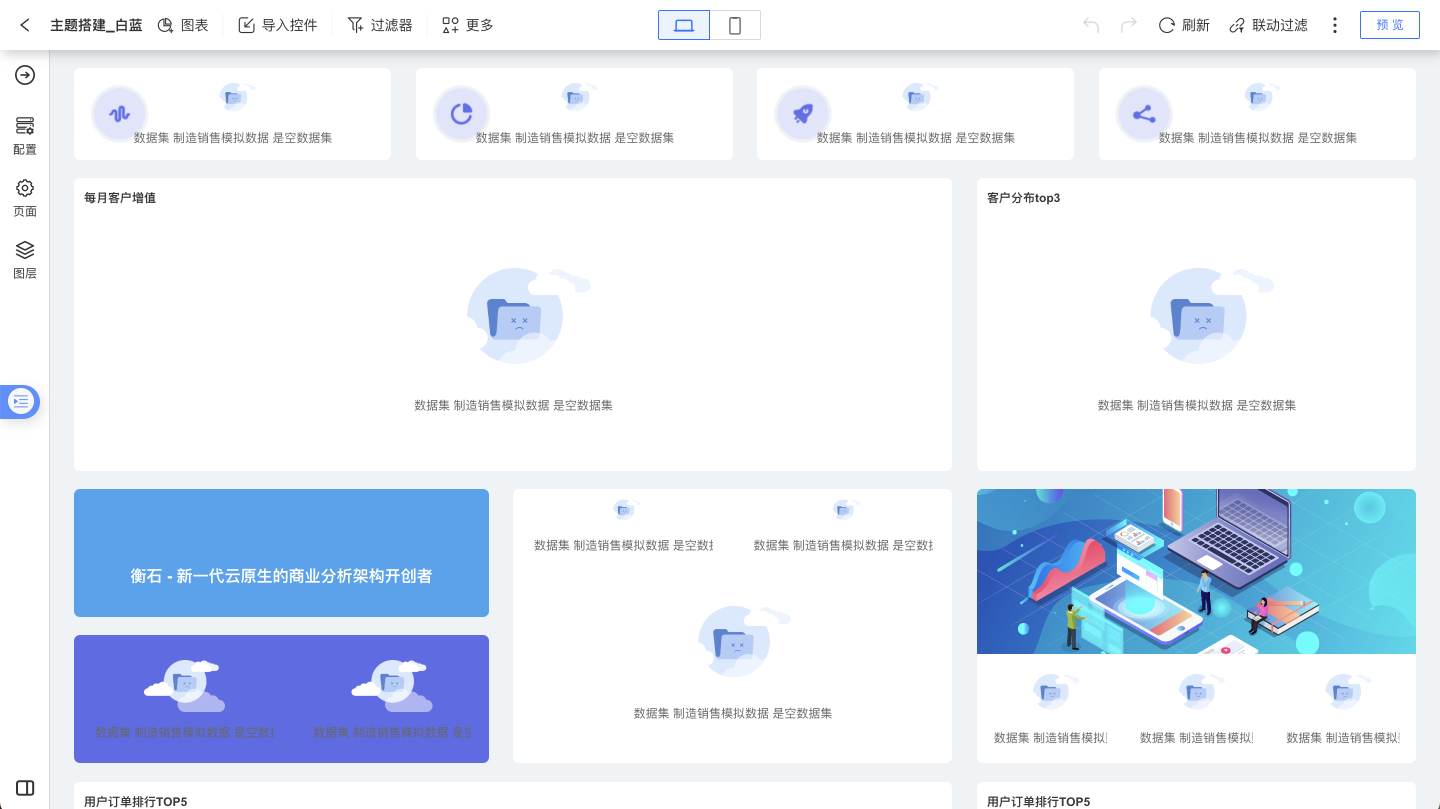
After importing the template, the dataset is empty, and charts cannot render properly:
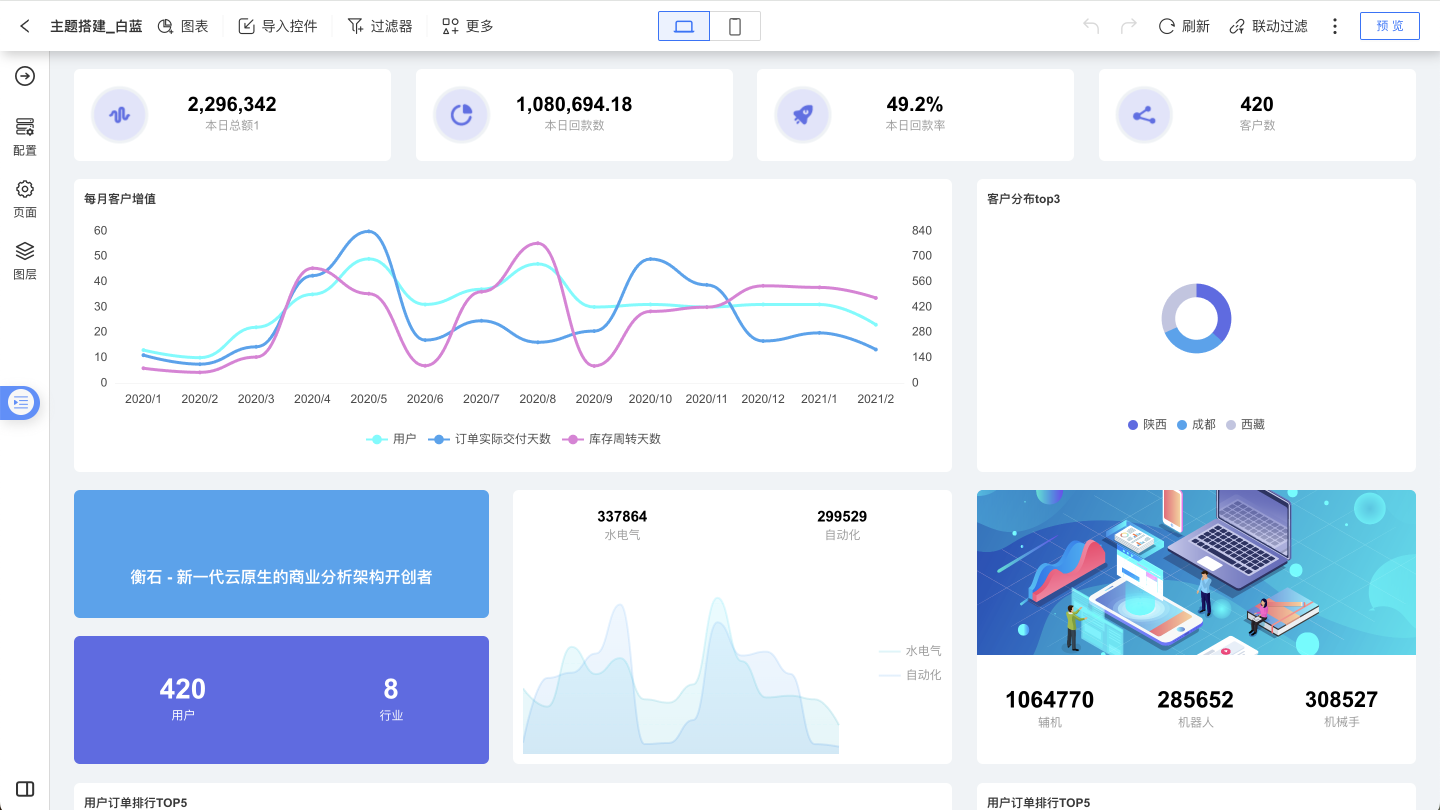
After replacing the dataset, the charts display correctly:
If the dataset is a Direct Connection Dataset or a SQL Query Dataset, the data displayed will depend on the current user's permissions for the data connection corresponding to the dataset.
Relationships established between datasets in the data model will be retained. For relationships built using local files, the relationship is preserved, and data can be re-added for use. For relationships built between direct connection datasets and SQL query datasets, both the relationships and data are retained, allowing for immediate chart creation.
Permission Configuration for Importing Templates
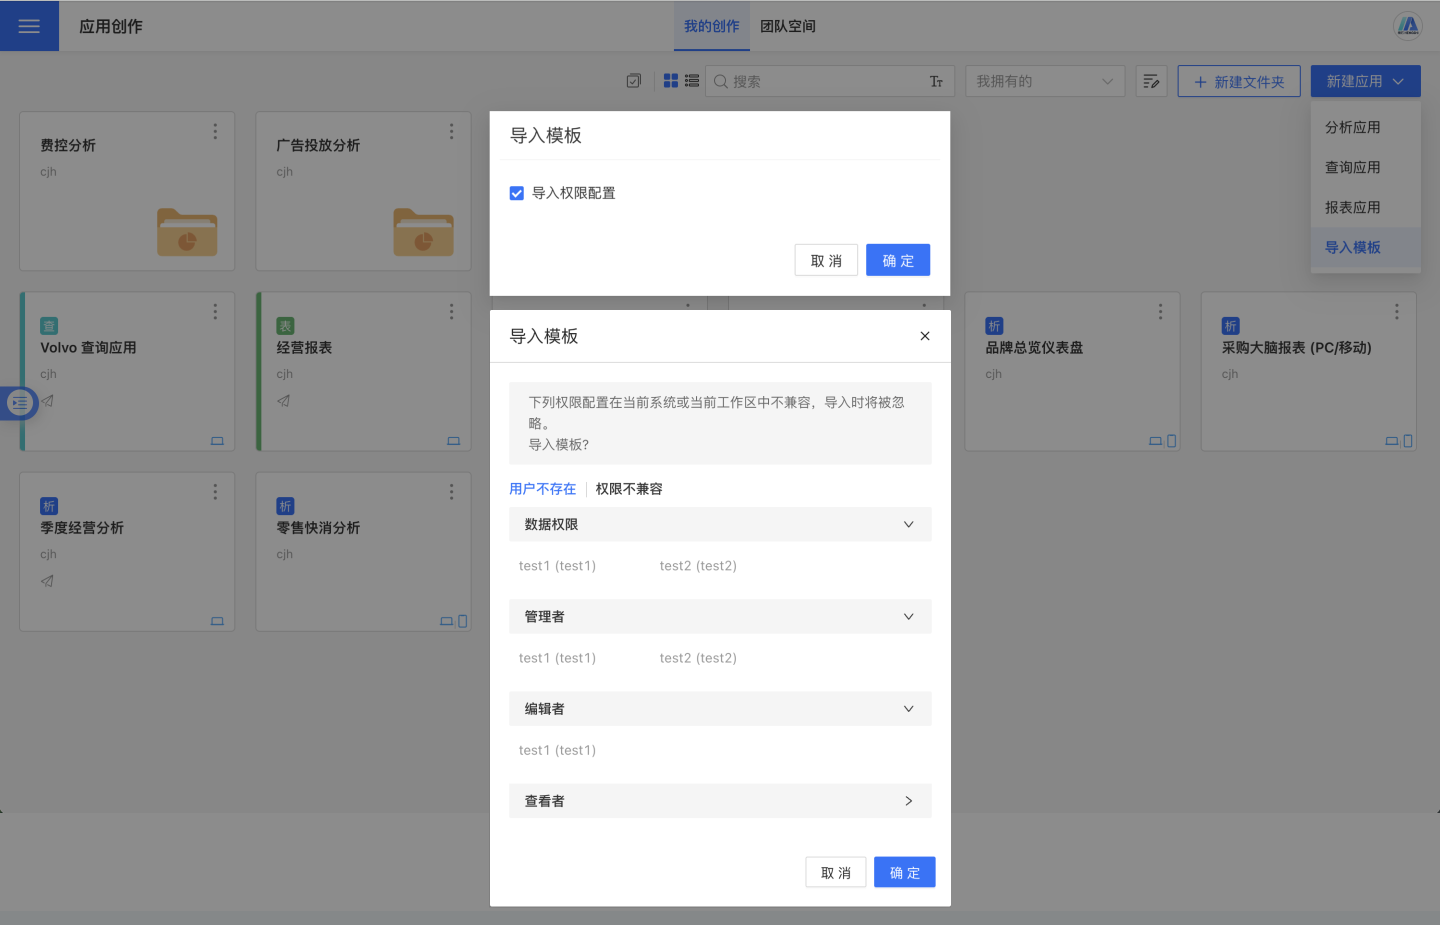
When a template includes permission configurations, the relevant permission configuration content in the template can be imported. This operation is optional and will only take effect if selected.
- When importing permissions, if the system cannot match the user object, the authorization rules will be retained during the import, but the authorized objects will be discarded.
- When importing application templates exported from the team space into "My Creation Space," the "Administrator" and "Tenant User" permission configurations will be discarded.
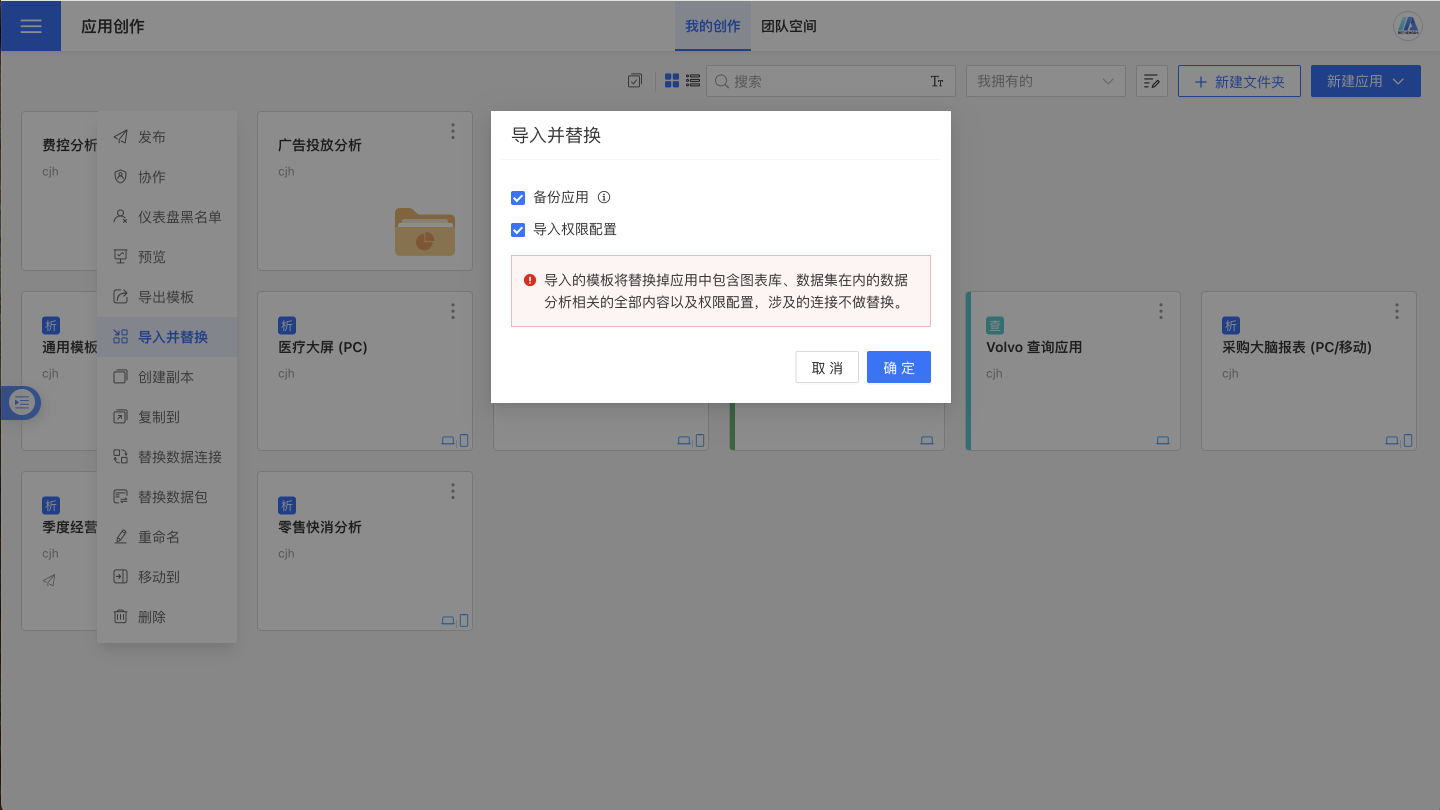
Replace Existing App
The existing app can be replaced by importing a new template through the Import Template and Replace option in the three-dot menu. When importing a new template, the original app can be backed up to Version Management. If an error occurs with the new template, the original app can be restored.
Template Data Replacement
The template retains the original application's dashboard style and model relationships, and typically requires data replacement to establish analysis for new data. There are three ways to replace data.
Replace Dataset
You can directly replace the dataset used for charting. This applies to direct connection datasets, SQL query datasets, and local file datasets. For detailed operations, please refer to Replace Dataset.
Replace Data Connection
Click the three-dot menu of the app and select "Replace Data Connection." In the dialog box that appears, replace specific connections or all connections. In the example, all connections are replaced, but you can also choose to replace only some connections.
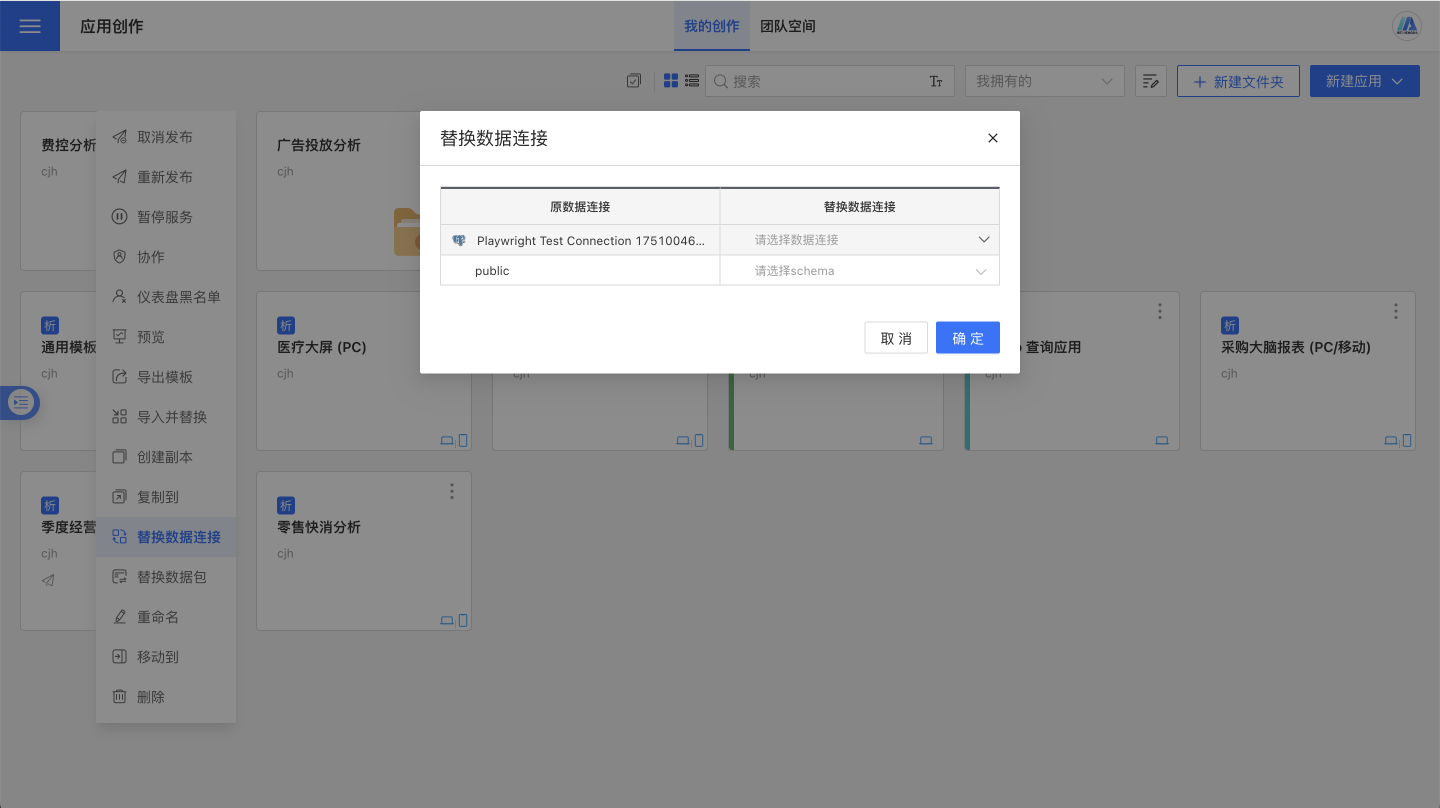
When replacing data connections, the schema defaults to same-name replacement. Users can also specify schema mapping, such as replacing the test schema with the production schema.
Replace Dataset
Click the three-dot menu of the app and select "Replace Dataset." In the dialog box that appears, you can replace specific datasets or all datasets. In the example, all data is replaced, but you can also choose to replace only certain datasets.
