Authentication Methods
When users log in to the HENGSHI SENSE system, the system needs to verify the entered username and password to ensure security. HENGSHI SENSE provides multiple single sign-on (SSO) authentication methods, including CAS, SAML2, and OAUTH2. In SSO single sign-on, HENGSHI SENSE acts as the Service Provider (SP), offering the required services to users, while user identity verification is achieved through the Identity Provider (IDP). Before using authentication services, please ensure that communication between the IDP and SP is established.
Configure Base URL
Base URL plays an important role in login authentication. Before configuring authentication, please set the Base URL.
Authentication Method Configuration
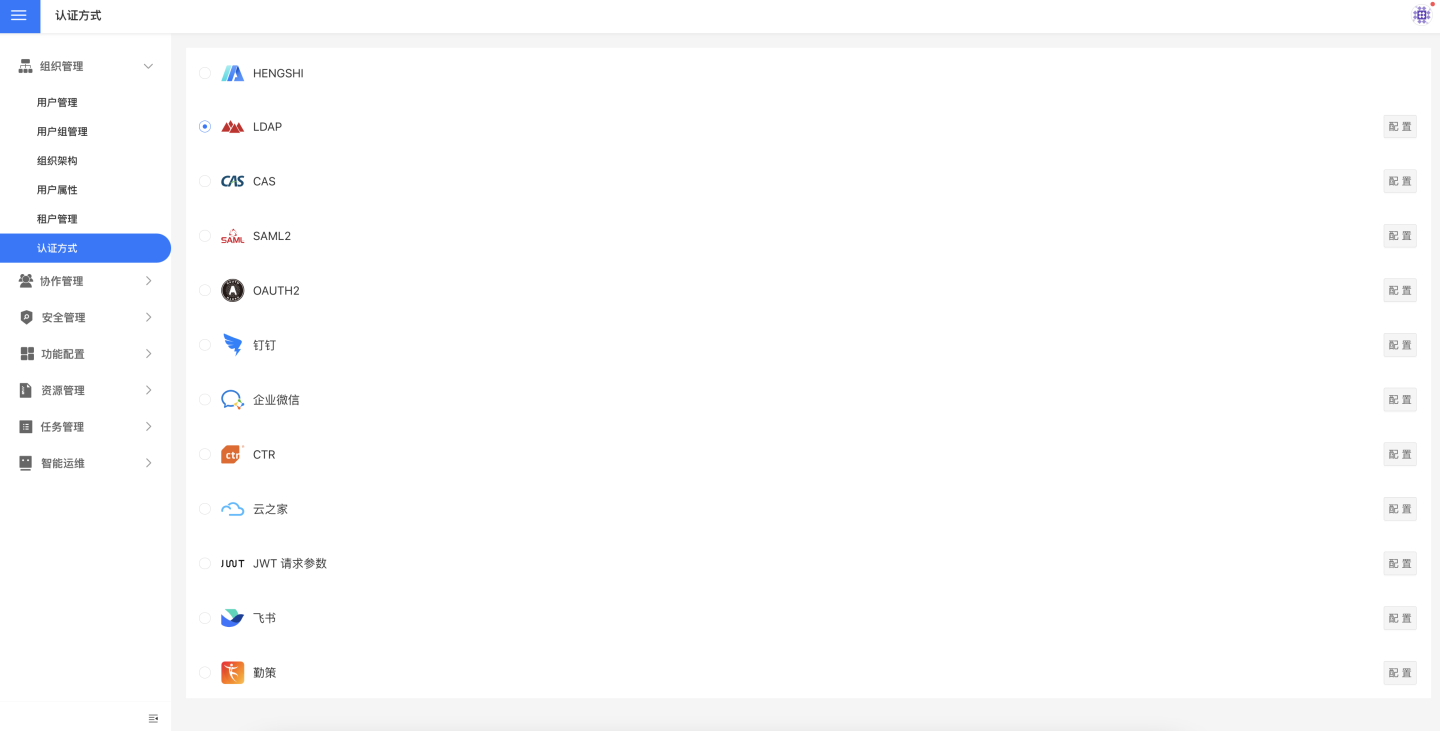
Set the user login authentication method in Settings -> Organization Management -> Authentication Method. Currently, HENGSHI, LDAP, CAS, SAML2, OAUTH2, DingTalk, Enterprise WeChat, CTR, Yunzhijia, JWT request parameters, Feishu, Qince, and other authentication methods are supported.
When users log into the system through an authentication method, some of their information will also be synchronized to the system via configuration items, such as syncing user attributes and organizational structures to the HENGSHI system. These configuration items are collectively referred to as general configuration items, which will be uniformly explained in General Configuration.
HENGSHI
HENGSHI has a built-in user authentication system that verifies identity using internal user information within the platform. Even if other authentication methods are configured, HENGSHI system administrators can still log in by accessing the /login page.
LDAP
Users who store user information using an LDAP authentication server and wish to log in to the HENGSHI SENSE system using the same authentication method can choose the LDAP authentication option. When using LDAP authentication, you need to select the LDAP configuration and perform related LDAP settings in Settings -> Organization Management -> Authentication Method. 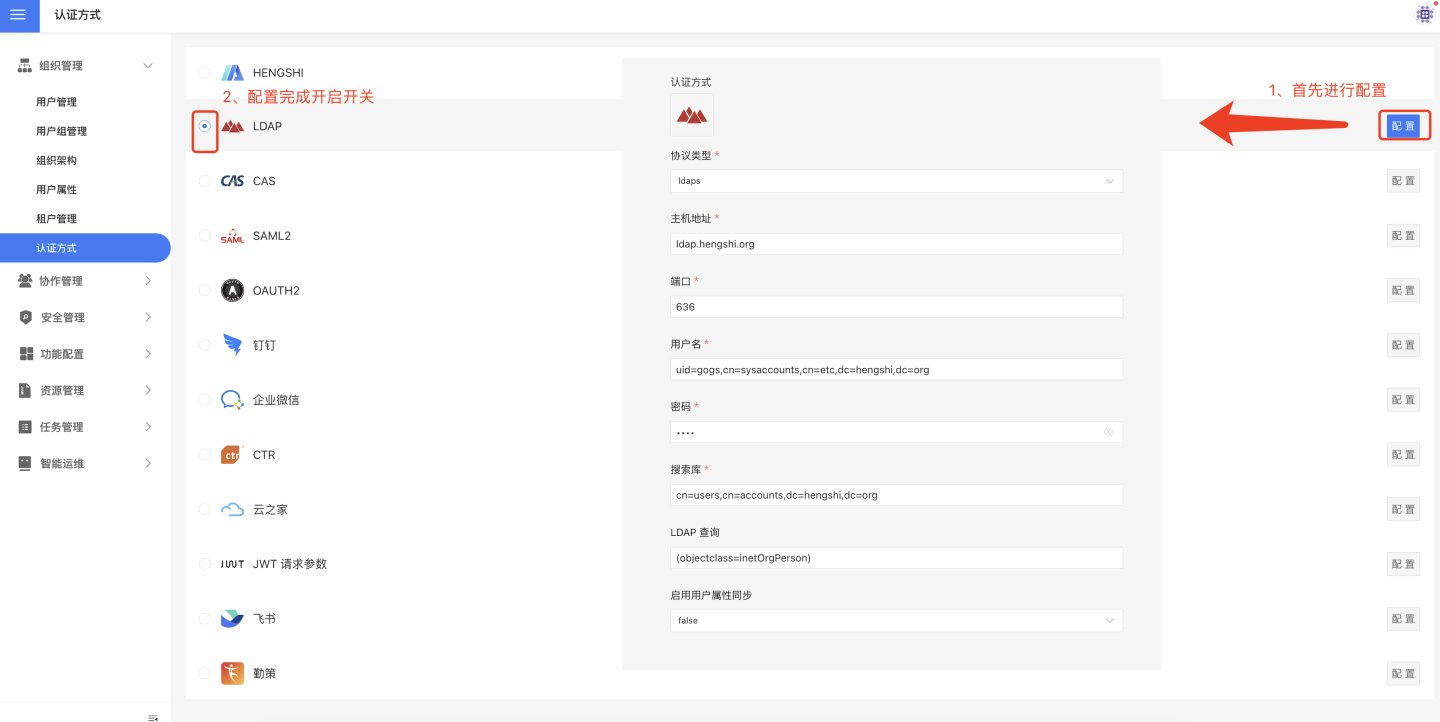
LDAP basic configuration includes:
- Protocol types, including ldap and ldaps.
- Host address.
- Port.
- Username.
- Password.
- Search base.
- LDAP query.
LDAP general configuration includes username mapping, display name mapping, email mapping, phone number mapping, role mapping, group mapping, organizational structure mapping, enterprise ID mapping, enterprise name mapping, platform ID, enabling SSO exp session validity synchronization, and session validity mapping. For explanations and usage of general configuration fields, please refer to the General Configuration section.
CAS
Users who use the CAS authentication server to store user information and wish to log in to the HENGSHI SENSE system using the same authentication method can choose the CAS authentication option. When using CAS authentication, you need to select the CAS configuration and perform related CAS settings in Settings->Organization Management->Authentication Method.
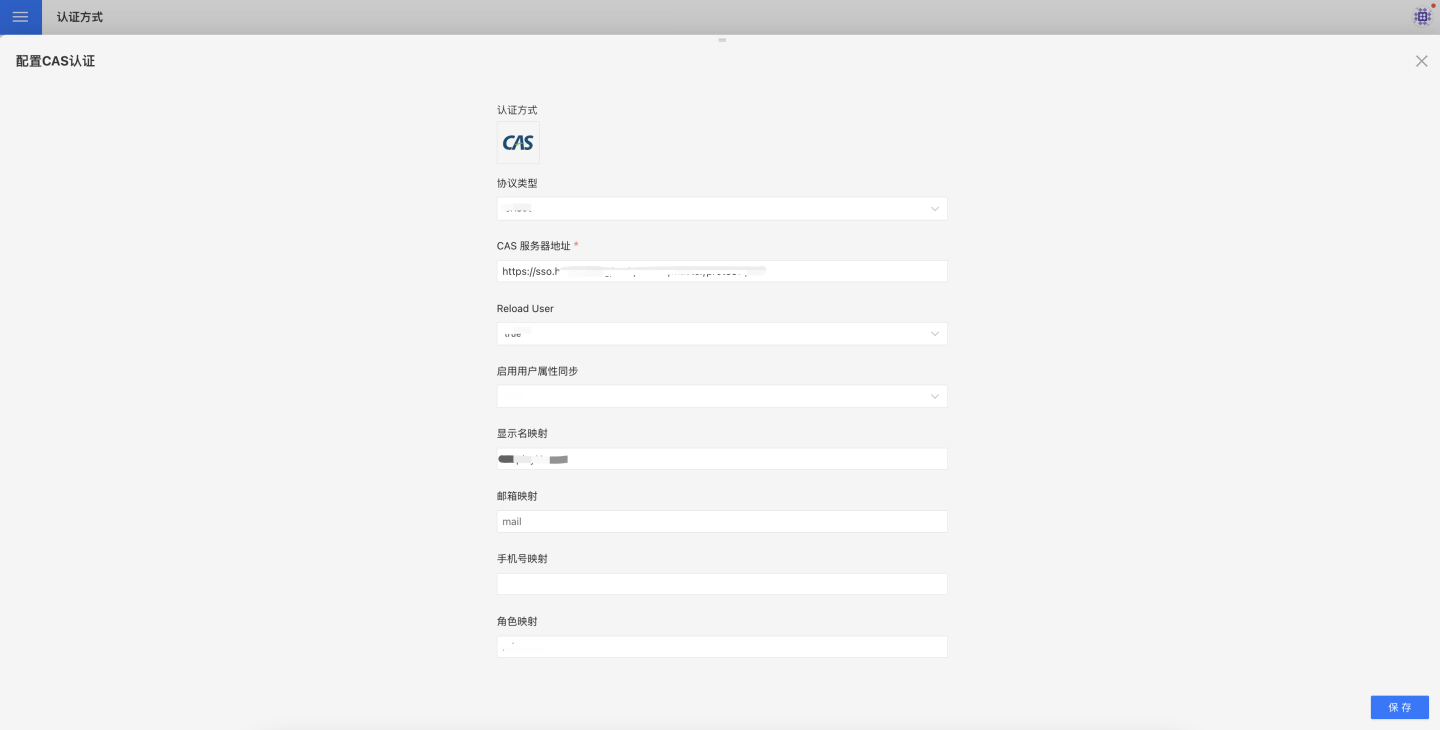
CAS basic configuration includes:
- Protocol Type.
- CAS Server Address.
- Reload User.
CAS general configuration includes display name mapping, email mapping, phone number mapping, role mapping, group mapping, organizational structure mapping, enterprise ID mapping, enterprise name mapping, platform ID, enabling SSO exp session validity synchronization, and session validity mapping. For explanations and usage of general configuration fields, please refer to the General Configuration section.
SAML2
Users who use the SAML2 authentication server to store user information can choose the SAML2 authentication method to log in to the HENGSHI SENSE system using the same authentication method. When using SAML2 authentication, you need to select the SAML2 configuration and perform related configurations in Settings->Organization Management->Authentication Method.
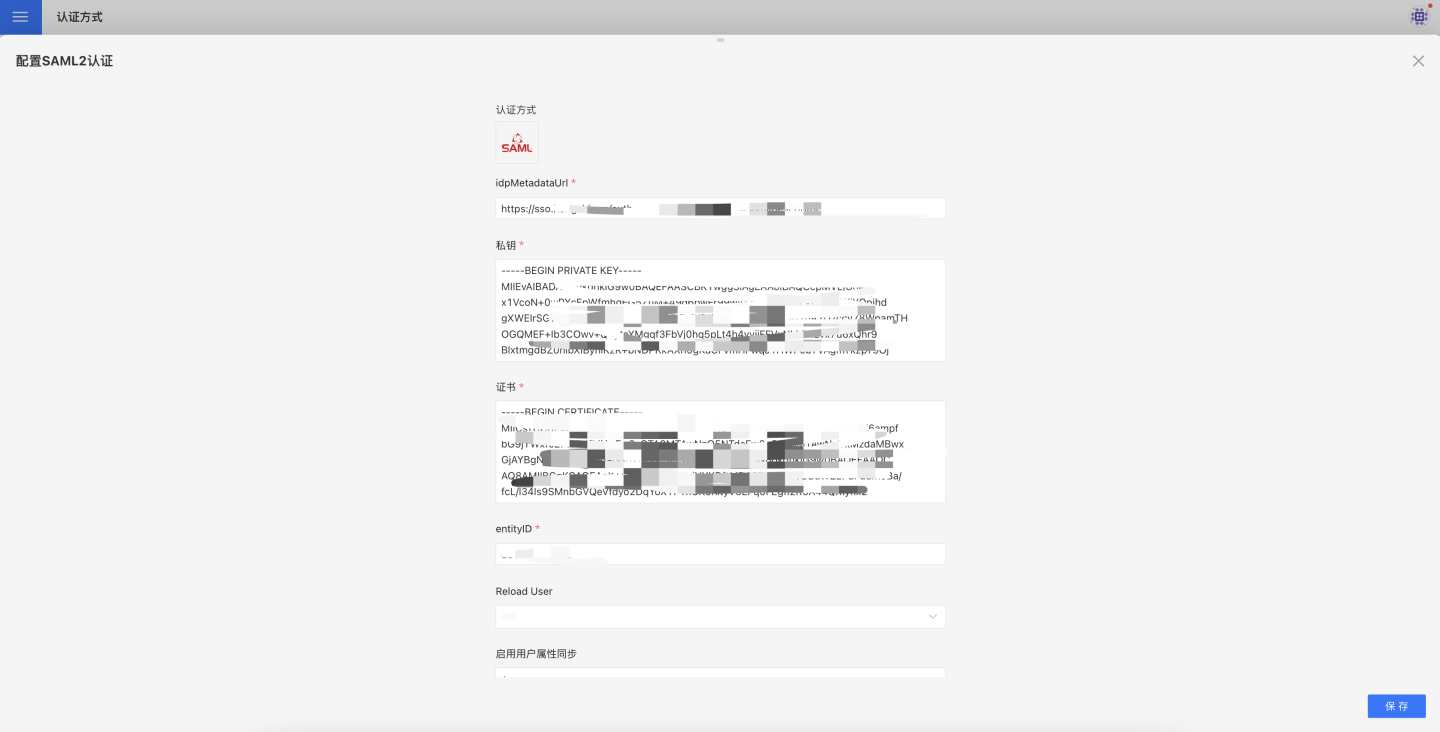
The SAML2 authentication-related configurations include:
- idpMetadataUrl.
- Private Key.
- Certificate.
- entityID.
- Reload User.
The general configurations for synchronizing user attributes and other information using SAML2 include: Username Mapping, Display Name Mapping, Email Mapping, Phone Number Mapping, Role Mapping, Group Mapping, Organization Structure Mapping, Enterprise ID Mapping, Enterprise Name Mapping, Platform ID, Enable SSO exp, Session Validity Synchronization, Session Validity Mapping. For explanations and usage of general configuration fields, please refer to the General Configuration section.
OAuth2
Users who use the OAuth2 authentication server to store user information and wish to log in to the HENGSHI system using the same authentication method can choose the OAuth2 authentication method. When using OAuth2 authentication, you need to select the OAuth2 configuration and perform related settings in Settings -> Organization Management -> Authentication Method.
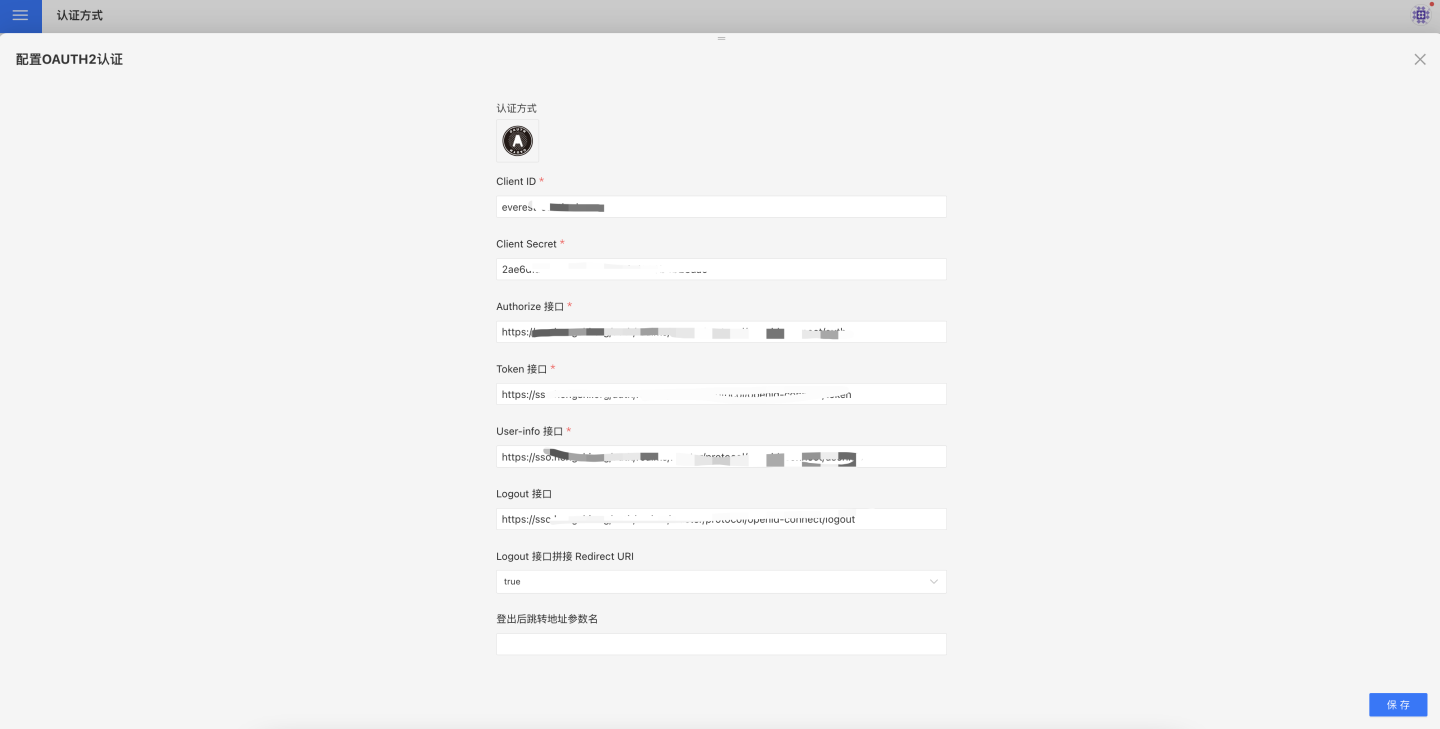
The relevant configurations for OAuth2 authentication are:
- Client Id: Refers to the client ID registered with the OAuth Server, also known as App ID in some systems. Different OAuth Servers may use different terms.
- Client Secret: Refers to the client secret registered with the OAuth Server, also known as App Secret in some systems.
- Authorize Endpoint: When the system detects that the user is not logged in, it redirects to this address, where the user enters their username and password to log in to the OAuth Server. After successful login, the OAuth Server redirects to the
redirect_uriprovided by HENGSHI and appends thecodeparameter. - Token Endpoint: The HENGSHI system requests a token from this endpoint using the
codeparameter. - User-info Endpoint: The HENGSHI system requests basic user information from this endpoint using the token.
- Logout Endpoint: When the HENGSHI system logs out, it redirects to this endpoint to log out from the OAuth Server. Some OAuth Servers may not implement this endpoint.
- Logout Endpoint Append Redirect URI: Defaults to
true. Determines whether the address visited before logging out of HENGSHI is appended to the Logout Endpoint. - Post-logout Redirect Parameter Name: Defaults to
redirect_uri. When the HENGSHI system sends a logout request to the OAuth Server, this parameter is passed, and the OAuth Server redirects to this address after logging out. - Scope: Defined by the OAuth Server and configured in the HENGSHI SENSE system. The HENGSHI system passes this parameter when requesting the
code. New versions of the OAuth Server, such as Keycloak (19.0.2 and above), require the scope to be set toopenid. - Original URL Passing Method: Refers to the method of recording the user's original request address. For example, if the user enters the URL
http://{host}:{port}/apps/1/dashboard/1, they will be redirected to this address after successful login. Typically recorded in the session, but in scenarios with multiple embedded iframe pages open simultaneously, it needs to be passed in the URL. - Validate Original URL: The original URL refers to the user's original request address before logging in. If set to
true, it checks whether the original URL starts with the base URL. - Reload User: Determines whether the current logged-in user needs to be fetched again from the OAuth Server every time the page is refreshed. For specific use cases, see Authentication Method Integration Instructions.
Logout-Related Notes and Examples (URLs below are for illustration purposes only):
- If the Logout Endpoint is not configured, only HENGSHI will be logged out.
- If the Logout Endpoint is configured as
http://logout.comand Logout Endpoint Append Redirect URI is set totrue, the post-logout redirect URL will be appended based on the Post-logout Redirect Parameter Name. The resulting URL will behttp://logout.com?redirect_uri=http://hengshi.com&activeAuth=oauth2&tenantId=xxxx. Theredirect_uriwill be encoded; for demonstration purposes, plaintext is used here. The parameter name depends on the configuration of Post-logout Redirect Parameter Name. - In newer versions of Keycloak, the
redirect_uriparameter for logout has changed. See Redirect URI Change Notes. If the Logout Endpoint is configured and Logout Endpoint Append Redirect URI is set tofalse, Keycloak requires the user to confirm logout. If Logout Endpoint Append Redirect URI is set totrueand Post-logout Redirect Parameter Name is set topost_logout_redirect_uri, the logout action does not require user confirmation. Keycloak's parameters and behavior may vary by version; refer to the Keycloak documentation for details.
General Configuration for Synchronizing User Attributes via OAuth2:
General configurations include username mapping, display name mapping, email mapping, phone number mapping, role mapping, group mapping, organizational structure mapping, enterprise ID mapping, enterprise name mapping, platform ID, enabling SSO session expiration synchronization, and session expiration mapping. For explanations and usage of these general configuration fields, refer to the General Configuration section.
OAuth2(Azure)
Integrate with Azure OAuth server using the OAuth2 authentication method.
Azure obtains configuration information through the following steps:
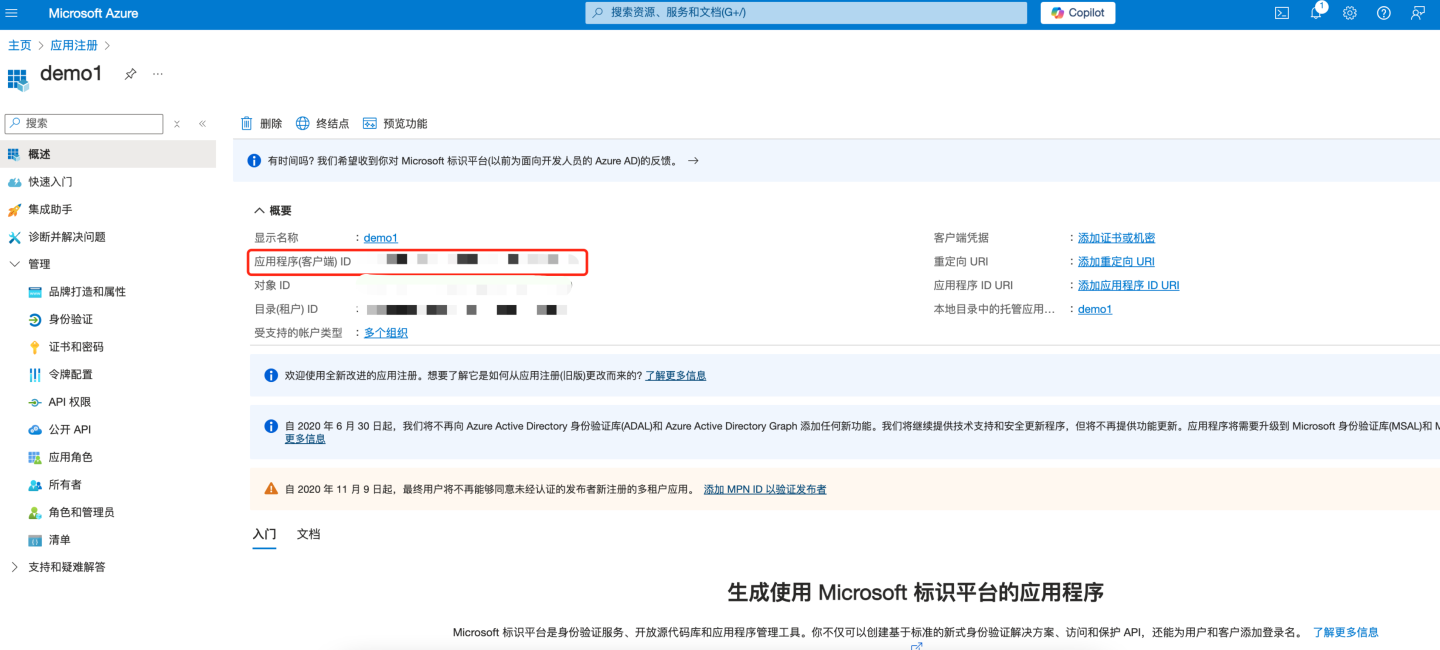
Add Application Registration
- Go to Azure
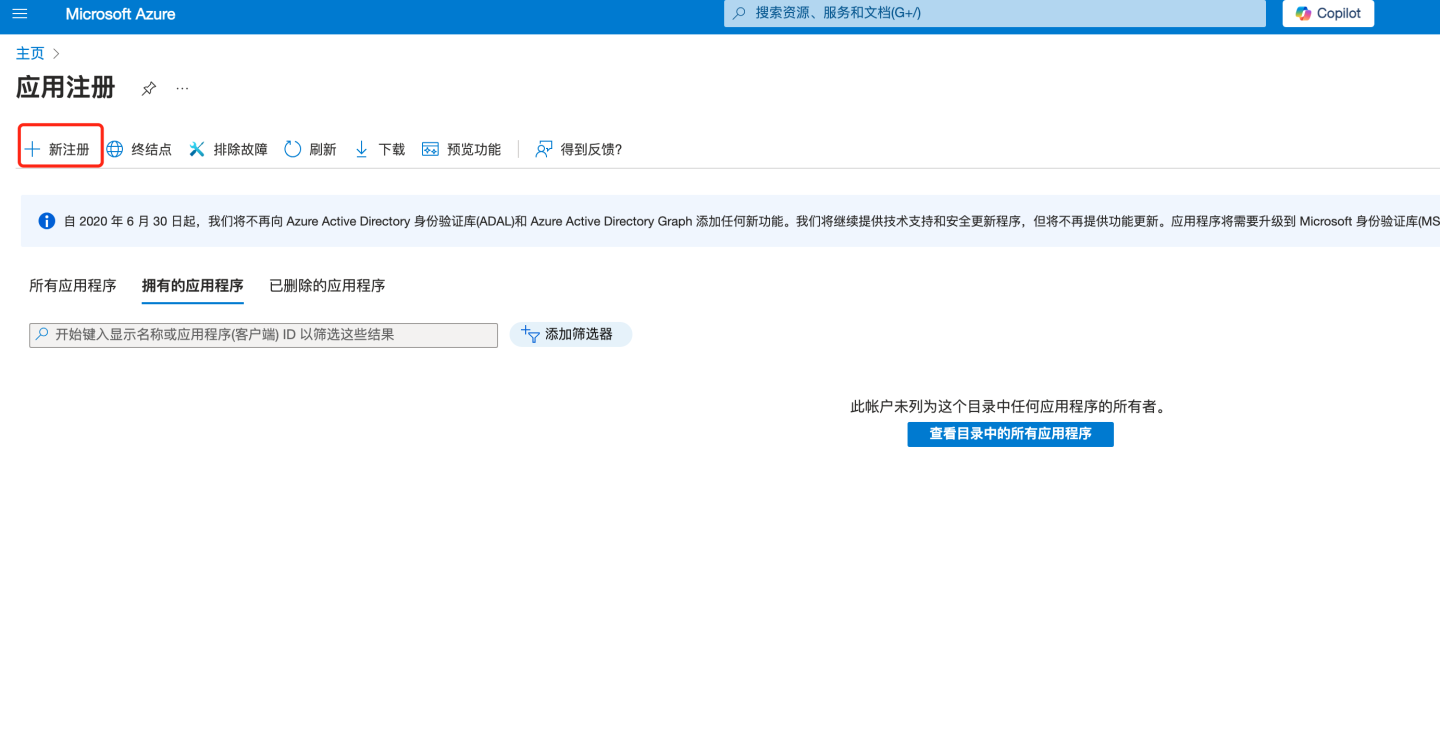
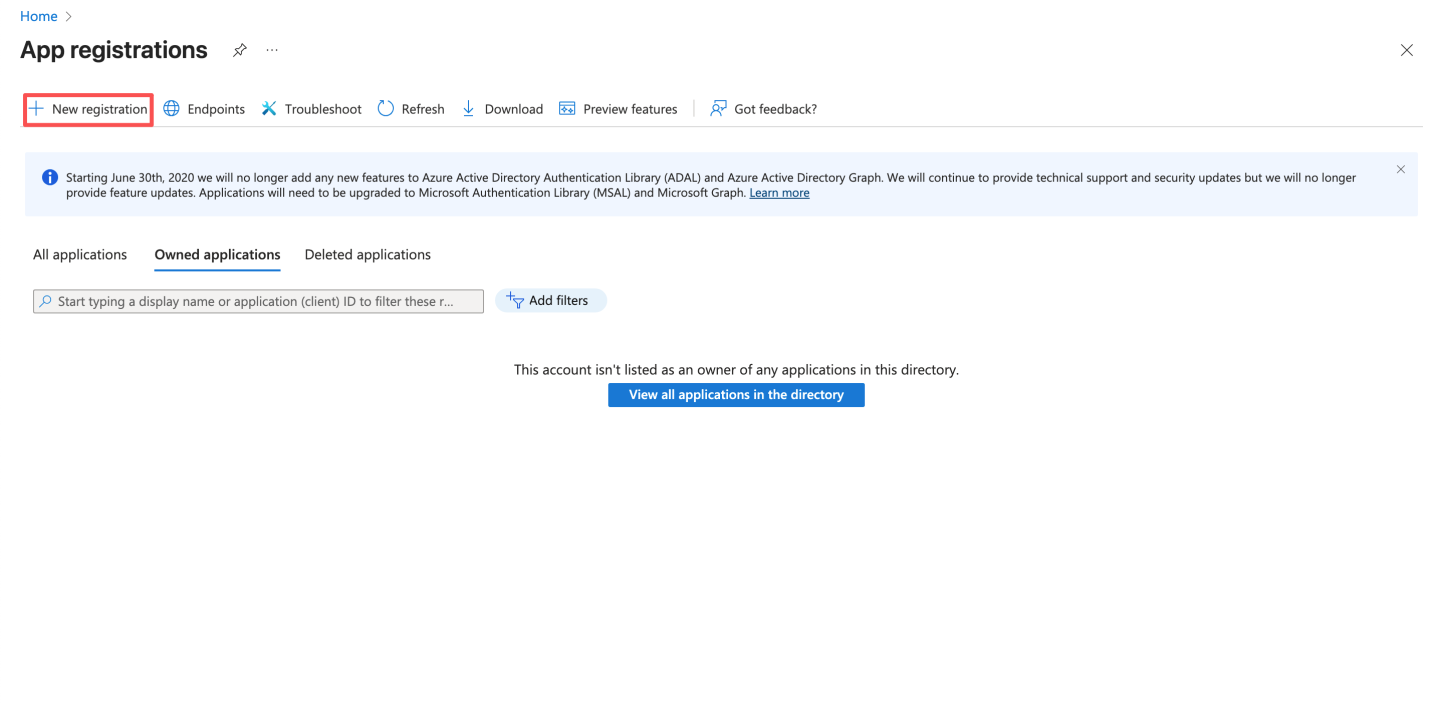
- Select "App registrations".
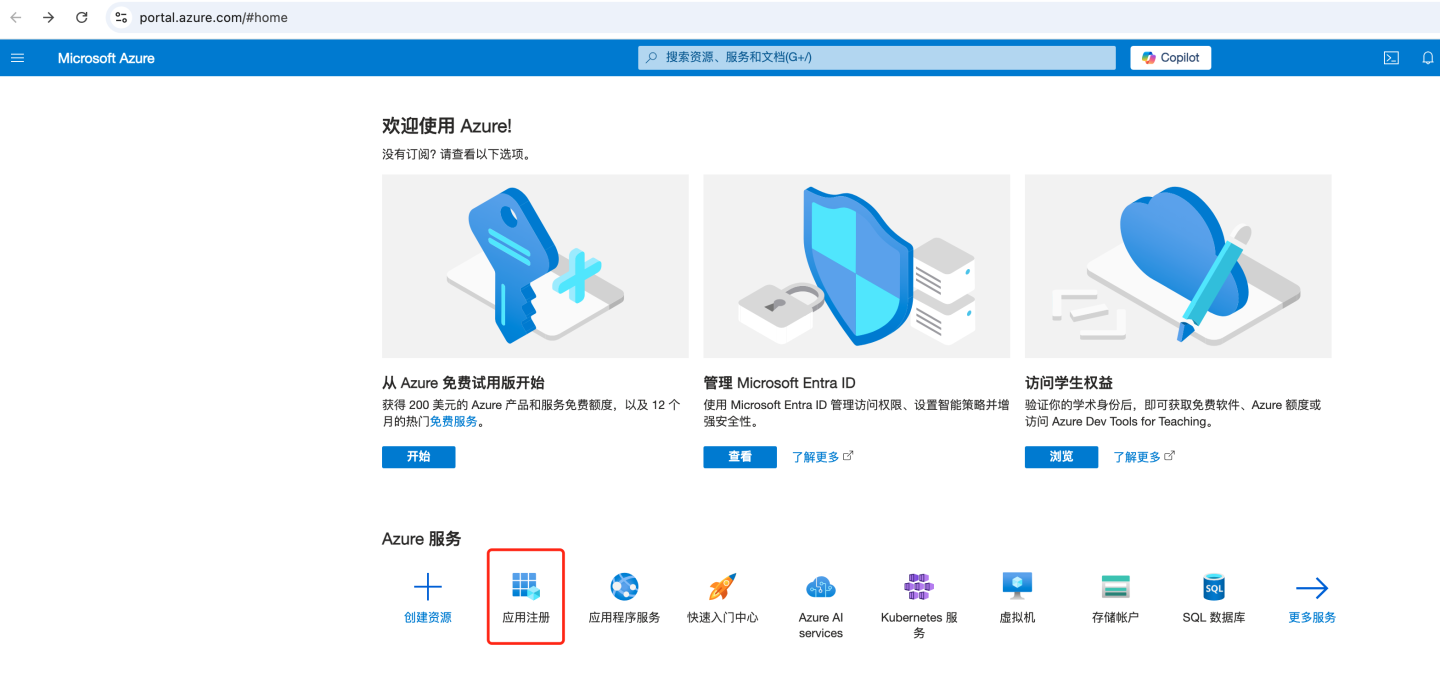
- Select "+ New registration".
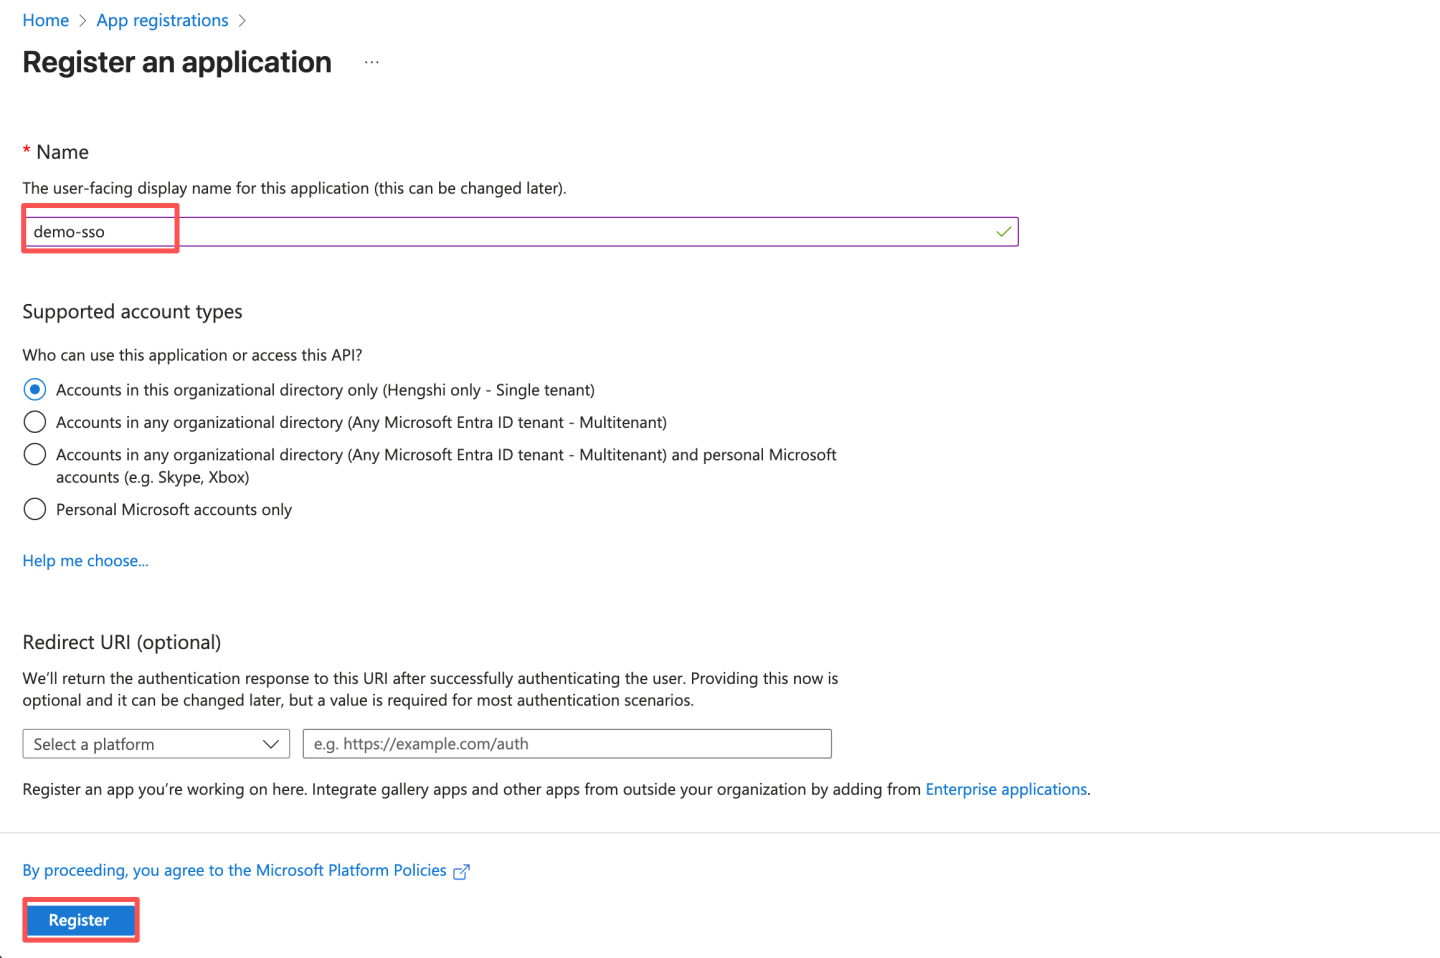
- Enter the name and other information, then click "Register".
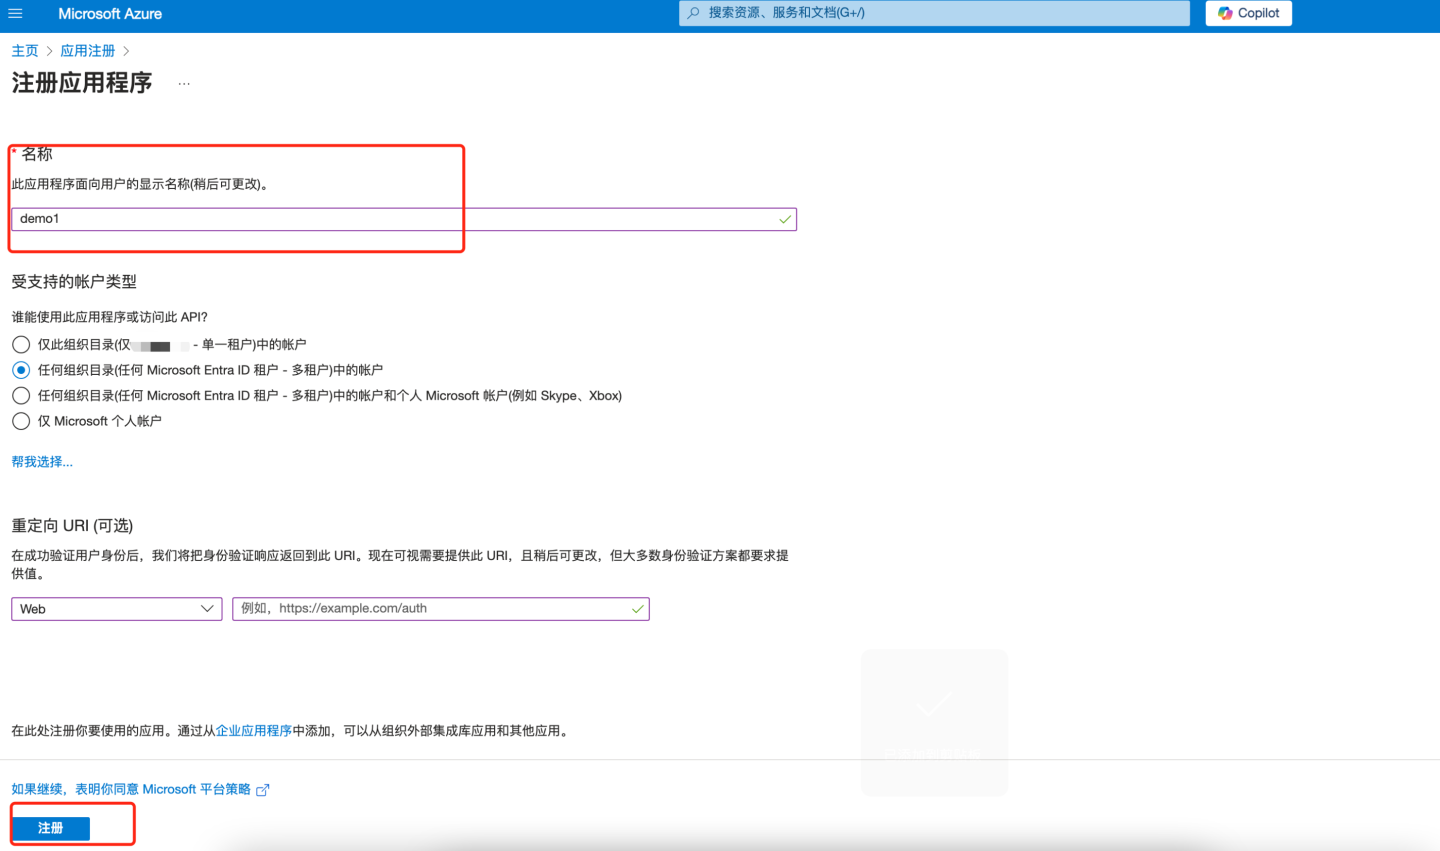
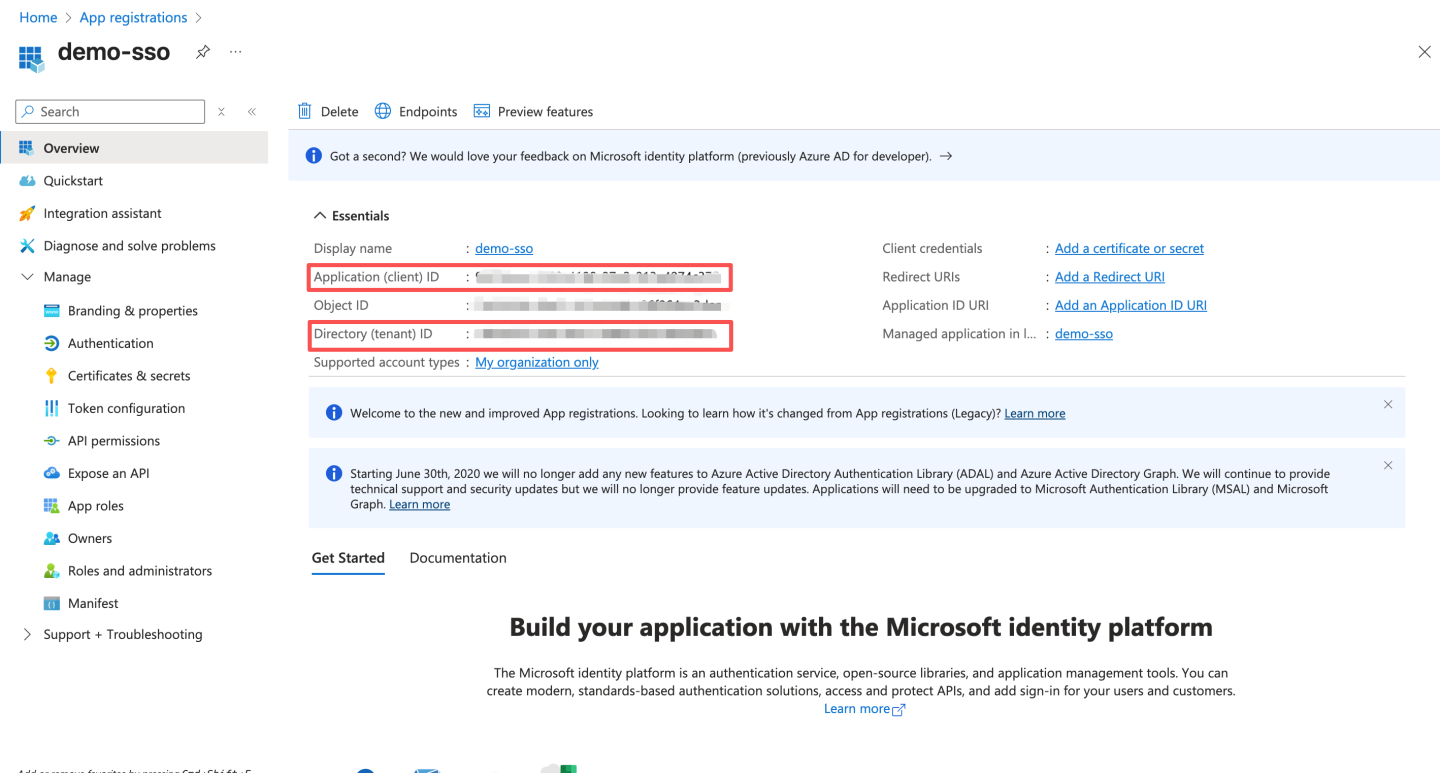
- The application is now registered in Entra ID Microsoft. At this point, the application overview page will be displayed. Record the "Application (client application ID)" information and configure the "Application (client application ID)" into the "Client ID" field in HengShi OAuth2 authentication method.
Add Web Authentication
- In the left pane under "Manage", select "Authentication".
- Select "Add a platform > Web".
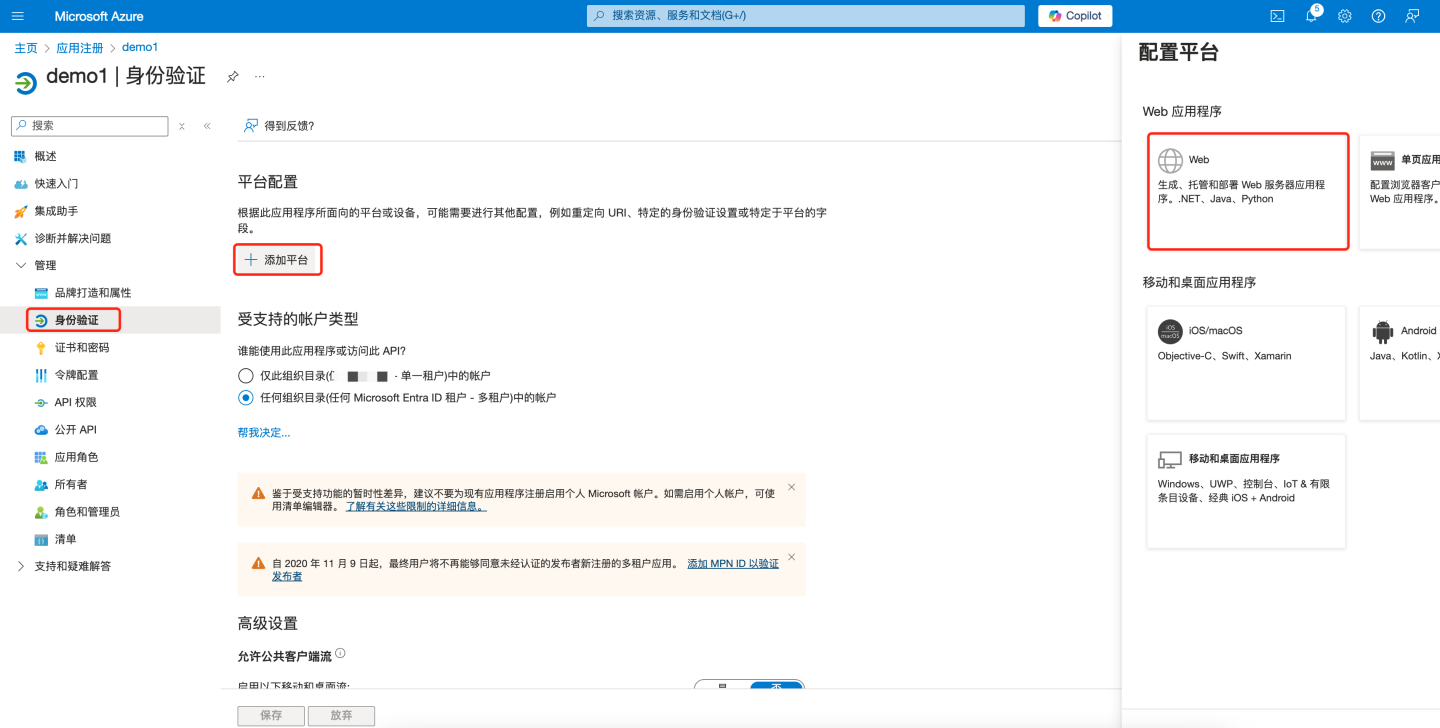
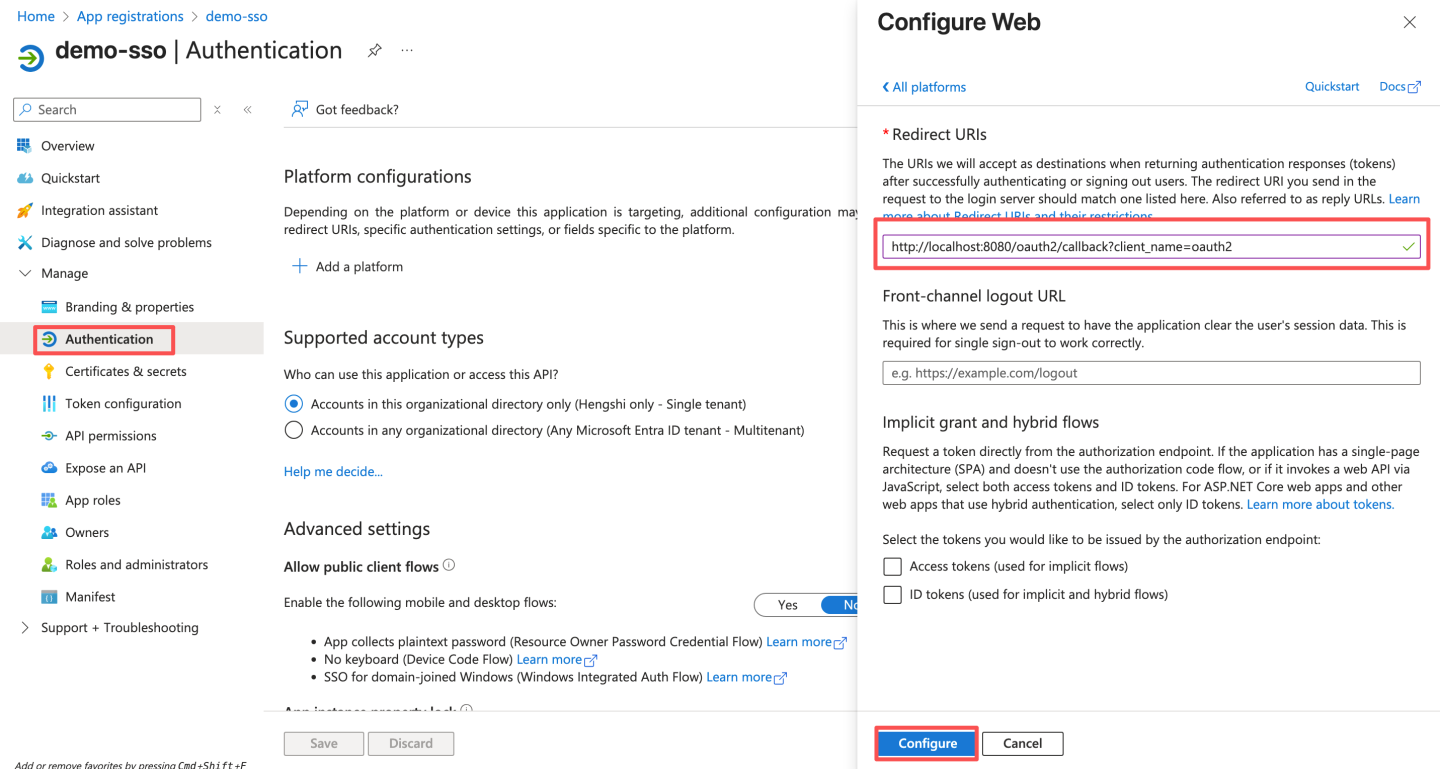
- Enter the application's redirect URL, e.g.,
{https://your-domain}/oauth2/callback?client_name=oauth2. Replace{https://your-domain}with the actual root path of the HengShi system, followed by/oauth2/callback?client_name=oauth2, then click "Configure" to save.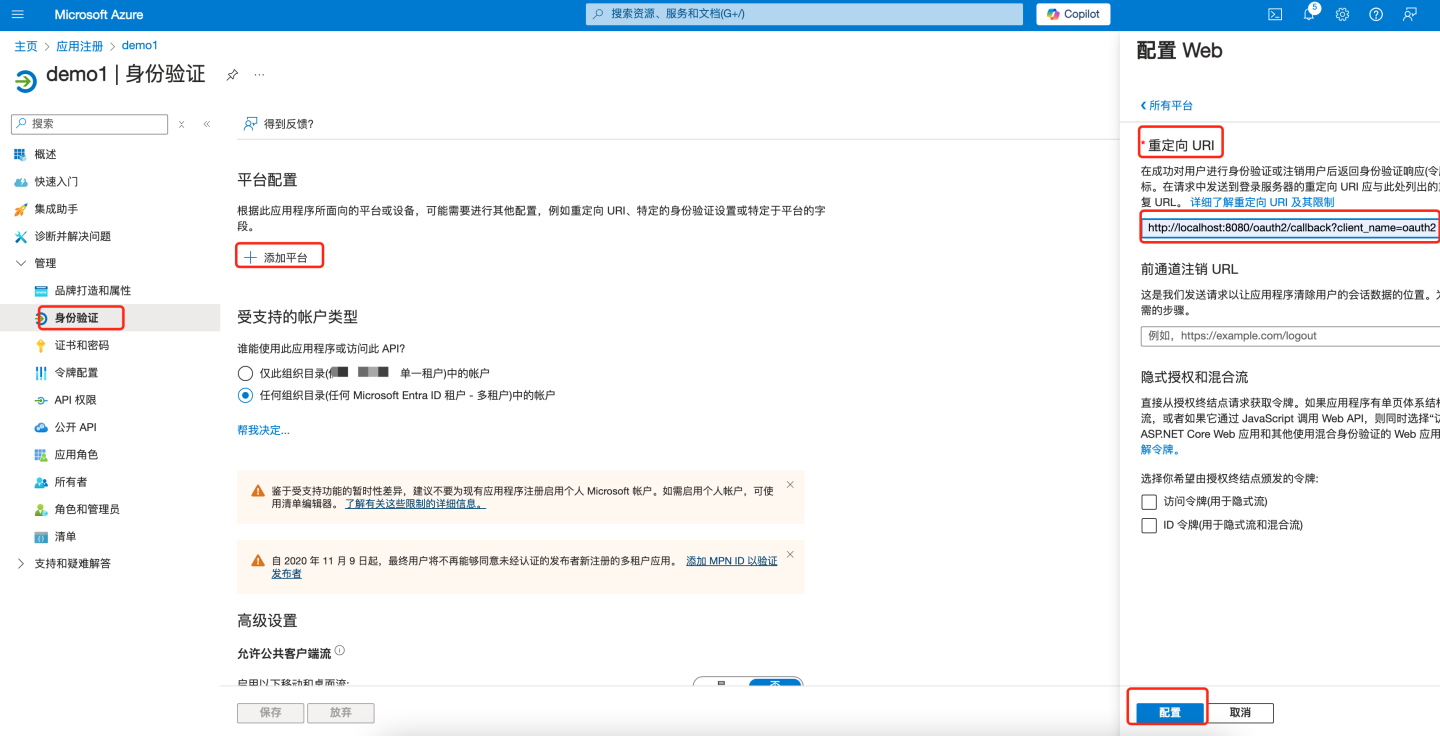
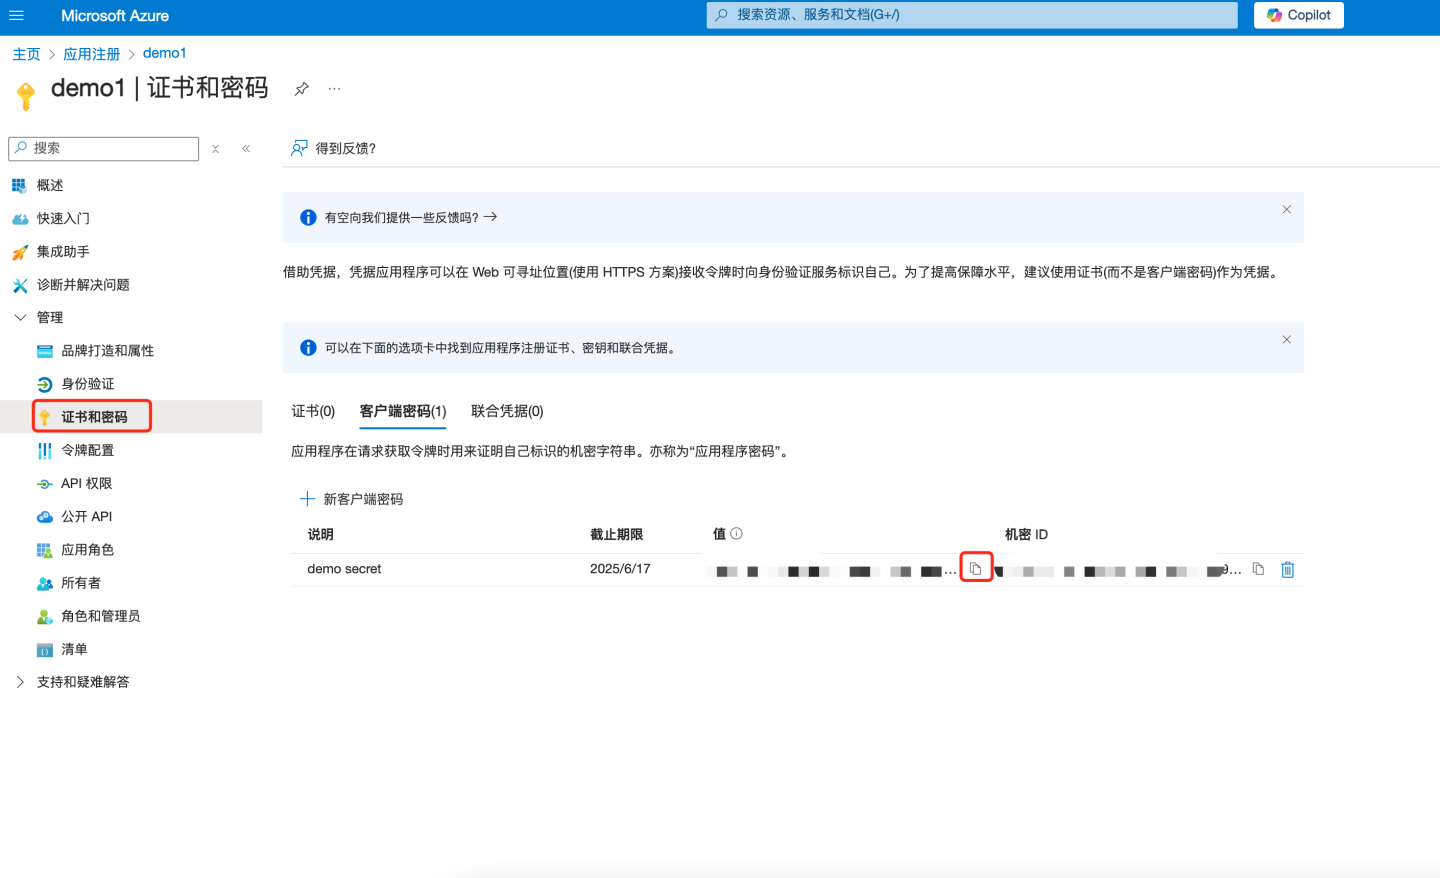
Create Client Secret
- In the left pane under "Manage", select "Certificates & secrets". Click "+ New client secret" on the right side of the page.
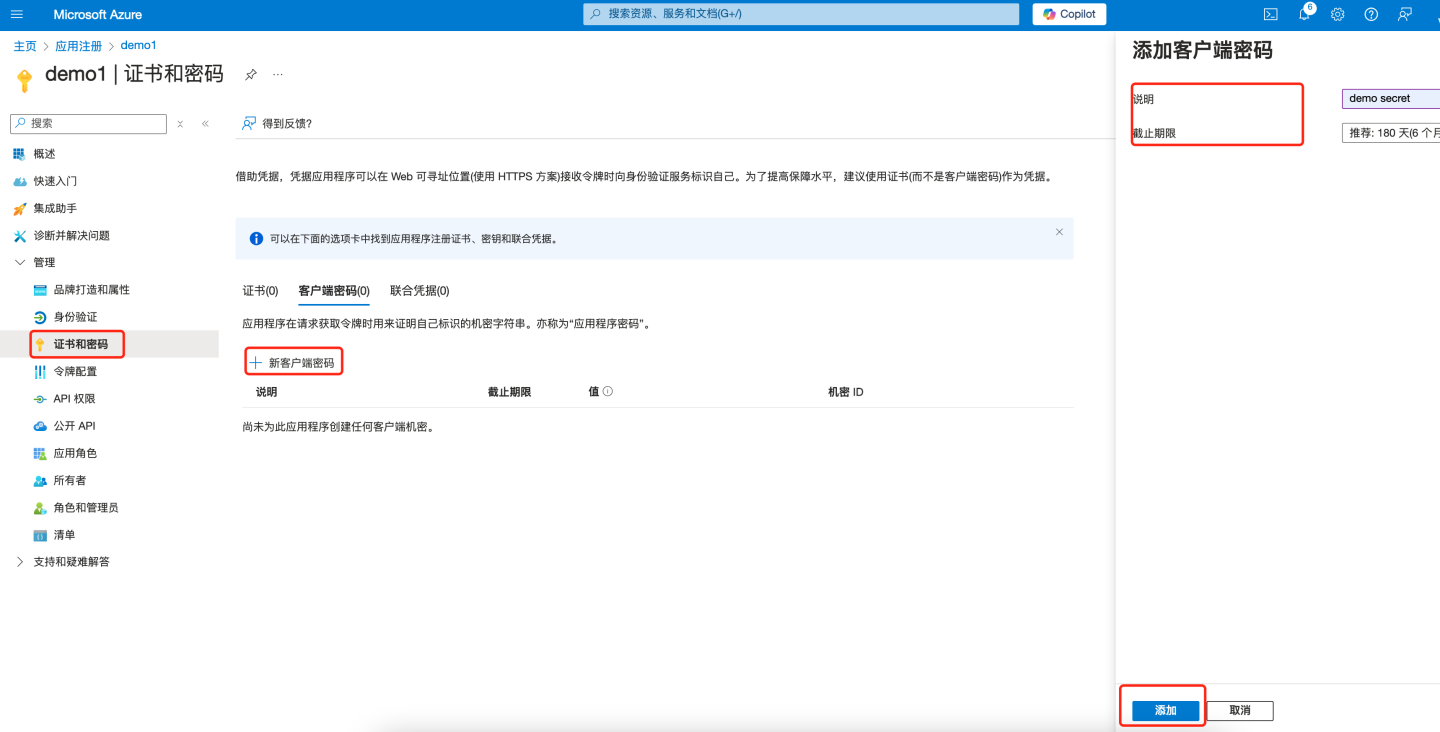
- Under "Value", select "Copy to clipboard" to save the client secret value for further use (the client secret value cannot be viewed after creation, so make sure to save it before leaving the page). Configure this secret into the "Client Secret" field in HengShi OAuth2 authentication method.
- In the left pane under "Manage", select "Certificates & secrets". Click "+ New client secret" on the right side of the page.
Obtain the configuration information required for the OAuth Client and configure HengShi OAuth authentication.
- Configure the "Application (client application ID)" recorded in step [1.5] into the "Client ID" field in HengShi OAuth authentication.
- Configure the "Client secret value" recorded in step [3.2] into the "Client Secret" field in HengShi OAuth authentication.
- In the left pane under "Overview", select "Endpoints" to view relevant information.
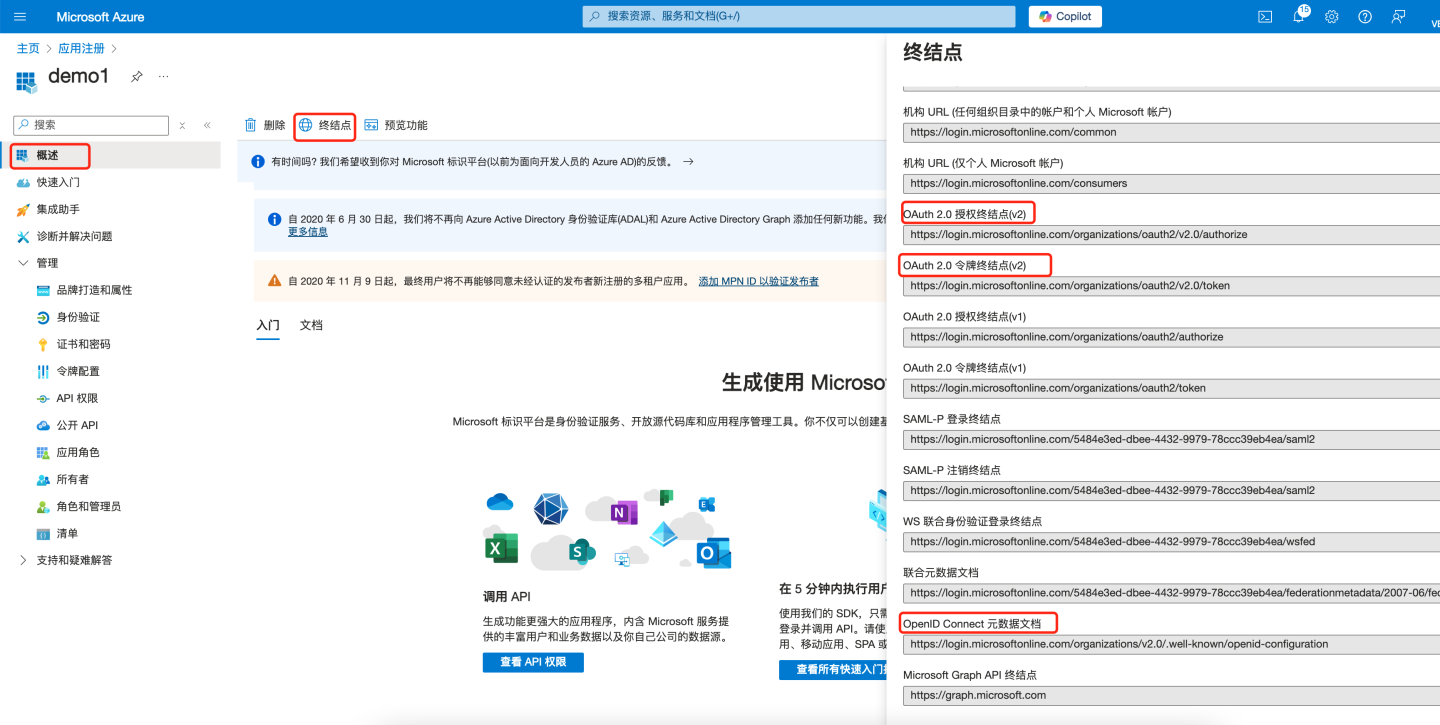
Configure the "OAuth 2.0 authorization endpoint (v2)" into the "Authorize API" field in HengShi OAuth authentication.
Configure the "OAuth 2.0 token endpoint (v2)" into the "Token API" field in HengShi OAuth authentication.
Open the URL under "OpenID Connect metadata document":
Configure the "userinfo_endpoint" into the "User-info API" field in HengShi OAuth authentication.
Configure "openid" into the "Scope" field in HengShi OAuth authentication.
At this point, the necessary information for integration using the OAuth2 authentication method has been configured. For more detailed configuration, you can refer to the following resources:
- HengShi OAuth2 configuration instructions can be found in the OAuth2 section.
- Teams-related explanations can be found in the official documentation.
DingTalk
DingTalk authentication methods support QR code login and micro-app seamless login.
DingTalk authentication-related configurations include:
| Configuration Item | Required | Description |
|---|---|---|
| AppKey | Yes | Basic information of DingTalk micro-app, refer to DingTalk Micro-App Configuration section for details. |
| AppSecret | Yes | Basic information of DingTalk micro-app, refer to DingTalk Micro-App Configuration section for details. |
| CorpId | No | If administrators need seamless login in the DingTalk application management backend, this information needs to be configured. CorpId and SSOsecret can be obtained from DingTalk Micro-App Configuration. |
| SSOsecret | No | If administrators need seamless login in the DingTalk application management backend, this information needs to be configured. CorpId and SSOsecret can be obtained from DingTalk Micro-App Configuration. |
| Login Method | Yes | Configure the default login method, which takes effect when the URL does not specify a method. authCode is for micro-app seamless login, and QR code is for login via scanning. |
| Sync Frequency | No | Configure the synchronization frequency for organizational structure, in minutes. 0 means no synchronization. If organizational structure synchronization is required, AppKey and AppSecret must be configured, and the app must enable address book permissions in permission management. |
| AgentId | No | Required for scenarios like subscription and alert message pushing. Refer to DingTalk Work Notification for details. |
| Auto-Join Organization on Login | No | Whether to automatically join the existing organizational structure based on the department information of the logged-in user. |
DingTalk's general configuration for synchronizing user attributes includes username mapping, display name mapping, email mapping, and phone number mapping.
For the description and usage of general configuration fields, refer to the General Configuration section.
DingTalk Configuration for Micro Apps
The following describes how to create and configure micro apps on the DingTalk Developer Platform.
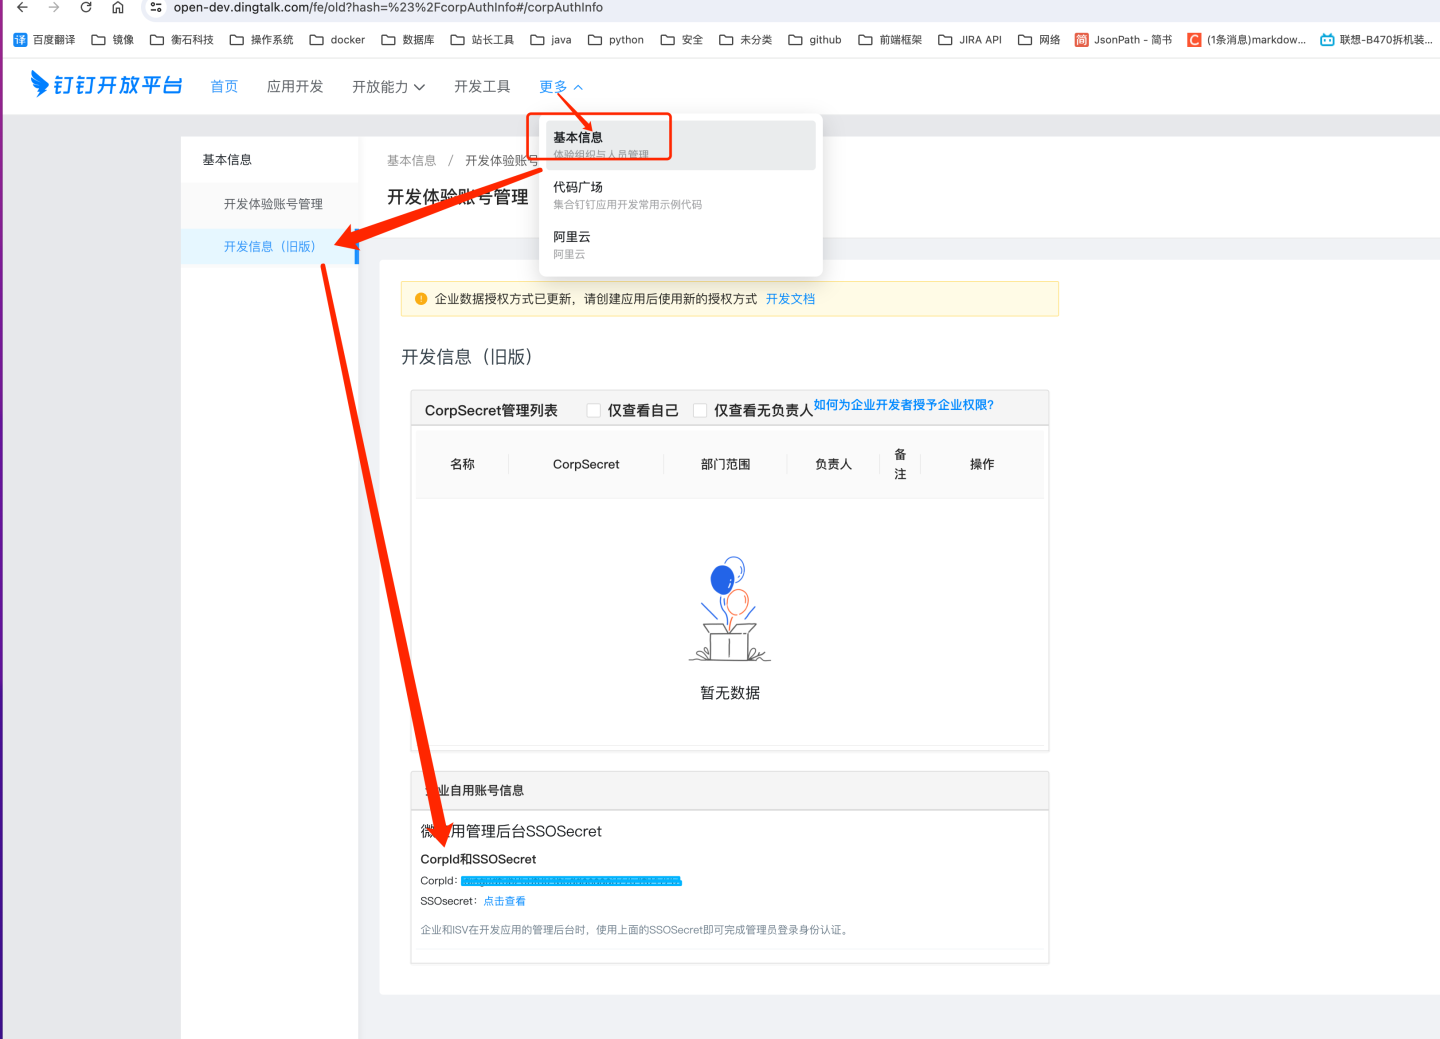
Obtain DingTalk's CorpId and SSOSecret
Retrieve DingTalk CorpId and SSOSecret from Developer Experience Account Management in DingTalk.
https://open-dev.dingtalk.com/fe/old?hash=%23%2FcorpAuthInfo#/corpAuthInfo
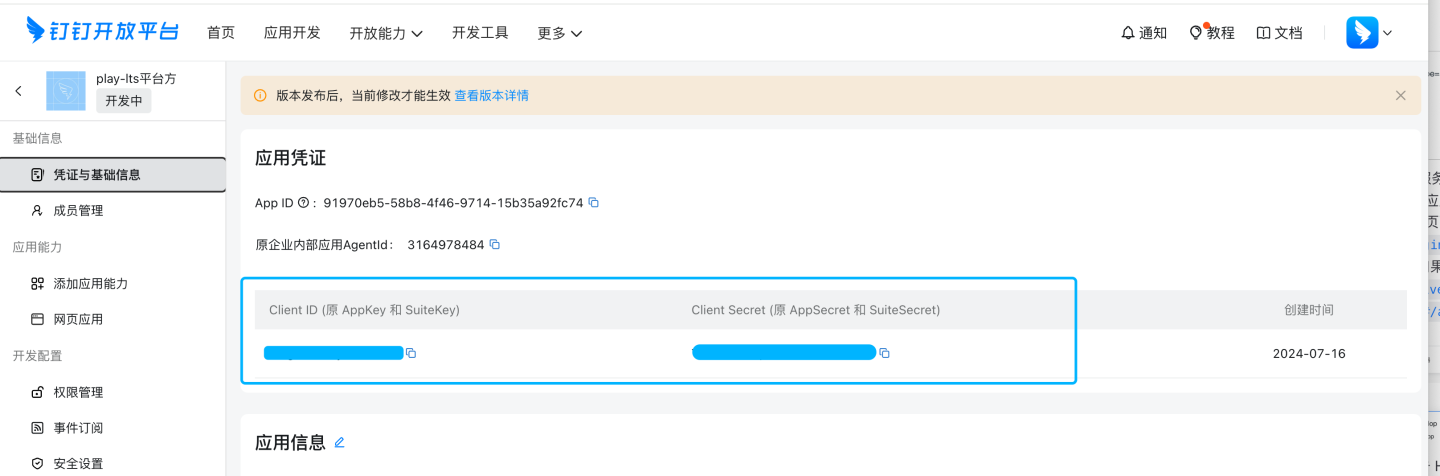
Navigate to
DingTalk Developer Console -> App Development -> H5 Micro Appand click to create an app.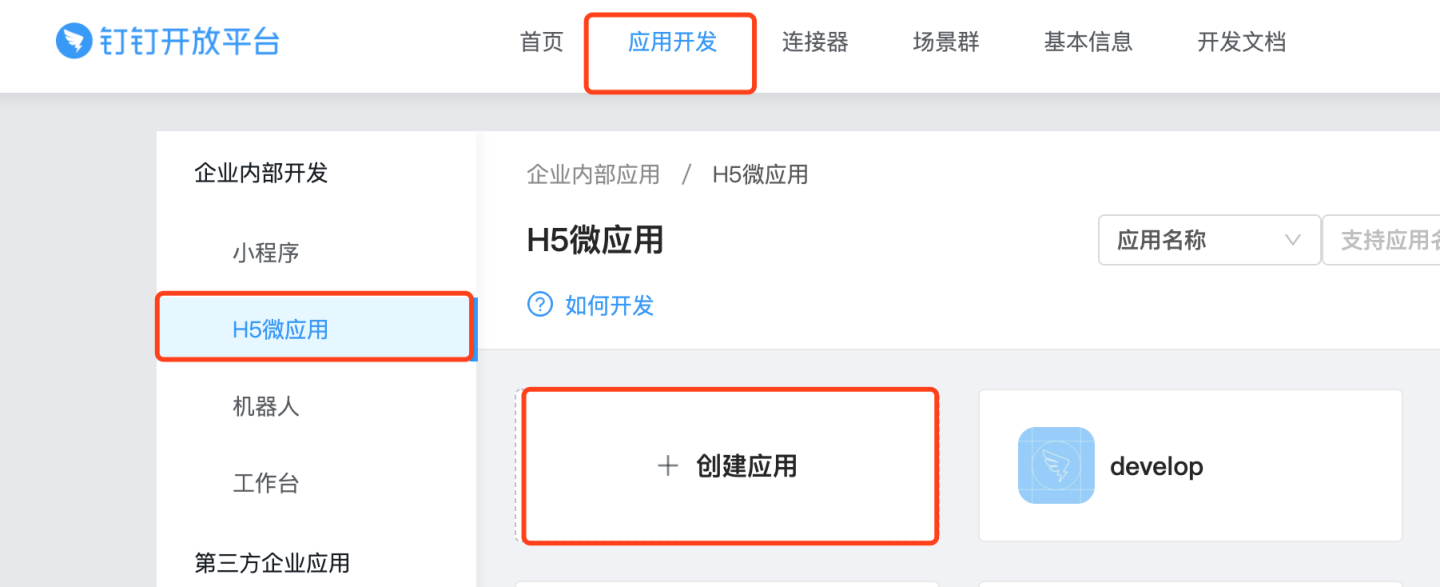
In the basic information section, you can view and obtain the AppKey and AppSecret. These two pieces of information need to be synchronized to the corresponding configuration fields in the DingTalk configuration page of the HENGSHI SENSE system.
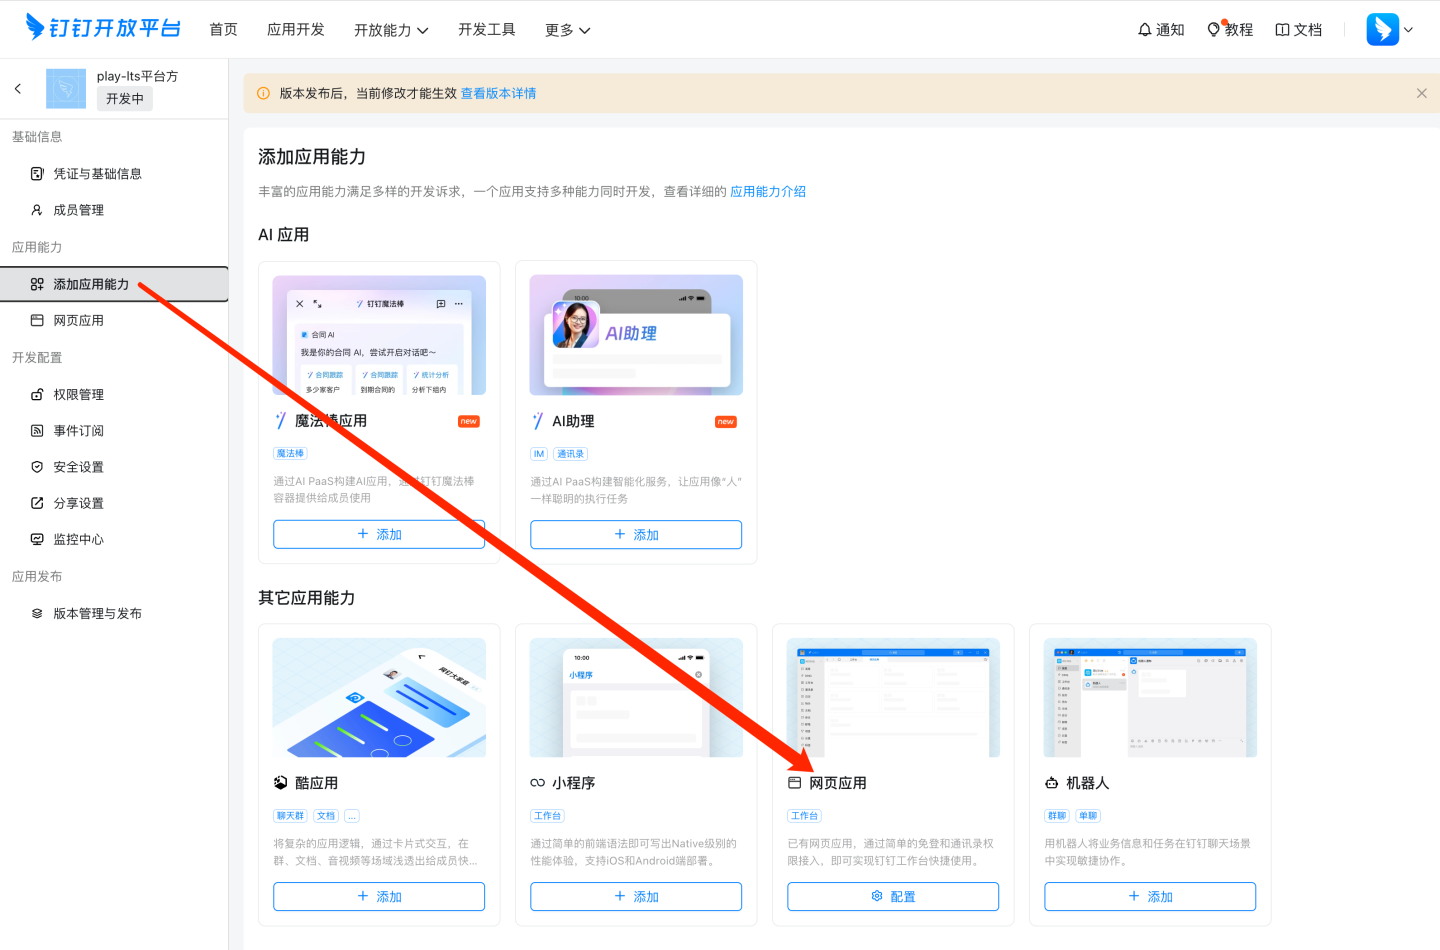
Add app capabilities.
Web H5 App Configuration
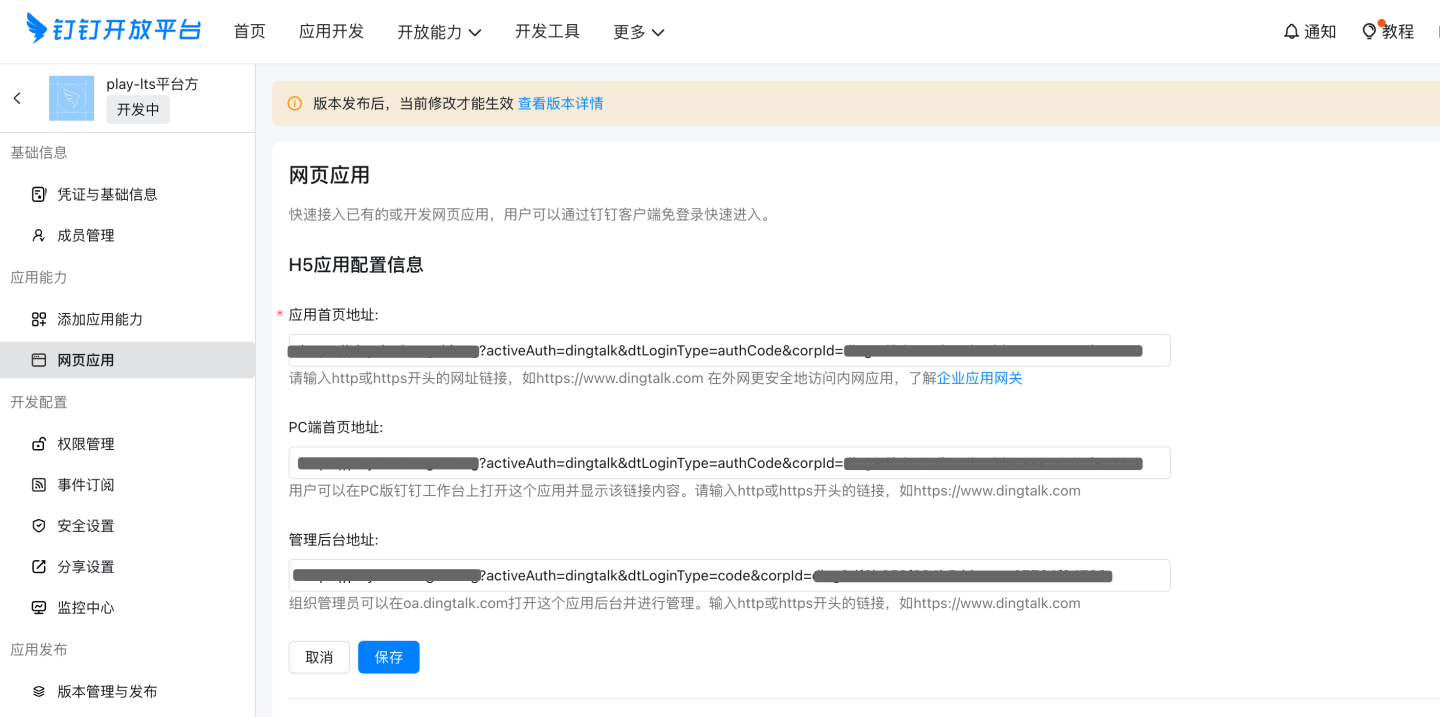
Configuration Item Format Description App Homepage URL http://{host}:{port}/?activeAuth=dingtalk&dtLoginType=authCode&corpId={corpId} dtLoginType=authCode PC Homepage URL http://{host}:{port}/?activeAuth=dingtalk&dtLoginType=authCode&corpId={corpId} dtLoginType=authCode Admin Console URL http://{host}:{port}/?activeAuth=dingtalk&dtLoginType=code&corpId={corpId} dtLoginType=code Please Note:
- {corpId} needs to be replaced with the correct corpId value.
- If tenant configuration for DingTalk is required, you need to add the tenantCode or tenantId parameter (tenantId is recommended). The format is as follows: http://{host}:{port}/?activeAuth=dingtalk&dtLoginType=authCode&corpId={corpId}&tenantId={tenantId}
- tenantId is automatically generated after creating a tenant.
Security Settings
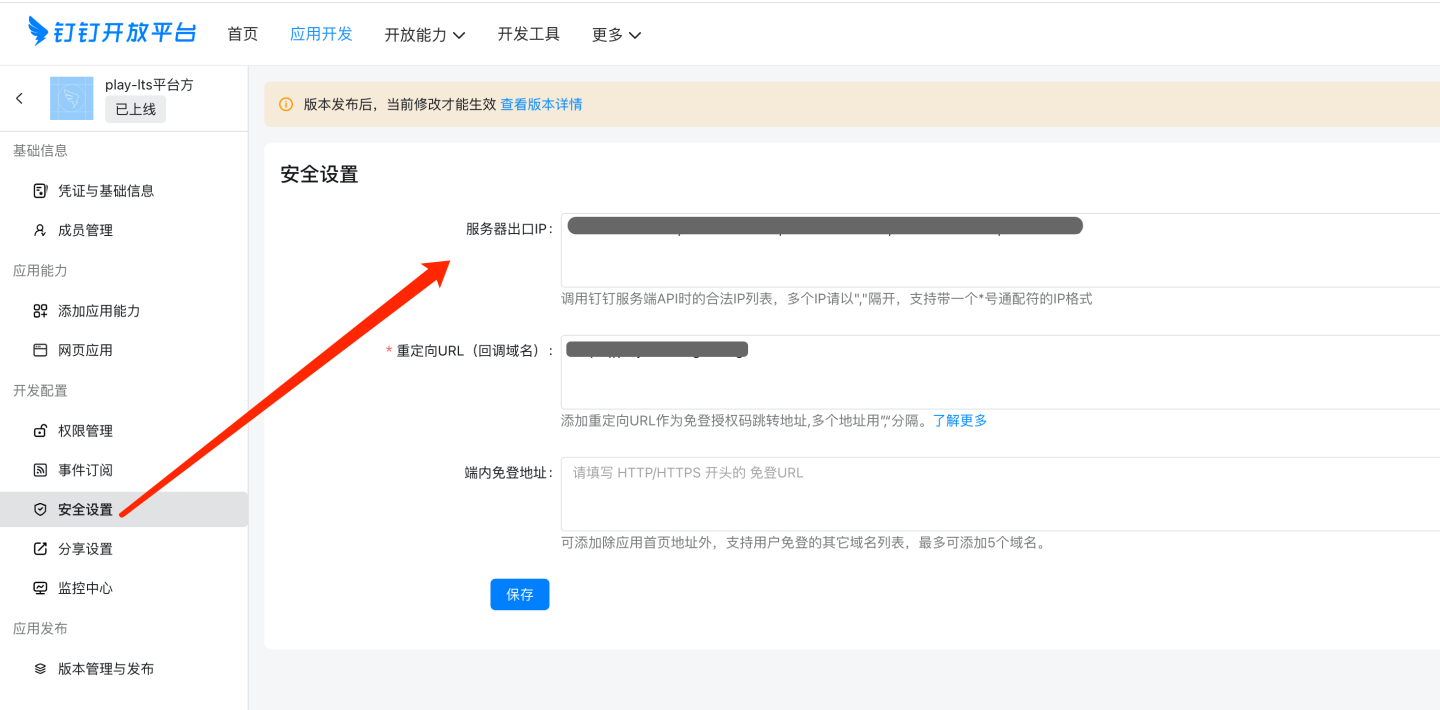
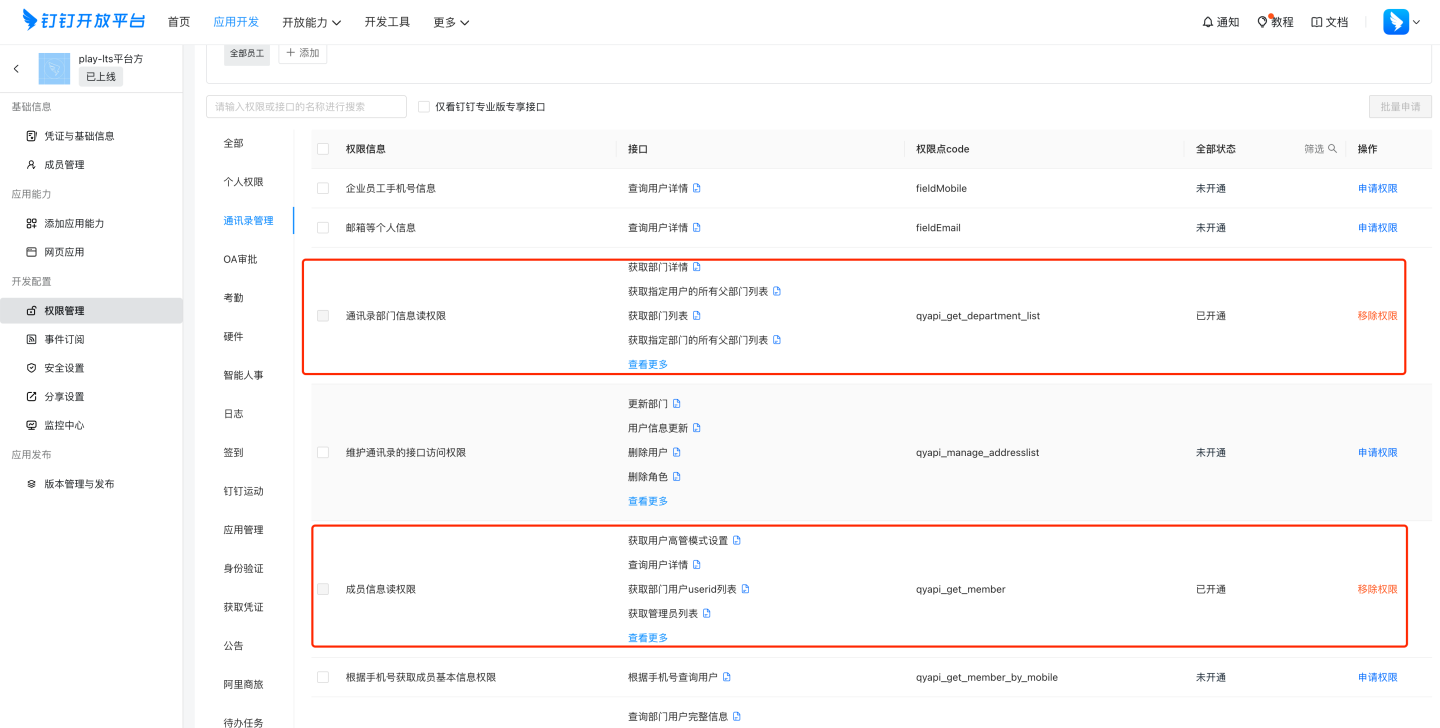
Configuration Item Description Server Outbound IP Enter the server outbound IP (can be queried via https://www.ip138.com/or obtained from the network administrator).Redirect URL (Callback Domain) BaseURL of the HENGSHI service. In-App Login-Free URL Fill in as needed. Permission Management
Currently known required permissions are as follows:
Permission Information Permission Code Read Department Information qyapi_get_department_list Read Member Information qyapi_get_member Read Personal Contact Info Contact.User.Read Employee Mobile Number Info fieldMobile Email and Other Personal Info fieldEmail Please Note:
DingTalk's permission management may change. Refer to DingTalk's official documentation for details.
Version Management and Release
You can set the usage scope for app release as needed. Only personnel within the scope can see the app.
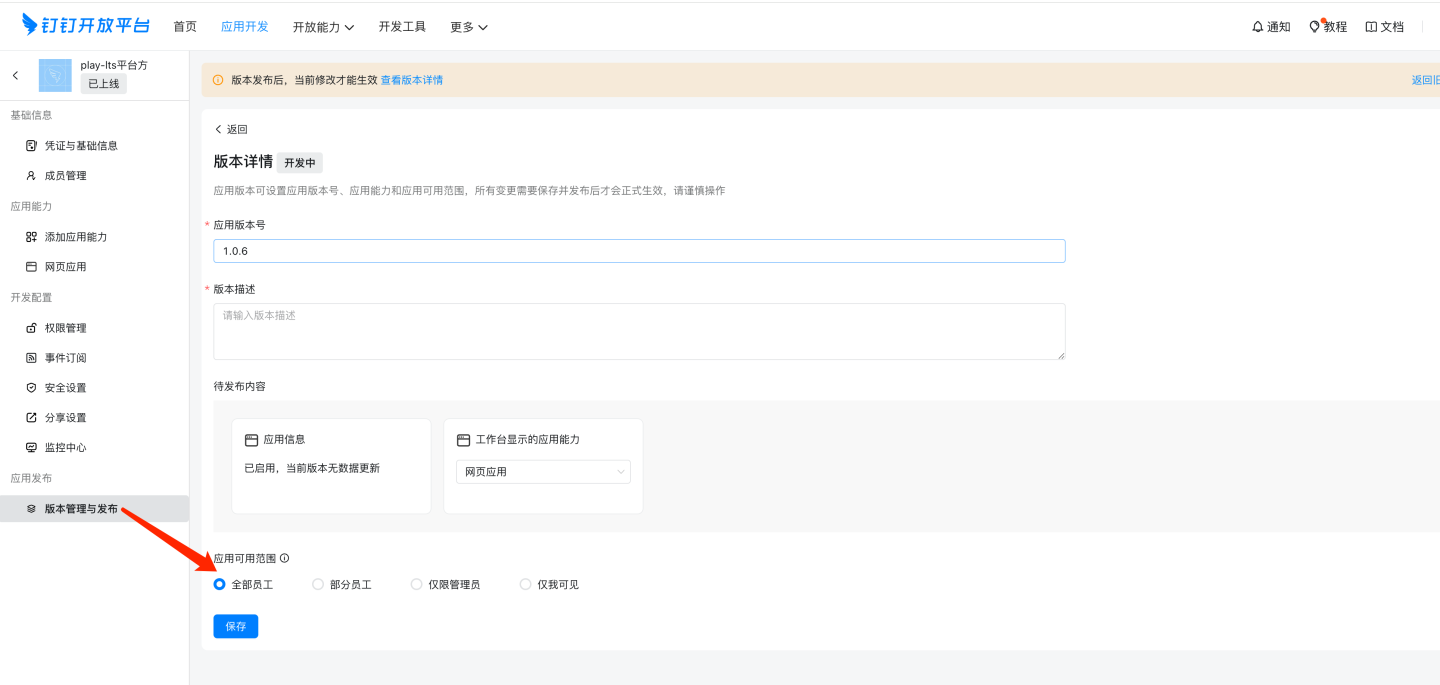
Please Note:
Images related to DingTalk micro app documentation may change. Refer to DingTalk's official documentation for the latest updates.
Enterprise WeChat
Enterprise WeChat authentication methods support QR code login and app-based seamless login.
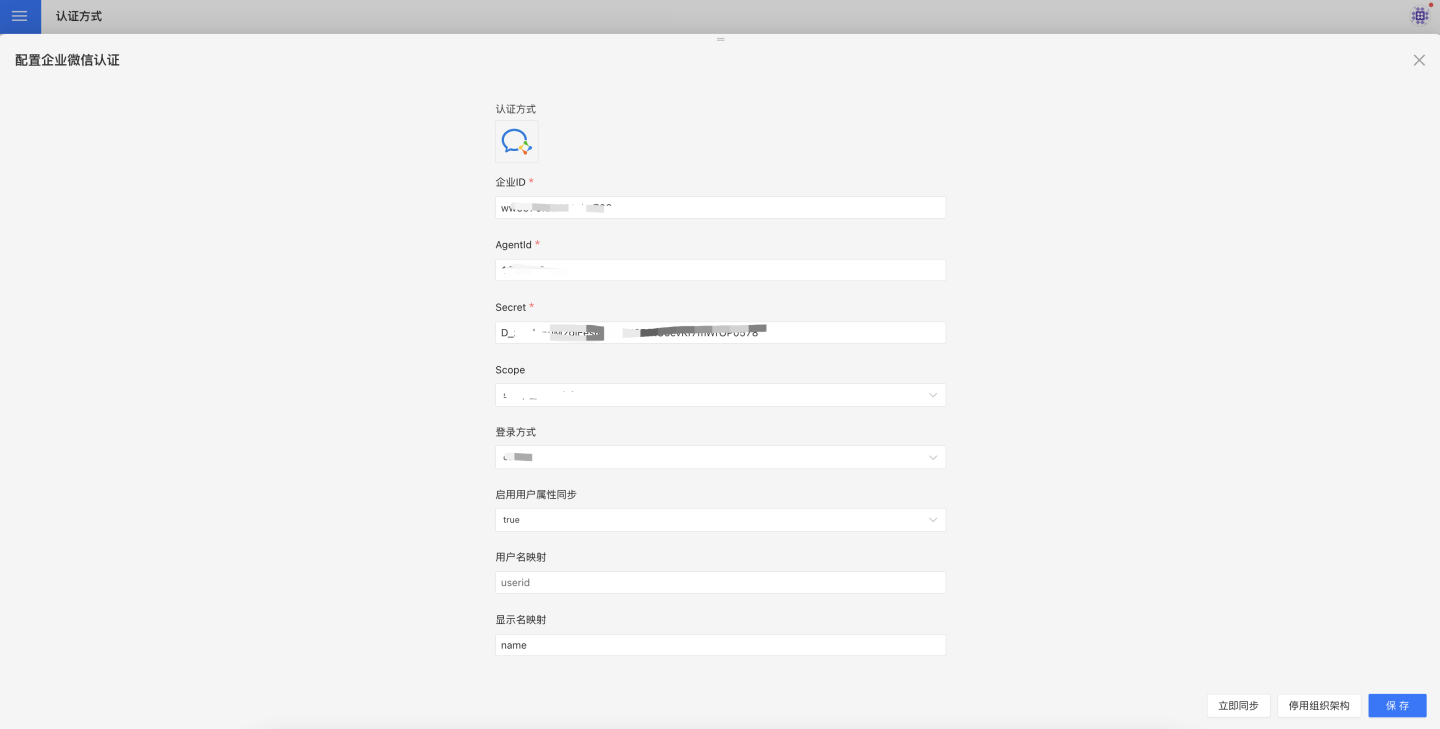
Enterprise WeChat authentication-related configurations include:
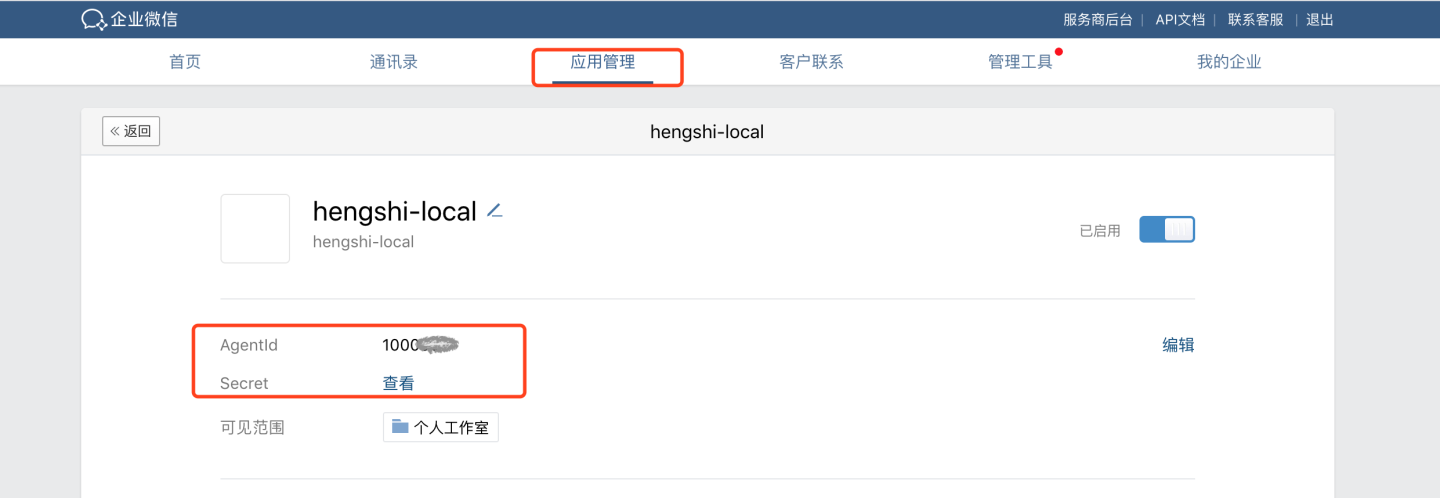
- Enterprise ID, AgentId, Secret: Basic information of Enterprise WeChat, which can be obtained by referring to the Enterprise WeChat Configuration for Custom Apps section.
- Login Method: This is the default login method configuration, which takes effect when the URL does not specify a method. OAuth is app-based seamless login, while QR code login is achieved by scanning a QR code.
- Scope:
- snsapi_base: Silent authorization, which allows access to basic member information (UserId).
- snsapi_privateinfo: Manual authorization, which allows access to detailed member information, including phone numbers, email addresses, etc. For more details, please refer to the Authentication section in the Enterprise WeChat Developer Documentation.
- Synchronization Frequency: Configures the synchronization of organizational structures, measured in minutes. A value of 0 means no synchronization. The visible scope of the Enterprise WeChat app should select the root node of the organizational structure.
- Automatically Join Organization on Login: Determines whether the user will automatically join the existing organizational structure based on their department information during login.
Enterprise WeChat authentication is used for general configurations to synchronize user attributes, such as username mapping, display name mapping, email mapping, and phone number mapping. For explanations and usage of general configuration fields, please refer to the General Configuration section.
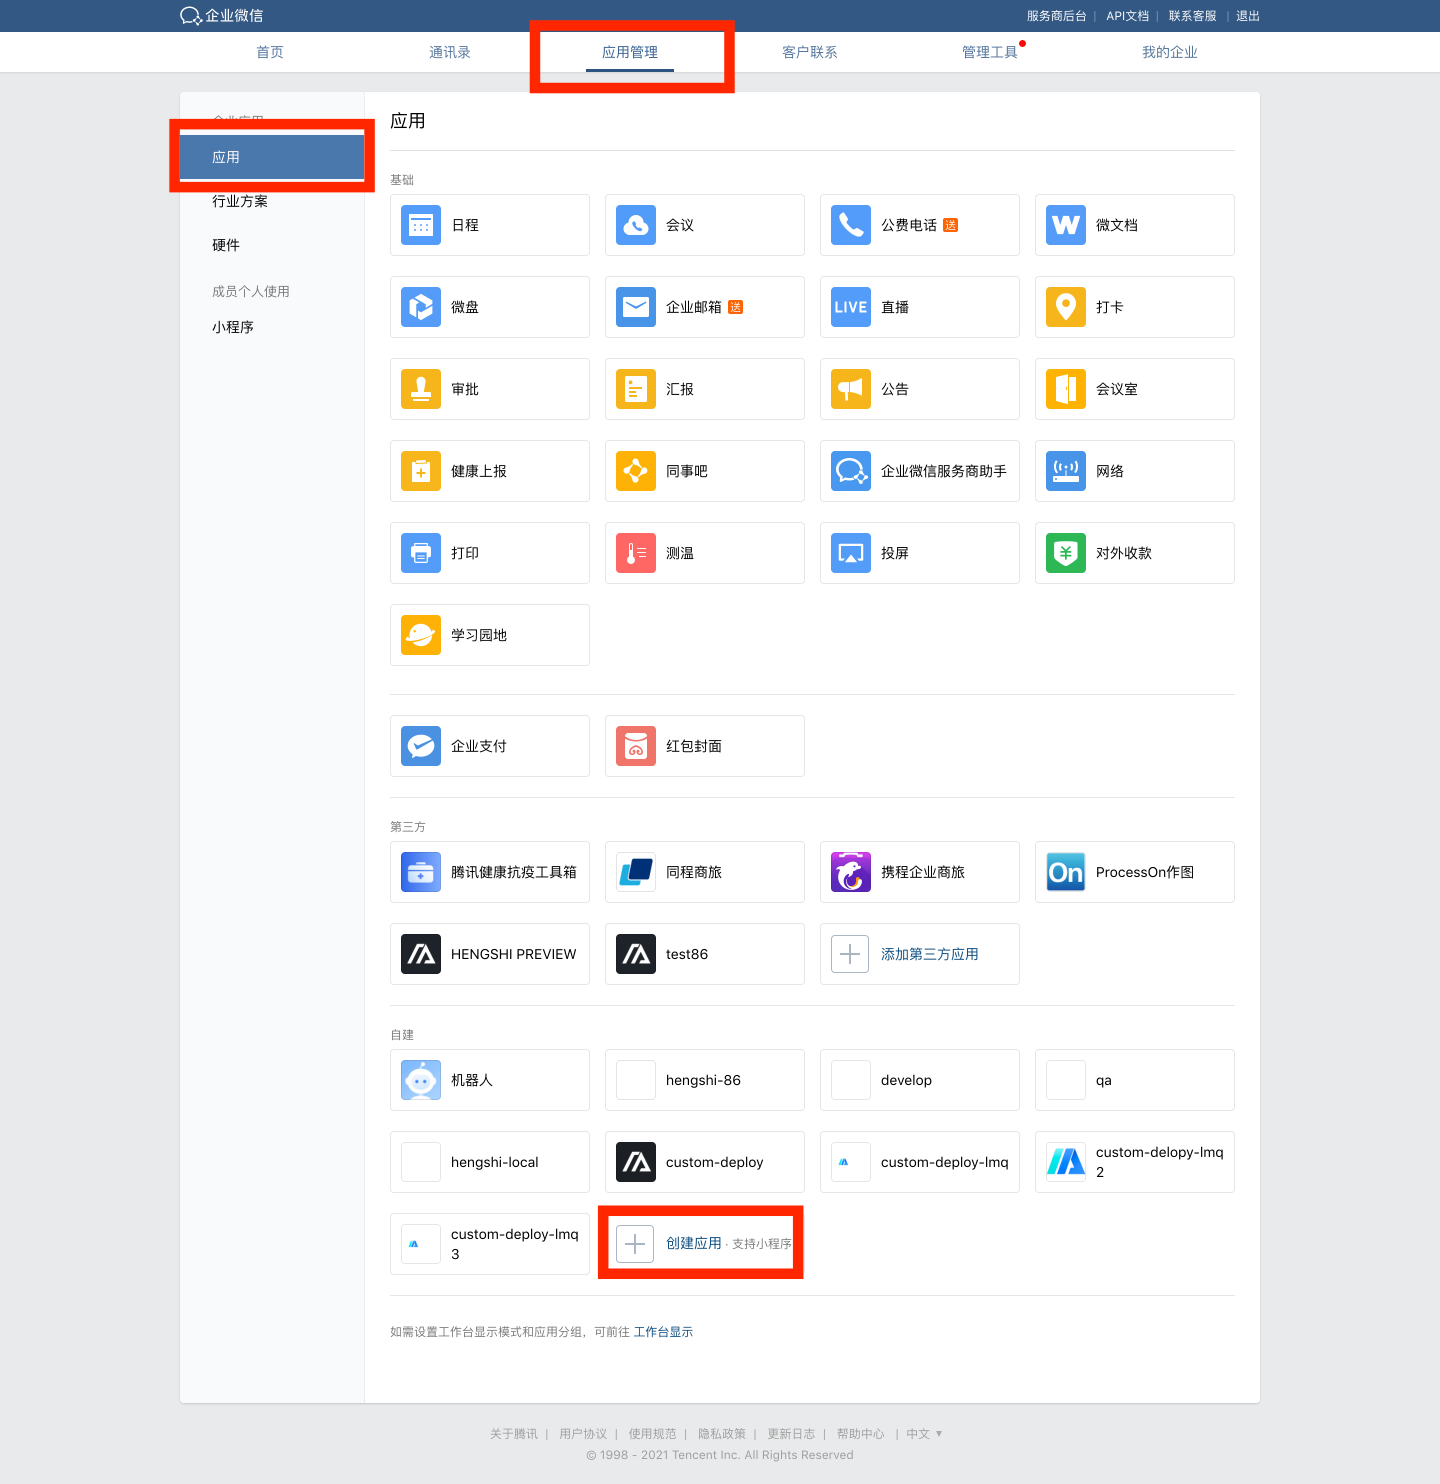
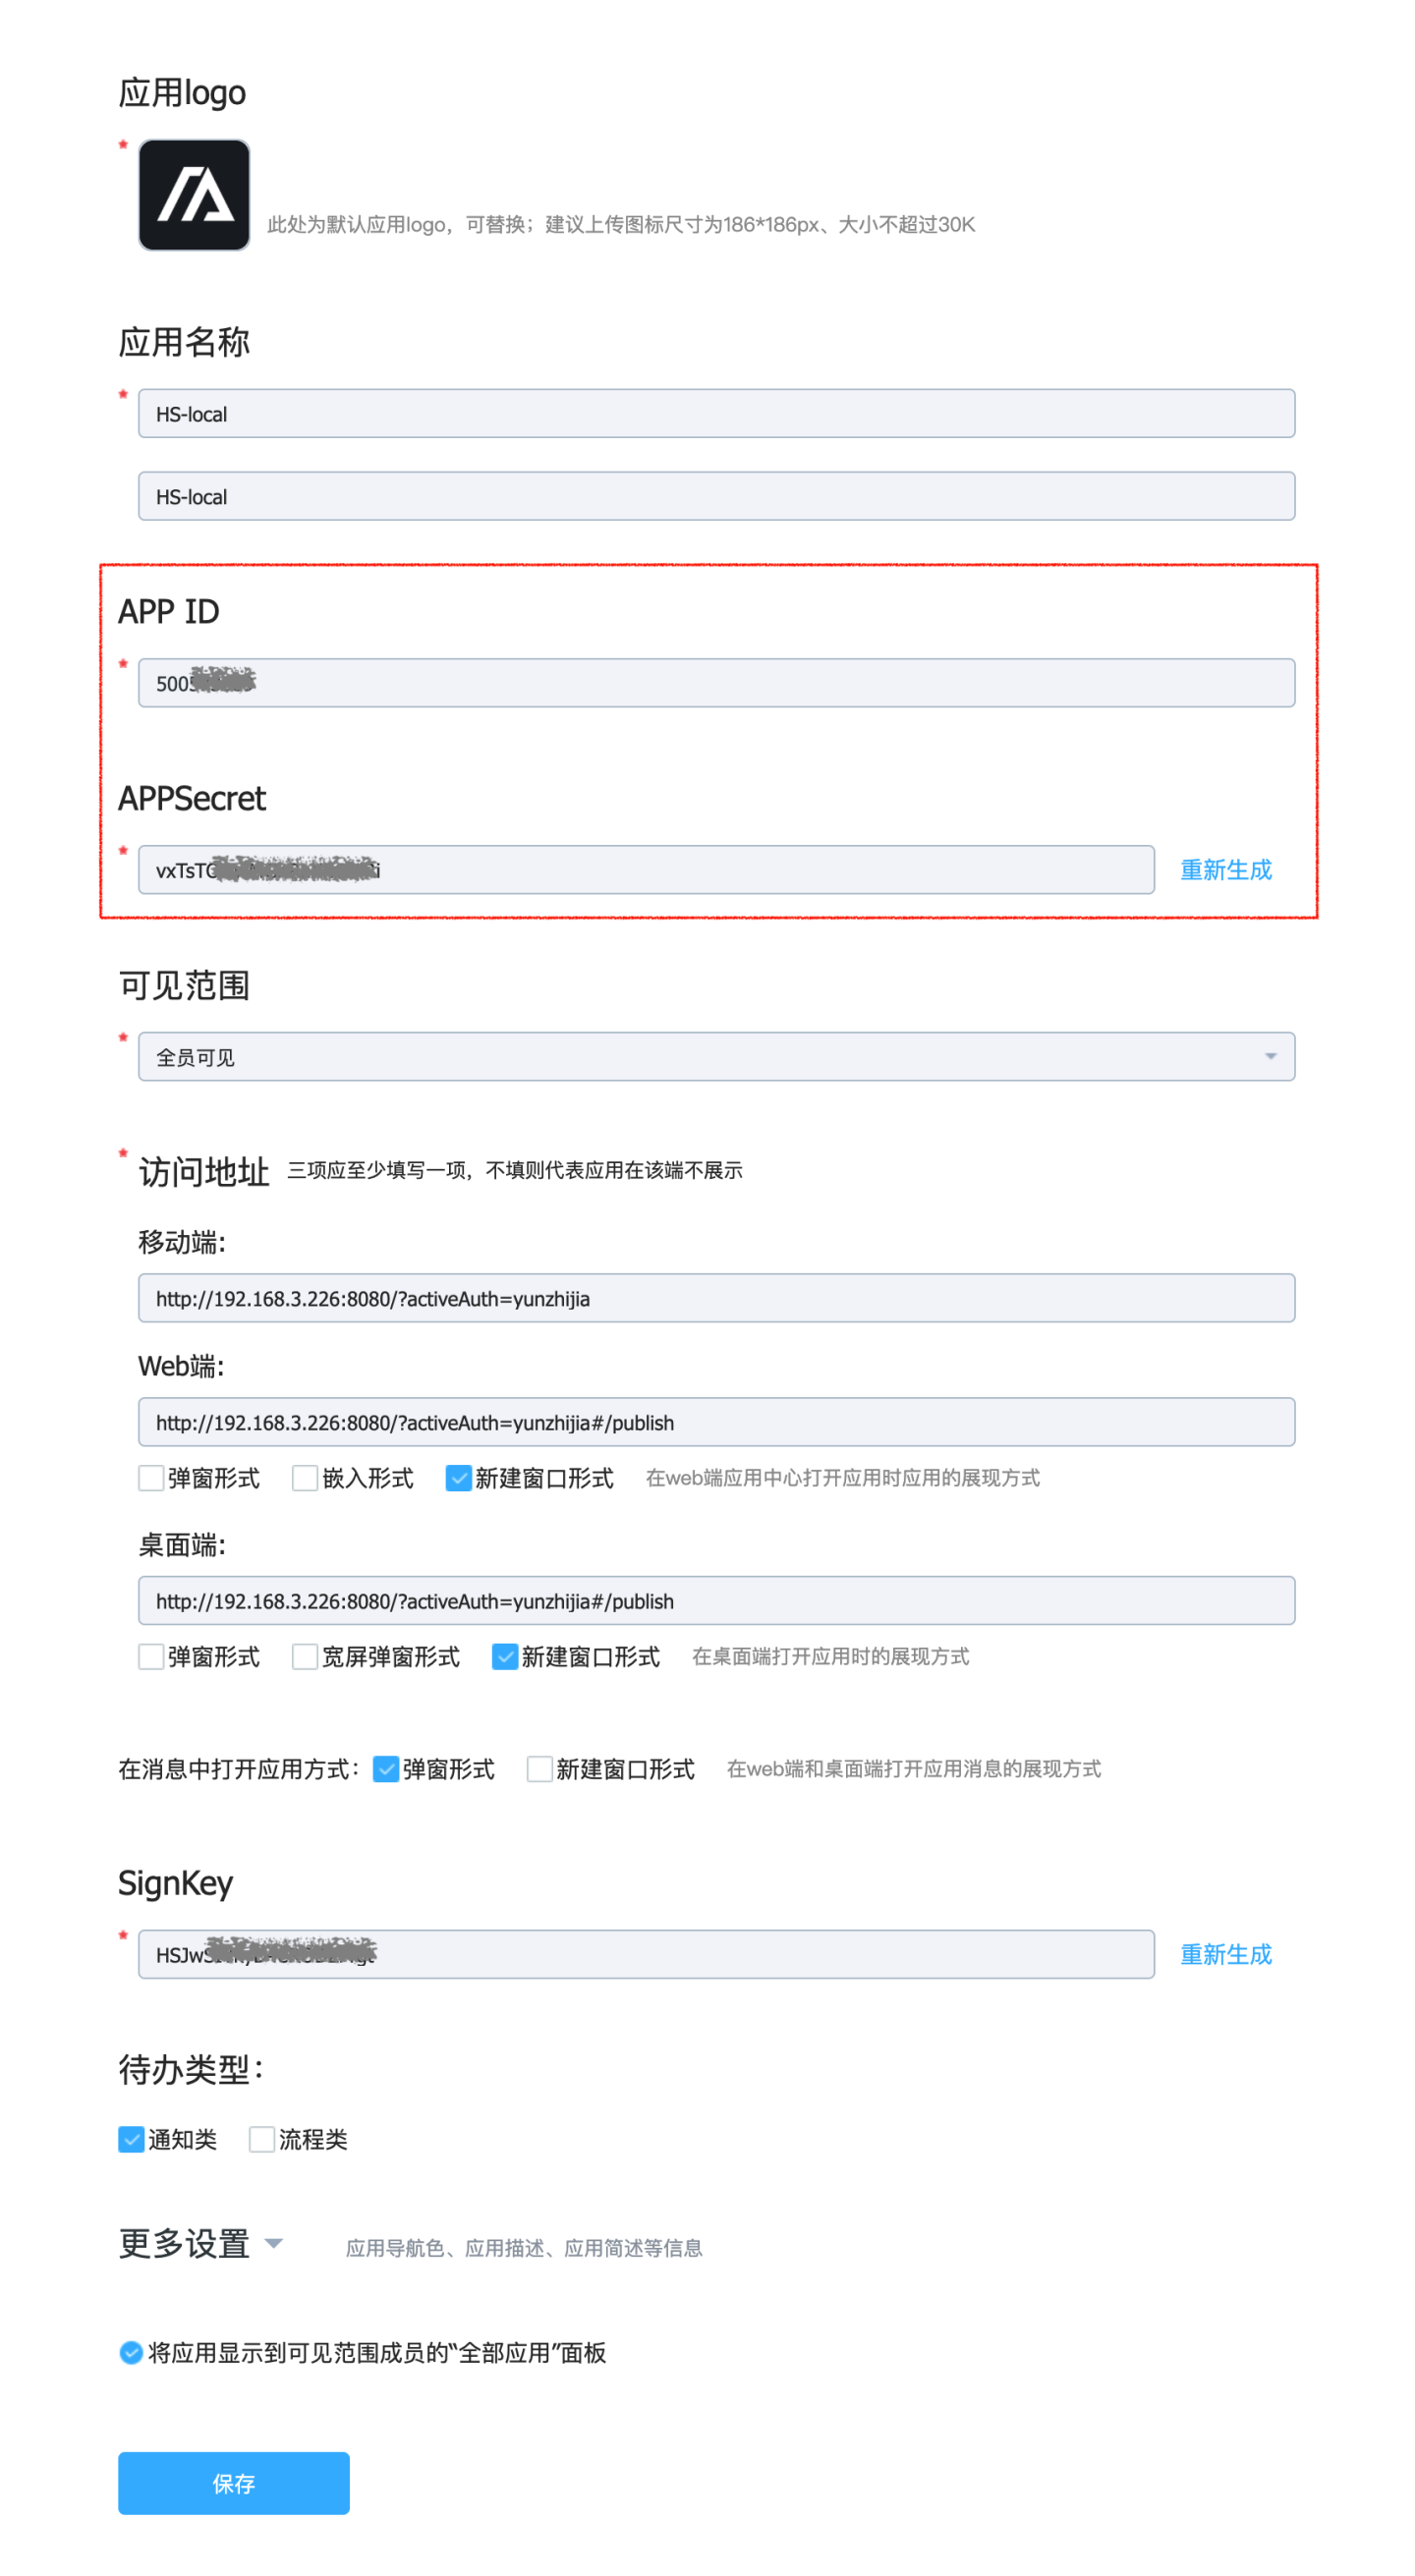
Enterprise WeChat Configuration for Custom Applications
- Navigate to Enterprise WeChat App Management -> Apps -> Custom, and click "Create App."
- Configure the app logo, app name, app description, and visibility scope.
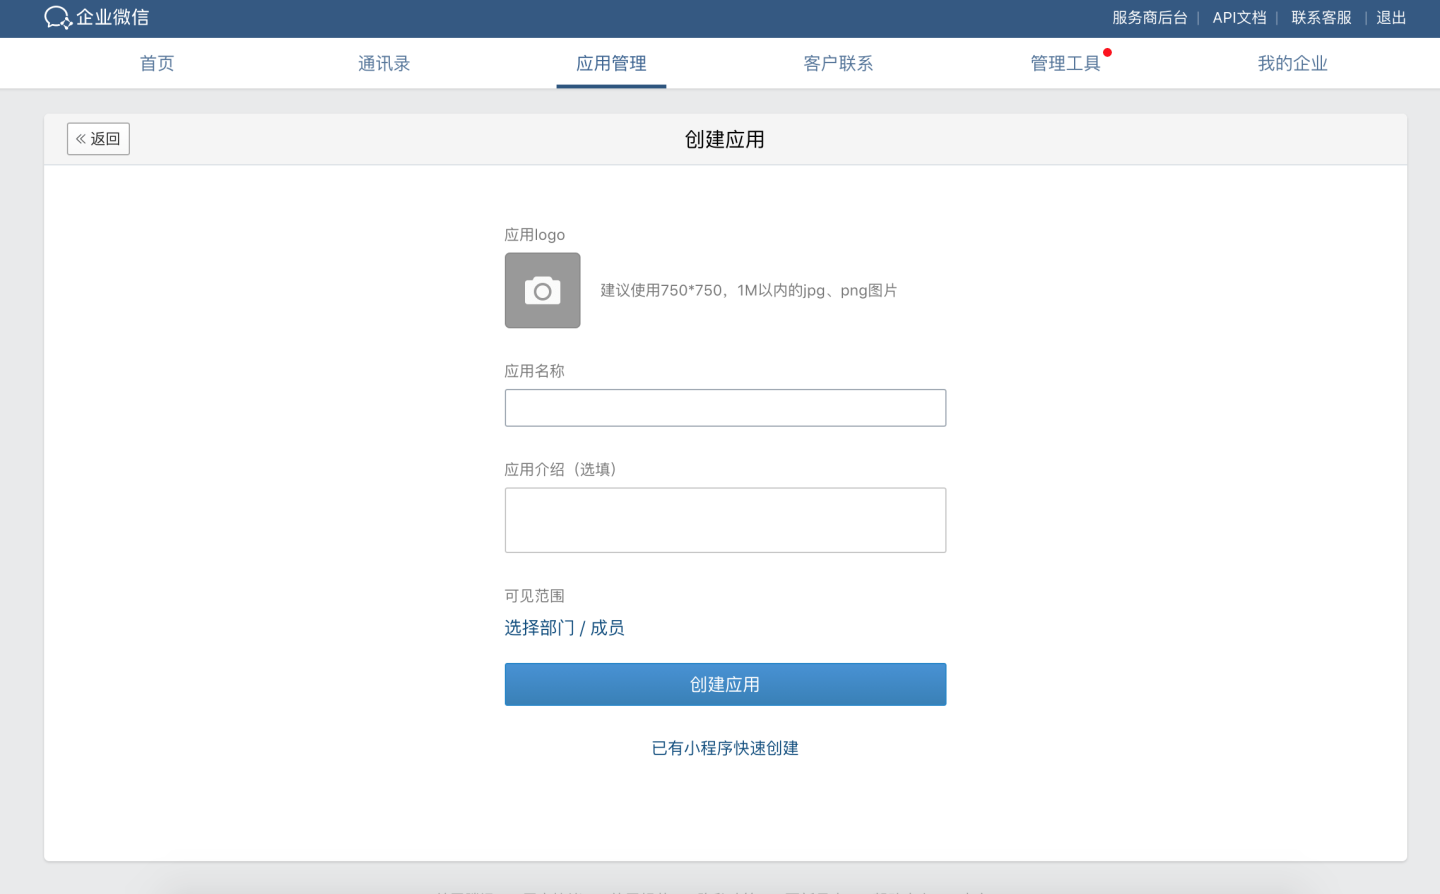
- Configure the app.
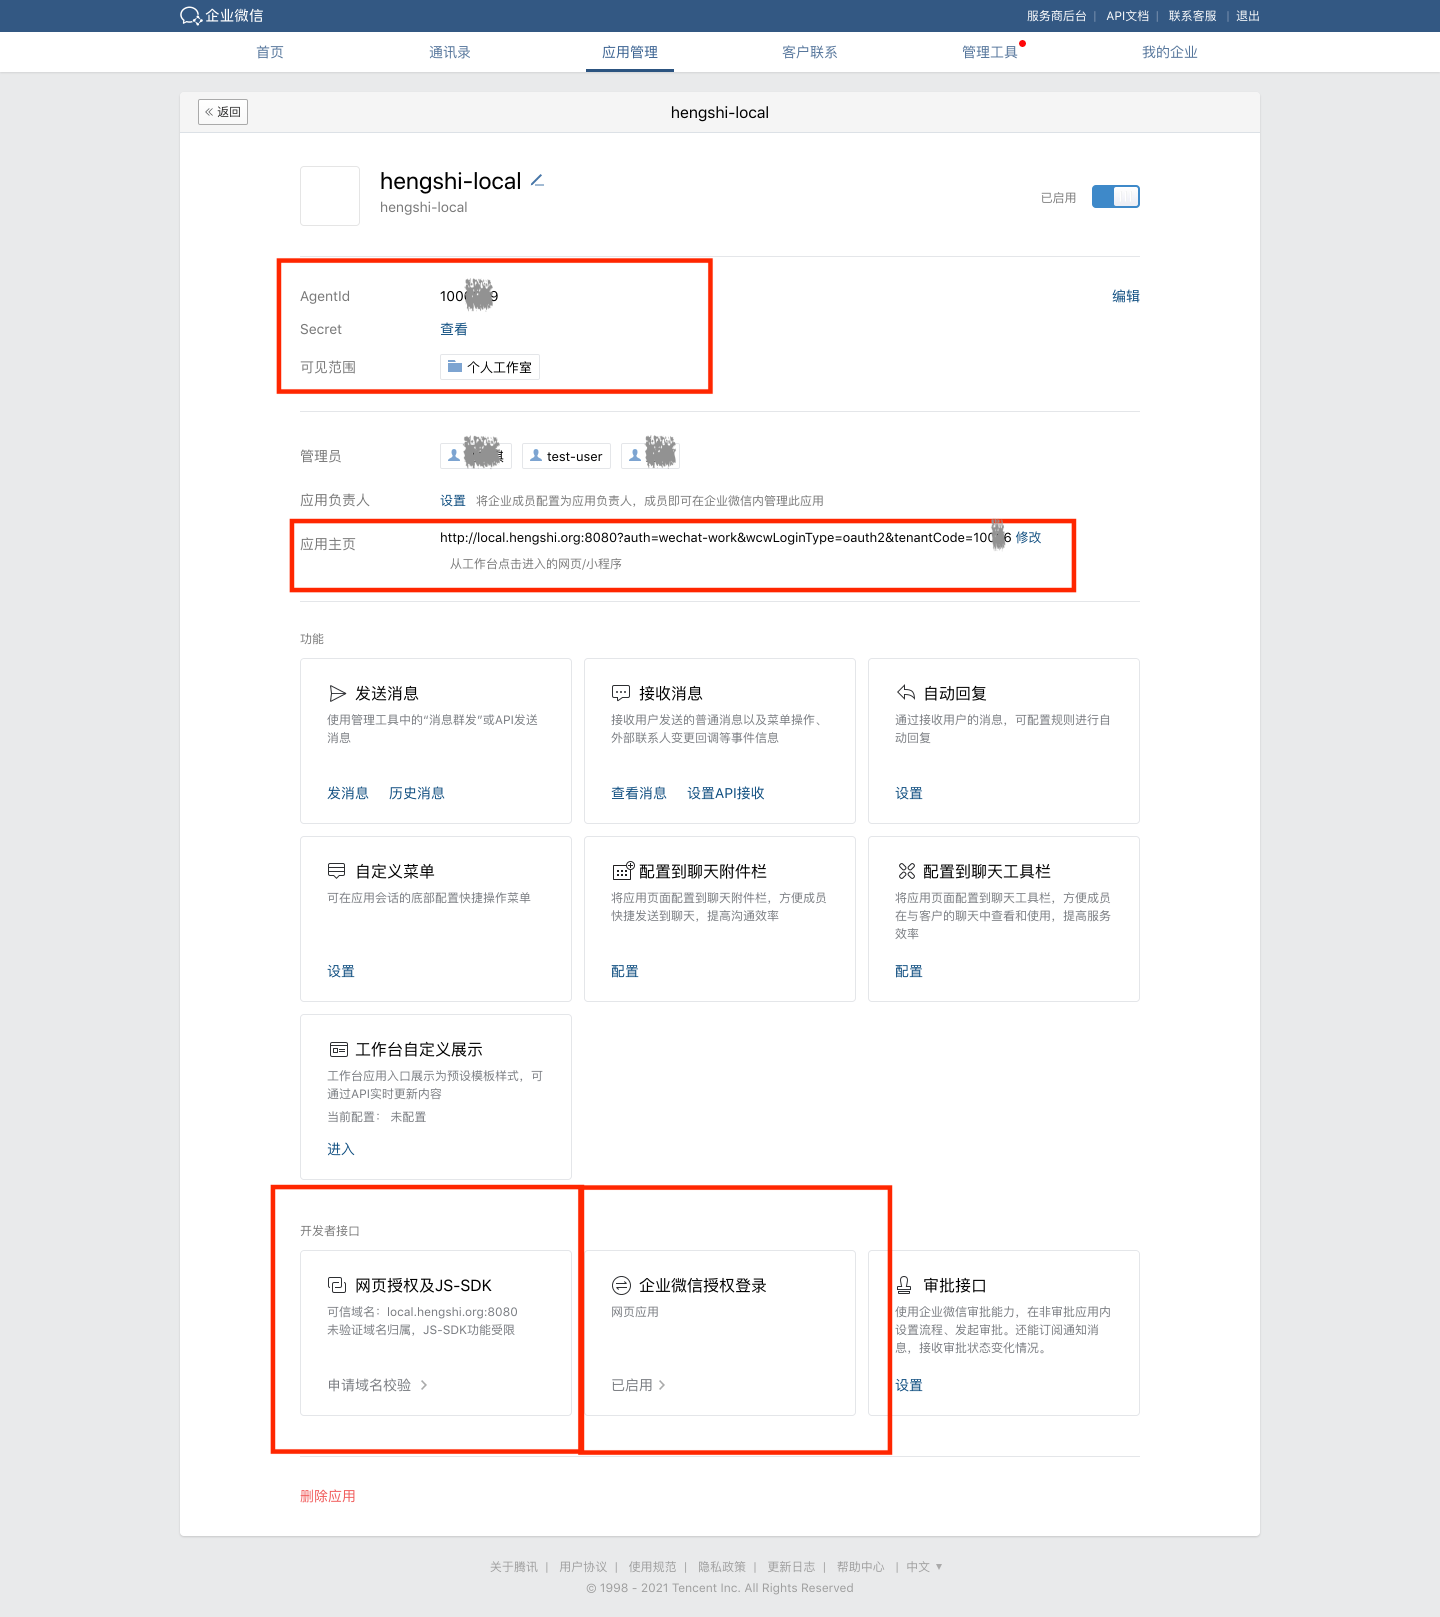
- Set the AgentId and Secret fields in the HENGSHI SENSE system's Enterprise WeChat configuration page to match the corresponding fields.
- Select the root node of the organizational structure as the app's visibility scope.
- Configure the app homepage, such as:
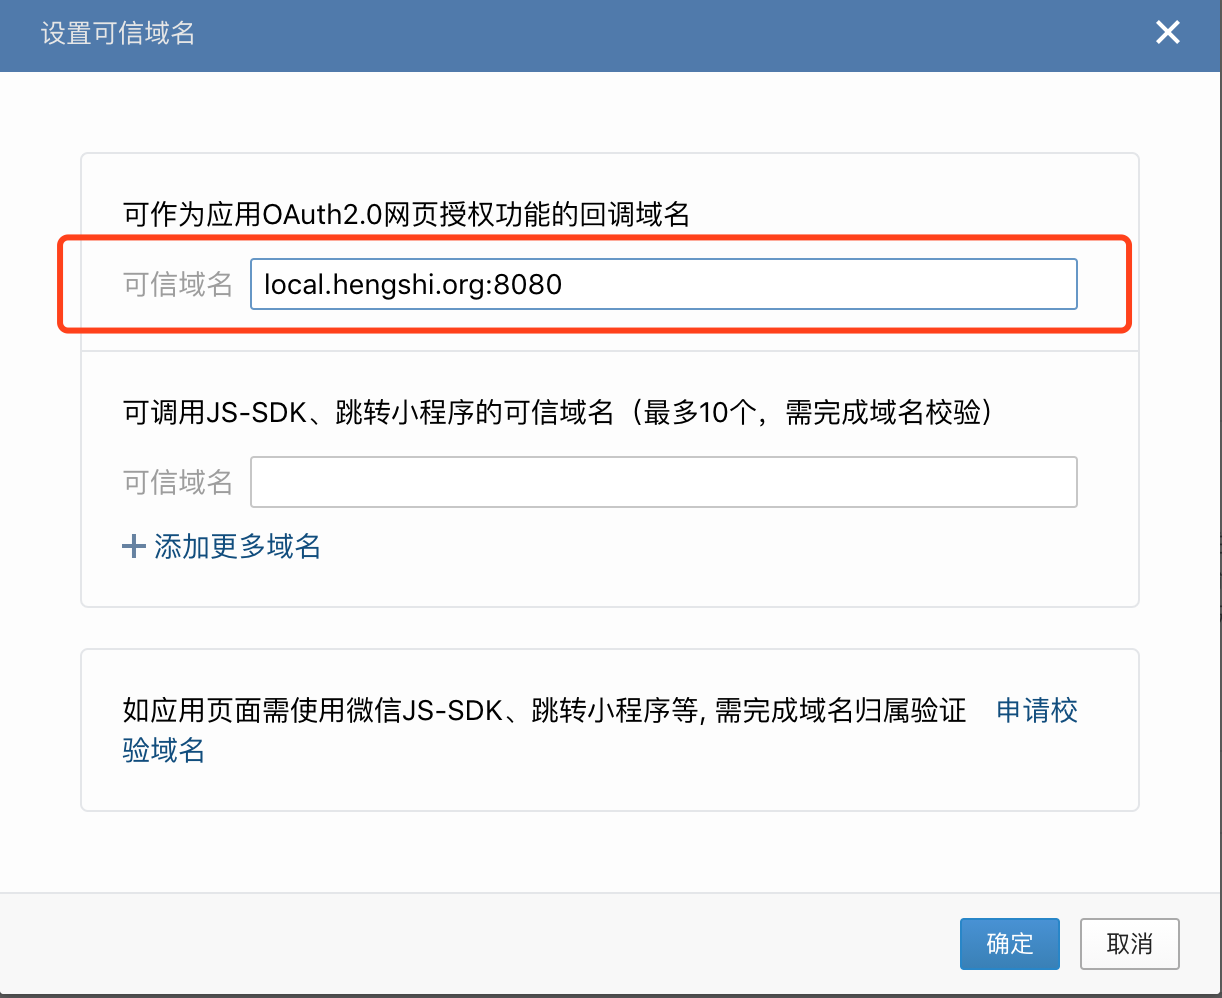
http://local.hengshi.org:8080?activeAuth=wechat-work&wcwLoginType=oauth2&tenantCode={tenantCode}. Here,activeAuthandwcwLoginTypeare fixed values, enabling seamless login when clicking the HENGSHI app within Enterprise WeChat. For tenant usage, you need to add thetenantCodeortenantIdparameter. - Configure the trusted domain for web authorization and JS-SDK.
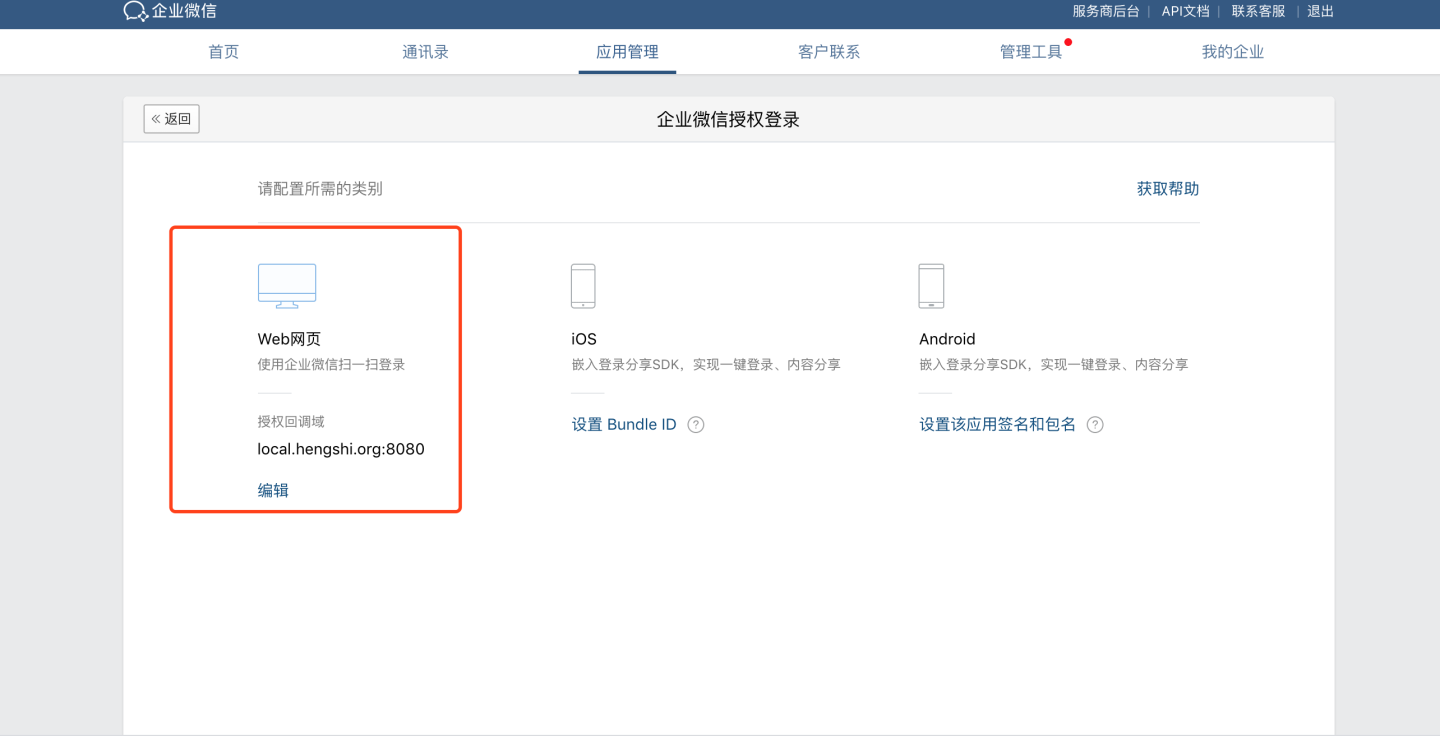
- If web QR code login functionality is required, configure the authorization callback domain in Enterprise WeChat's authorization login settings.
For related documentation on Enterprise WeChat authentication methods, refer to:
- Enable Web Authorization Login
- Enterprise WeChat Terminology Introduction
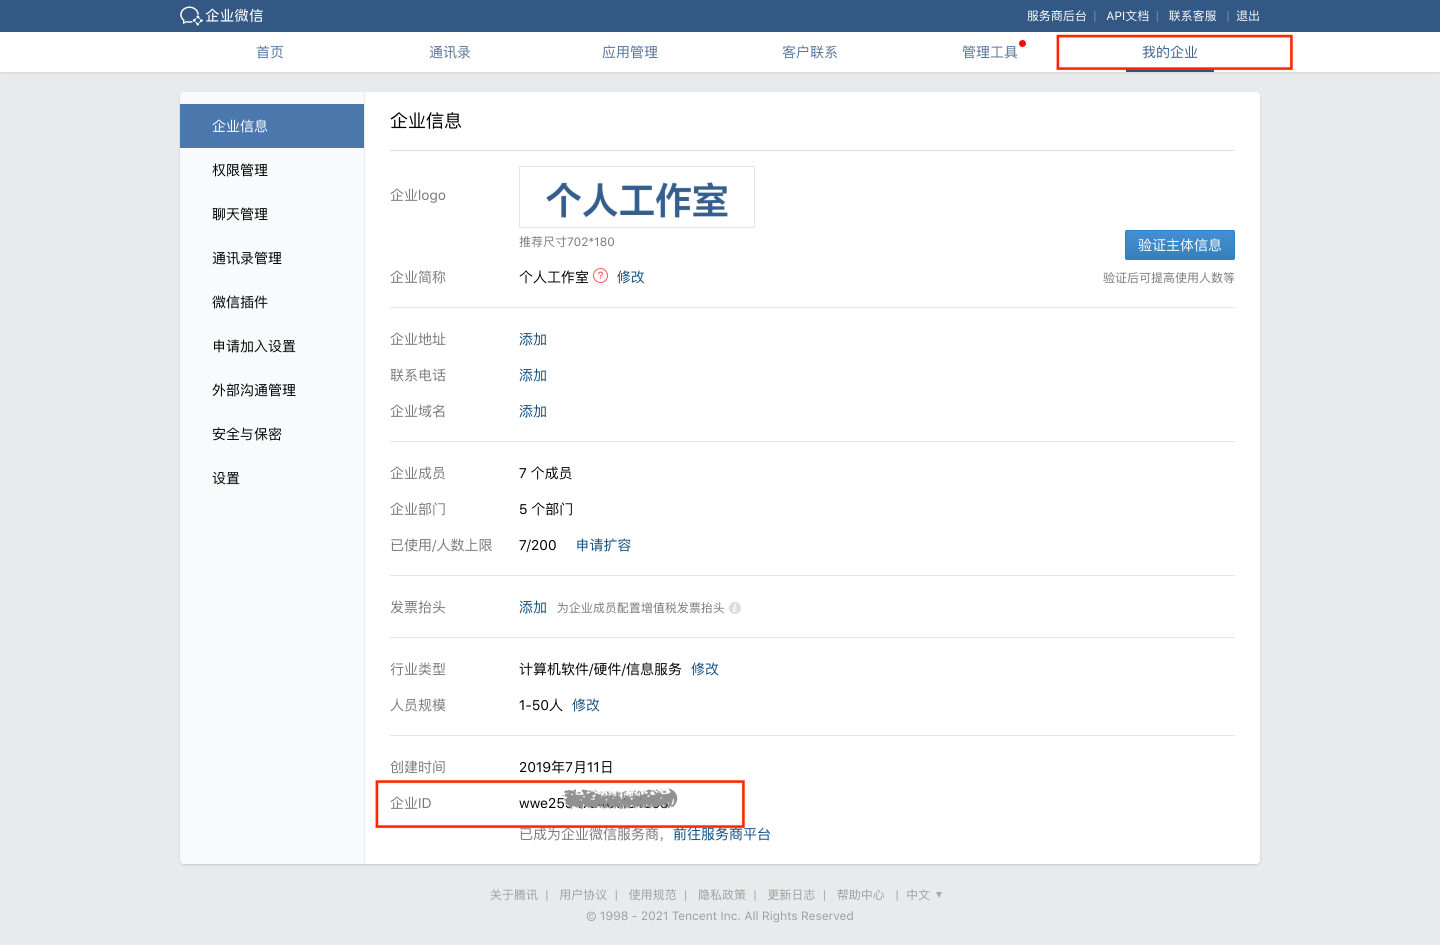
- View Enterprise ID
- View AgentId and Secret Navigate to the specific app
Please Note
Enterprise WeChat documentation may change. Refer to the official Enterprise WeChat documentation for the most accurate information.
CTR
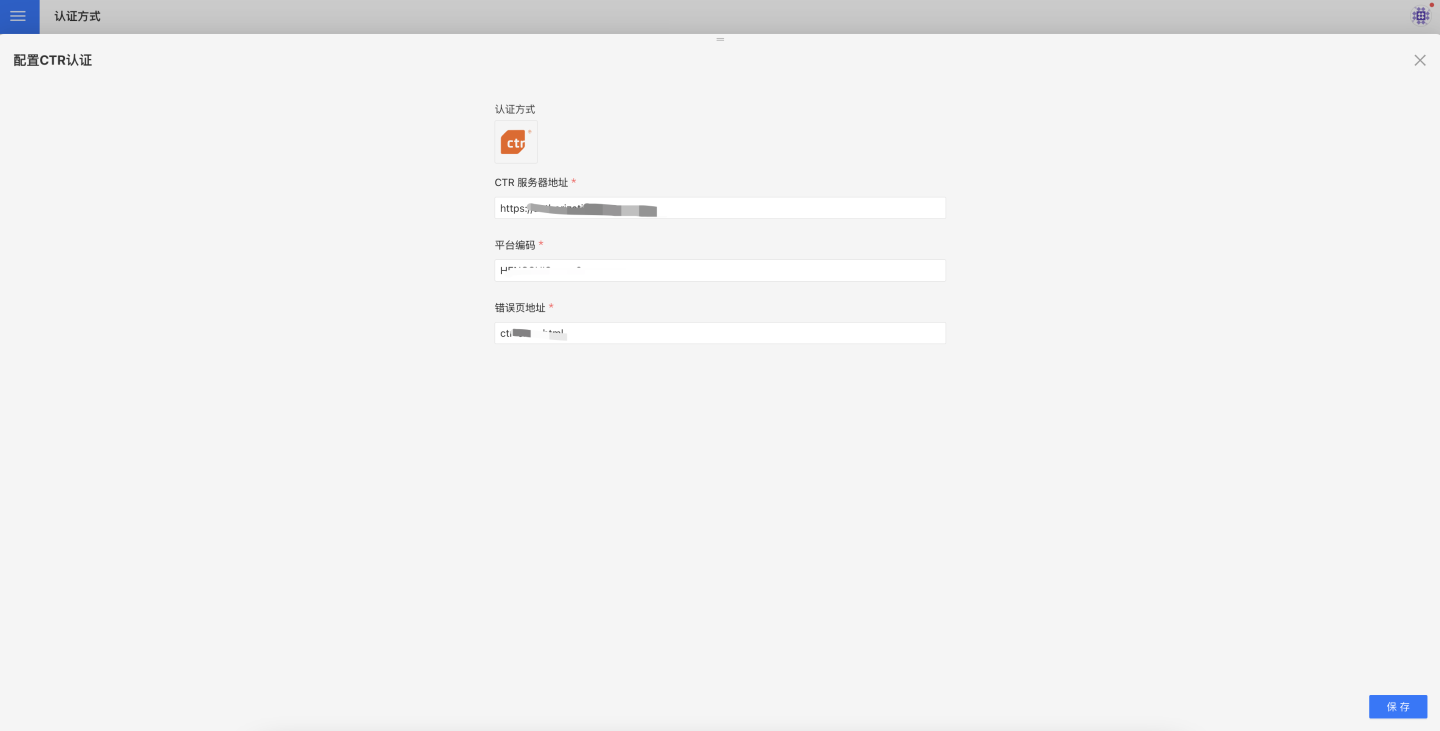
CTR is a customized authentication method for customers, integrated with the customer's self-developed SSO system.
Yunzhijia
If you are using the Kingdee Yunzhijia app and performing expense approval and report analysis tasks in Yunzhijia, you can access the corresponding report content on Yunzhijia by configuring Yunzhijia authentication.
The entry point for the report is to create an app entry in Yunzhijia. Using the integration API provided by Yunzhijia, you can set up SSO authentication and directly configure the report's URL address in the Yunzhijia app. This allows you to open the report in the Yunzhijia app without logging in.
Configuration steps:
Apply to become a system administrator on Yunzhijia (www.yunzhijia.com) or be invited and designated as a system administrator by someone else.
After becoming a system administrator, navigate to Management Center -> App Center -> Lightweight App Management to enter the Lightweight App Management page.
Select "Create App" and fill in the information on the opened page. The URL in the red box should be the HENGSHI SENSE system's URL, with
activeAuth=yunzhijiaappended at the end. If a tenant is using it, you need to include thetenantCodeortenantIdparameter. Example:http://192.168.3.226:8080/?activeAuth=yunzhijia&tenantCode=tenant1#/publish.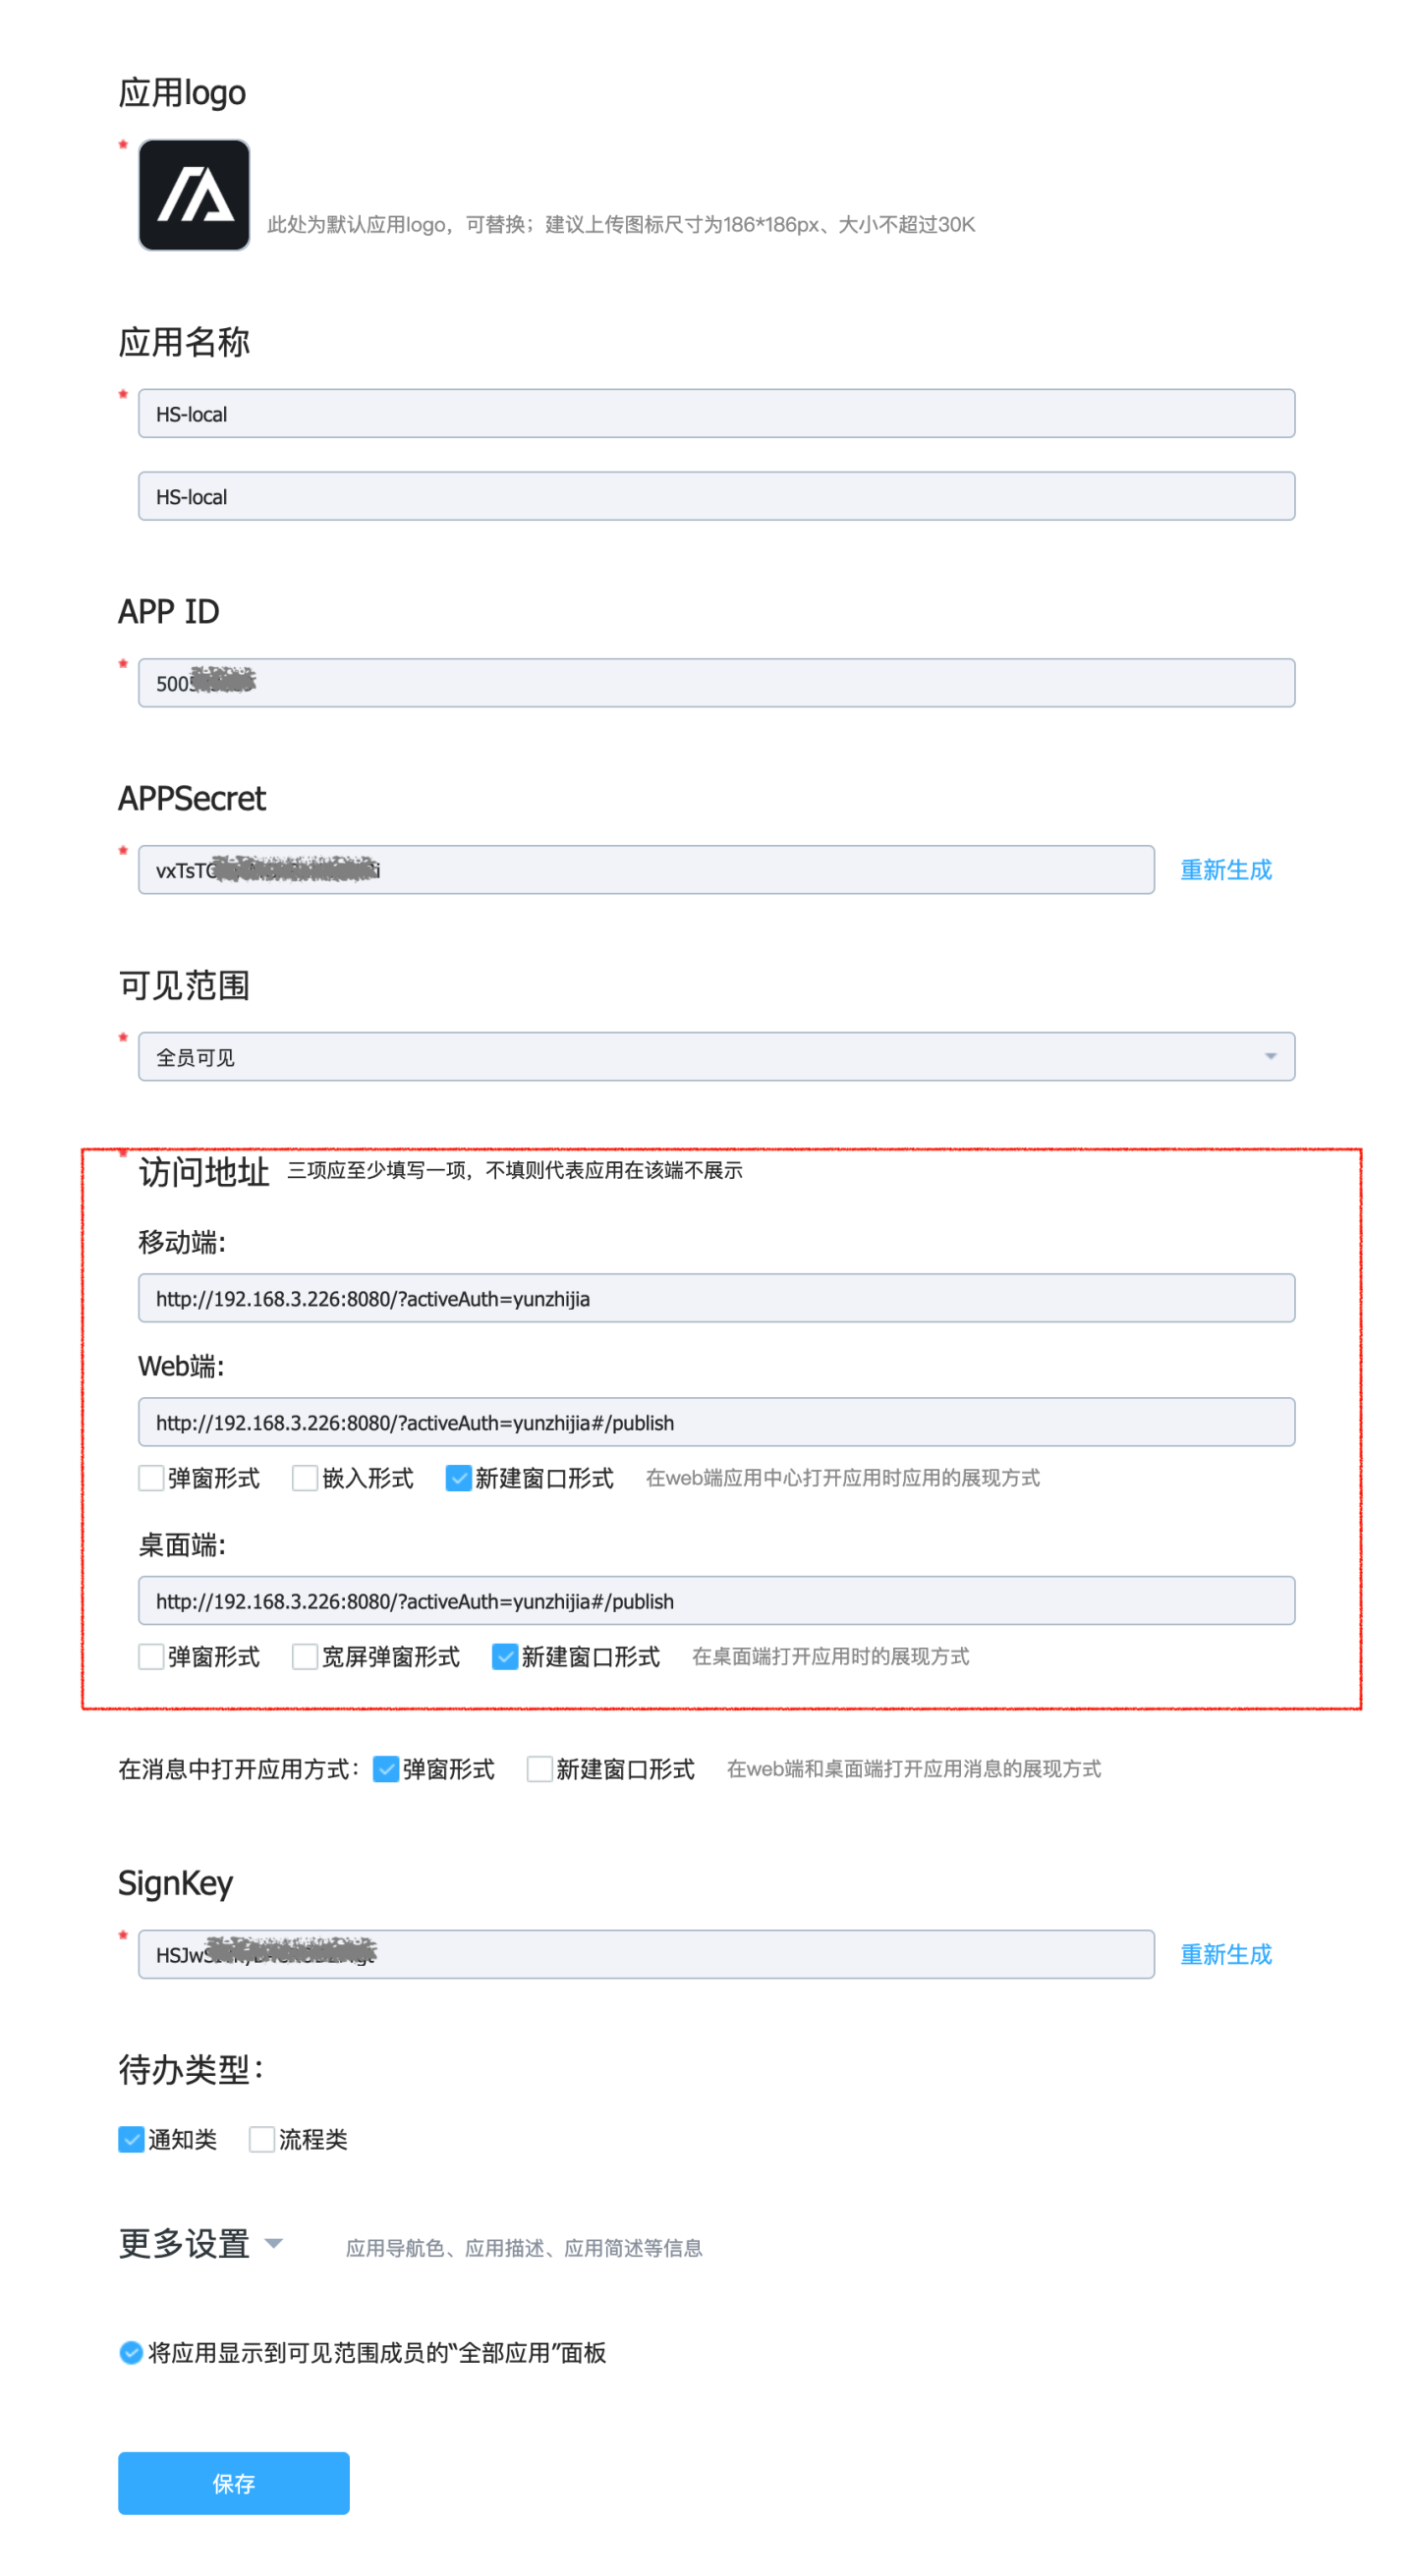
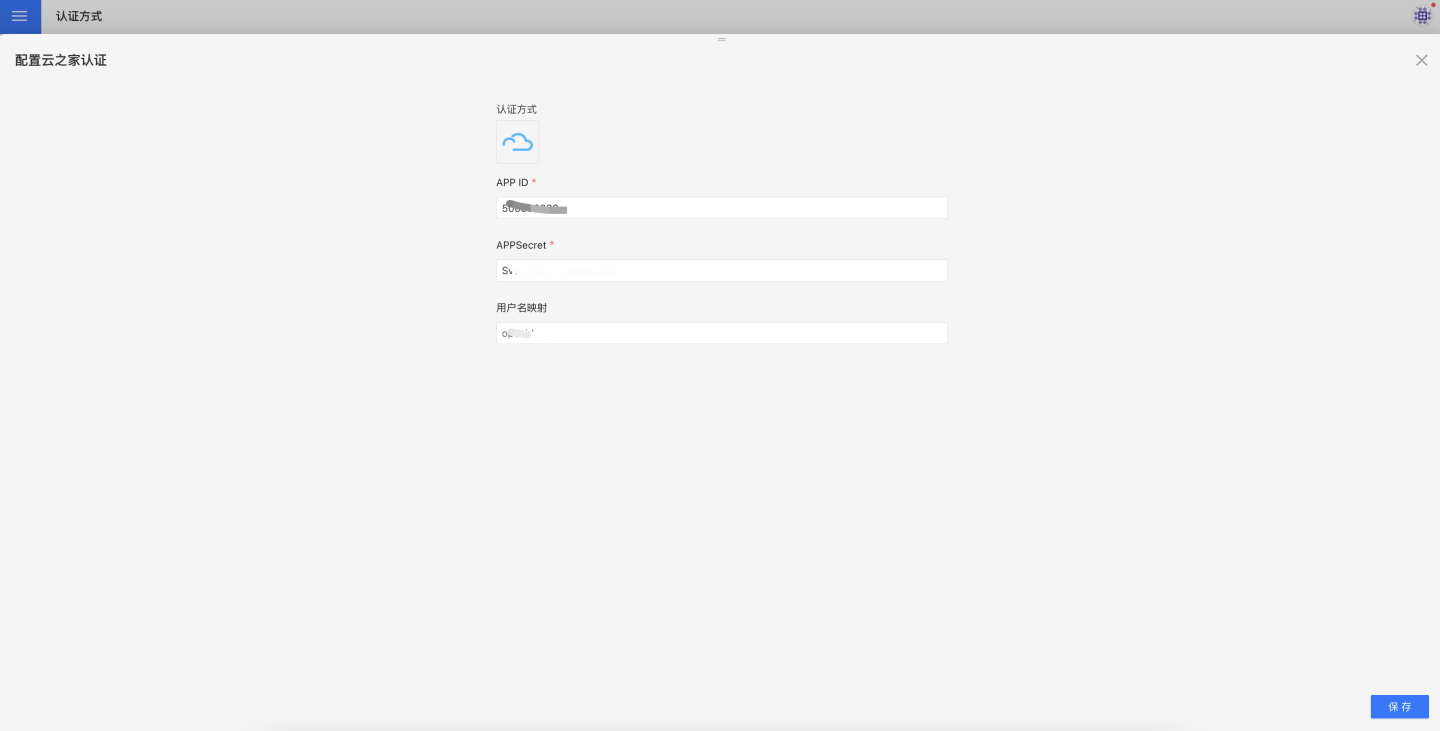
After saving, an APPId and APPSecret will be generated.
In the HENGSHI SENSE system settings, navigate to Organization Management -> Authentication Methods -> Yunzhijia to configure the APP ID and APPSecret.
Teams
Teams authentication method supports login-free access in Teams.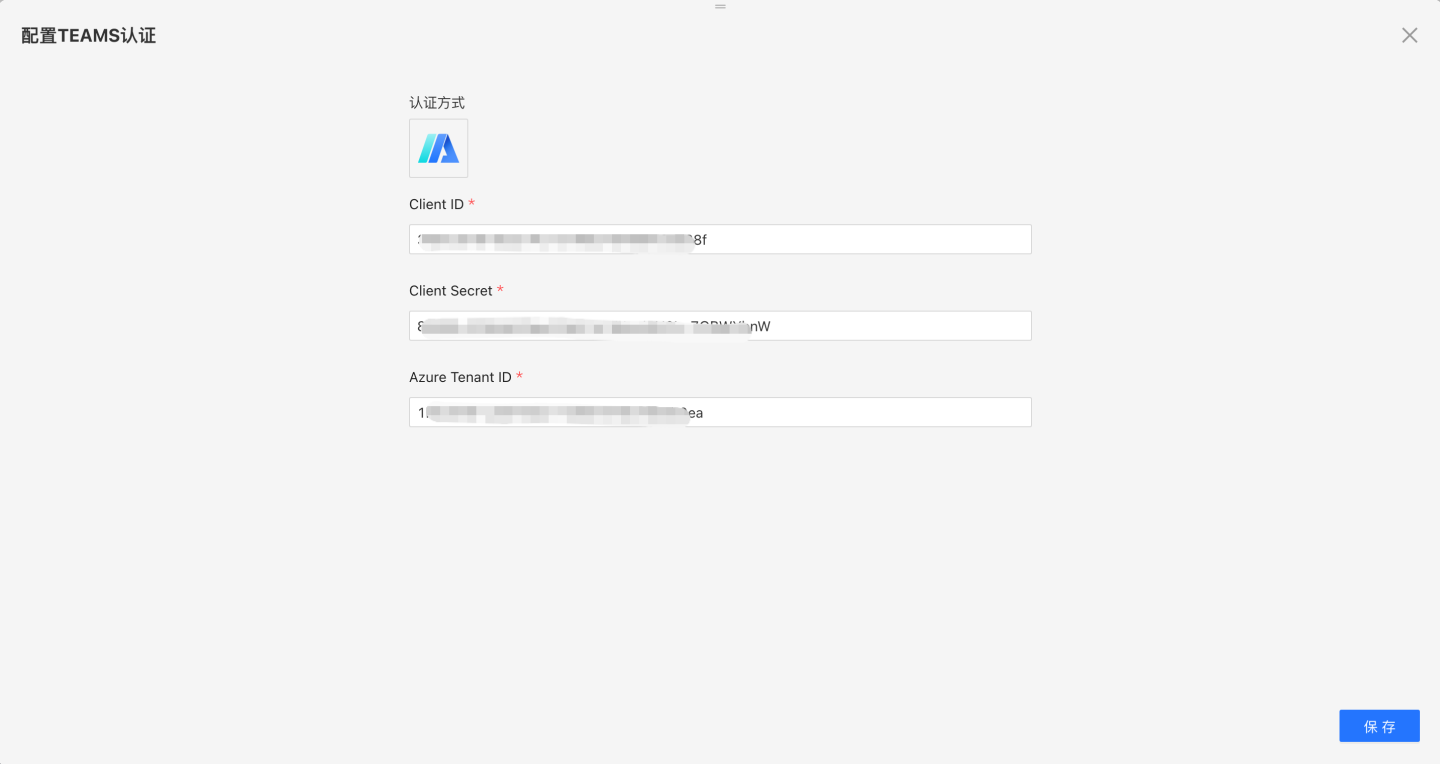
Teams-related configurations include:
- Client ID, Client Secret, Azure Tenant ID. Obtain these from the application in Microsoft Entra ID. Refer to Creating a Teams Application.
Teams App Creation
Register a new app in Microsoft Entra ID.
- Open the Azure portal and select "Register an application."
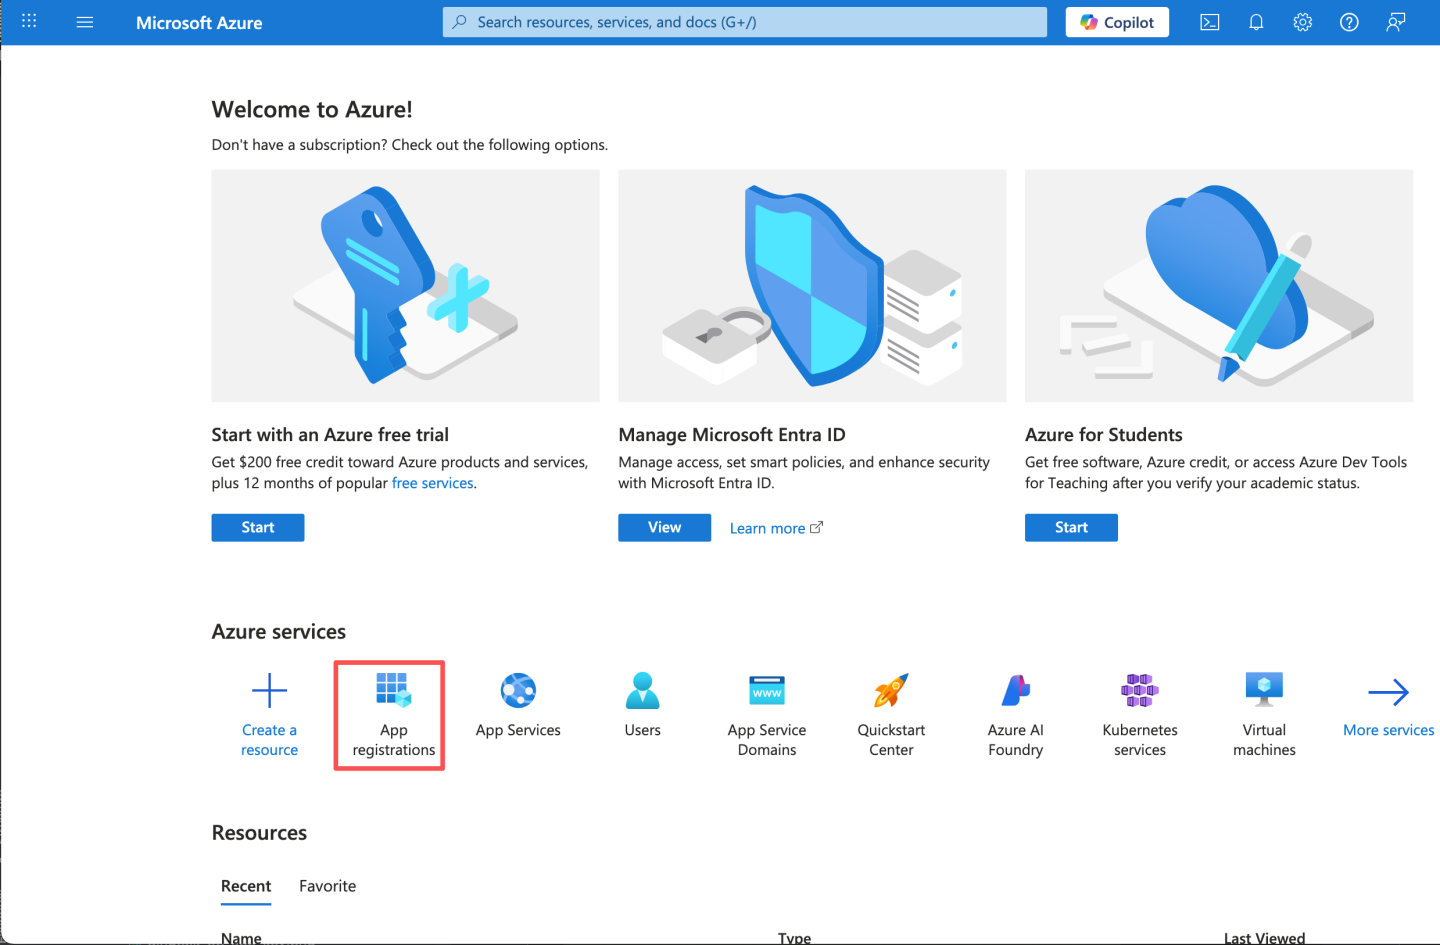
- Enter the app name and click "Register."
- After registration, record the Application (client) ID and Directory (tenant) ID. Later, you need to configure the Application (client) ID in HengShi Teams authentication as ClientId and the Directory (tenant) ID as Azure Tenant ID.
- Create a client secret.
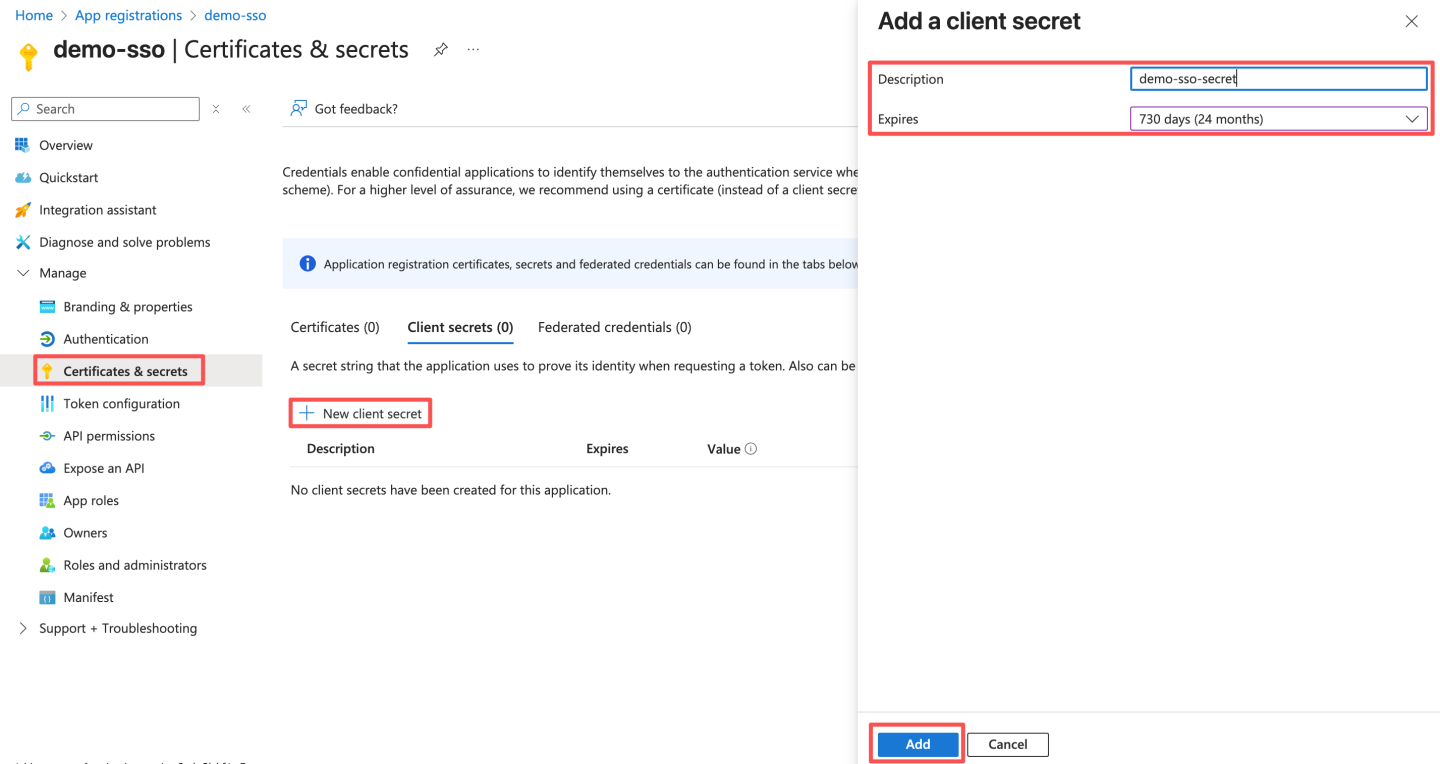 After saving, record the secret. The client secret value can only be viewed at the time of creation and cannot be viewed later. Be sure to save the secret before leaving the page. Later, you need to configure this secret in HengShi Teams authentication as Client Secret.
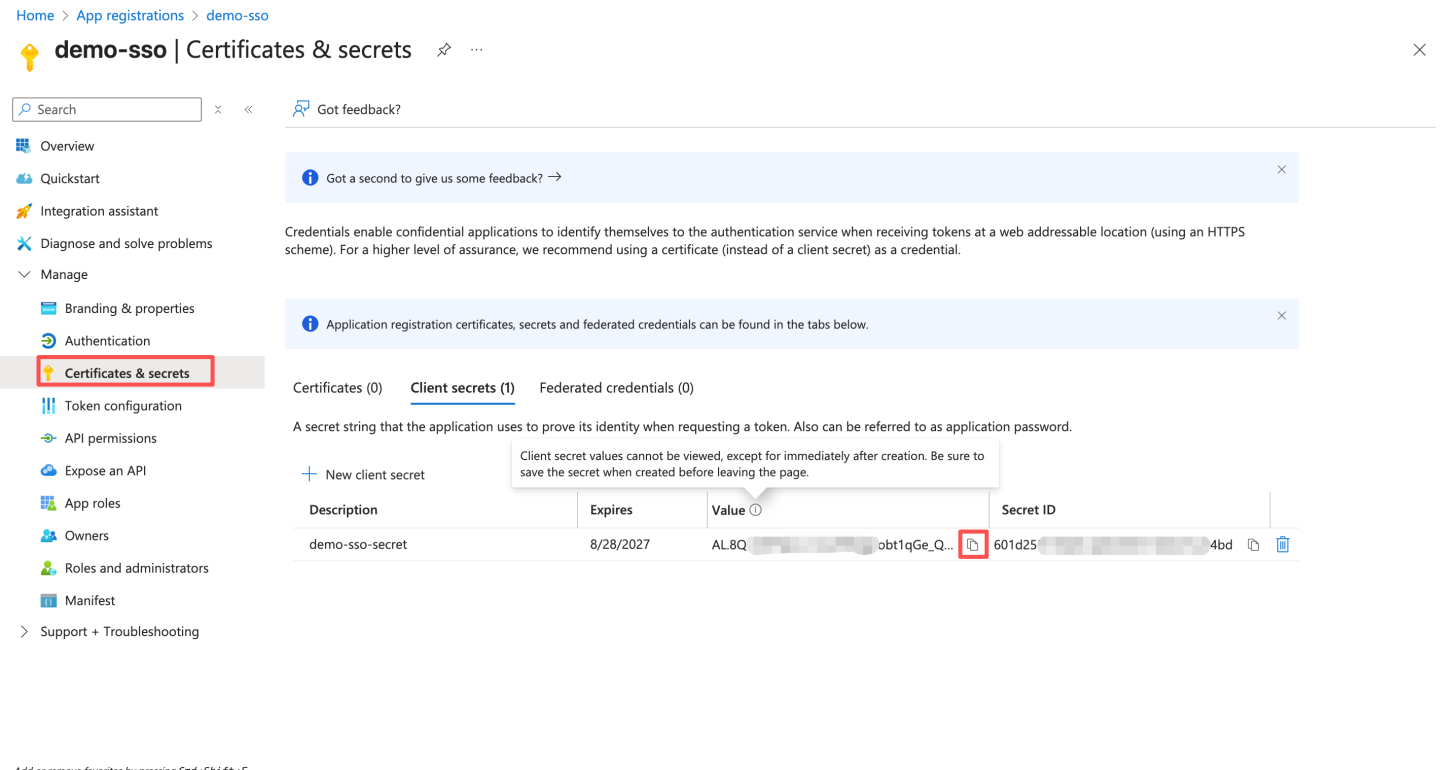
- Configure the access token version by modifying the value of
accessTokenAcceptedVersionto 2 and saving it.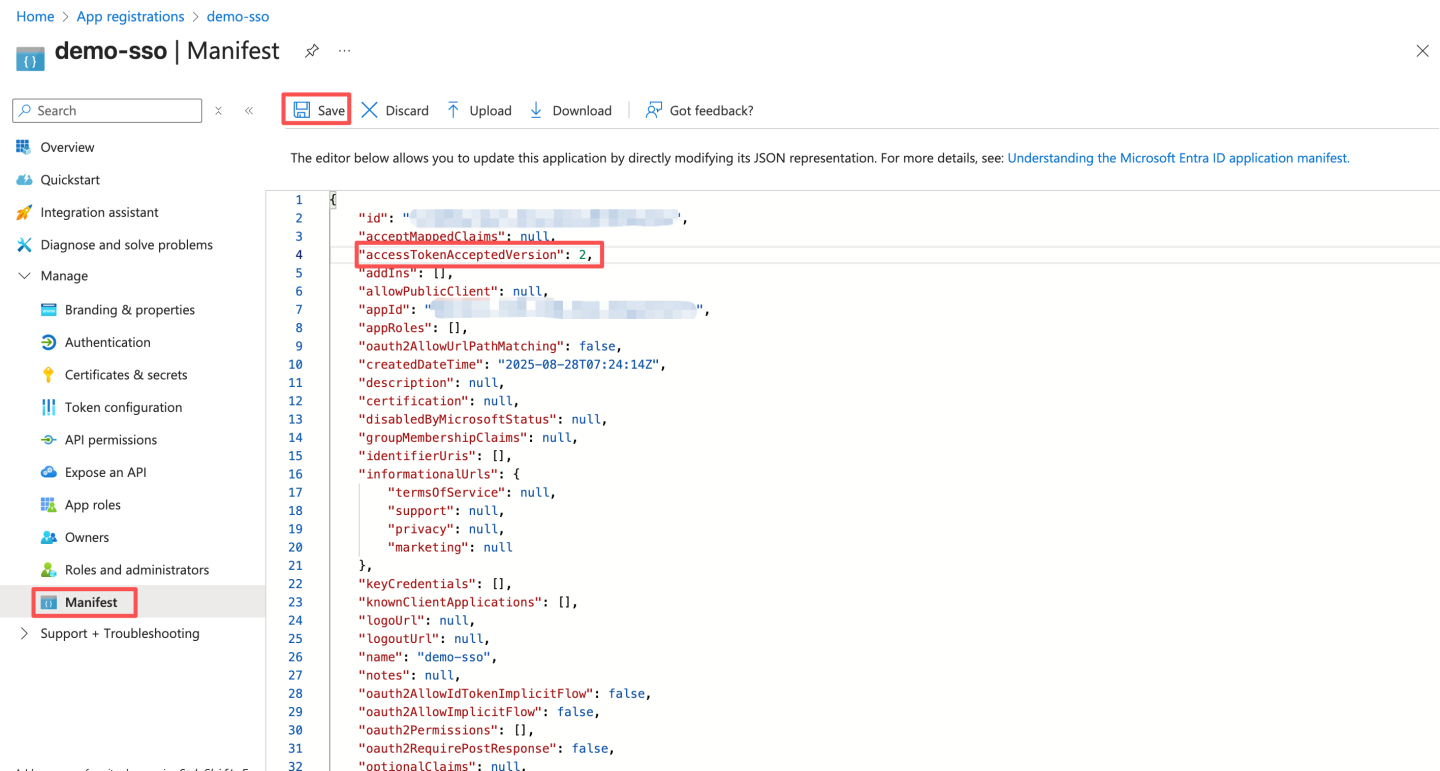
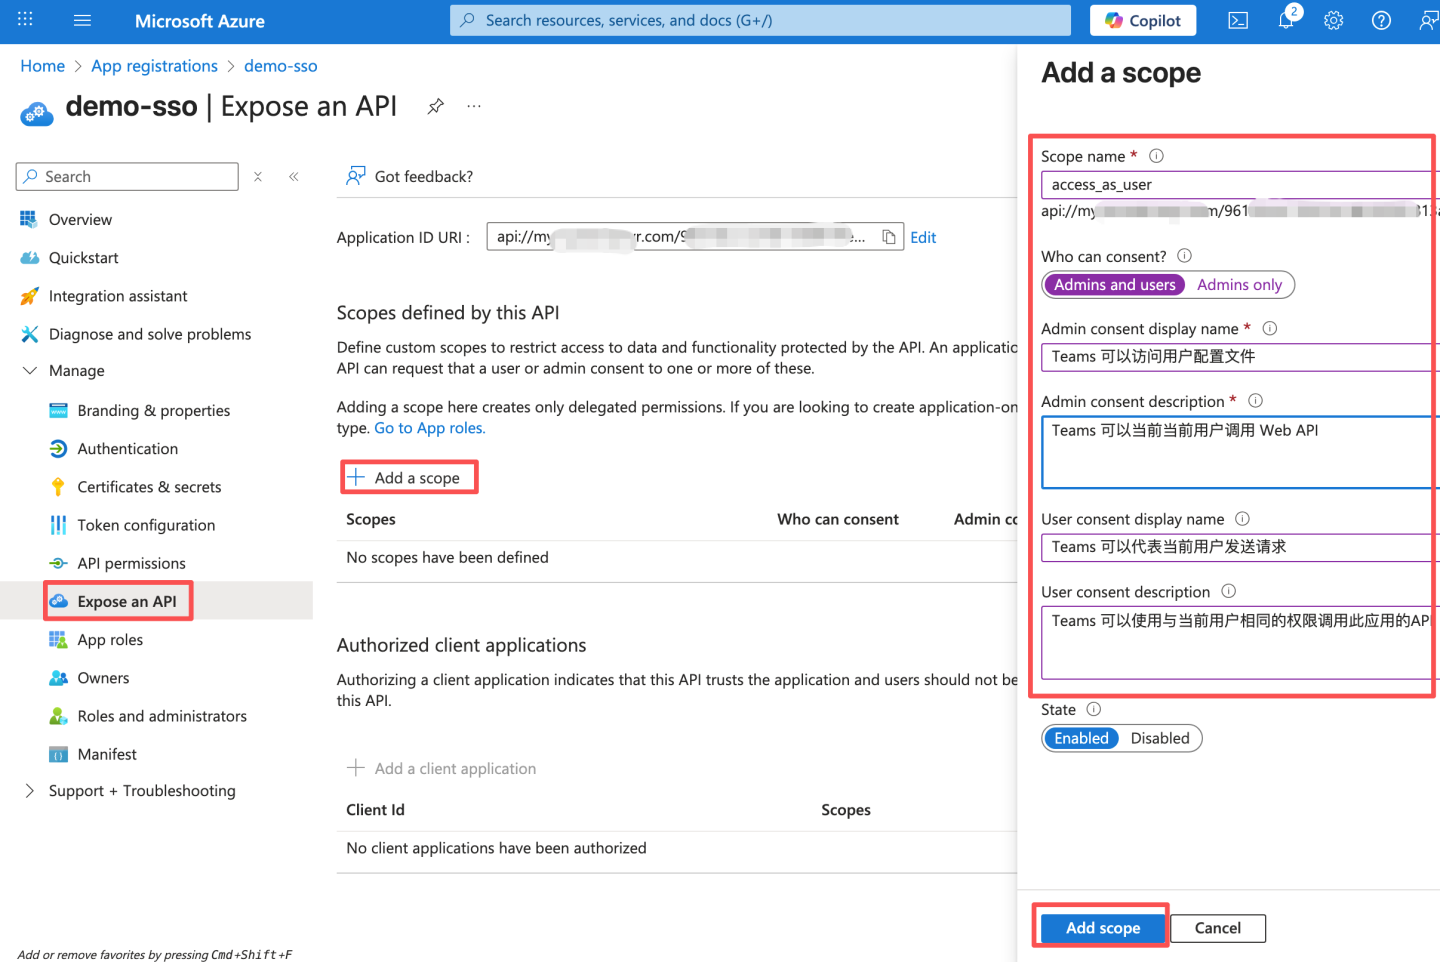
- Configure the access token scope and expose the API. The ID URI is pre-filled with the app ID in the format
api://{AppID}. The application ID URI format must be:api://domain.example.com/{AppID}. Enterdomain.example.com(i.e., GUID) betweenapi://and{AppID}.domain.example.comis HengShi's access domain name, e.g.,api://domain.example.com/{AppID}. Domain name format: Use lowercase letters for the domain name. Do not use uppercase letters.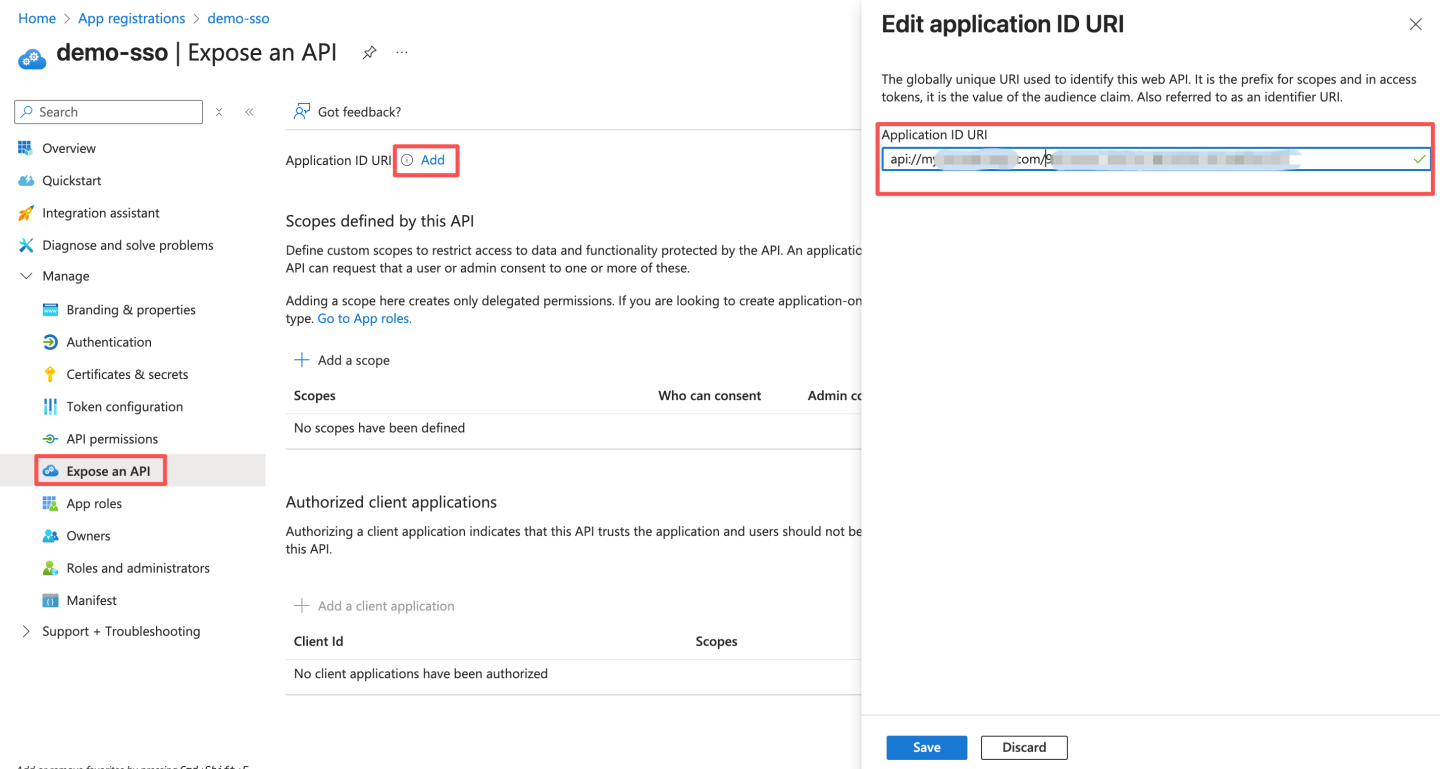 After saving, record the ID URI, which will be used later when updating the Teams app manifest.
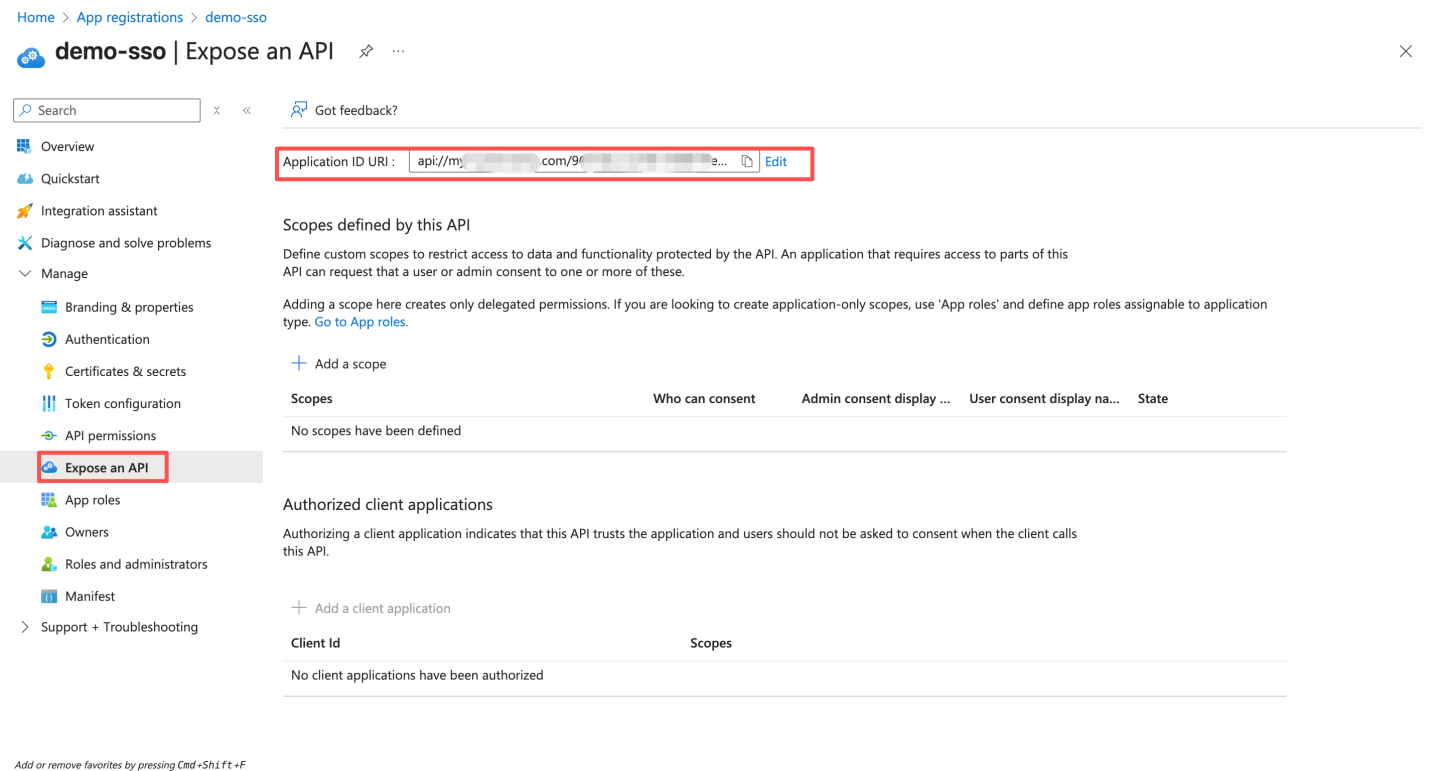
- Configure API scopes, and fill in the consent prompt text as needed.
- Configure authorized client applications. The Client ID is a fixed value:
- Teams desktop and mobile Client ID:
1fec8e78-bce4-4aaf-ab1b-5451cc387264 - Teams web Client ID:
5e3ce6c0-2b1f-4285-8d4b-75ee78787346Add two clients here, and fill in the above IDs as the Client ID.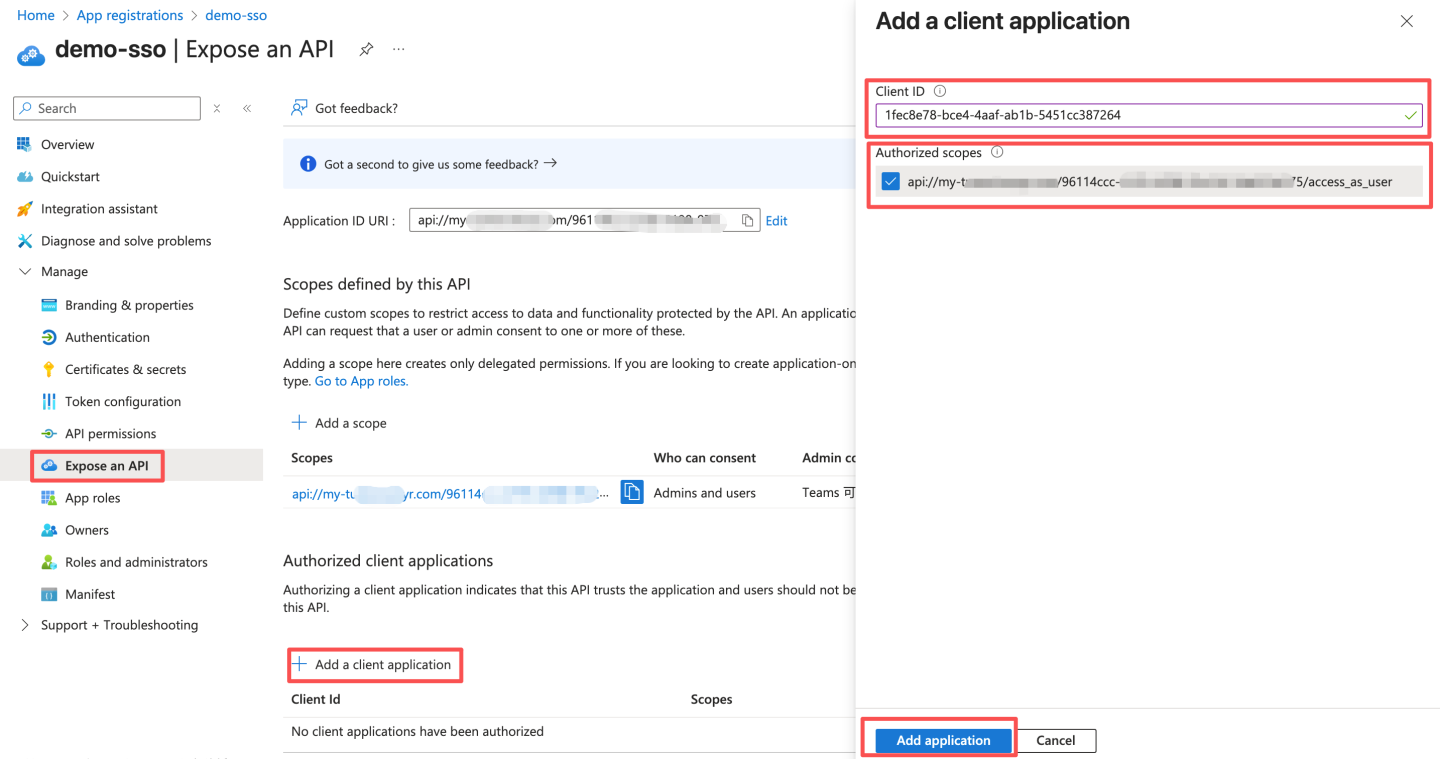
- Teams desktop and mobile Client ID:
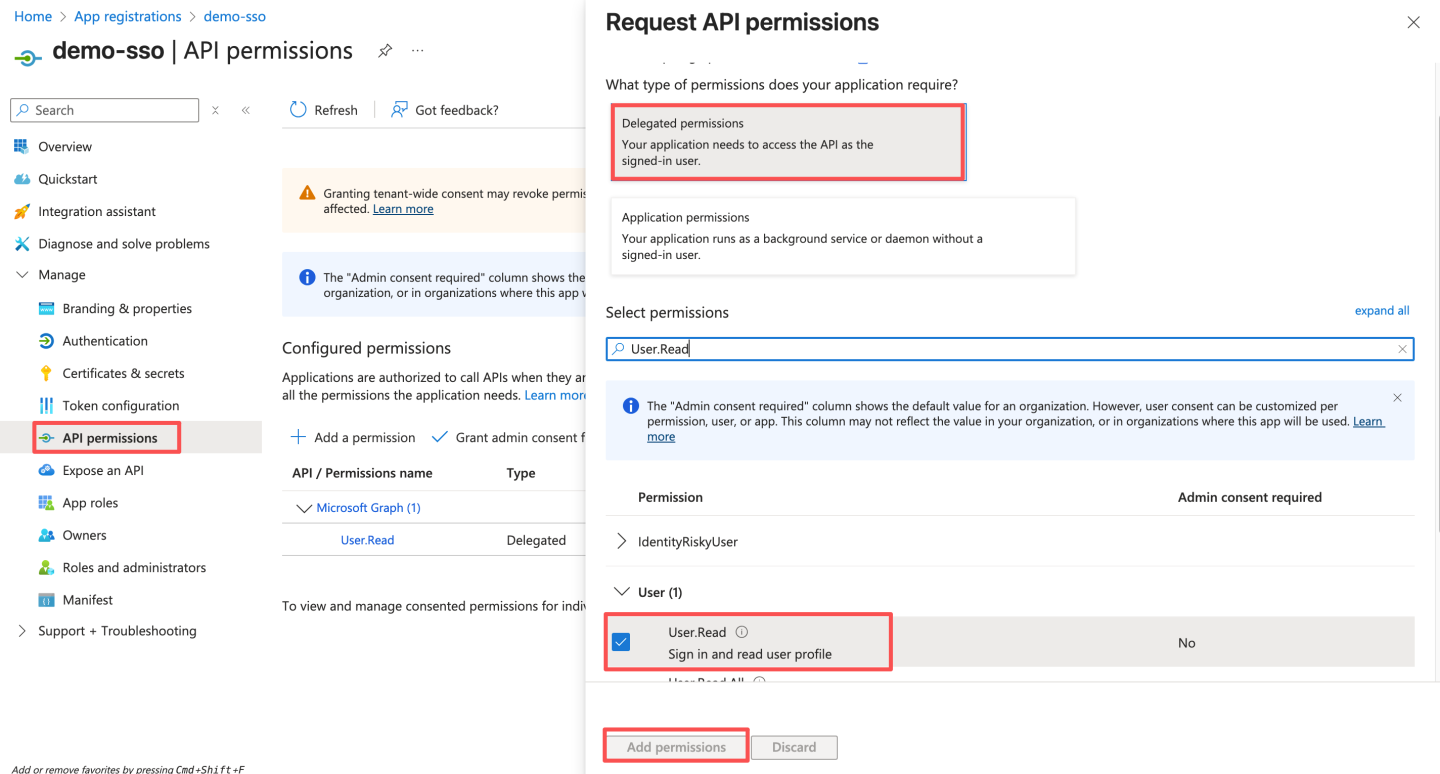
- Configure API permissions. By default, the
User.Readpermission already exists. Click "Grant admin consent for xxx."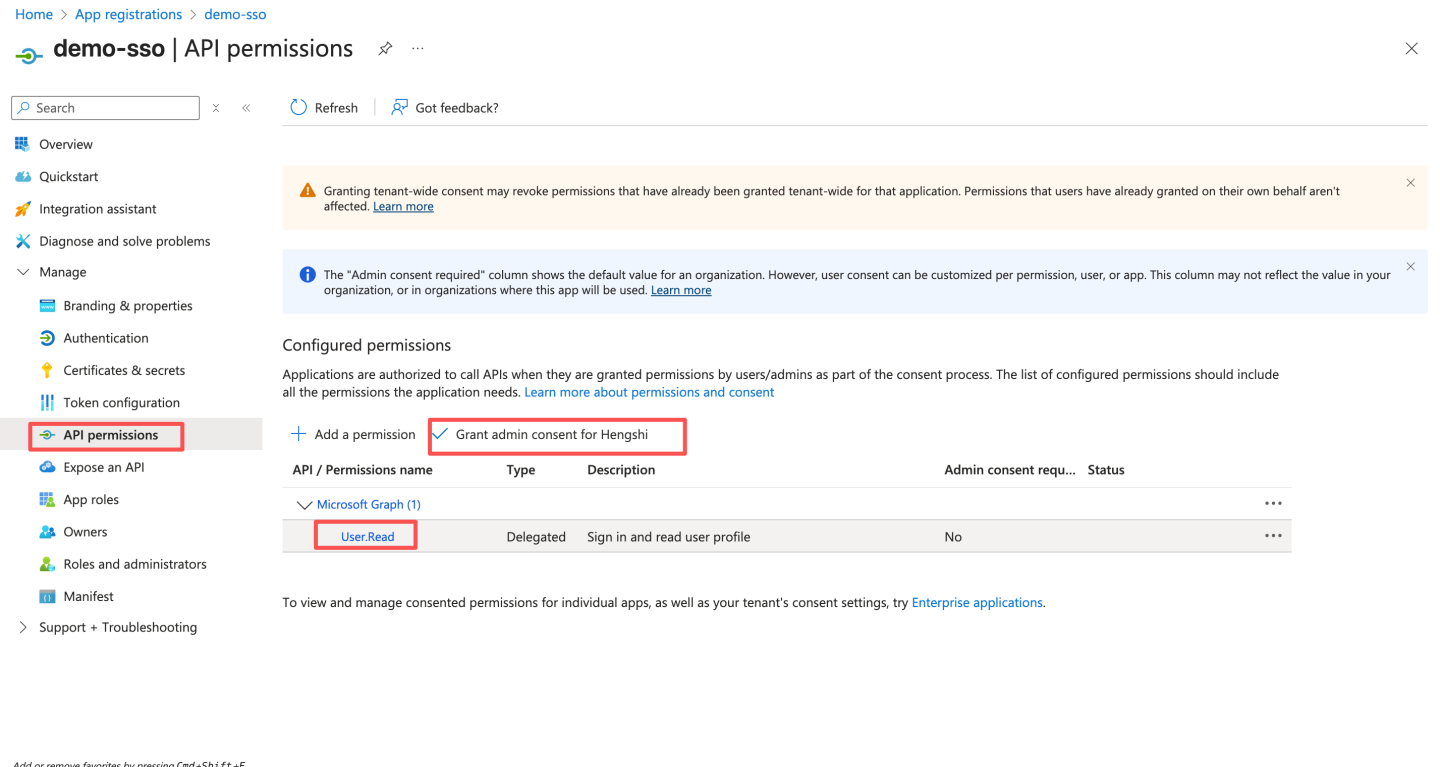 If the permission does not exist, follow the steps below to enable the permission, and finally click "Grant admin consent for xxx."
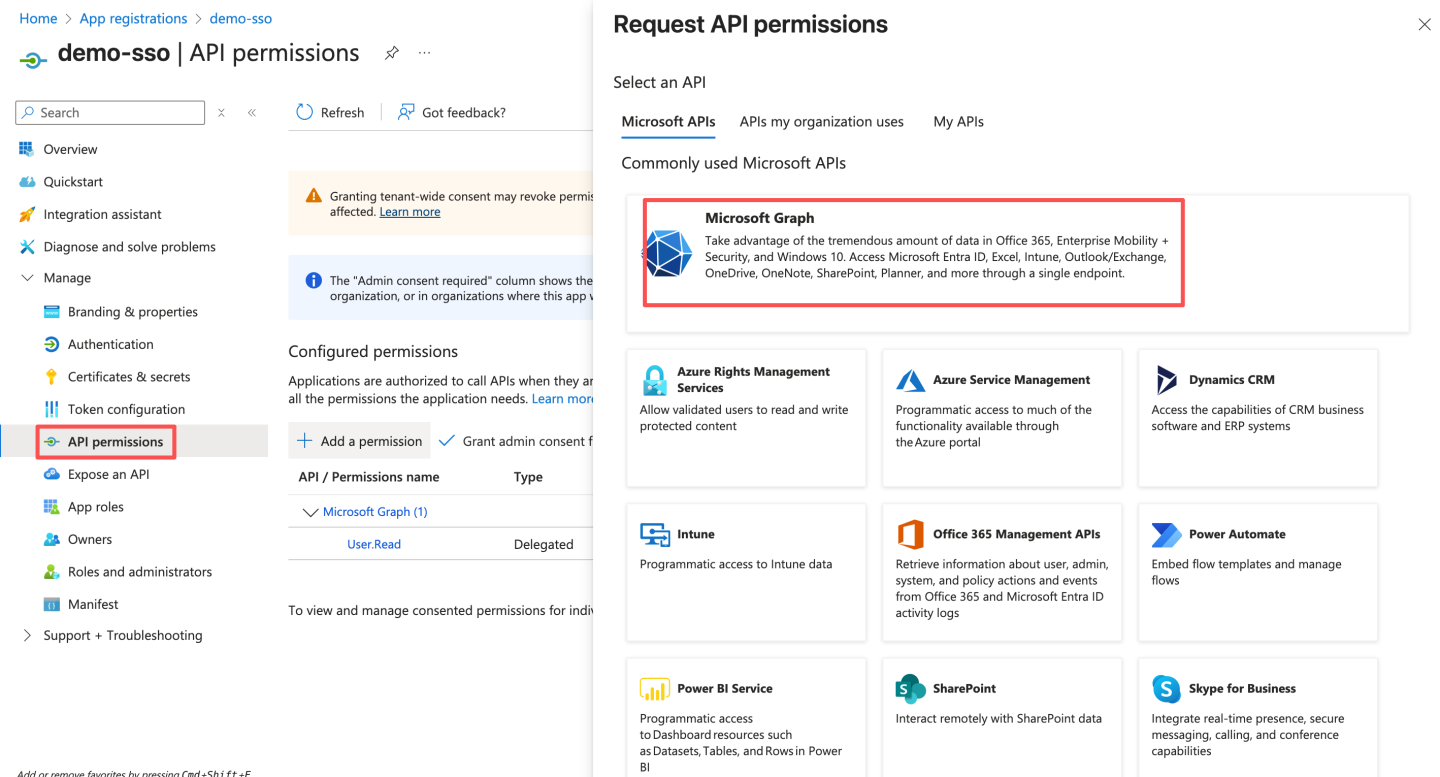
- Configure authentication for the platform, replacing
http://localhost:8080with HengShi's access domain name.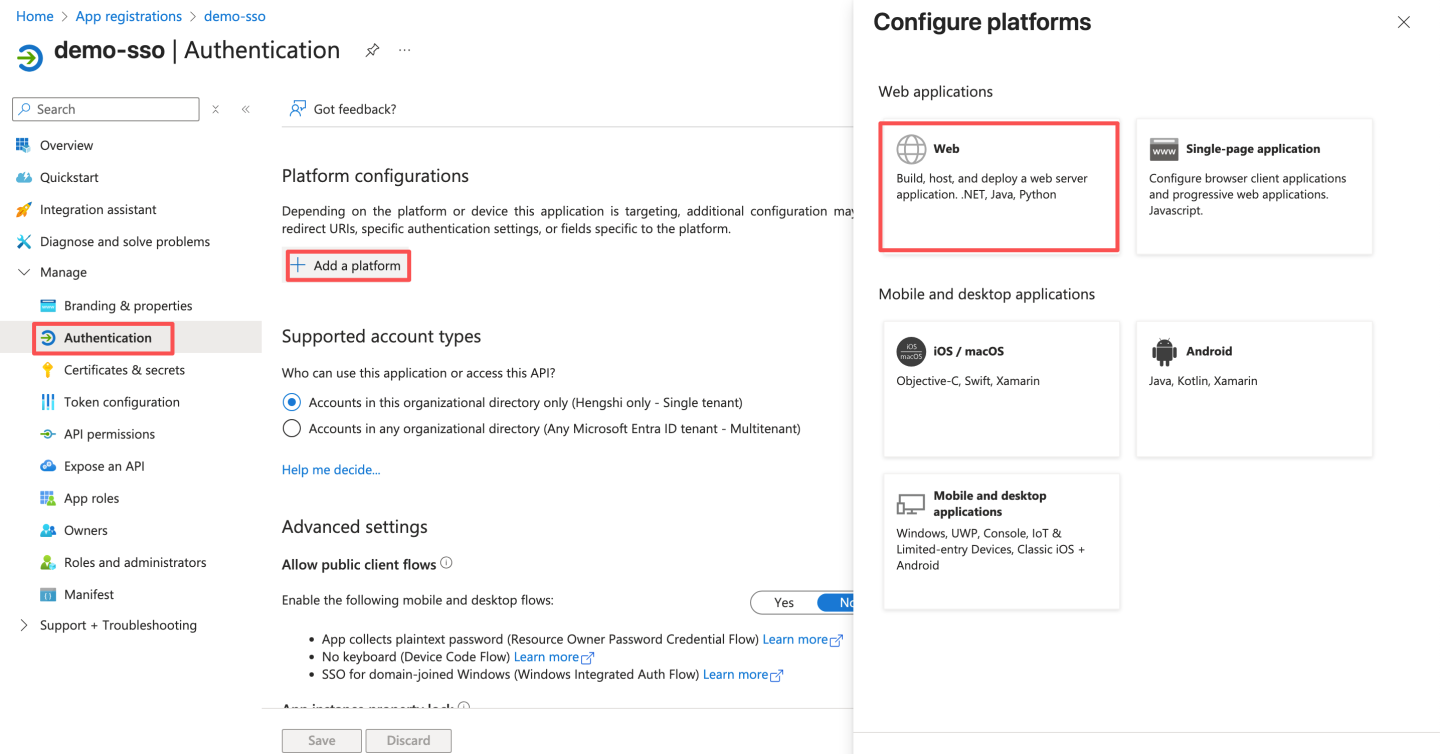
- Refer to Enable SSO for Teams apps for more details. Additional information can be found in this document.
- Open the Azure portal and select "Register an application."
Update the Teams app manifest.
- Refer to Create a Microsoft Teams app package to create a Teams app package.
- Update the app manifest: Add the following code snippet to the manifest file to include new properties:json
"webApplicationInfo": { "id": "{Application (client) ID}", "resource": "api://domain.example.com/{Application (client) ID}" }"id"is the Application (client) ID recorded in step 1.3, and"resource"is the ID URI recorded in step 1.6. Modify thecontentUrlin the app manifest to include the parameteractiveAuth=teamsin the embedded HengShi URL.jsonTeams Sample App Package"contentUrl": "https://{domain.example.com}?activeAuth=teams",
You can also create a Teams app package or modify the manifest through the Teams Developer Portal. For details, refer to the Teams Developer Portal Documentation.
JWT Request Parameters
JWT request parameters refer to the process where users access the system by signing/encrypting their basic information according to the JWT specification and passing it to the server via URL, ensuring both security and convenience. 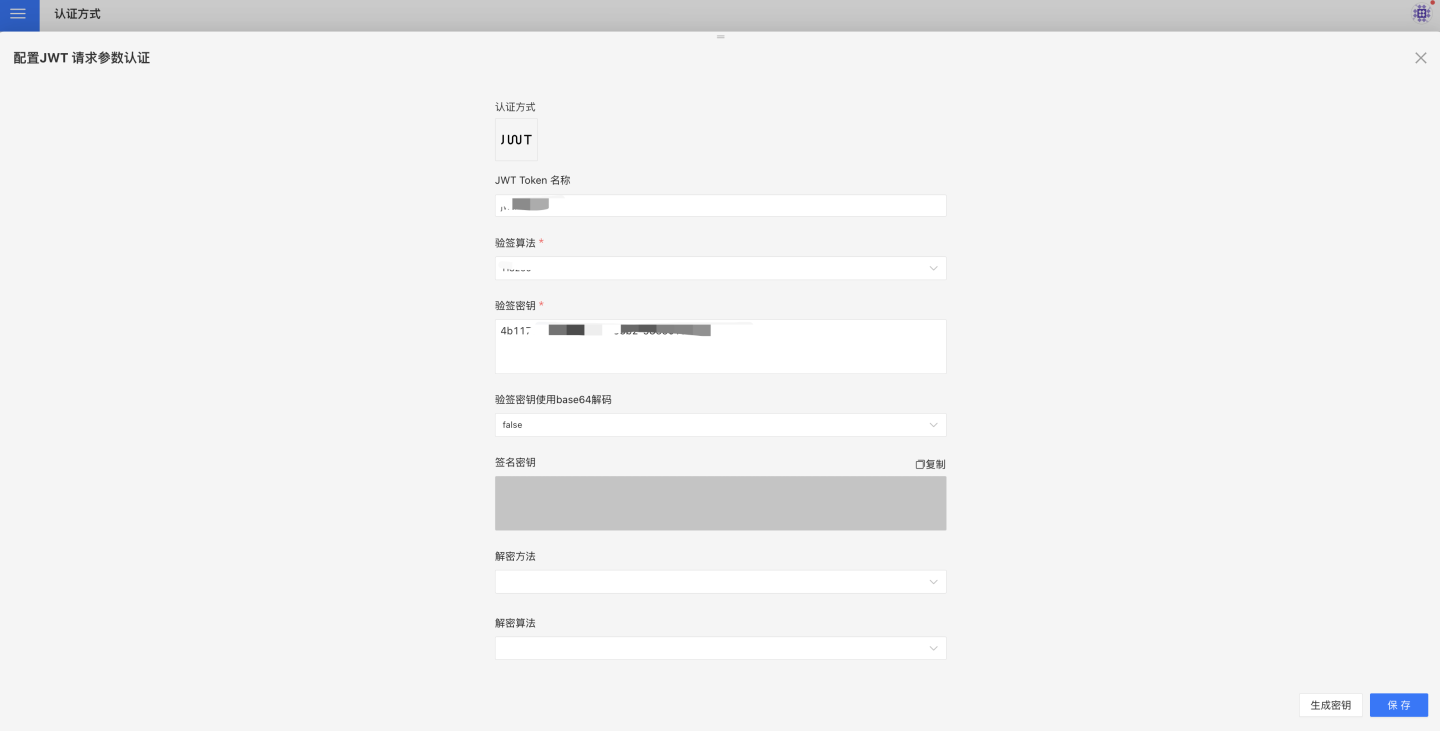
The configuration related to JWT request parameter authentication includes:
- JWT Token Name.
- Signature verification algorithm, which should be consistent with the HENGSHI configuration during client signing.
- Signature verification key: When the verification algorithm is HS256, the client and HENGSHI configuration should be consistent. When the verification algorithm is RS256, the client uses a private key for signing, and the HENGSHI configuration specifies the public key.
- Signature verification key is decoded using base64.
- Decryption method, which should be consistent with the HENGSHI configuration during client encryption.
- Decryption algorithm, which should be consistent with the HENGSHI configuration during client encryption.
- Decryption key: The client uses a public key for encryption, and the HENGSHI configuration specifies the private key.
- The URL for accessing the system is http://{host}:{port}/?activeAuth=jwt-param&jwtParam={signed/encrypted JWT string}.
- Groovy script: Configures the default role for users after login. By default, the role assigned to users after login is Data Viewer.
JWT request parameters related reference materials.
JWT request parameters are used for general configurations to synchronize user attributes and other information, including username mapping, display name mapping, email mapping, phone number mapping, role mapping, group mapping, organizational structure mapping, enterprise ID mapping, enterprise name mapping, platform ID, enabling SSO exp session validity synchronization, session validity mapping, groovy script, etc.
For explanations and usage of general configuration fields, please refer to the General Configuration section.
JWT Basic Format Description
Standard claims in JWT:
| Claim | Meaning | Required | Processing Logic and Restrictions |
|---|---|---|---|
| iss | JWT issuer | No | None |
| sub | JWT subject | Yes | Non-empty and unique. If there is no mapping configuration for loginName/email, HENGSHI will use this value as the unique identifier for the user. If there is a mapping configuration for loginName/email, this value will be ignored. It is recommended to use the mapping configuration for loginName/email, where the value of sub is the same as the value of loginName/email. |
| exp | JWT expiration time | No | If expired, the JWT becomes invalid. |
Custom claims:
| Claim | Meaning | Processing Logic and Restrictions |
|---|---|---|
| Custom claims with mapping configuration | Configured mapping relationships in the HENGSHI system | HENGSHI will save the information to the corresponding user fields based on the mapping relationships. For example, if loginName=alice is configured in HENGSHI as the login name mapping, alice will be used as the loginName for the user in HENGSHI. For other details, refer to General Configuration. |
| Custom claims without mapping configuration | No mapping relationships configured in the HENGSHI system | HENGSHI will save this type of information as user attributes. For example, if abc=123 is not configured in HENGSHI, it will be saved as user attribute information. |
JWT consists of three parts of information, concatenated with "." to form a JWT string. Below is an example:
eyJ0eXAiOiJKV1QiLCJhbGciOiJIUzI1NiJ9.eyJzdWIiOiJhbGljZS1zdWJqZWN0IiwiYWJjIjoiMTIzIiwicm9sZXMiOlsic3lzdGVtIGFkbWluIiwiZGF0YSBhZG1pbiIsImRhdGEgYW5hbHlzdCIsImRhdGEgdmlld2VyIiwiYXBpIGFkbWluIl0sImxvZ2luTmFtZSI6ImFsaWNlIn0.PGA9DNa-B_4e4WS-fVG57tvxYe0dlu0r8O_Lw1vEtAQ- The first part is the header, in plain text:
{"typ":"JWT","alg":"HS256"}, which is encoded using base64URL to becomeeyJ0eXAiOiJKV1QiLCJhbGciOiJIUzI1NiJ9. - The second part is the payload, in plain text:
{"sub":"alice-subject","abc":"123","roles":["system admin","data admin","data analyst","data viewer","api admin"],"loginName":"alice"}(whereloginName,roles, andabcare custom example information that can be added or modified as needed). After base64URL encoding, it becomes:eyJzdWIiOiJhbGljZS1zdWJqZWN0IiwiYWJjIjoiMTIzIiwicm9sZXMiOlsic3lzdGVtIGFkbWluIiwiZGF0YSBhZG1pbiIsImRhdGEgYW5hbHlzdCIsImRhdGEgdmlld2VyIiwiYXBpIGFkbWluIl0sImxvZ2luTmFtZSI6ImFsaWNlIn0. - The third part is the signature, generated by signing the concatenation of the first part (header) + "." + the second part (payload). The information to be signed is:
eyJ0eXAiOiJKV1QiLCJhbGciOiJIUzI1NiJ9.eyJzdWIiOiJhbGljZS1zdWJqZWN0IiwiYWJjIjoiMTIzIiwicm9sZXMiOlsic3lzdGVtIGFkbWluIiwiZGF0YSBhZG1pbiIsImRhdGEgYW5hbHlzdCIsImRhdGEgdmlld2VyIiwiYXBpIGFkbWluIl0sImxvZ2luTmFtZSI6ImFsaWNlIn0, which is signed using the corresponding signing algorithm (in this example, HS256). After base64URL encoding, the signature becomes:PGA9DNa-B_4e4WS-fVG57tvxYe0dlu0r8O_Lw1vEtAQ. The above explains the basic process of generating a JWT. For more details and implementation libraries, you can visit the JWT Official Website.
Java example dependency library:
<dependency>
    <groupId>com.nimbusds</groupId>
    <artifactId>nimbus-jose-jwt</artifactId>
    <version>5.4</version>
</dependency>Java example code:
import com.nimbusds.jose.EncryptionMethod;
import com.nimbusds.jose.JOSEException;
import com.nimbusds.jose.JWEAlgorithm;
import com.nimbusds.jose.JWEHeader;
import com.nimbusds.jose.JWEObject;
import com.nimbusds.jose.JWSAlgorithm;
import com.nimbusds.jose.JWSHeader;
import com.nimbusds.jose.JWSSigner;
import com.nimbusds.jose.Payload;
import com.nimbusds.jose.crypto.MACSigner;
import com.nimbusds.jose.crypto.RSAEncrypter;
import com.nimbusds.jose.crypto.RSASSASigner;
import com.nimbusds.jwt.JWTClaimsSet;
import com.nimbusds.jwt.SignedJWT;

import java.security.KeyPair;
import java.security.KeyPairGenerator;
import java.security.NoSuchAlgorithmException;
import java.security.interfaces.RSAPrivateKey;
import java.security.interfaces.RSAPublicKey;
import java.util.ArrayList;
import java.util.Base64;
import java.util.List;

public class Test {
    public static void main(String[] args) throws Exception {
        // HS256 HMAC signing
        hmacSign();
        System.out.println("------------------------------------------");
        // RS256 RSA signing
        rsaSign();
        System.out.println("------------------------------------------");
        // A128CBC-HS256 RSA-OAEP-256 encryption
        signAndEncrypt();
    }

    // RS256
    public static void rsaSign() throws NoSuchAlgorithmException, JOSEException {
        KeyPairGenerator kpg = KeyPairGenerator.getInstance("RSA");
        KeyPair kp = kpg.genKeyPair();
        RSAPrivateKey privateKey = (RSAPrivateKey) kp.getPrivate();
        RSAPublicKey publicKey = (RSAPublicKey) kp.getPublic();
        JWTClaimsSet claimsSet = getJwtClaimsSet();

        JWSSigner signer = new RSASSASigner(privateKey);
        SignedJWT signedJWT = new SignedJWT(new JWSHeader.Builder(JWSAlgorithm.RS256).type(JOSEObjectType.JWT).build(), claimsSet);
        signedJWT.sign(signer);
        String token = signedJWT.serialize();
        String url = "http://{host}:{port}?activeAuth=jwt-param&jwtParam=" + token;
        System.out.println(url);
        // Verification key configured in the HENGSHI system
        System.out.println("Verification key=" + Base64.getEncoder().encodeToString(publicKey.getEncoded()));
    }

    // HS256
    public static void hmacSign() throws Exception {
        JWTClaimsSet claimsSet = getJwtClaimsSet();
        String key = "4b117a14-c652-410a-83b2-9839c16e7ae1"; // HS256 key, must be greater than 32 characters
        SignedJWT signedJWT = new SignedJWT(new JWSHeader.Builder(JWSAlgorithm.HS256).type(JOSEObjectType.JWT).build(), claimsSet);
        JWSSigner signer = new MACSigner(key);
        signedJWT.sign(signer);

        String token = signedJWT.serialize();
        String url = "http://{host}:{port}?activeAuth=jwt-param&jwtParam=" + token;
        System.out.println(url);
        // Verification key configured in the HENGSHI system
        System.out.println("Verification key=" + key);
        /*
        Note: Different signing content results in different tokens. The token below is generated based on the content in the code above. If modified, the token will change accordingly.
        Generated token: eyJ0eXAiOiJKV1QiLCJhbGciOiJIUzI1NiJ9.eyJzdWIiOiJhbGljZS1zdWJqZWN0IiwiYWJjIjoiMTIzIiwicm9sZXMiOlsic3lzdGVtIGFkbWluIiwiZGF0YSBhZG1pbiIsImRhdGEgYW5hbHlzdCIsImRhdGEgdmlld2VyIiwiYXBpIGFkbWluIl0sImxvZ2luTmFtZSI6ImFsaWNlIn0.PGA9DNa-B_4e4WS-fVG57tvxYe0dlu0r8O_Lw1vEtAQ
        Example request URL: http://{host}:{port}?activeAuth=jwt-param&jwtParam=eyJ0eXAiOiJKV1QiLCJhbGciOiJIUzI1NiJ9.eyJzdWIiOiJhbGljZS1zdWJqZWN0IiwiYWJjIjoiMTIzIiwicm9sZXMiOlsic3lzdGVtIGFkbWluIiwiZGF0YSBhZG1pbiIsImRhdGEgYW5hbHlzdCIsImRhdGEgdmlld2VyIiwiYXBpIGFkbWluIl0sImxvZ2luTmFtZSI6ImFsaWNlIn0.PGA9DNa-B_4e4WS-fVG57tvxYe0dlu0r8O_Lw1vEtAQ
         */
    }

    private static JWTClaimsSet getJwtClaimsSet() {
        List<String> roles = new ArrayList<>();
        roles.add("system admin"); // System Administrator
        roles.add("data admin");  // Data Administrator
        roles.add("data analyst"); // Data Analyst
        roles.add("data viewer"); // Data Viewer
        roles.add("api admin");   // API Administrator

        String loginName = "alice"; // Login name, unique

        JWTClaimsSet claimsSet = new JWTClaimsSet.Builder()
                .subject(loginName + "-subject") // JWT subject, required to be non-empty. If no login name mapping is configured, this value will be used as the default login name. It must be unique and can be the same as the login name.
                //.issuer("https://c2id.com") // Issuer identifier, representing the unique identifier of the token issuer, usually an HTTP(S) URL. Not used in HENGSHI.
                .claim("roles", roles)
                /* Login name, unique. The key can be set to any name, but it needs to be configured in HENGSHI's [JWT Parameter Authentication] method as the login name mapping. For example, here it should be configured as loginName.
                 * HENGSHI can also configure mappings for email, phone, roles, user groups, etc. For details, refer to the documentation. */
                .claim("loginName", loginName)
                .claim("abc", "123") // Additional claims can be added as needed, and they will be saved as user attributes.
                //.expirationTime(new Date(new Date().getTime() + 60 * 1000)) // Validity period, set as needed.
                .build();
        return claimsSet;
    }

    public static void signAndEncrypt() throws Exception {
        KeyPairGenerator kpg = KeyPairGenerator.getInstance("RSA");

        KeyPair signkp = kpg.genKeyPair();
        RSAPrivateKey signPrivateKey = (RSAPrivateKey) signkp.getPrivate();
        RSAPublicKey signPublicKey = (RSAPublicKey) signkp.getPublic();
        // Verification key configured in the HENGSHI system
        System.out.println("Verification key=" + Base64.getEncoder().encodeToString(signPublicKey.getEncoded()));
        JWTClaimsSet jwtClaimsSet = getJwtClaimsSet();
        SignedJWT signedJWT = new SignedJWT(
                new JWSHeader.Builder(JWSAlgorithm.RS256).type(JOSEObjectType.JWT).build(),
                jwtClaimsSet);

        signedJWT.sign(new RSASSASigner(signPrivateKey));
        KeyPair encryptKP = kpg.genKeyPair();
        RSAPrivateKey encryptPrivateKey = (RSAPrivateKey) encryptKP.getPrivate();
        // Decryption key configured in the HENGSHI system
        System.out.println("Decryption key=" + Base64.getEncoder().encodeToString(encryptPrivateKey.getEncoded()));

        RSAPublicKey encryptPublicKey = (RSAPublicKey) encryptKP.getPublic();
        JWEObject jweObject = new JWEObject(
                new JWEHeader.Builder(JWEAlgorithm.RSA_OAEP_256, EncryptionMethod.A128CBC_HS256).type(JOSEObjectType.JWT)
                        .contentType("JWT")
                        .build(),
                new Payload(signedJWT));

        jweObject.encrypt(new RSAEncrypter(encryptPublicKey));
        String token = jweObject.serialize();
        String url = "http://{host}:{port}?activeAuth=jwt-param&jwtParam=" + token;
        System.out.println(url);
    }
}Feishu
Feishu authentication methods support QR code login, micro-app seamless login, and management backend seamless login. 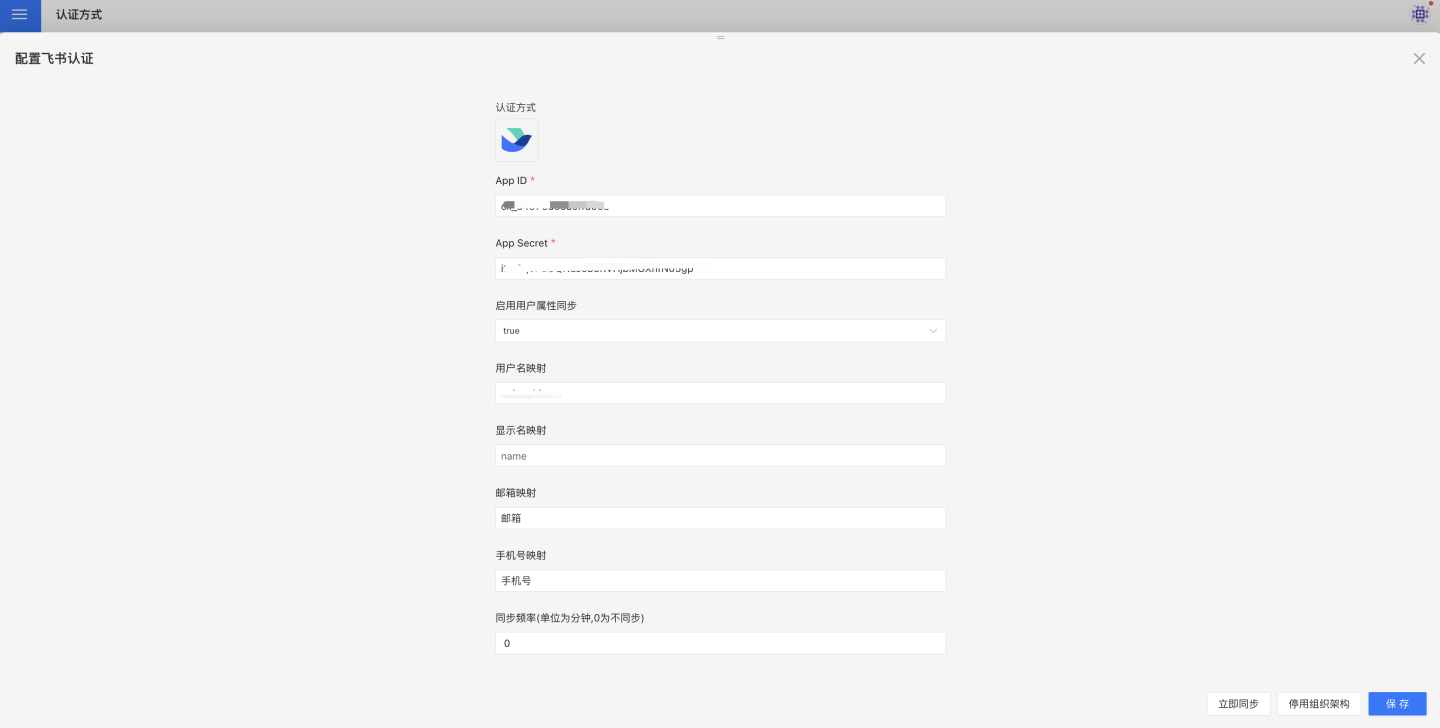
Feishu authentication-related configurations include:
- App ID, App Secret: Basic information of Feishu, refer to Feishu Configuration for Custom Apps for details.
- Synchronization Frequency: Configure the synchronization of organizational structure, measured in minutes. Setting it to 0 means no synchronization. If organizational structure synchronization is required, permissions to access contact directory department structure information and enterprise information must be enabled.
- Automatically Join Organization on Login: Whether to automatically join the existing organizational structure based on the department information of the logged-in user during login.
Feishu Configuration for Custom Applications
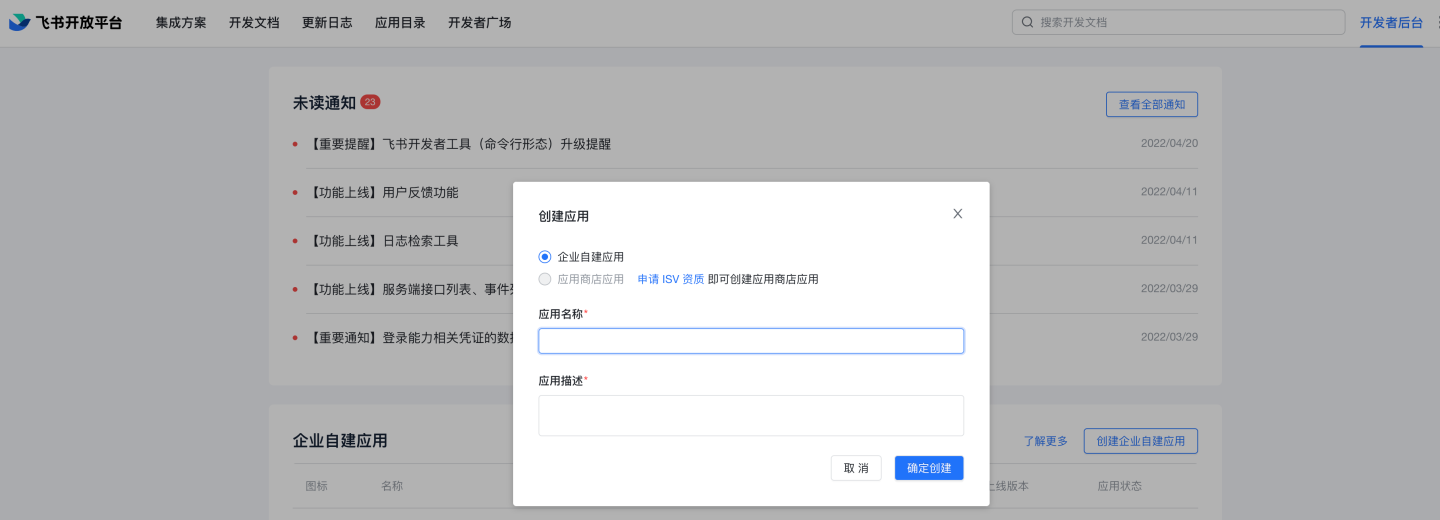
Navigate to Developer Console -> Enterprise Custom Applications -> Click on Enterprise Custom Applications.
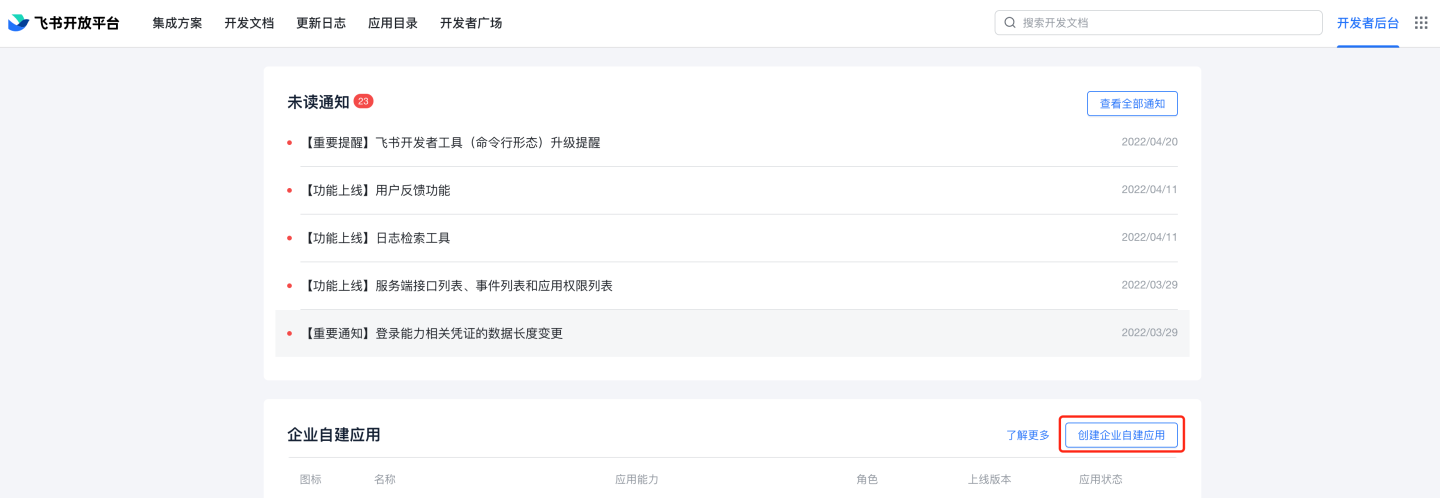
Fill in the application name and description.
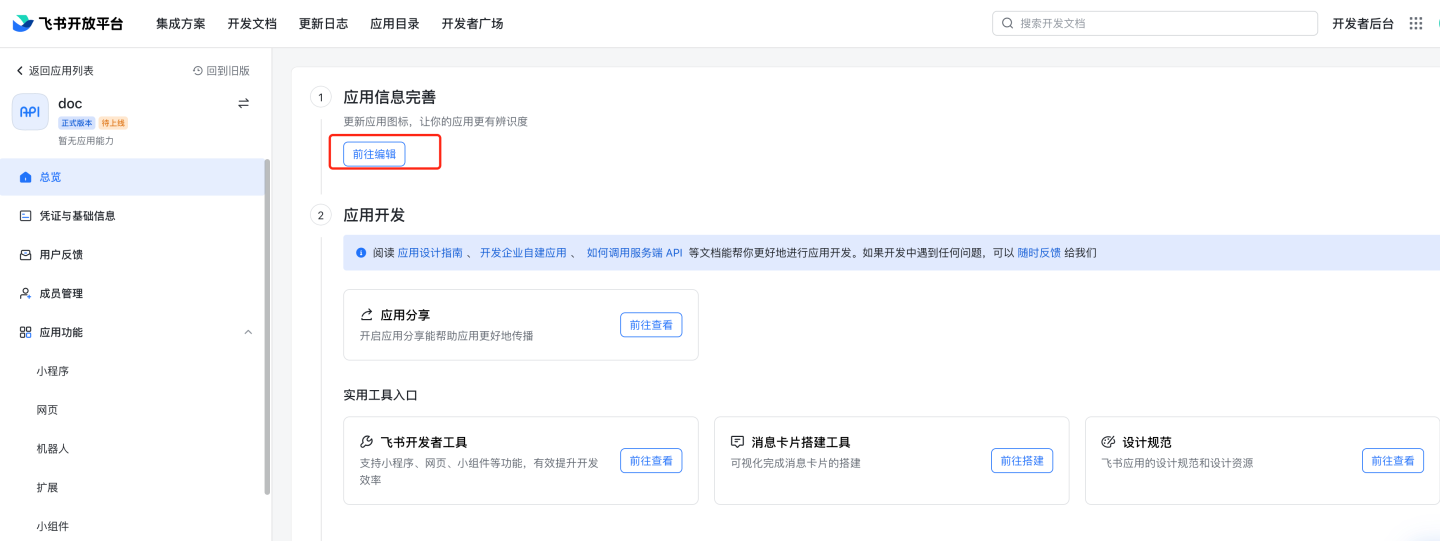
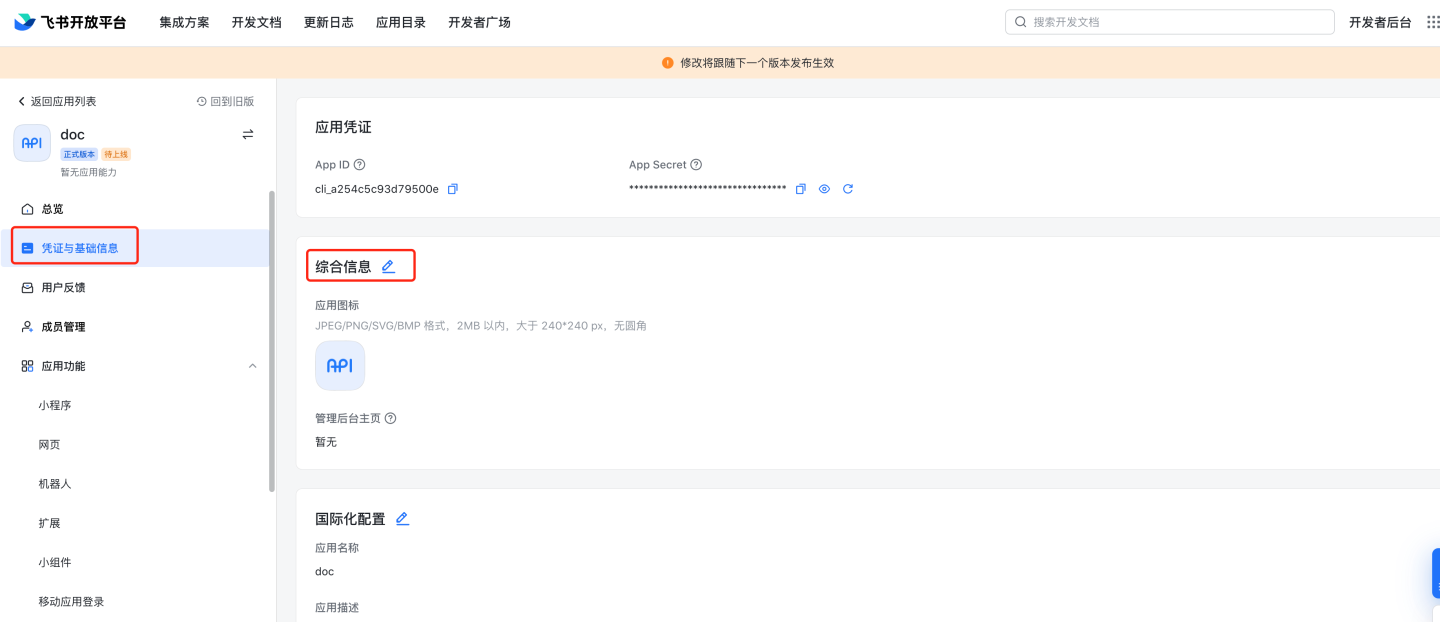
In the Enterprise Custom Applications list, click to enter the newly created application, complete the application information, and edit the comprehensive information. Upload the application icon. You can optionally fill in the management backend homepage
http://{host}:{port}?activeAuth=lark&larkLoginType=larkAdminBackend, which is used for system access without login from the Feishu management backend. The specific address can be modified as needed, while the parametersactiveAuthandlarkLoginTypeare fixed. If this feature is not required, you can leave it blank.

Configure application features, web pages, and fill in the desktop and mobile homepage URLs. The specific addresses can be modified as needed, while the parameters
activeAuthandlarkLoginTypeare fixed. Desktop homepage:http://{host}:{port}?activeAuth=lark&larkLoginType=desktopMobile homepage:
http://{host}:{port}?activeAuth=lark&larkLoginType=app
Security settings: Configure the redirect URL.
http://{host}:{port}/lark/callback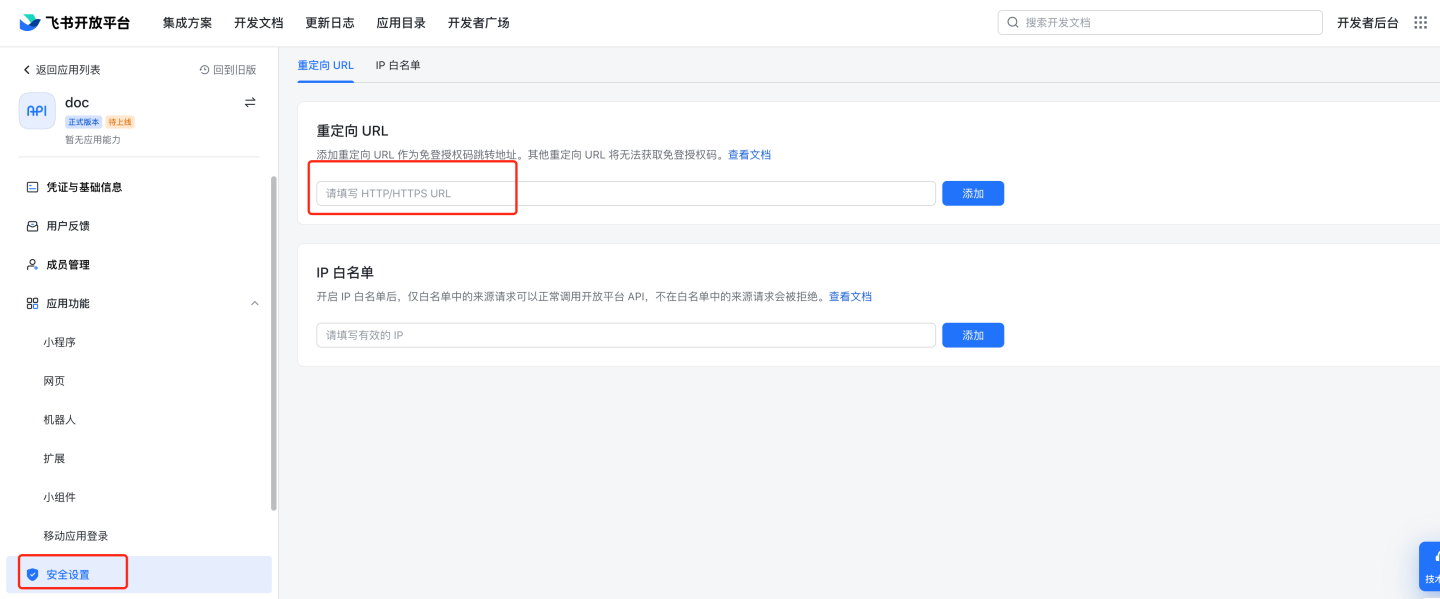
Permission management: Enable permissions such as obtaining user basic information (
contact:user.base:readonly), user email information (contact:user.email:readonly), user ID (contact:user.employee_id:readonly), and user phone number (contact:user.phone:readonly). For details, refer to the table below. Note that obtaining user email information, user ID, and user phone number are optional permissions. If not enabled, Feishu will not return this information. If organizational structure synchronization is required, enable permissions for obtaining contact department organizational structure information (contact:department.organize:readonly) and enterprise information (tenant:tenant:readonly).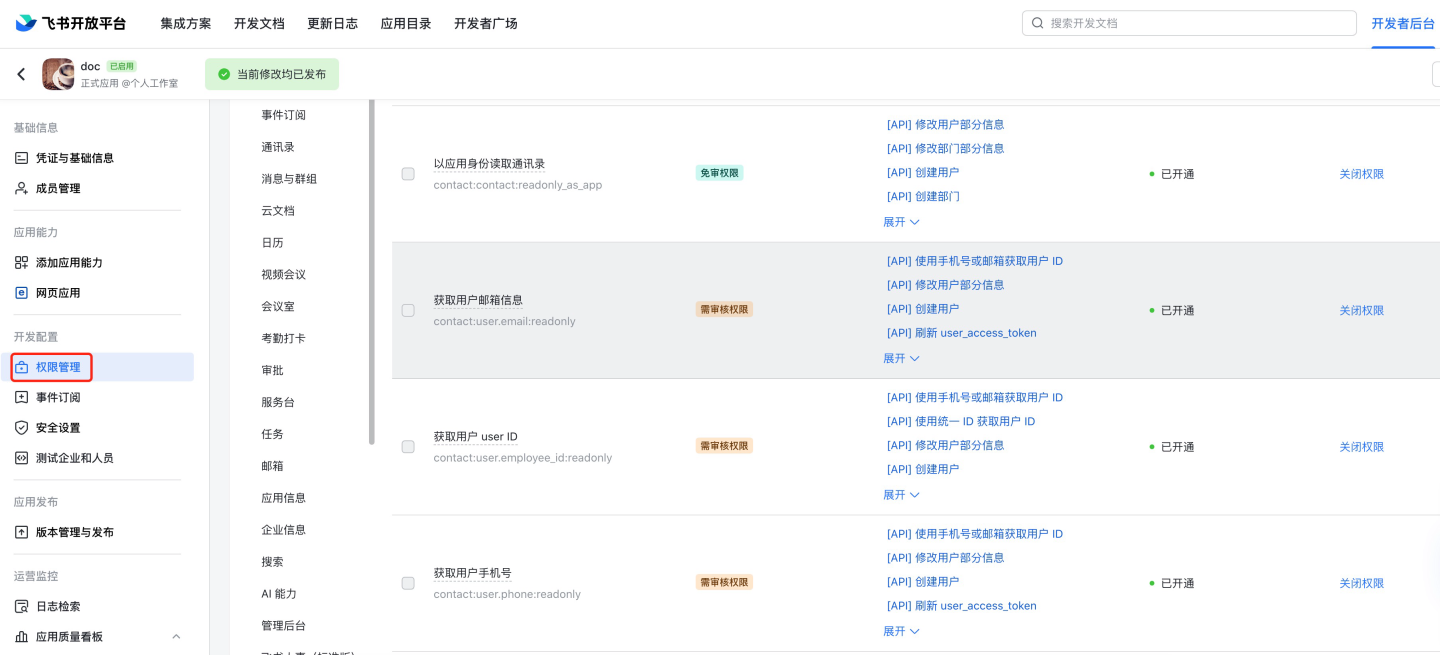
Feishu Permission Overview:
| Permission Name | Code | Description |
|---|---|---|
| Obtain user basic information | contact:user.base:readonly | |
| Obtain user's usable applications | admin:app.user_usable:readonly | |
| Obtain user organizational structure information | contact:user.department:readonly | |
| Obtain user email information | contact:user.email:readonly | |
| Obtain user ID | contact:user.employee_id:readonly | |
| Obtain user group information | contact:group:readonly | |
| Obtain user ID via phone or email | contact:user.id:readonly | |
| Obtain user phone number | contact:user.phone:readonly | |
| Obtain user gender | contact:user.gender:readonly | |
| Query user job level | contact:user.job_level:readonly | |
| Query user's enterprise email | mail:user_mailbox:readonly | |
| Query personal email information | corehr:person.email:read | |
| Obtain contact basic information | contact:contact.base:readonly | |
| Read contact information as application identity | contact:contact:readonly_as_app | |
| Send and receive single or group messages | im:message | Required for Feishu message push |
| Send messages as application identity | im:message:send_as_bot | Required for Feishu message push |
| Send batch messages to members of one or more departments | im:message:send_multi_depts | Required for Feishu message push |
| Send batch messages to multiple users | im:message:send_multi_users | Required for Feishu message push |
| Obtain and upload image or file resources | im:resource | Required for Feishu message push |
| Obtain contact department organizational structure information | contact:department.organize:readonly | Required for organizational structure synchronization |
| Obtain enterprise information | tenant:tenant:readonly | Required for organizational structure synchronization |
Quickly enable required permissions in Feishu permission configuration by searching the following codes:
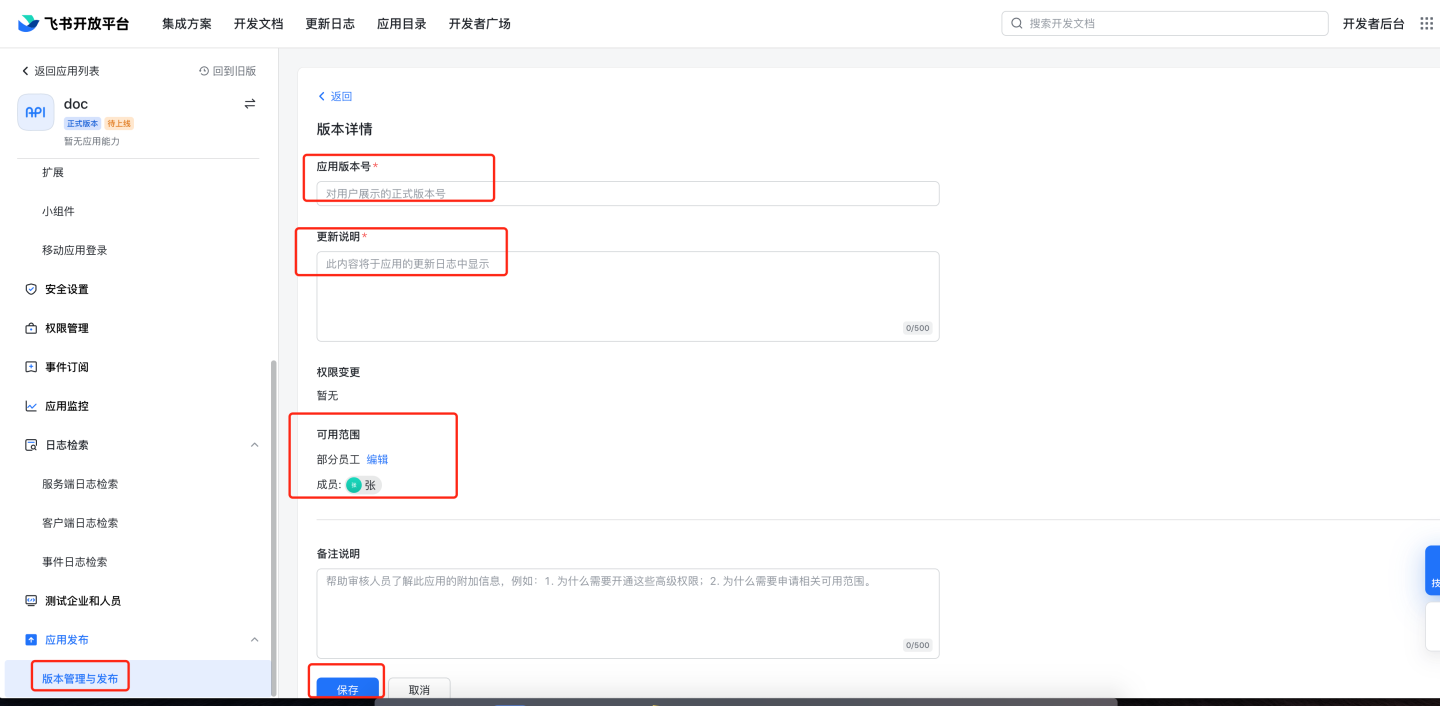
contact:user.base:readonly,contact:contact:readonly_as_app,contact:contact.base:readonly,admin:app.user_usable:readonly,contact:user.department:readonly,contact:user.email:readonly,contact:user.employee_id:readonly,contact:group:readonly,contact:user.id:readonly,contact:user.phone:readonly,contact:user.gender:readonly,contact:user.job_level:readonly,mail:user_mailbox:readonly,corehr:person.email:read,im:message,im:message:send_as_bot,im:message:send_multi_depts,im:message:send_multi_users,im:resourceVersion management and release: Create a version, fill in the application version number, update notes, and select the applicable scope as required by Feishu. Apply for online release.

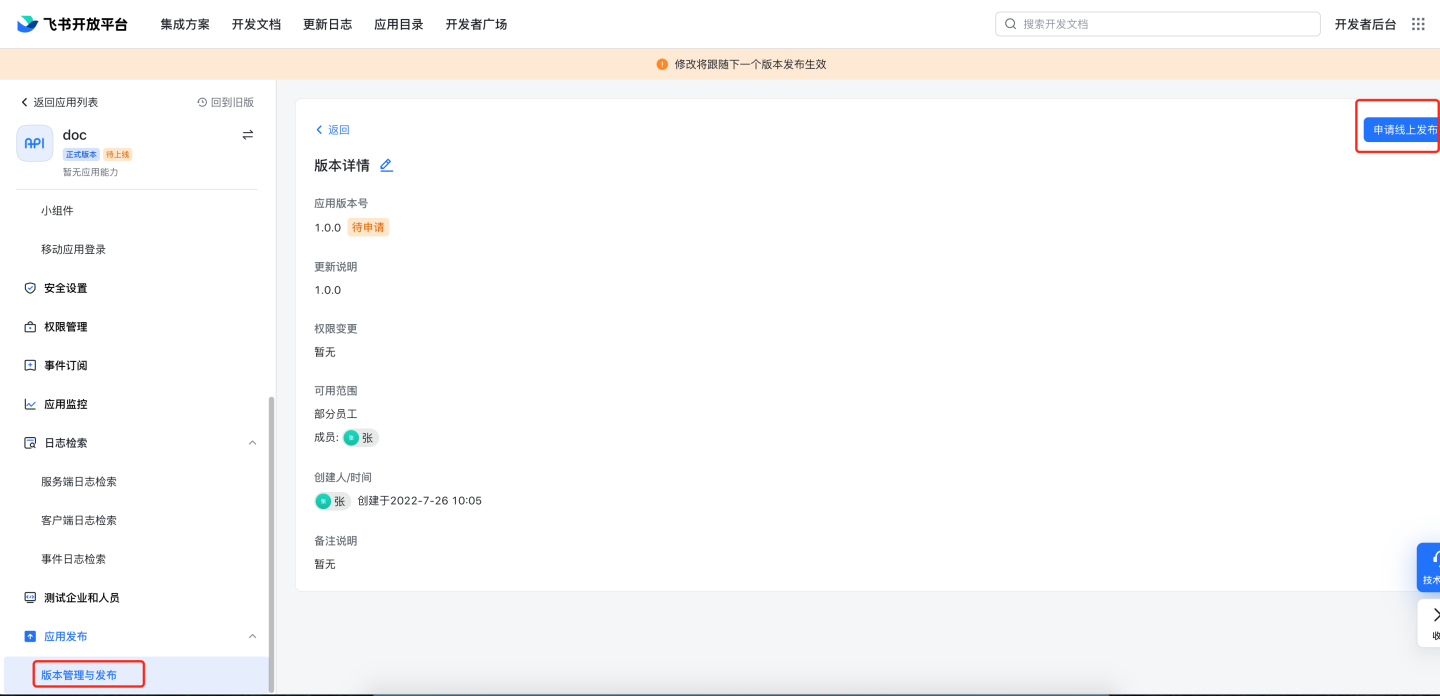
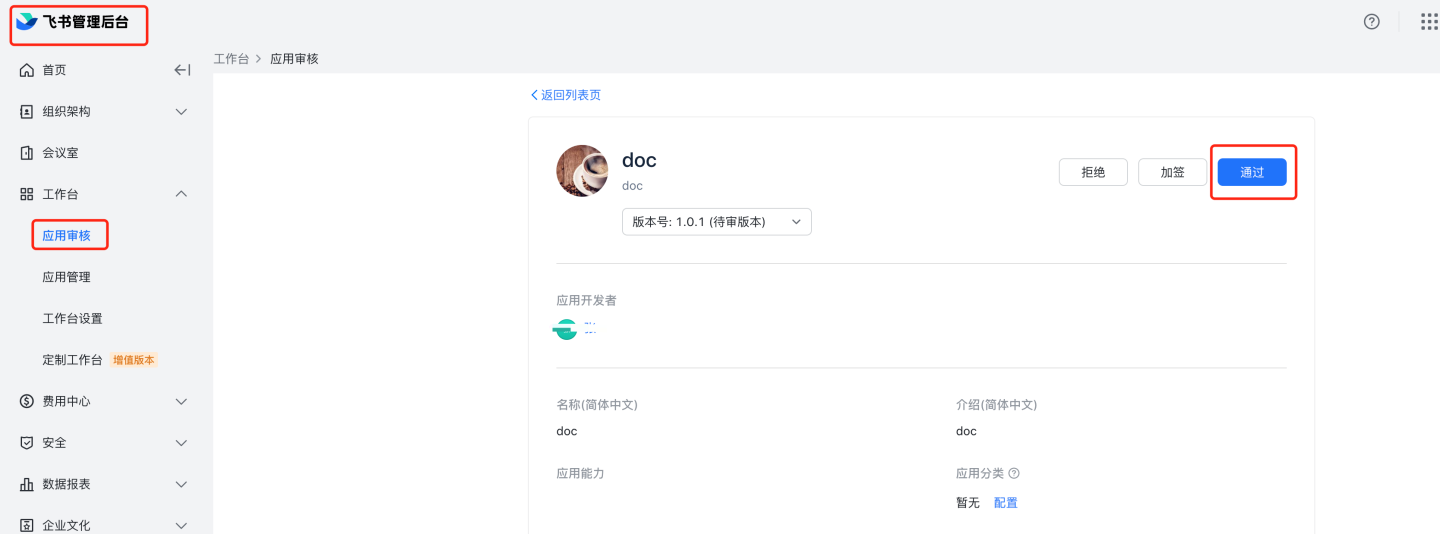
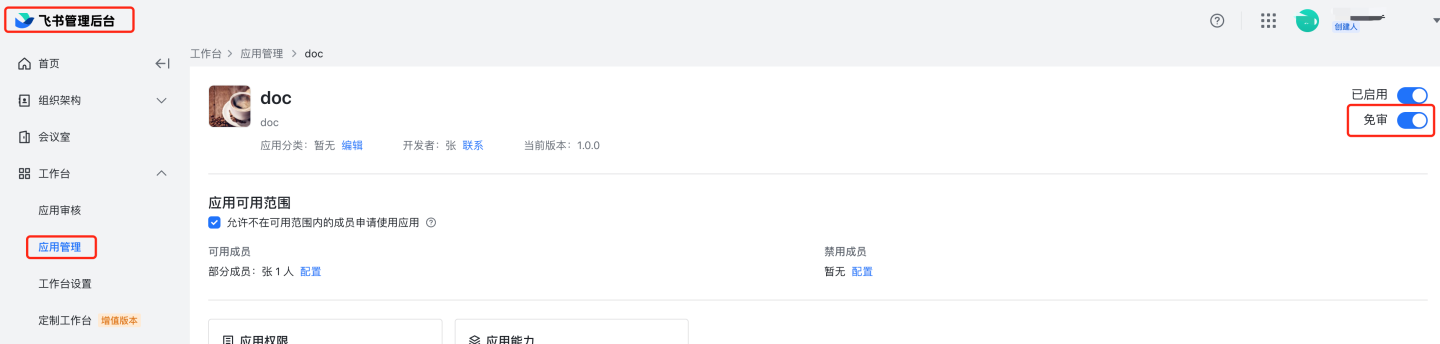
Application review. 8.1 Manual review: Navigate to Feishu management backend
https://bc0nlvsmah.feishu.cn/admin/appCenter/audit, select the application to be reviewed, and proceed with the review.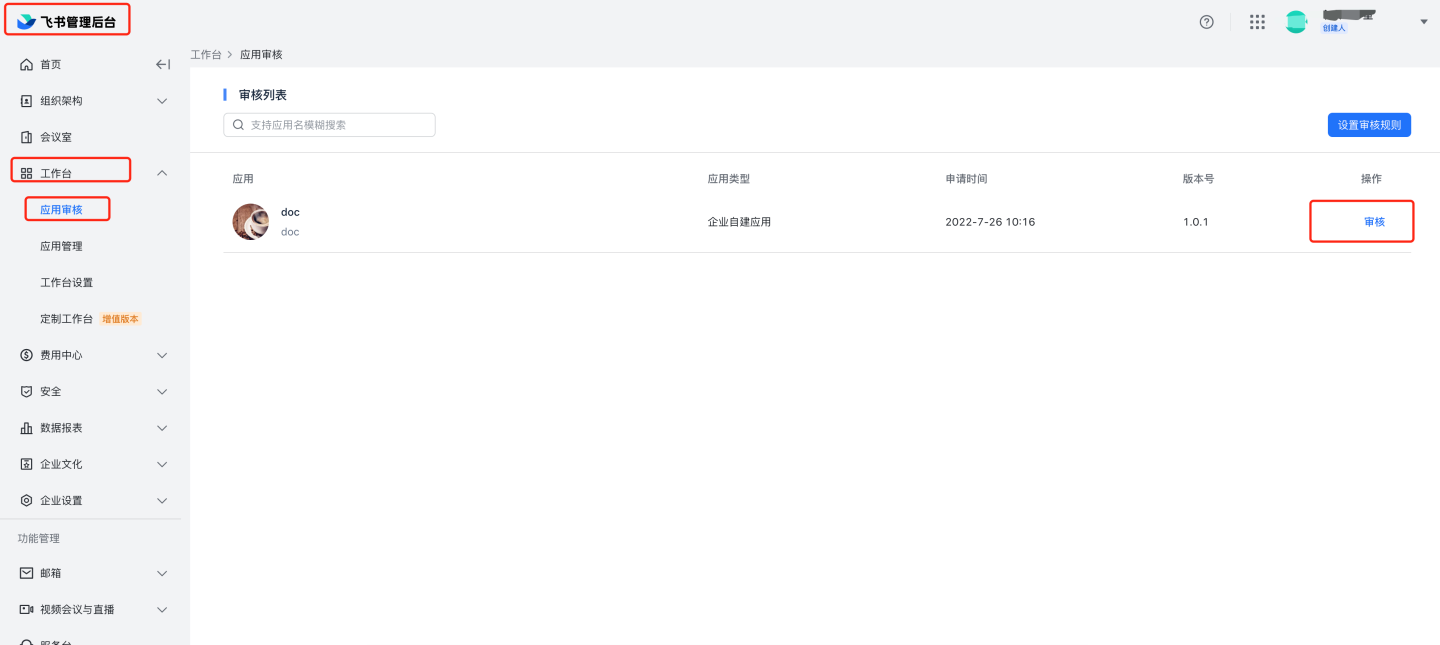
 8.2 Automatic review: Navigate to Feishu management backend, Application Management,
 https://bc0nlvsmah.feishu.cn/admin/appCenter/manage, select the application to configure automatic review, click on configuration, and enable the no-review feature.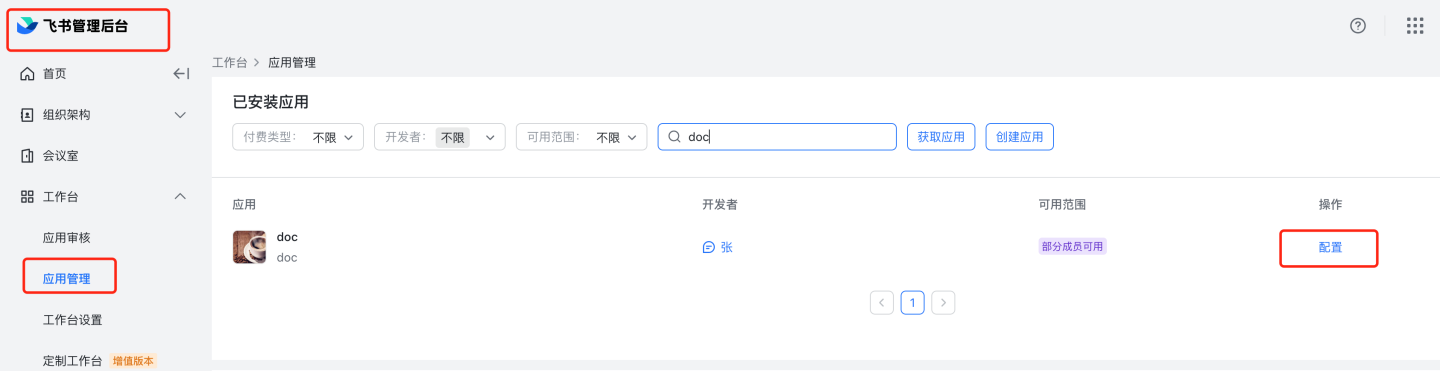
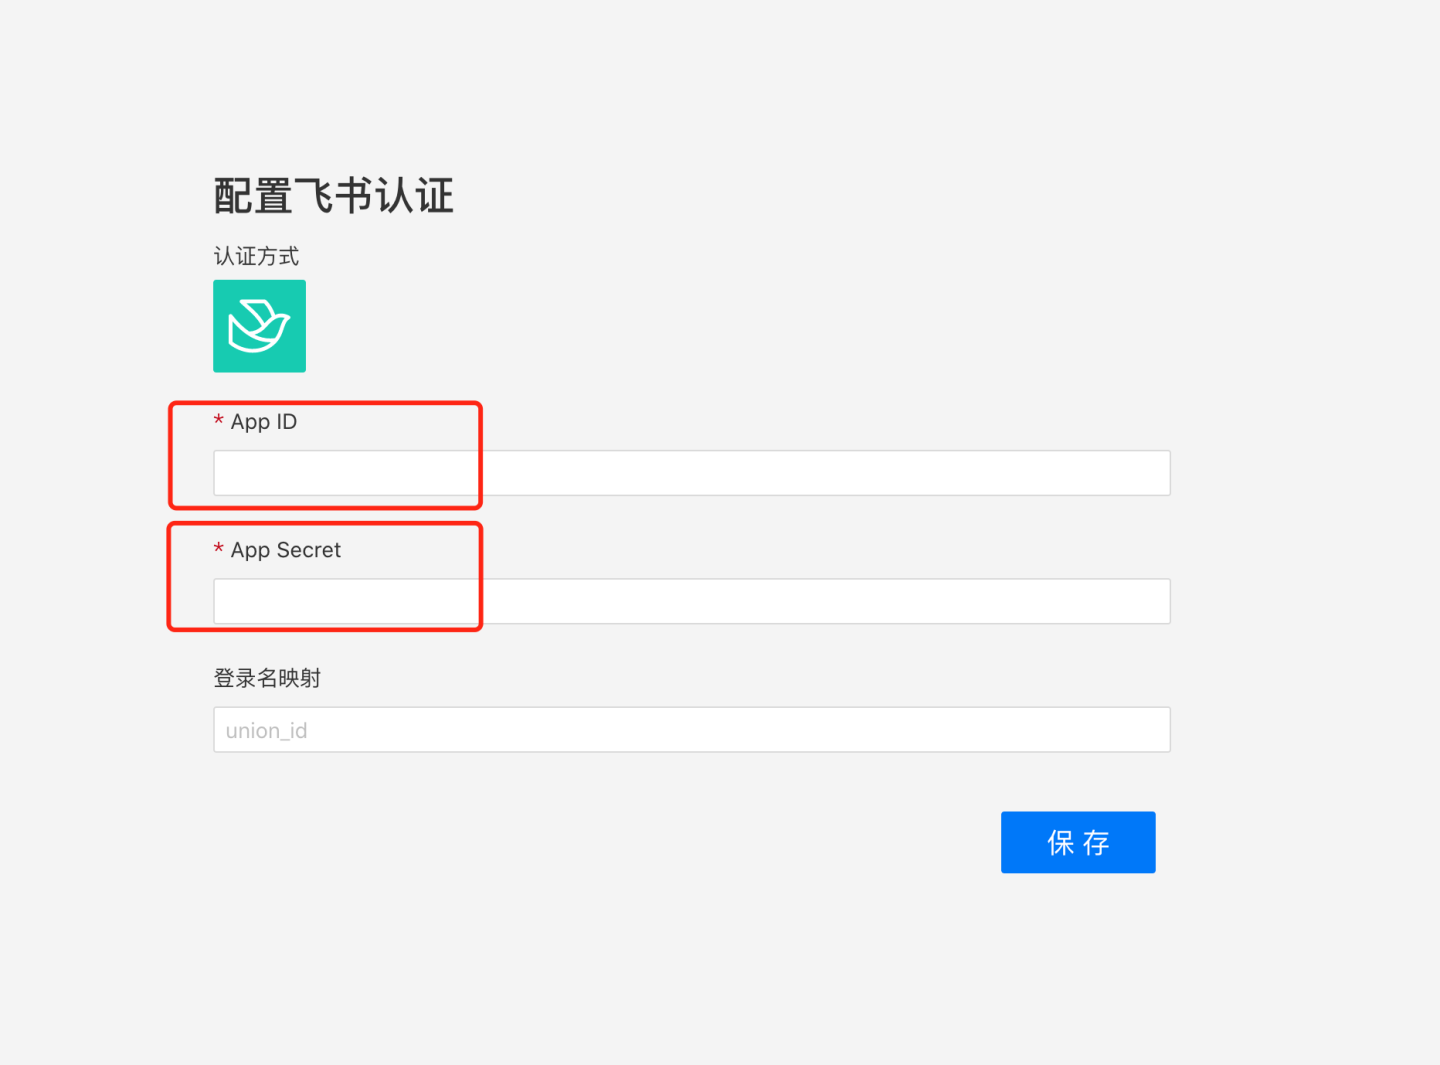
Configure the App ID and App Secret of the Feishu custom application in the system.
Related Feishu authentication documentation can be referenced:
- Application Single Sign-On
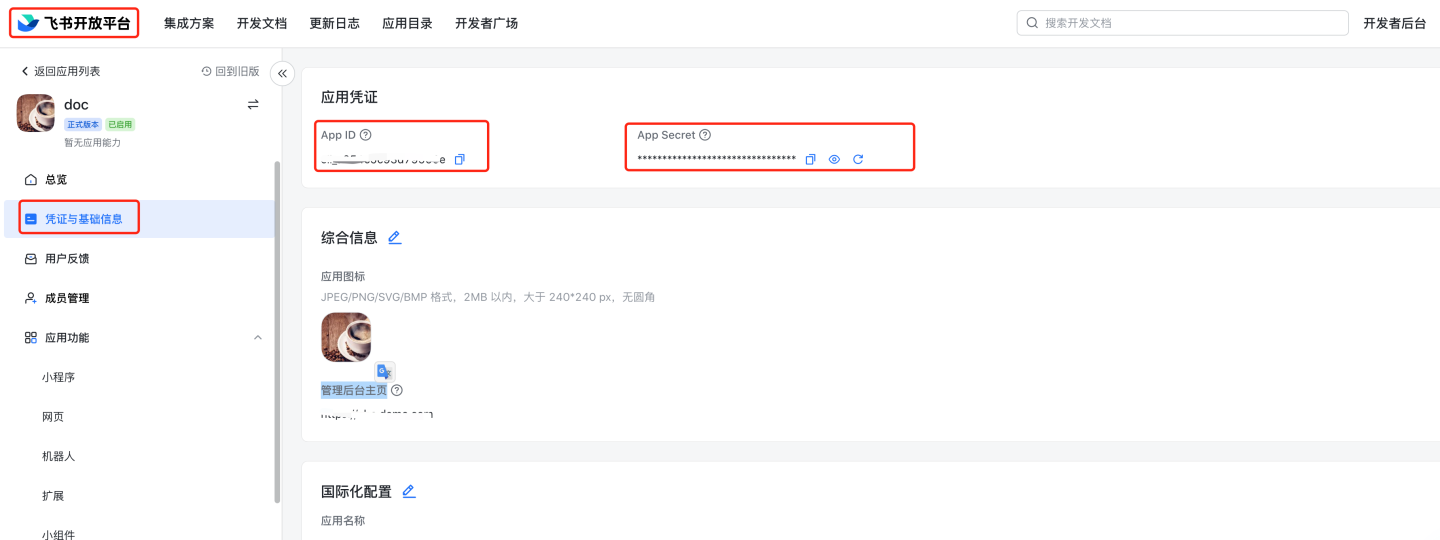
- View App ID and App Secret Navigate to Feishu Open Platform, select the specific application, and view the App ID and App Secret.
- Feishu management backend
https://bc0nlvsmah.feishu.cn/admin/appCenter/manageSingle Sign-On to specific applications If the management backend homepage address is filled in the comprehensive information under credentials and basic information, you can access the application via Single Sign-On in the Feishu management backend.
Please note
Feishu documentation may change; refer to the official Feishu documentation for the latest updates.
General Configuration
Certain authentication methods (e.g., OAuth2, jwt-param, etc.) support mapping configurations for login names, email addresses, phone numbers, etc. For authentication methods with these configuration options, they have the same meaning.
Enable User Attribute Synchronization: Configure whether to synchronize user attributes.
Username Mapping: A specific field in the customer system will be used as the login name in the system, which must be unique across the system. The purpose is to automatically associate the user during each login.
Display Name Mapping: A specific field in the customer system will be used as the display name in the system.
Email Mapping: A specific field in the customer system will be used as the email in the system, which must be unique across the system. The purpose is to automatically associate the user during each login.
Phone Number Mapping: A specific field in the customer system will be used as the phone number in the system, which must be unique across the system.
Role Mapping: A specific field in the customer system will be used as the roles assigned to the user in the system. Role IDs or role identifiers can be passed. If not provided, the default role is Data Viewer. The role identifiers and role names correspond as follows:
- system admin: System Administrator.
- data admin: Data Administrator.
- data analyst: Data Analyst.
- data viewer: Data Viewer.
- api admin: API Administrator.
Group Mapping: A specific field in the customer system will be used as the group the user belongs to in the system. User group IDs or group names can be passed.
Organization Structure Mapping: The organizational structure in the customer system can be mapped to the HENGSHI system.
Enterprise ID Mapping: When logging in via tenant mode, this field can be used to map the enterprise ID in the system.
Enterprise Name Mapping: When logging in via tenant mode, this field can be used to map the enterprise name in the system.
Platform ID: This field stores the platform ID.
Enable SSO Expiration Synchronization: Configure whether to synchronize the expiration period in the session.
Session Expiration Mapping: The session expiration field, default is
exp.
For example, if the JSON passed from the customer system is as follows:
{
  "uniqueName": "zhangsan",
  // Unique identifier
  "nickname": "张 san",
  "name": "张三",
  "given_name": "张三",
  "family_name": "张",
  "roles": [
    "data admin",
    // Role identifier
    "data analyst"
  ],
  "groups": [
    "group1",
    // User group name
    "group2"
  ],
  "email": "zhangsan@hengshi.com"
}In HENGSHI, the login name mapping should be configured as uniqueName.
In HENGSHI, the username mapping should be configured as name.
In HENGSHI, the email mapping should be configured as email.
In HENGSHI, the role mapping should be configured as roles.
In HENGSHI, the group mapping should be configured as groups.
Integration Instructions for Authentication Methods
- The HENGSHI SENSE system supports multiple authentication methods. Depending on different scenarios, you can choose different authentication methods.
- Regardless of the authentication method chosen, you can log in using the HENGSHI username and password. The login address is: http://{host}:{port}/login.
- The selection of HENGSHI authentication methods supports two approaches: configuration page selection and URL parameter passing. Selecting on the configuration page means it is the default authentication method. If no specific method is specified in the URL, the default method will be used for authentication. However, if a specific authentication method is specified in the URL, the method specified in the URL will take precedence. For example: If the authentication method configured is HENGSHI, but the URL specifies
activeAuth=oauth2, then OAuth2 will be used for authentication. Example:
http://{host}:{port}/?activeAuth=oauth2#/- To specify the authentication method via tenant URL parameters, you need to pass
tenantCode={tenantCode}ortenantId={tenantId}. Example:
http://{host}:{port}/?activeAuth=oauth2&tenantCode={tenantCode}#/Direct Use of HENGSHI System in Browser
When users use the HENGSHI system in a browser and there is only one authentication method available, they only need to configure the corresponding authentication method and select it.
iframe Embedding HENGSHI Pages Scenario
Users may directly use the HENGSHI SENSE system in a browser to create applications and then embed the HENGSHI visualization pages into their own systems using iframe, achieving single sign-on (SSO).
In this scenario, using OAuth2 as an example:
When users use the HENGSHI SENSE system in a browser to create visualizations and embed visualization pages via iframe, both are implemented through the user's OAuth Server for single sign-on. In this case, you only need to configure the OAuth authentication method, set
reloadUsertofalse, and the iframe embedding URL should behttp://{host}:{port}/?reloadUser=true#/. The purpose ofreloadUser=trueis to ensure that when users log out from the main site and switch users, upon entering the HENGSHI page, HENGSHI will re-fetch the currently logged-in user from the OAuth Server. When using the HENGSHI SENSE system in a browser to create visualizations, there is no scenario of logging out from the main site, so it is unnecessary to fetch the currently logged-in user from the OAuth Server every time.Users use the HENGSHI SENSE system in a browser to create visualizations by logging in with HENGSHI SENSE username and password, while iframe uses the OAuth Server for single sign-on.
2.1 Select HENGSHI authentication as the authentication method. Users log in using this method when creating visualizations in the HENGSHI SENSE system via a browser.
2.2 Configure the OAuth2 authentication method, set
reloadUsertofalse, and the iframe embedding URL should behttp://{host}:{port}/?activeAuth=oauth2&reloadUser=true#/. This ensures single sign-on when users view visualizations.
Scenarios for Embedding Mobile Micro-Apps into HENGSHI Pages
The mobile platform primarily supports DingTalk, WeCom, and Yunzhijia.
The usage of embedding mobile micro-apps into HENGSHI pages is generally consistent with the scenario of embedding HENGSHI pages via iframe.
The difference lies in configuring multiple HENGSHI page addresses on the mobile micro-app management page. Taking WeCom as an example:
- Select HENGSHI authentication, where users log in on the web using their HENGSHI username and password to create charts.
- Configure the embedded HENGSHI address on the WeCom custom app management page:
http://{host}:{port}/?activeAuth=wechat-work&wcwLoginType=oauth2#/,
allowing users to access HENGSHI without logging in on both mobile and desktop platforms.