JS SDK Integration Guide
If you want to keep your own page, entry points, and business shell, but do not want to build HENGSHI’s result rendering layer yourself, then JS SDK is the right choice.
This document is about how to embed HENGSHI’s result rendering capability into your page, not how to call the low-level Q&A API directly.
Start with the overview
If you have not yet clarified the boundary between API, JS SDK, and iframe, read Data Agent Integration Overview first.
This document focuses on four questions:
- When JS SDK is the right fit
- What it can actually embed into your page
- What the minimal integration looks like
- What is customizable, and which boundaries should not be misunderstood
First: what layer of capability JS SDK provides
JS SDK is the embedding path for HENGSHI’s frontend result rendering capability.
That means:
- your page shell, entry points, layout, and business flow can still stay on your side
- HENGSHI takes care of rendering the result card, charts, and answer experience
- you do not need to convert HENGSHI’s result protocol into your own chart-rendering logic
When to use JS SDK
JS SDK is suitable when:
- you want to place ChatBI capabilities inside your own business page
- you want to control the entry point, layout, show/hide behavior, and theme yourself
- you want to reuse HENGSHI’s ready-made result rendering capability
- you do not want to convert HENGSHI’s chart/result protocol into your own frontend chart implementation
If your goal is “take HENGSHI output and feed it directly into our own ECharts renderer”, JS SDK is not designed for that.
Key boundary
JS SDK provides an embedding method for HENGSHI’s frontend rendering capability. It is not a general protocol-to-ECharts converter.
JS SDK offers two embedding forms
1. Floating chat window: new Copilot(...)
This is the full chat-window embedding form. A show/hide AI assistant window appears inside your page, and the message list, input area, suggested questions, charts, and result presentation are all rendered by HENGSHI.
Best for:
- putting an AI assistant on the right side or bottom-right of your page
- reusing the full conversation experience
- controlling only the window toggle, position, size, and theme
2. Inline result card: Copilot.renderChat(...)
Best for:
- when you already have your own chat entry point
- when you only want to show one answer and chart inside a business page
- when you want to display a “data Q&A result” as a page module
Use JS SDK together with an iframe Dashboard
If your parent page already loads Copilot JS SDK and also embeds a HENGSHI Dashboard through iframe, you can let the parent Copilot take over the assistant capability inside the iframe Dashboard.
Add this to the iframe Dashboard URL:
?agentHost=parent&parentOrigin={parent origin}After takeover:
- the iframe Dashboard no longer shows its own Copilot sidebar
- assistant entries in the Dashboard, such as opening the assistant, Dashboard interpretation, and chart interpretation, open the parent Copilot
- when Agent reads or edits the iframe Dashboard, it uses business actions and business objects proxied from the iframe
For a complete example, see iframe Integration: parent Copilot SDK takes over an iframe Dashboard.
Common parameters
This section does not try to expose every internal detail. It focuses on the parameters that matter most during integration and are easiest to confuse.
Common options for new Copilot(container, config)
container
- Type:
HTMLElement - Meaning: the DOM node where the chat window is mounted
- You need to prepare this container in your page first
locale
- Type:
string - Purpose: controls UI language, such as
zh-CNoren-US - Use it when you need the SDK to load the correct localized copy
userConfig
- Type:
object - Purpose: defines the data scope available to this conversation
- Most common form:
userConfig: {
  dataSources: [
    { dataAppId: 130870, datasetId: 1 },
  ],
}dataSources supports two modes, but you should not mix them in one configuration:
data app / dataset mode
dataAppIddatasetId
subject mode
subjectId
Example:
userConfig: {
  dataSources: [
    { subjectId: 1 },
    { subjectId: 2 },
  ],
}draggable
- Type:
object - Purpose: turns the chat window into a draggable, resizable floating panel
- Common fields:
enable: whether dragging is enabledbounds: drag boundary, commonlywindoworparentminWidth/minHeight: minimum sizeposition: initial position, such as{ x, y }size: initial size, such as{ width, height }
Example:
draggable: {
  enable: true,
  bounds: 'window',
  minWidth: 440,
  minHeight: 440,
  position: { x: window.innerWidth - 480, y: 20 },
  size: { width: 440, height: window.innerHeight * 0.8 },
}stylesheet
- Type:
string - Purpose: injects custom styles into the SDK shadow DOM
- Best for theme color, spacing, and presentation-level overrides
Example:
stylesheet: ':host > *, ::before, ::after { --brand: #4CAF50; }'i18n
- Type:
object - Purpose: overrides selected built-in SDK text
- Useful when you want to rename labels such as question understanding / answer / data logic
Example:
i18n: {
  'en-US': {
    'copilot.question-reasoning': 'Question Understanding',
    'copilot.question-answer': 'Answer',
    'copilot.question-reasoning-logic': 'Data Logic',
  },
}Other common options
| Parameter | Purpose |
|---|---|
closable | whether to show a close button |
headless | whether to initialize in a hidden state |
style | root container style |
completionConfig | controls result-stage rendering behavior |
onReady | callback after SDK initialization |
onHide | callback after hide() is called |
Common fields in completionConfig
This configuration affects how the result card is rendered after the Q&A completes.
| Parameter | Purpose |
|---|---|
meta | controls which result blocks are shown, such as answer,chart,chartConfig |
openChartConfig | whether to expand the data-logic panel by default |
stylesheet | extra styling for the completion/result stage |
i18n | extra copy overrides for the completion/result stage |
onCompletionDone | callback when the answer finishes, with (conversationId, uid) |
Parameters of Copilot.renderChat(container, chatConfig, copilotConfig)
renderChat(...) accepts 3 parameters:
1st parameter: container
- Type:
HTMLElement - Purpose: the DOM node where the result card should be rendered
2nd parameter: chatConfig
This controls how the single rendered result is produced. There are two common patterns:
- Dynamic Q&A
{
  prompt: 'What was last month\'s sales in East China?',
  type: 'workflow',
}Common fields:
prompt: the user questiontype:agentorworkflowconversationId: continue inside an existing conversation if neededmeta: controls which result blocks are shownopenChartConfig: whether to expand the data-logic panelonCompletionDone: callback after this answer completes
- Static rendering of an existing result
If you already have the full answer payload, you can pass fields such as:
conversationIduidpromptanswerrefineQuestioncharts- and related result fields
This is better when you want to re-render one existing result into another page region.
3rd parameter: copilotConfig
This follows the same idea as new Copilot(...). The most common use is passing userConfig so the rendered answer runs under an explicit data scope:
{
  userConfig: {
    dataSources: [
      { dataAppId: 130870, datasetId: 1 },
    ],
  },
}Deployment and authentication related parameters
window.__hs_sdk_base_url__
If the SDK file is loaded from a CDN or another static asset domain instead of directly from the HENGSHI host, you should explicitly set the backend base URL before loading the script:
<script>
  window.__hs_sdk_base_url__ = 'https://your-hengshi-host';
</script>
<script src="https://cdn.example.com/assets/hengshi-copilot@<version>.js"></script>Otherwise, the SDK will infer the API host from the script host, which can send requests to the wrong place.
Authentication
Whether the SDK can actually render answers and charts also depends on login state being ready.
Two common patterns are:
- your system already has SSO connected with HENGSHI
- you complete authentication first through the JWT login endpoint
For example:
fetch('https://your-hengshi-host/api/auth/login-info?activeAuth=jwt-param&jwtParam=<your-jwt-param>')Instance methods
new Copilot(...) returns an instance. The two methods you will use most often are:
| Method | Purpose |
|---|---|
show() | show the chat window |
hide() | hide the chat window |
So in most pages, you do not need to destroy and recreate the instance repeatedly. Show / hide is usually enough.
About the example code
The code snippets below are meant to explain the integration path, so you can understand what finally appears on the page and what the frontend is still responsible for.
Note
These snippets are documentation examples. They do not mean extra demo pages are automatically included in the product delivery package.
Quick Start: Floating Chat Window
1. Get the SDK link
Open Data Agent on any page in the system, click the SDK icon button in the upper-right corner, and you can see the SDK file URL for the current system, for example:
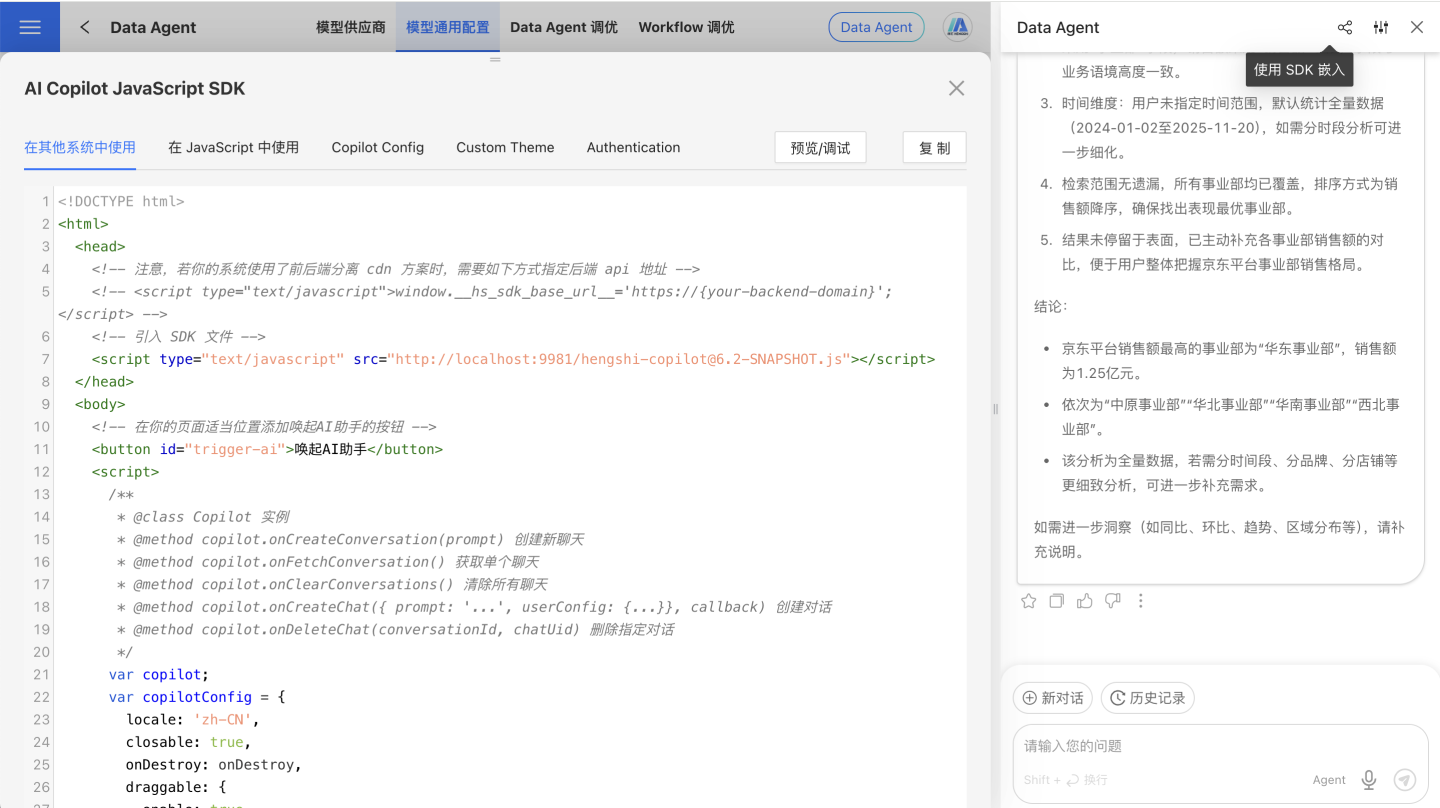
<host>/assets/hengshi-copilot@<version>.jsNote
@<version> must match the current HENGSHI system version. After the system is upgraded, the SDK link should also be updated.
2. Import the SDK
<script
  type="text/javascript"
  src="https://your-hengshi-host/assets/hengshi-copilot@<version>.js">
</script>3. Create a floating chat window
The following example creates a draggable AI assistant window after clicking the button.
Expand to view the full HTML example
<!DOCTYPE html>
<html lang="en-US">
<head>
  <meta charset="UTF-8">
  <meta name="viewport" content="width=device-width, initial-scale=1.0">
  <title>JS SDK Demo</title>
  <script type="text/javascript" src="https://your-hengshi-host/assets/hengshi-copilot@<version>.js"></script>
</head>
<body>
  <button id="trigger-ai">Open AI Assistant</button>
  <div id="copilot-root"></div>

  <script>
    const root = document.getElementById('copilot-root');
    const button = document.getElementById('trigger-ai');
    let copilotInstance = null;

    const copilotConfig = {
      locale: 'en-US',
      draggable: {
        enable: true,
        minWidth: 440,
        minHeight: 440,
        position: { x: window.innerWidth - 480, y: 20 },
        size: { width: 440, height: window.innerHeight * 0.8 },
      },
      userConfig: {
        dataSources: [
          { dataAppId: 130870, datasetId: 1 },
        ],
      },
    };

    button.addEventListener('click', () => {
      if (!copilotInstance) {
        copilotInstance = new Copilot(root, copilotConfig);
        button.textContent = 'Hide AI Assistant';
        return;
      }

      const visible = root.style.display !== 'none';
      if (visible) {
        copilotInstance.hide();
        button.textContent = 'Show AI Assistant';
      } else {
        copilotInstance.show();
        button.textContent = 'Hide AI Assistant';
      }
    });
  </script>
</body>
</html>