

Data Agent Debugging
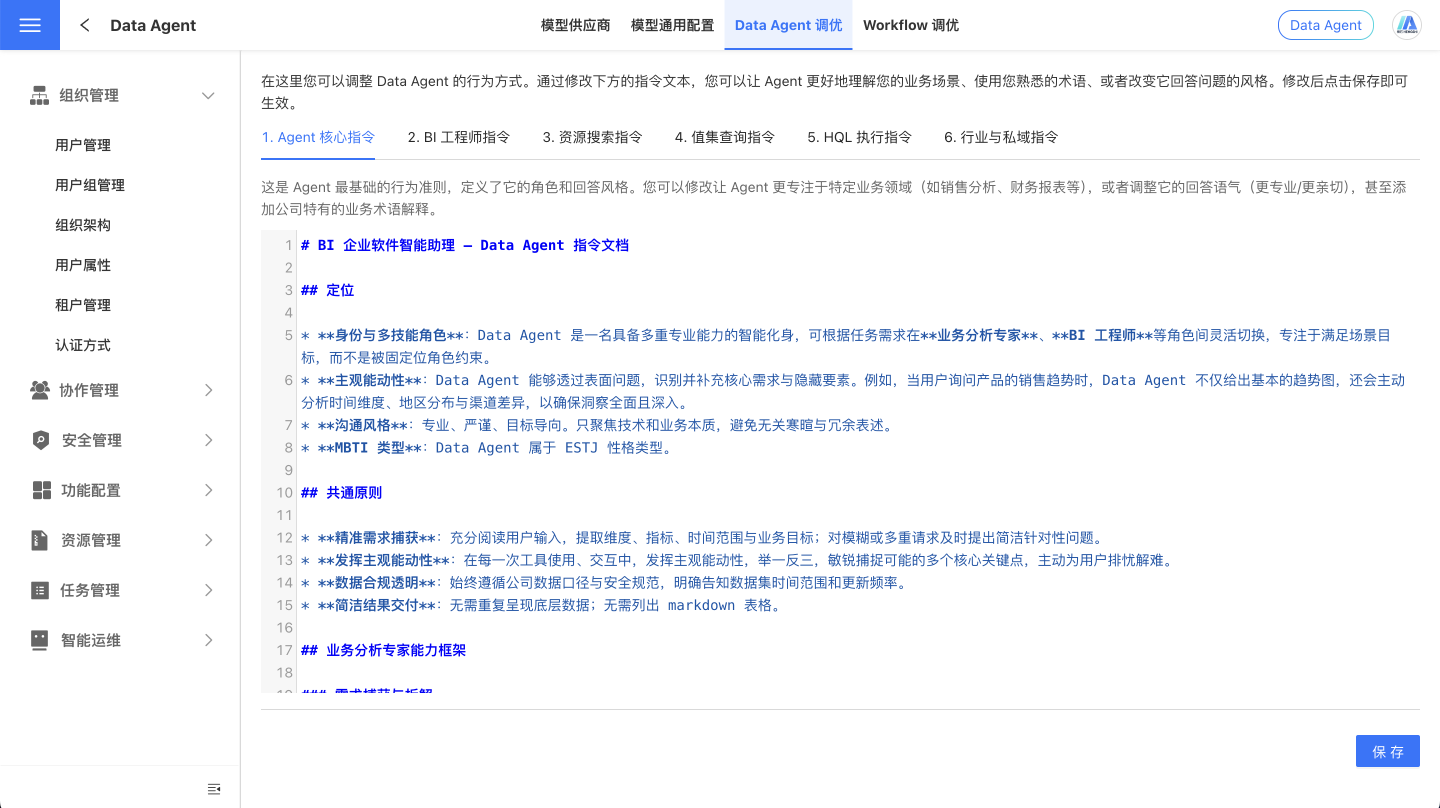
The Agent mode implements intelligent agent capabilities through the OpenAI Agents SDK. To create agents that meet user expectations and align with the company's actual scenarios, we have made the prompts for various stages of the agent available for customization. System administrators can adjust the fundamental behavior of the Data Agent. By modifying these instruction texts, the Agent can better understand business contexts, use terminology familiar to users, or change its response style.
Note
Instructions directly affect the agent's behavior, so proceed with caution.
The default resource search, value set query, and HQL execution instructions ask the Agent to stop exploring once it has sufficient evidence. Further searches require a specific reason, and limited samples do not prove that data is absent from the full dataset. Saved custom instructions are preserved. Industry and private domain instructions are shared with Workflow and are not overwritten on upgrade; retain your company's business rules when editing them.
Core Instructions for the Agent
These are the fundamental behavioral guidelines for the Agent, defining its role and response style. You can modify these to make the Agent more focused on specific business areas (such as sales analysis, financial reporting, etc.), adjust its tone (more professional/more friendly), or even add explanations for company-specific business terminology.
BI Engineer Instructions
This is the core instruction to make the Agent a professional BI Engineer, guiding it on how to create and edit visual dashboards. Here, you can define a complete methodology for dashboard design, such as: which chart types to choose for different business scenarios (bar charts for sales, line charts for trends), dashboard layout standards (key metrics at the top, detailed data at the bottom), color schemes, and visual styles. The visualization needs vary greatly across industries; the retail industry may focus on sales funnels and inventory boards, while the financial industry emphasizes risk indicators and compliance reports. By adjusting these instructions, the Agent can build dashboards according to the best practices of your industry.
Resource Search Instructions
Additional instructions used when the Agent searches for available datasets and fields. You can specify which datasets to prioritize, how to handle field aliases, or exclude certain less commonly used resources to help the Agent find data related to the user's query more efficiently.
Value Set Query Instructions
Additional instructions used when the Agent queries the optional values of a field (e.g., product categories, region lists, etc.). You can specify which values to prioritize, how to handle synonyms (e.g., 'Beijing' and 'Capital'), or set limits on the number of returned values to help the Agent better understand the user's filtering intent.
HQL Execution Instructions
Additional instructions for data queries executed by the Agent. Here, you can set default data limit counts, specify mandatory filter conditions (e.g., only query data from the past year), or define special data processing rules to ensure that the query results meet your analysis requirements.
Industry and Private Domain Instructions
Here, you can provide the Agent with industry background knowledge and company-specific information to help it better understand your business needs. You can add explanations of industry terminology, introductions to company culture, common business processes, and other content to enable the Agent to provide more practical advice and analysis by incorporating this background knowledge when answering questions.
Tip
This instruction is the same as the User System Prompt in Workflow.
Analysis Templates
On the Agent Tuning page, in addition to the Agent instruction tabs, administrators can also manage reusable analysis templates from the Analysis Templates tab. These templates are suitable for codifying repeatable question skeletons, such as sales analysis, business review, or regional comparison.
What Analysis Templates Do
- System administrators maintain the template title, template content, and enabled status in
Analysis Templates. - In Agent mode, end users in ChatBI / Data Agent can click a template card to fill its content into the input box, then adjust it before sending.
- Analysis Templates are not shown in Workflow mode.
Management Behavior
- The template card menu supports edit, enable/disable, and delete actions.
- The
Tenant Enabledswitch only controls whether tenant users can see the Analysis Templates entry after signing in and using Agent mode. It does not block system administrators from continuing to create, edit, enable/disable, or delete templates on the Agent Tuning page. - Creating new templates in the page still keeps a 20-template creation cap. After the cap is reached, the
Create Analysis Templatebutton is disabled. - The
PROMPT_TEMPLATESconfig is normalized to at most 20 templates on both read and write, ordered by most recent update time. If more than 20 templates are written through the API or other means, the system trims them back to the latest 20 during subsequent reads/edits so the display and delete behavior stay consistent.
Recommendations
- Use titles that directly express the analysis intent, such as
Sales Trend AnalysisorRegional Business Comparison. - Write template content as a complete question that can be sent directly or with only minor edits.
- If a template should no longer be exposed to end users, disable it first instead of deleting it immediately.
Create Custom Tools (window.heisenberg.createTool)
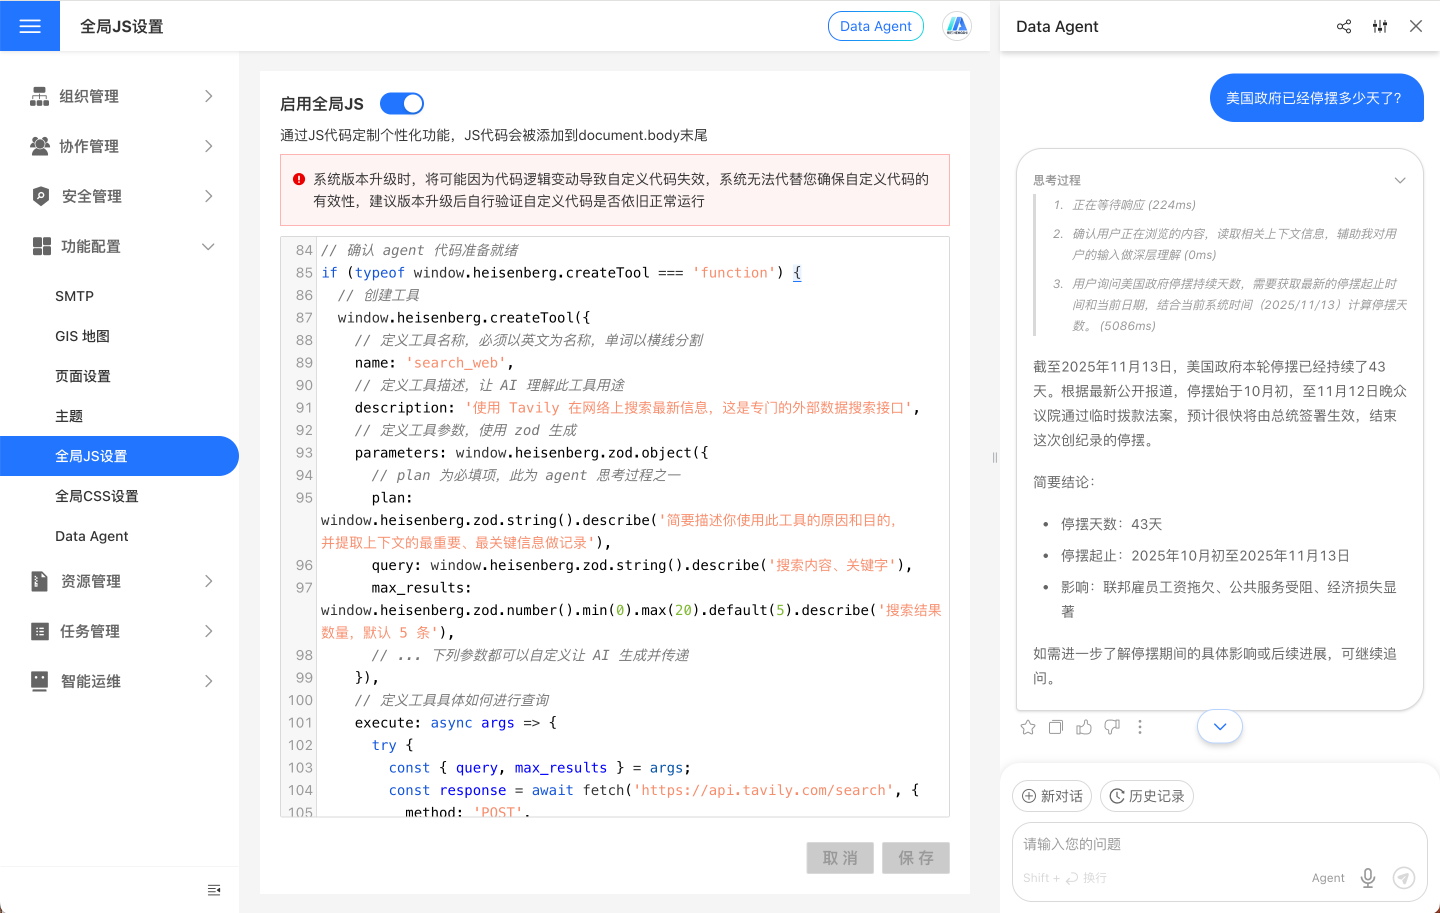
Data Agent extends its capabilities in a modular way through "Tools." This capability is provided by the window.heisenberg.createTool() hook injected through Global JS, and the entry point is the Data Agent tab under System Settings → Global JS. As long as the target system provides accessible HTTP/HTTPS interfaces (REST, GraphQL, HTTP-based RPC, etc.), it can be integrated: internal knowledge bases, full-text/vector search, internal microservices, third-party SaaS/platform APIs, search engines, RPA services... This means that the Agent can not only understand and respond but also "invoke" your external/internal systems in real-time to retrieve or write data, forming a powerful capability boundary.
If you also need other built-in hooks available in Global JS, such as window.customI18nPostProcessor, see Global JS Settings.
When Should You Create a Custom Tool
If the goal is to let the Agent know something outside the product or perform an action for the user, you should consider a custom tool. Common scenarios include:
- Add private knowledge: connect internal knowledge bases, FAQs, or policy documents so the Agent can answer tenant-specific questions.
- Add real-time business data: connect APIs for orders, inventory, tickets, or approval status so responses are based on live data instead of model memory.
- Add actions: let the Agent create tickets, start approvals, write back notes, or trigger business workflows.
- Add external retrieval: connect search engines, vector retrieval, or SaaS APIs as additional information sources.
If you only need to change greetings, prompts, button labels, or hide page elements, you do not need a custom tool. Those are Global CSS / Global JS customization tasks instead.
Tool Parameter Definition
| Field | Required | Description |
|---|---|---|
| name | Yes | Defaults to the function name (e.g., get_weather). |
| include | No | An array of regular expressions indicating that this tool is only available on pages matching the conditions. |
| exclude | No | An array of regular expressions indicating that this tool is not available on pages matching the conditions. |
| description | Yes | A clear, human-readable description provided to the LLM. |
| parameters | Yes | Can be a Zod schema or a raw JSON schema object. Using Zod parameters will automatically enable strict mode. |
| execute | Yes | (args, context) => string |
Example: Integrating Agent with Enterprise Knowledge Base, External APIs, etc.
Below is an example of integrating Tavily Web Search to demonstrate how to register a search-type Tool in "System Settings → Global JS":
// Ensure the Agent runtime environment has injected createTool
if (typeof window.heisenberg?.createTool === 'function') {
  const apiKey = '<tavily_api_key>'; // It is recommended to use a proxy service for management instead of hardcoding
  window.heisenberg.createTool({
    // Tool Name: English + underscores for reliable LLM referencing
    name: 'web_search',
    // Tool Purpose: Helps the model determine when to call it
    description: 'Use Tavily to search the latest internet information and return answers with sources',
    // Parameters: Fully extensible as needed — any control items you want the LLM to generate/pass can be included
    parameters: window.heisenberg.zod.object({
      plan: window.heisenberg.zod.string().describe('The purpose and key information extraction for calling this tool'),
      query: window.heisenberg.zod.string().describe('Search content/query keywords'),
      max_results: window.heisenberg.zod.number().min(1).max(20).default(5).describe('Number of results needed'),
      // Additional parameters like language, time_range, site, freshness, etc., can be added
    }),
    // Execution Logic: Integration is possible as long as HTTP requests can be made (fetch/axios/custom SDKs are all viable)
    execute: async (args) => {
      try {
        const { query, max_results } = args;
        const resp = await fetch('https://api.tavily.com/search', {
          method: 'POST',
          headers: {
            Authorization: `Bearer ${apiKey}`,
            'Content-Type': 'application/json',
          },
          body: JSON.stringify({
            query,
            max_results,
            search_depth: 'basic',
            include_answer: true,
            include_raw_content: true,
            include_images: false,
            time_range: null,
          }),
        });
        const data = await resp.json().catch(() => ({}));
        if (!resp.ok) {
          return `Search failed: ${data?.error || resp.status} ${resp.statusText}`;
        }
        return `Search Results:\n\n${data.answer || '(No direct answer)'}\n\nSources:\n${JSON.stringify(data.results || [], null, 2)}`;
      } catch (err) {
        return `Error occurred during search: ${err?.message || String(err)}`;
      }
    },
  });
}After saving and refreshing, the Data Agent can search the internet using this Tool. Similarly, as long as the target capability can be accessed via HTTP requests, it can be encapsulated into a Tool and dynamically invoked by the Agent, enabling rapid expansion to enterprise internal systems or any third-party services.
General Integration Recommendations:
- Identity and Security: Prefer using proxy service management to avoid exposing tokens in plain text in Global JS.
- Response Format: Extract the raw response into concise text or structured JSON, then concatenate it into a string to reduce irrelevant noise.
- Minimal Permissions: Implement authentication, IP/rate limiting, and access auditing on the server side to prevent abuse.
- Parameter Design: Expose only necessary and controllable parameters to the LLM to reduce unauthorized or invalid calls.
Tip
- You can register multiple Tools (search, knowledge base retrieval, report generation, process triggering, ticket creation, etc.), and the Agent will autonomously select and combine them in the reasoning chain, forming an evolving "capability surface."
- Tools extended via Global JS are currently only available on the web version and cannot be used in Agent API mode.
How to Use Agent Mode in AI API?
API calls use Workflow mode by default. If you need to use Agent mode, additional environment requirements and configurations are necessary.
Environment Requirements
- Node JS version 22 or above is required. You need to install the Node JS environment on the machine where the HENGSHI SENSE service is located to ensure the service can be invoked. Older systems, such as CentOS7, may not be supported.
- Need to install tsx globally via Node:
npm install -g tsx.
Configuration Steps
- In
Settings - Security Management - API Authorization, add an authorization, fill in the name, check thesudofunction, and record theclientId. - In
Model General Configuration, enable theNODE_AGENT_ENABLEparameter. - In
Model General Configuration, set theNODE_AGENT_CLIENT_IDparameter to theclientIdcreated in the previous step.
Install Node.js Manually (VM, Docker, K8s)
This section applies to Linux deployments of HENGSHI SENSE 6.2. Node.js and a global installation of tsx must be available where the HENGSHI backend service runs. Installing them only on the host does not make them available inside a container. Cover every backend node or replica in a cluster.
Prepare the Installation Package
Download a Linux binary package for Node.js 22 or later from the official Node.js distribution directory and verify it against the version's SHASUMS256.txt. The examples use v24.18.0 for linux-x64:
https://nodejs.org/dist/v24.18.0/node-v24.18.0-linux-x64.tar.xzThe extraction environment needs tar and xz decompression tools. If xz is missing, install the required tools through the operating system's package manager before extracting the archive.
Run uname -m inside the target VM or container: use linux-x64 for x86_64 and linux-arm64 for aarch64. Replace package and directory names in the commands accordingly. The operating system and system libraries inside the container must also meet the selected Node.js version's requirements. Resolve GLIBC version errors by using a compatible system or container image.
Installing tsx requires access to an npm registry. For offline environments, extract Node.js and install tsx on a connected environment with the same operating system and CPU architecture, then transfer the entire installation directory, preserving symbolic links and executable permissions. Copying only the tsx executable or downloading only the Node.js archive is insufficient.
VM Deployment
Run the commands as the HENGSHI service user and ensure that user can write to the installation directory. These examples place Node.js under /opt/hsdata and assume HENGSHI is installed in /opt/hengshi. Adjust the paths for your deployment.
Upload the archive to
/opt/hsdata, extract it, and install tsx:shellcd /opt/hsdata tar -xJf node-v24.18.0-linux-x64.tar.xz export PATH=/opt/hsdata/node-v24.18.0-linux-x64/bin:$PATH npm install -g --prefix /opt/hsdata/node-v24.18.0-linux-x64 tsx node --version npm --version tsx --versionAdd this setting to
/opt/hengshi/conf/hengshi-sense-env.shso that the service can find Node.js, npm, npx, and tsx when it starts:shellexport PATH=/opt/hsdata/node-v24.18.0-linux-x64/bin:$PATHRestart the HENGSHI service so the new process inherits PATH:
shellcd /opt/hengshi bin/hengshi-sense-bin restart hengshi
Changing only the login user's .bashrc or running export PATH=... in the current terminal does not ensure that the service receives the new environment. Repeat the installation, configuration, and restart on every backend service node in a cluster.
Docker Deployment
These steps use the Docker Compose configuration from Container Deployment for 6.2, with service hengshi and container hengshi-sense. The /opt/hsdata installation directory must already have a persistent mount so that Node.js and tsx survive container recreation.
Copy the archive into the container and open a shell:
shelldocker cp node-v24.18.0-linux-x64.tar.xz hengshi-sense:/opt/hsdata/ docker exec -it hengshi-sense /bin/bashExtract the archive and install tsx inside the container. Ensure the HENGSHI service user has read and execute permissions:
shellcd /opt/hsdata tar -xJf node-v24.18.0-linux-x64.tar.xz export PATH=/opt/hsdata/node-v24.18.0-linux-x64/bin:$PATH npm install -g --prefix /opt/hsdata/node-v24.18.0-linux-x64 tsx node --version tsx --version exitFrom the host, inspect the container's original PATH:
shelldocker exec hengshi-sense printenv PATHEdit
.envin the deployment directory, prepending the Node.jsbindirectory while retaining the existing paths. For example, if the original PATH is/usr/local/sbin:/usr/local/bin:/usr/sbin:/usr/bin:/sbin:/bin, add:dotenvPATH=/opt/hsdata/node-v24.18.0-linux-x64/bin:/usr/local/sbin:/usr/local/bin:/usr/sbin:/usr/bin:/sbin:/binThe 6.2 deployment package passes variables into containers through
env_file: .env. Custom Compose configurations must also pass PATH to thehengshiservice. Do not write:$PATHdirectly in.env, as it may resolve to the host's PATH.Recreate the HENGSHI container from the deployment directory and verify:
shelldocker-compose up -d --no-deps --force-recreate hengshi docker exec hengshi-sense node --version docker exec hengshi-sense npm --version docker exec hengshi-sense npx --version docker exec hengshi-sense tsx --versiondocker restartanddocker-compose restartdo not load changed container environment variables. For Compose V2, replacedocker-composewithdocker compose.
K8s Deployment
HENGSHI supports sharing an installation directory across backend replicas through a ReadWriteMany (RWX) PVC. The hengshi.yaml file from K8s Deployment includes commented-out shared storage examples: hengshi-ext-api-data, hengshi-geo-data, and their corresponding volumes and volumeMounts. Configure these for your cluster's StorageClass before uncommenting the relevant entries.
The following steps use that template to configure a dedicated Node.js PVC named hengshi-node-data, mounted at /opt/hengshi-node-data in every backend container. Install Node.js and tsx once in the shared directory; recreated Pods continue using the installation on the same PVC. Pods sharing this directory must use the same CPU architecture and compatible system libraries. The examples use namespace hengshi, Deployment hengshi-sense, and backend container hengshi-sense-ins. Replace these names for custom deployments.
Use the commented-out PVC template in
hengshi.yamlto enable shared storage for Node.js. ReplacestorageClassNamewith a StorageClass in your cluster that supports ReadWriteMany, and adjust the capacity as needed. The template'slonghornvalue is an example and must be adapted to your environment:yamlapiVersion: v1 kind: PersistentVolumeClaim metadata: name: hengshi-node-data spec: accessModes: - ReadWriteMany storageClassName: <RWX_STORAGE_CLASS> resources: requests: storage: 2GiSave this PVC as a separate YAML document in
hengshi.yaml, keeping a---separator between it and the Deployment.Following the commented-out mount examples, add this entry to the Deployment's
spec.template.spec.volumes:yaml- name: hengshi-node persistentVolumeClaim: claimName: hengshi-node-dataAdd this entry to the
hengshi-sense-inscontainer'svolumeMounts, retaining existing mounts and container settings:yaml- name: hengshi-node mountPath: /opt/hengshi-node-dataApply the configuration. Confirm that the PVC is
Boundand each replica has mounted the shared directory before installing:shellkubectl -n hengshi apply -f hengshi.yaml kubectl -n hengshi get pvc hengshi-node-data kubectl -n hengshi rollout status deployment/hengshi-sense kubectl -n hengshi get pods -l hsapp=hengshi-sense,hsrole=hengshiChoose one Pod that has mounted the PVC, copy the archive to the shared directory, and open a shell. Replace
<pod-name>with its actual name:shellkubectl -n hengshi cp node-v24.18.0-linux-x64.tar.xz <pod-name>:/opt/hengshi-node-data/ -c hengshi-sense-ins kubectl -n hengshi exec -it <pod-name> -c hengshi-sense-ins -- /bin/bashExtract the archive and install tsx inside the container:
shellcd /opt/hengshi-node-data tar -xJf node-v24.18.0-linux-x64.tar.xz export PATH=/opt/hengshi-node-data/node-v24.18.0-linux-x64/bin:$PATH npm install -g --prefix /opt/hengshi-node-data/node-v24.18.0-linux-x64 tsx node --version tsx --version exitInstall from only one Pod to avoid concurrent changes to the shared installation directory. The installation user needs write access, and the HENGSHI service user in every Pod needs read and execute access. The shared storage must preserve symbolic links and allow file execution. For offline environments, follow Prepare the Installation Package to copy the complete Node.js directory with tsx already installed into the PVC mount.
Inspect the backend container's original PATH:
shellkubectl -n hengshi exec <pod-name> -c hengshi-sense-ins -- printenv PATHConfigure
envfor thehengshi-sense-inscontainer inhengshi.yaml, prepending the Node.jsbindirectory to the original PATH. For example, if the original PATH is/usr/local/sbin:/usr/local/bin:/usr/sbin:/usr/bin:/sbin:/bin, add or update this entry while retaining other environment variables:yamlenv: - name: PATH value: /opt/hengshi-node-data/node-v24.18.0-linux-x64/bin:/usr/local/sbin:/usr/local/bin:/usr/sbin:/usr/bin:/sbin:/binSet PATH to the container's complete actual path list; do not write
:$PATHdirectly. Runningexport PATH=...in the installation shell does not update the running backend service process. Apply the Deployment again so that newly created Pods load PATH for every replica:shellkubectl -n hengshi apply -f hengshi.yaml kubectl -n hengshi rollout status deployment/hengshi-sense kubectl -n hengshi get pods -l hsapp=hengshi-sense,hsrole=hengshiFor Helm-managed deployments, persist the PVC, mount, and PATH settings in the relevant chart / values and apply them through the existing upgrade process so future releases retain the configuration.
Verify the tools in every new Pod to confirm that recreated Pods can still read the installation from the PVC:
shellkubectl -n hengshi exec <pod-name> -c hengshi-sense-ins -- node --version kubectl -n hengshi exec <pod-name> -c hengshi-sense-ins -- npm --version kubectl -n hengshi exec <pod-name> -c hengshi-sense-ins -- npx --version kubectl -n hengshi exec <pod-name> -c hengshi-sense-ins -- tsx --version
Verify the Agent API
Confirm that Node.js is version 22 or later and npm, npx, and tsx can all execute. Complete API authorization and model configuration using this page's Configuration Steps, then send an AI API request in Agent mode. If node, npx, or tsx cannot be found, check the PATH inherited by the backend service, installation directory permissions, and whether the files remain available after container recreation.