Using appParam to Pass Parameter Information
During the dashboard creation process, you can control the display of dashboard content using parameters. In embedded scenarios, you can use appParam to append parameter information to the URL. When the page is displayed, the parameter information in appParam will be included in the final executed SQL code, thereby displaying dashboard data under different parameter values.
appParam Structure
appParam is an array that can contain multiple parameter objects. Each parameter object is an object with the following key-value pairs:
appId: The ID of the data package or application that creates the parameter.id: The ID of the parameter, which can be obtained through a network request message.name: The name of the parameter.value: The value of the parameter, with a type consistent with the parameter type.sig: A boolean value indicating whether the parameter is included as part of the HMAC calculation. See HMAC Signature Parameter Description.
Parameters can be specified using either id or name, so appParam supports the following two formats:
{"appId": 1, "id": 1, "value": "Parameter Value"}or
{"appId": 1, "name": "Parameter Name", "value": "Parameter Value"}URL Splicing Format
The format for appending appParam to the embedded URL is as follows:
<EmbeddedURL>?appParam=[{"appId":1,"name":"Parameter Name","value":"Parameter Value"}]Note
- The format is
{url}?appParam={appParam}. - The value of the
appParamparameter needs to be passed after being processed withJSON.stringifyand URL encoding, but theappParam=string itself does not need to be encoded. - You can use the URL Encoding Tool below to conveniently generate the URL-encoded
appParamparameter value and complete the URL splicing.
appParam Usage Tips
- Parameter Identification: In
appParam, you can use either the parameter'sidornameto identify the parameter. Only one of the two is required. - appId Explanation: The
appIdinappParamrefers to the application ID where the parameter was created, not the application ID where the parameter is being used. For example, if a parameter is created in Dataset Market's data package A (withappIdas 3) but is used in Application Creation's App A (withappIdas 5), theappIdto be entered inappParamshould be 3. - Importance of appId: The
appIdand the parameter'sid(orname) together determine the parameter. Omitting theappIdmay lead to incorrect results. - Multi-Parameter Support:
appParamsupports passing in multiple parameters.
URL Encoding
Result(Click to Copy)
https://preview.hengshi.com/share/app/SC7624DA6F8451588A1C621DFD6A4FC44/dashboard/1?appParam=%5B%7B%22appId%22%3A16743%2C%22name%22%3A%22Department%22%2C%22value%22%3A%5B%22Gastroenterology%22%2C%22Neurology%22%5D%7D%5D
appParam Example
There are various ways to control the content display of a dashboard using parameters. Refer to the methods introduced in Parameter Scenarios. Below, we use the example of using parameters in the Dataset Chart Creation Process to demonstrate how to pass parameters via appParam in an embedded scenario.
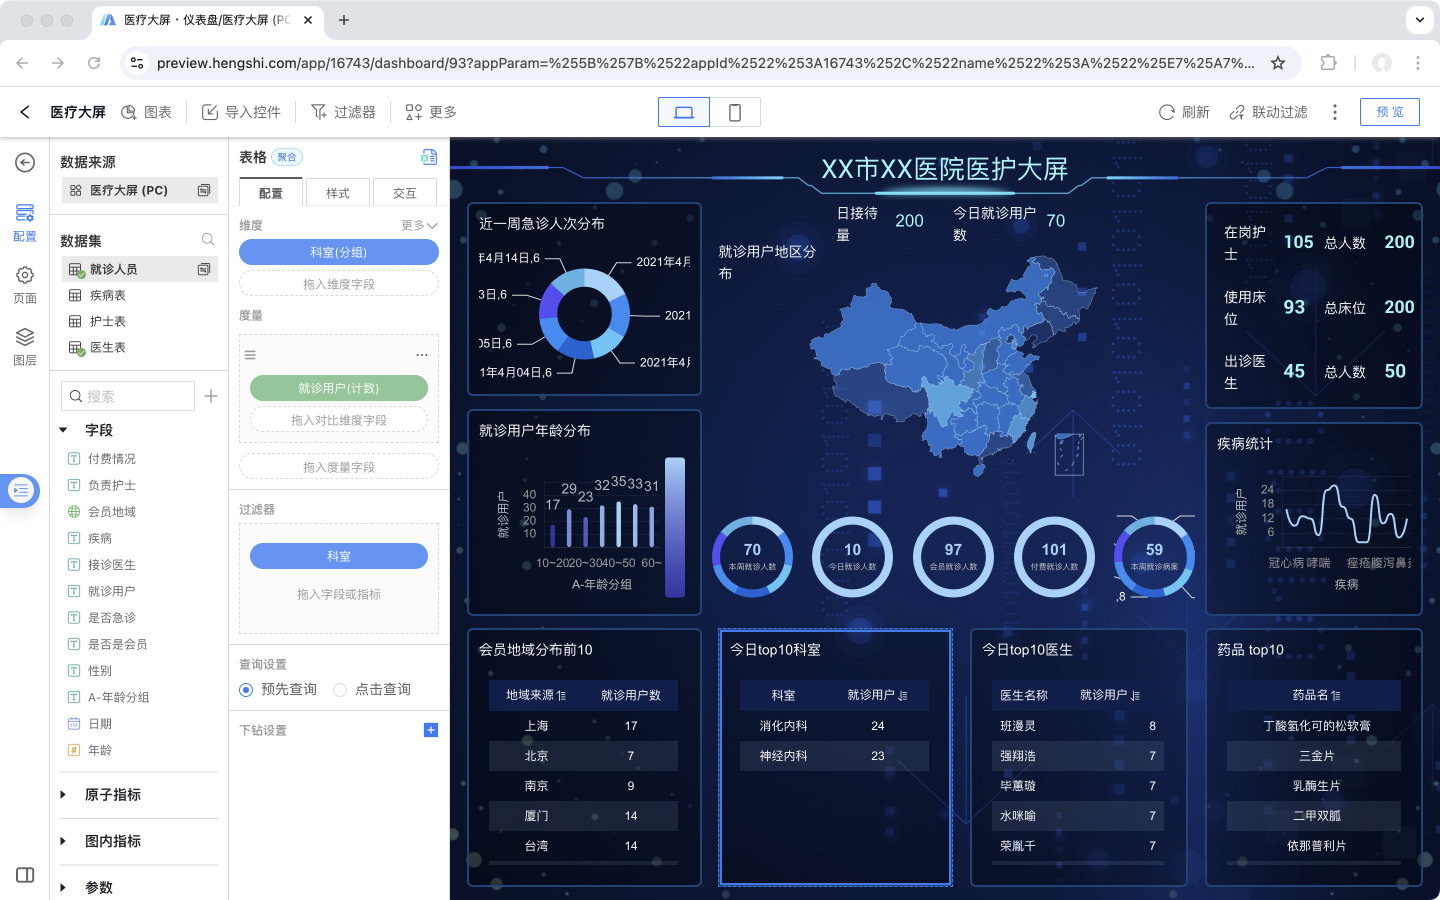
As shown in the figure, during the display of patient visit information in a hospital, the consultation room and attending doctor information are controlled using the department parameter. When the department parameter is changed, the chart information updates accordingly.
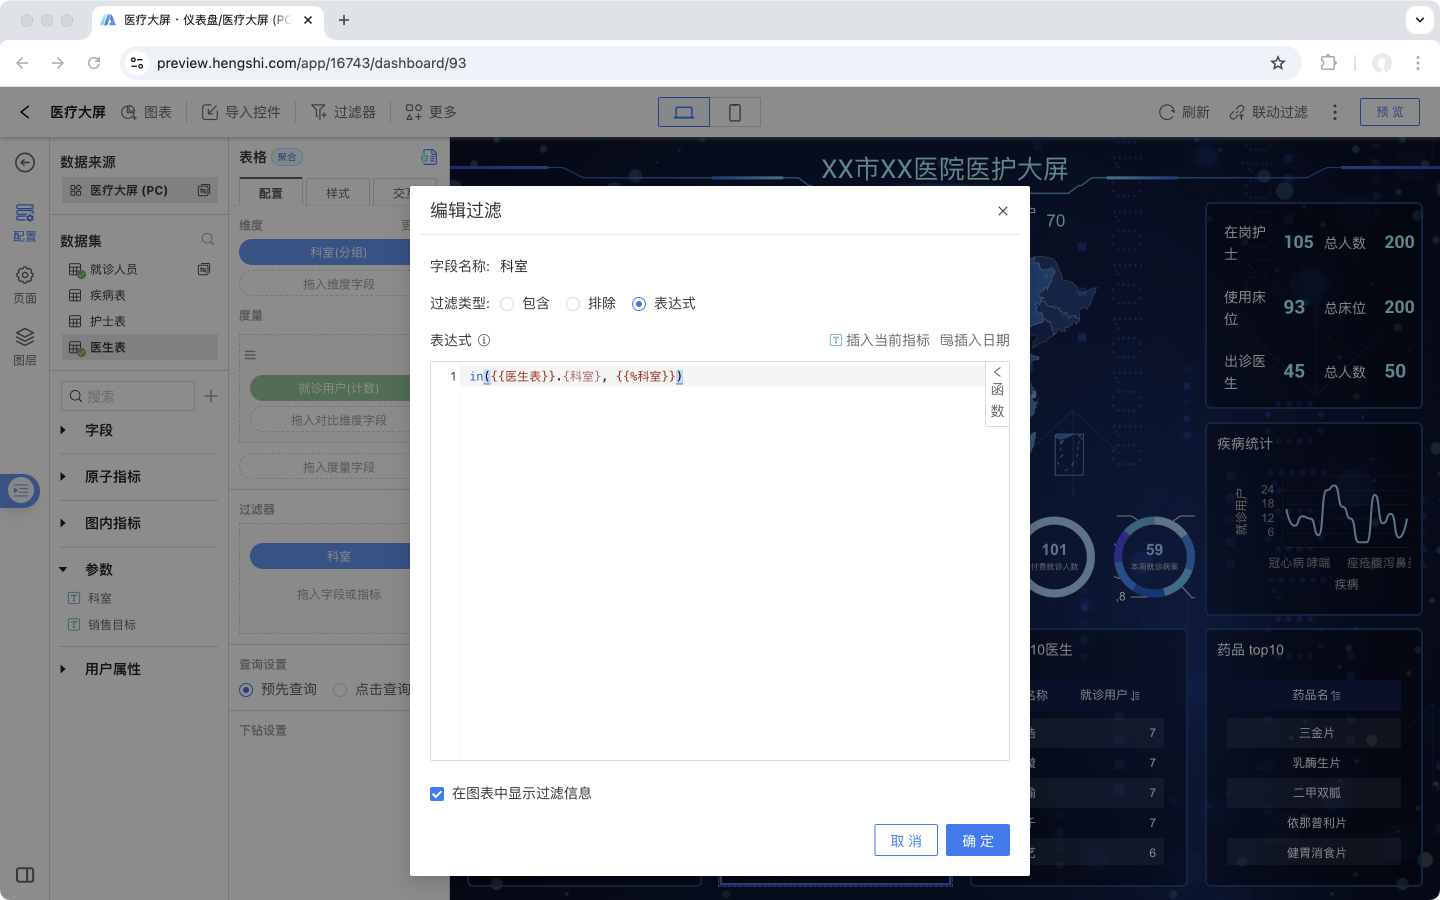
The URL of the dashboard is:
https://preview.hengshi.com/app/16743/dashboard/93The dashboard content is as follows:
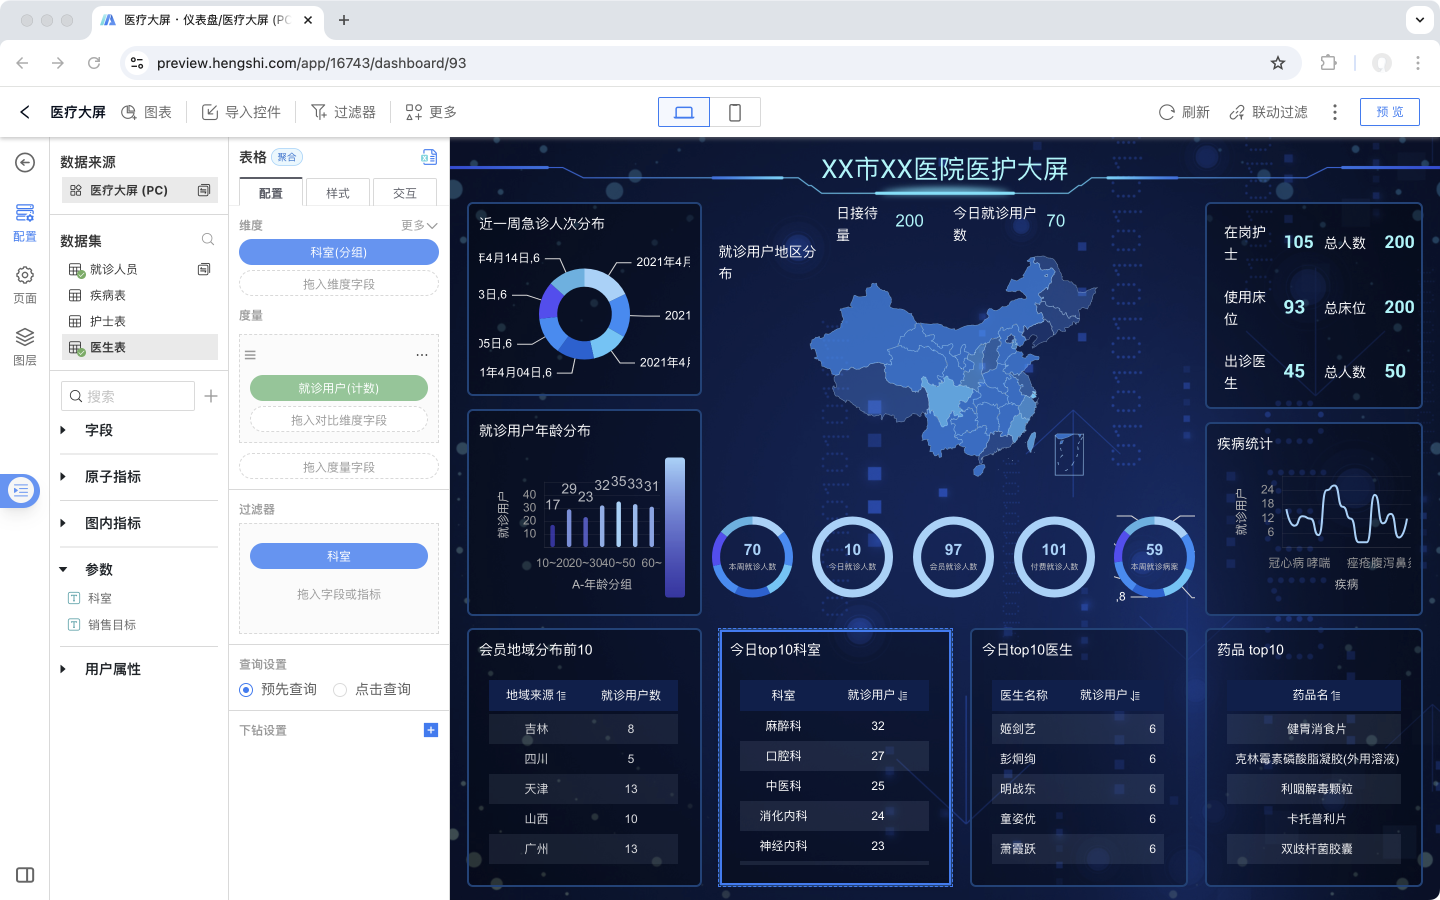
Both the department and region source parameters are multi-value enabled fixed text list parameters. The parameter configuration is as follows:
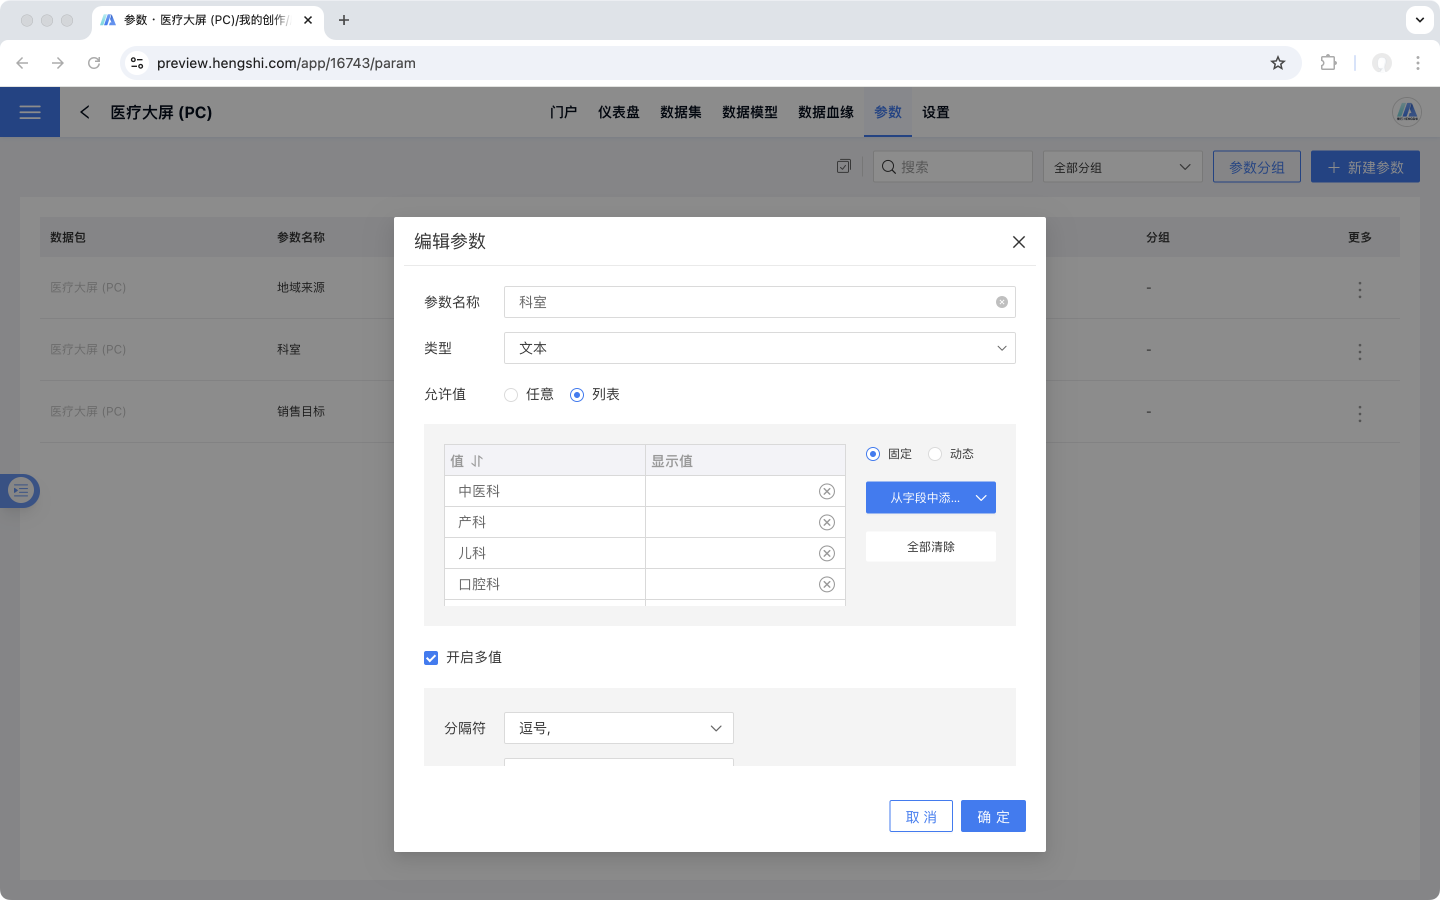
At this point, you can pass parameters via appParam to control the dashboard content display.
- Scenario 1: Use appParam to pass the department parameter, displaying only the information for the Gastroenterology and Neurology departments. The appParam JSON structure is:
[
  {
    "appId": 16743,
    "name": "Department",
    "value": [
      "Gastroenterology",
      "Neurology"
    ]
  }
]2
3
4
5
6
7
8
9
10
Append the appParam to the URL as follows:
https://preview.hengshi.com/app/16743/dashboard/93?appParam=%5B%7B%22appId%22%3A16743%2C%22name%22%3A%22Department%22%2C%22value%22%3A%5B%22Gastroenterology%22%2C%22Neurology%22%5D%7D%5D
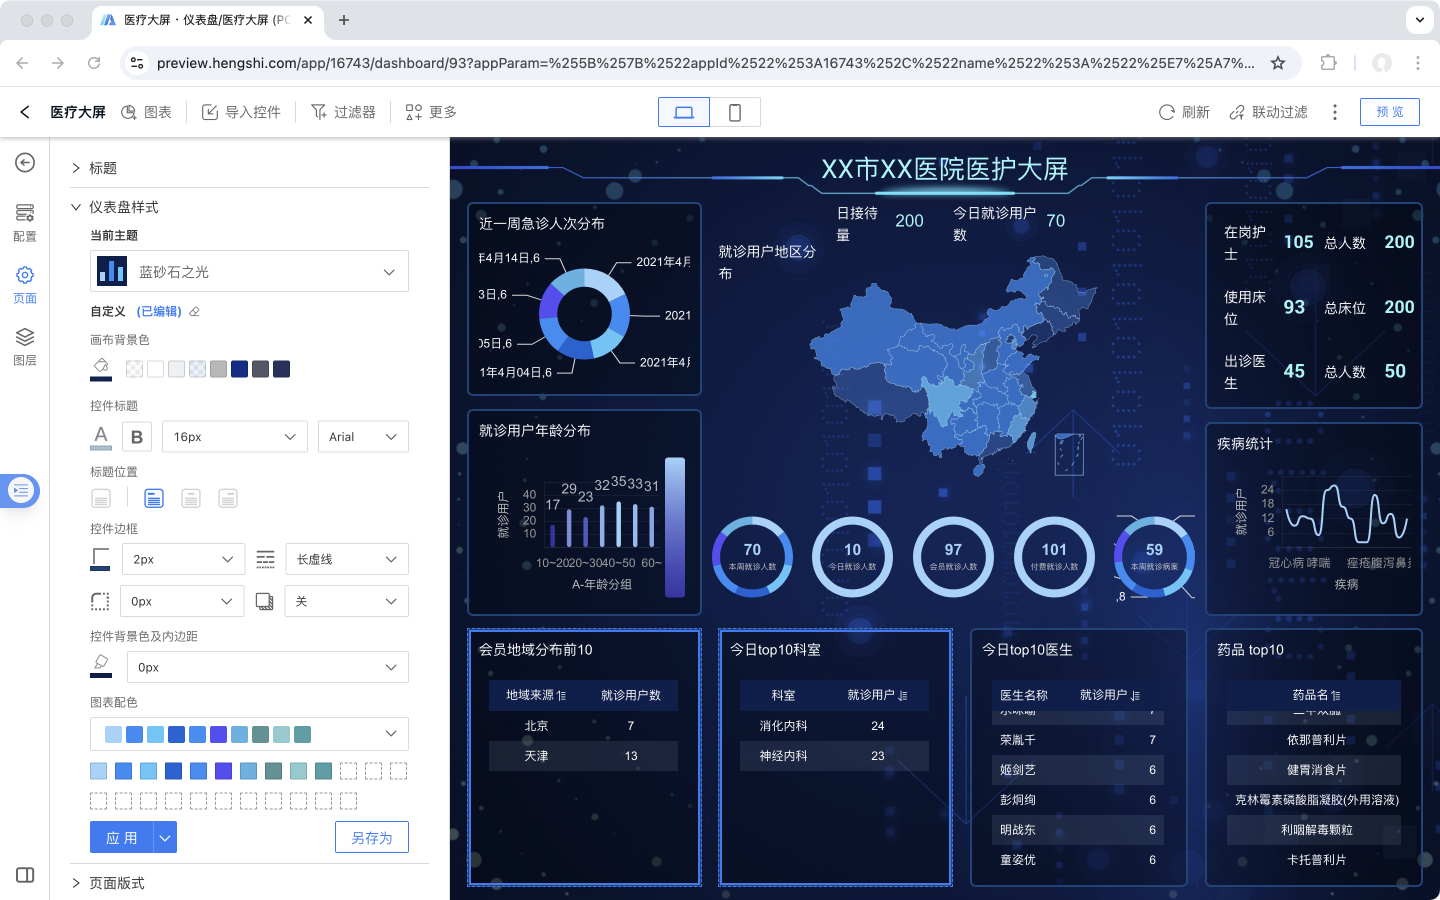
The dashboard displays as follows:
- Scenario 2: Use appParam to pass multiple parameters, such as controlling department-related information via the department parameter and controlling patient region-related information via the region parameter. The appParam JSON structure is:
[
  {
    "appId": 16743,
    "name": "Department",
    "value": [
      "Gastroenterology",
      "Neurology"
    ]
  },
  {
    "appId": 16743,
    "name": "Region Source",
    "value": [
      "Beijing",
      "Tianjin"
    ]
  }
]2
3
4
5
6
7
8
9
10
11
12
13
14
15
16
17
18
The appended URL is:
https://preview.hengshi.com/app/16743/dashboard/93?appParam=%255B%257B%2522appId%2522%253A16743%252C%2522name%2522%253A%2522Department%2522%252C%2522value%2522%253A%255B%2522Gastroenterology%2522%252C%2522Neurology%2522%255D%257D%252C%257B%2522appId%2522%253A16743%252C%2522name%2522%253A%2522Region%2520Source%2522%252C%2522value%2522%253A%255B%2522Beijing%2522%252C%2522Tianjin%2522%255D%257D%255D
The dashboard displays as follows:
