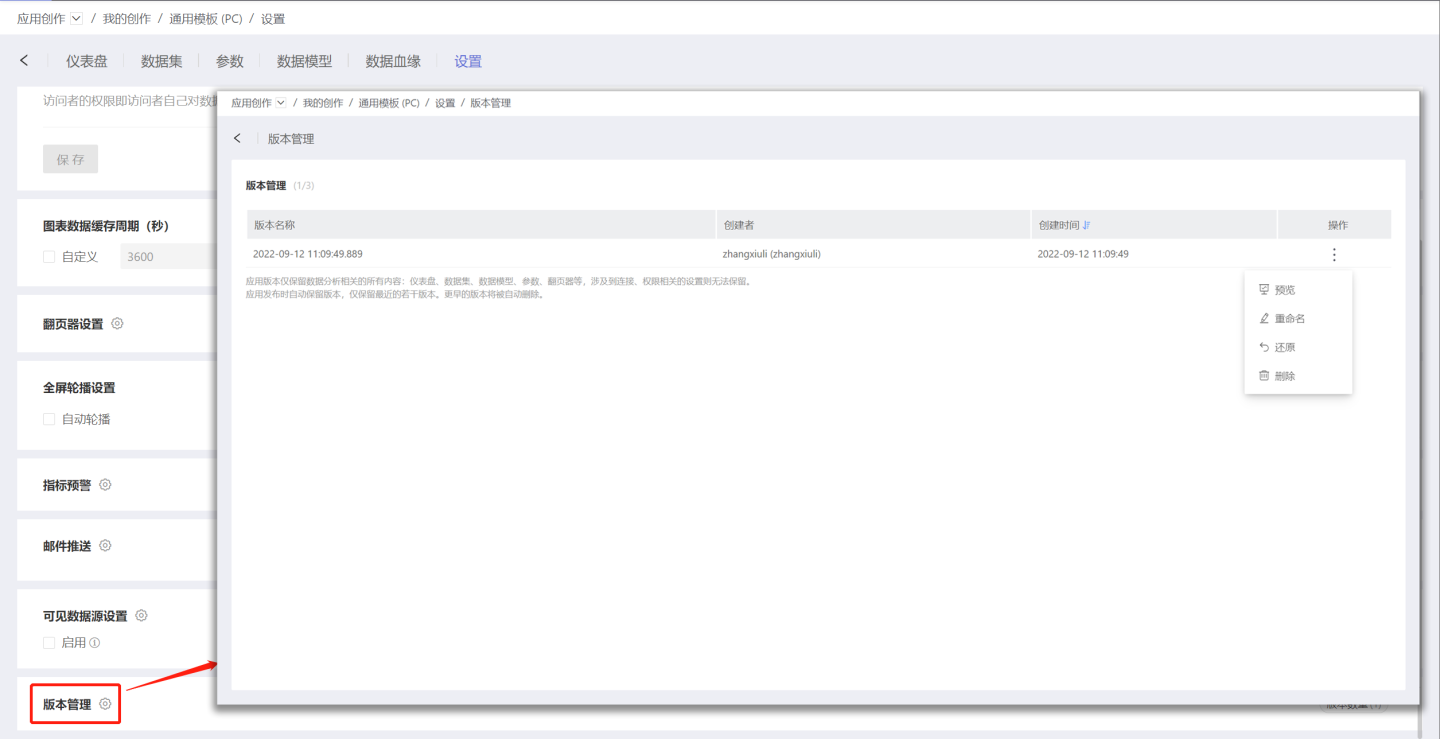
Application Settings
Each user with administrative privileges for an application (specifically, their own applications in the personal zone, and applications in team spaces and data markets for which they have administrative privileges) will have a settings menu. In the settings menu, you can set the data permission mode for the app, and also set row permissions for datasets. You can also enable the sharing link for the application in the application settings, and set the chart interaction in the sharing link.
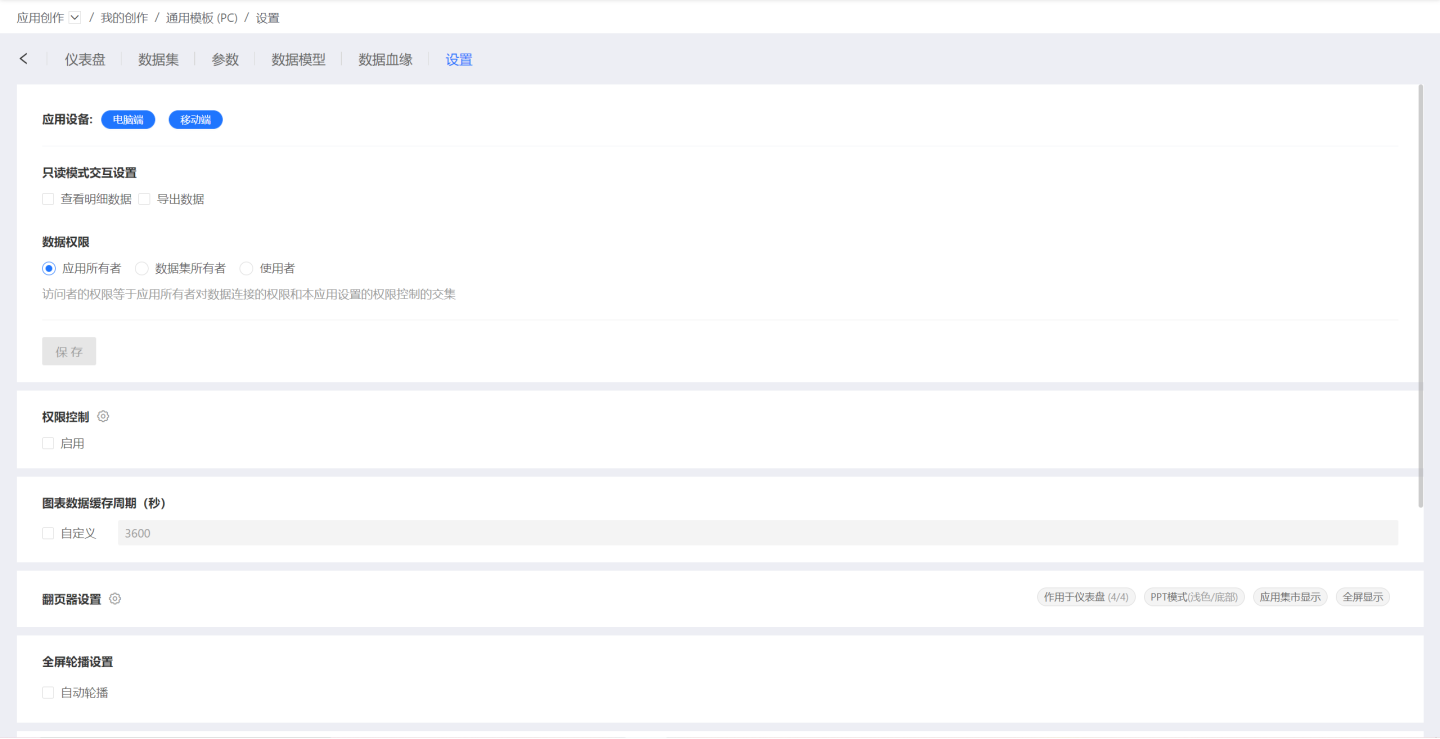
Application Device
Dashboards have different display styles on desktop and mobile devices. The application settings have added application device settings, and the corresponding device editing pages are presented according to the configuration, making it more convenient for users who use a single display device.
The image below shows examples of desktop and mobile devices.
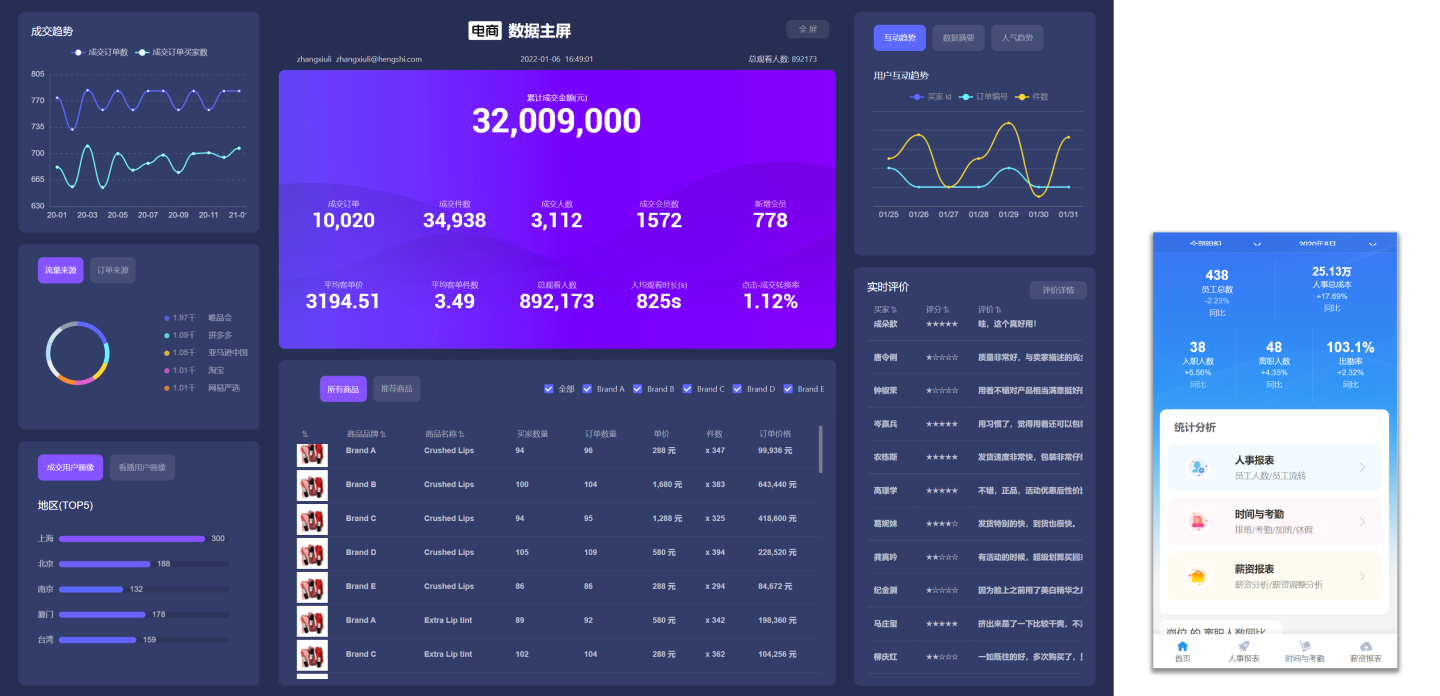
The display device can be modified at any time during the application editing process. The application's display device will be presented on the card. Query applications only support display on PC.

Read-Only Mode Interaction Settings
The interaction permissions that can be set when sharing a public link include: viewing detailed data, exporting data;
When sharing a public link, the default interaction permissions are: not allowed to view detailed data, not allowed to export data. After sharing according to the default settings, the operations of viewing detailed data and exporting data in the shared link are not available.
View Data
When the interaction permission is set to "View Detailed Data," there are two formats for viewing data in the shared link chart:
The ①st format: Select a dimension group, click to bring up, and select Details to view the detailed data of the current group.
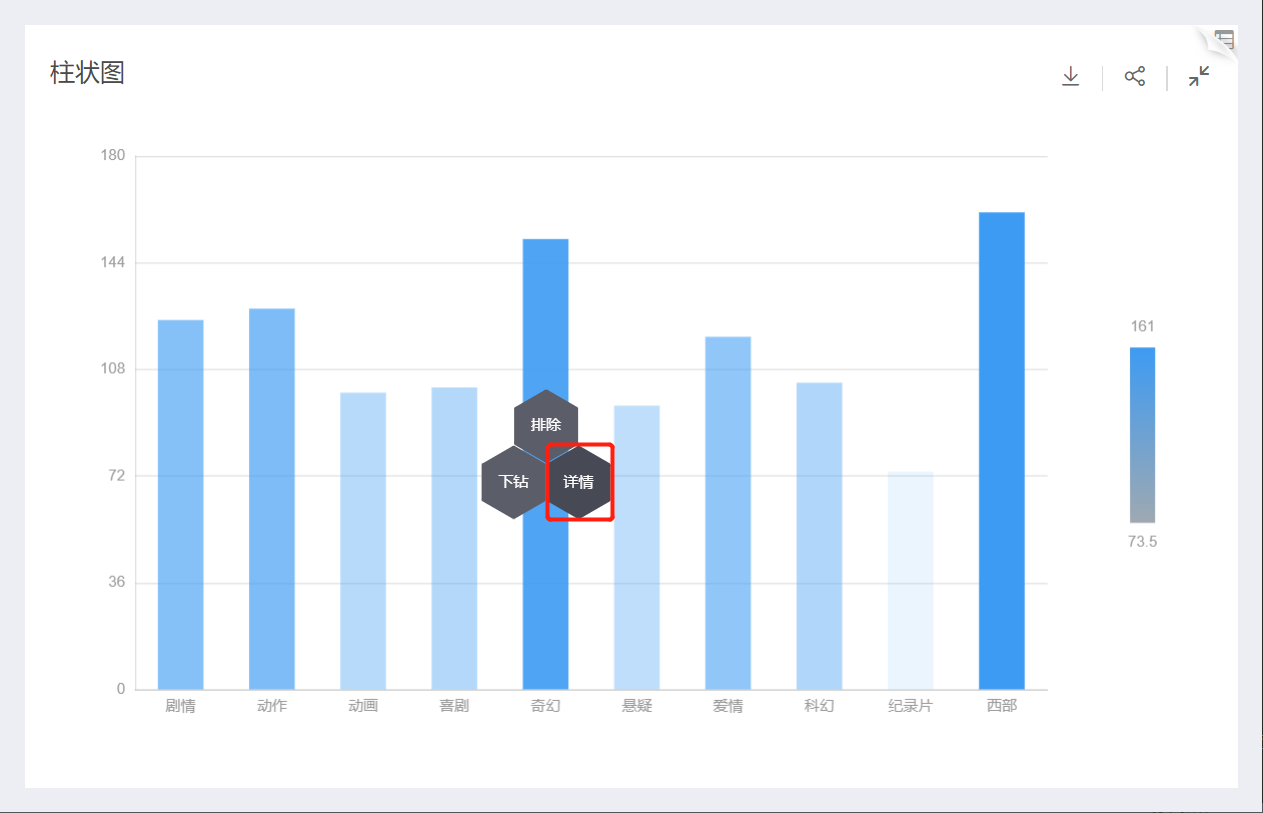
The ②nd format: Click View Data in the upper right corner to view the detailed data of the fields used in the current chart.
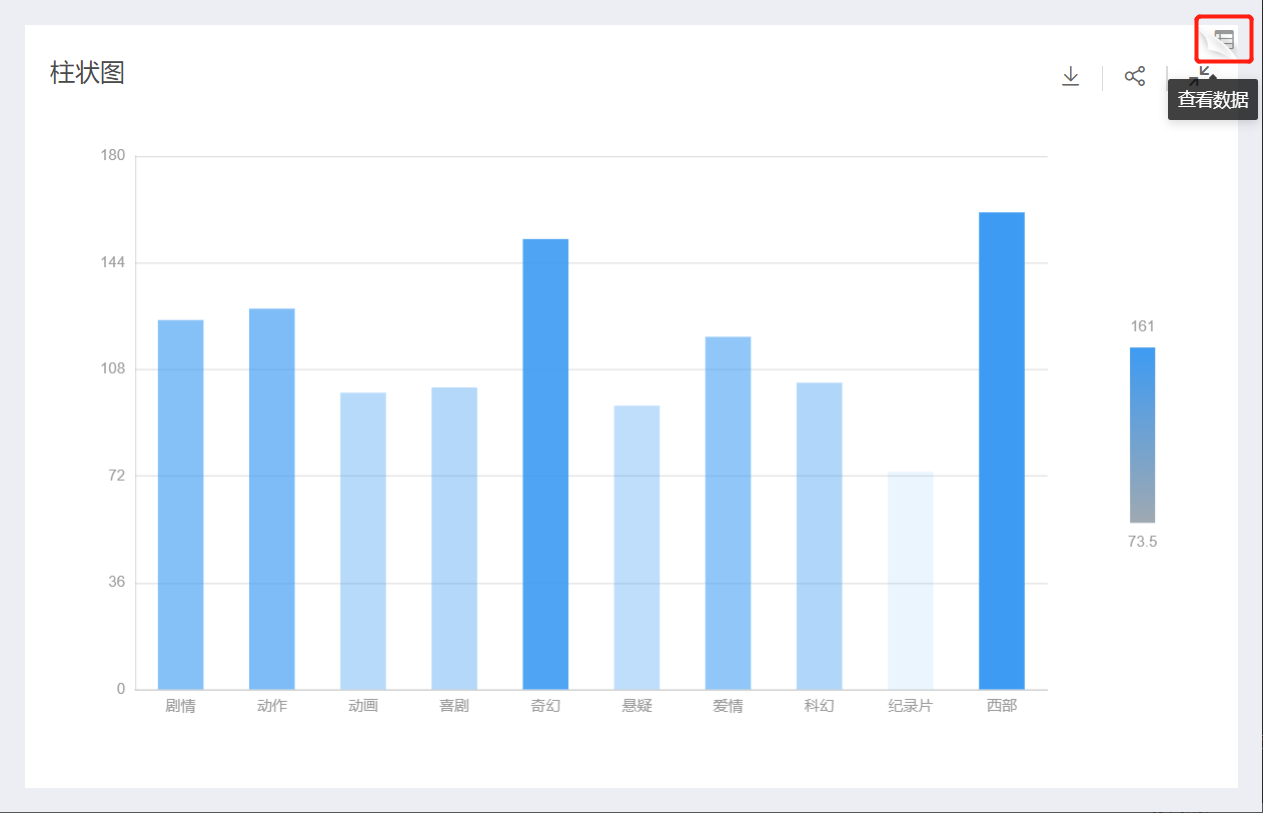
Note
If Chart Click Interaction Behavior is set to No Response, when the app is published, regardless of whether "View Data" or "Drill Down" is checked, clicking on the chart dimension group in the shared link will not respond, meaning the hexagon menu will not pop up.
Export Data
When the Export Data interaction permission is checked, aggregated data and detailed data of the chart can be exported from the shared link:
Export Data from Dashboard Charts
In the dashboard, select a chart and click Export Data to export the aggregated data of the chart:
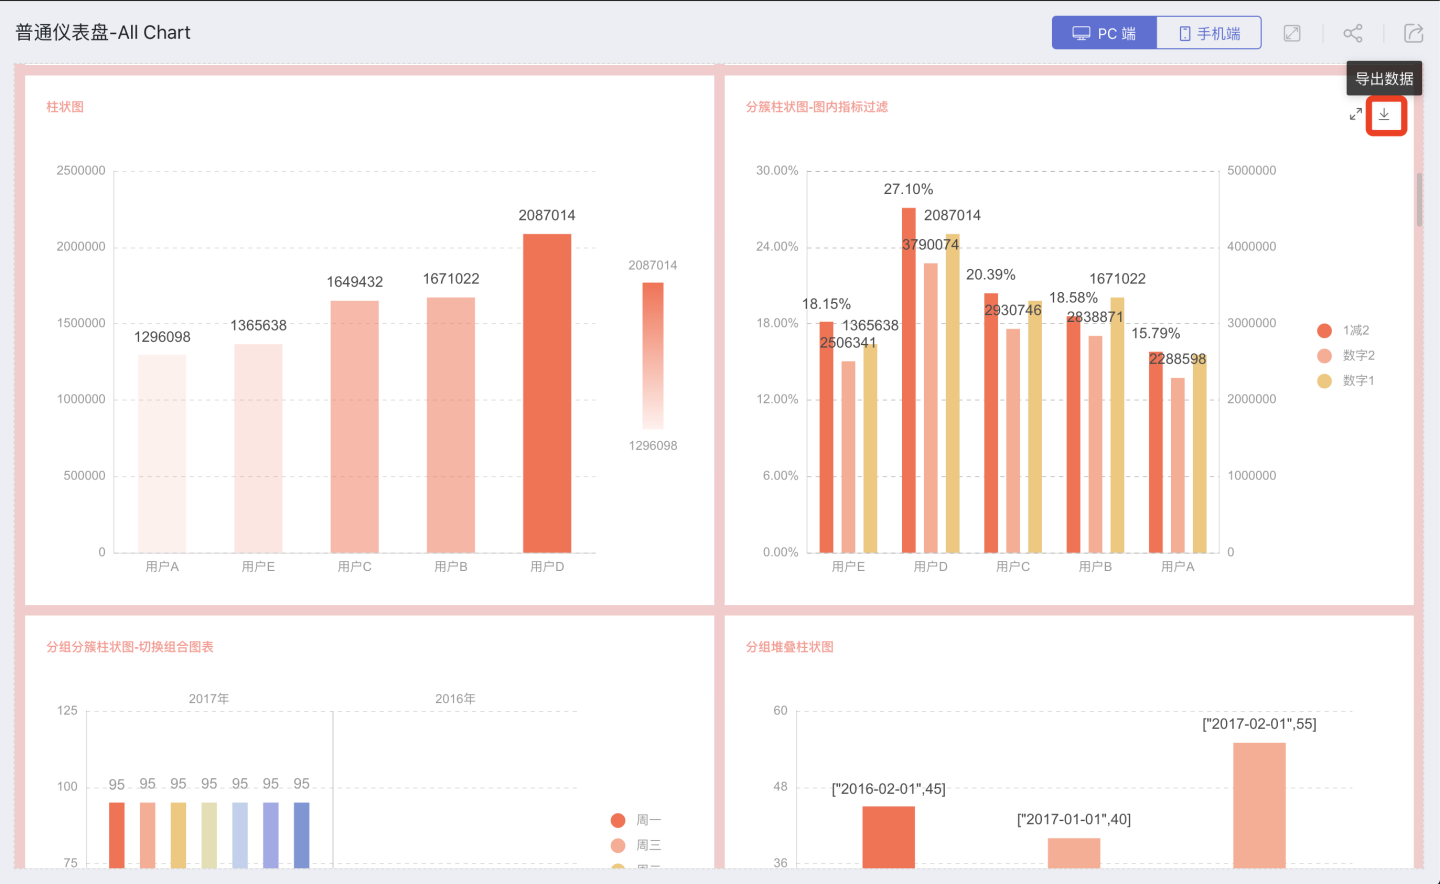
Export Data from Charts
In the chart, click the export button to expand the dropdown, select Export Data to export the aggregated result data of the chart:

Download Data from View Data in the top-right corner
In the chart, click View Data in the top-right corner, and in the pop-up window, select Download Data to download the detailed data of the chart:

Download Data from View Details in Chart Grouping
In the chart, select a dimension group and click Details, then in the pop-up window, select Download Data to download the detailed data of the selected group, such as viewing data for the "2020/6" group:
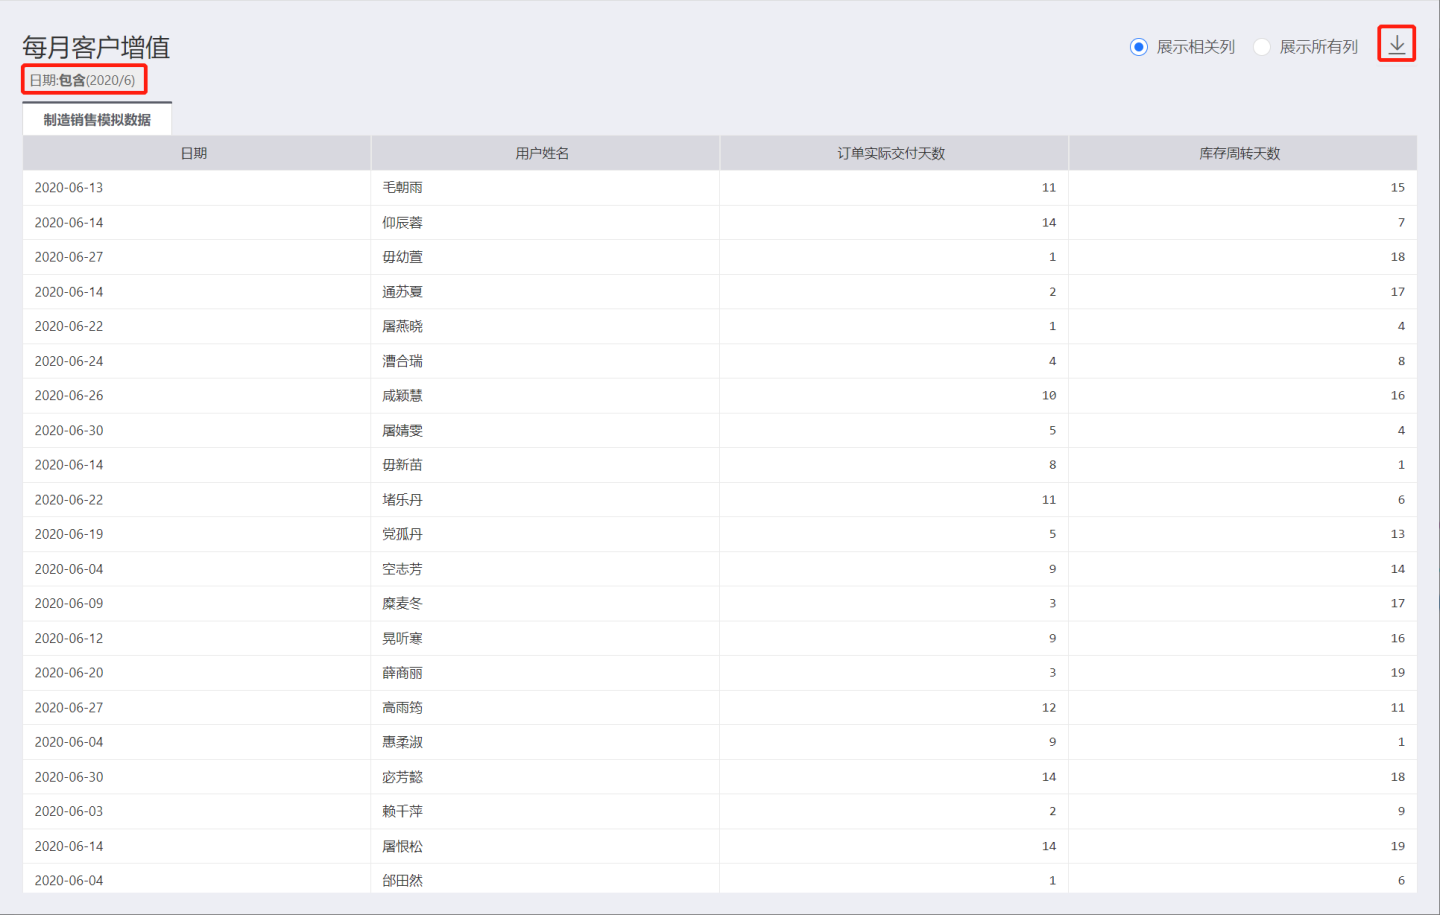
Data Permissions
By setting data permissions for an application, users can only view and use data within the permitted scope, thereby achieving data distribution. Administrators can decide which data users can see when accessing the application.
Data permissions are divided into three types: Application Author, Dataset Author, and User; when creating an application, the application defaults to Application Author permissions.
Application Author
Using the application author privilege, primarily for scenarios where analysts establish analytical models, all users with access to the application within the system can view the complete data within the application created by the analyst without needing additional permission settings.
All accounts with access to the application will see data that is identical to what the application creator sees.
Application administrators can set row-level permissions on datasets to restrict data. Accounts with access to the application that have row-level permissions applied will see data that is based on the application owner's view, with the addition of row-level permissions.
Dataset Author
The Dataset Author uses the data published by the creator to deploy applications, enabling the reporting and sharing of operational metrics. Relevant teams can promptly identify and adjust strategic directions.
Using Dataset Author permissions is also a form of sharing within the system. The publisher can set permission controls within the application to specify which accounts can access the application and the data access scope for each account, thereby authorizing the reading permissions of the application to designated users.
Application administrators can add rules to the dataset. Non-administrator accounts with access permissions to the application will see data that is based on the dataset owner's view, with additional row-level permissions applied.
User
Using user data, by controlling the scope of user access to data through permissions on the data connection, allows enterprises to easily build rich data applications with HENGSHI SENSE and embed them into different business systems.
Using user data is a form of sharing within the system. Any user with the publisher's permission settings in the application only needs to specify the accounts that can access the application. The visible data scope within the application is controlled by the permissions on the connection.
In the User mode, the engine function is unavailable. Additionally, row-level permissions do not take effect in this mode. Data is viewed based on the current account's connection permissions.
Note
If there are datasets imported by the engine in the application, switching to the User mode is not allowed.
Permission Control
In the mode of using App Author permissions and using Dataset Author permissions, application administrators can set permissions for datasets, including row permissions and column permissions.
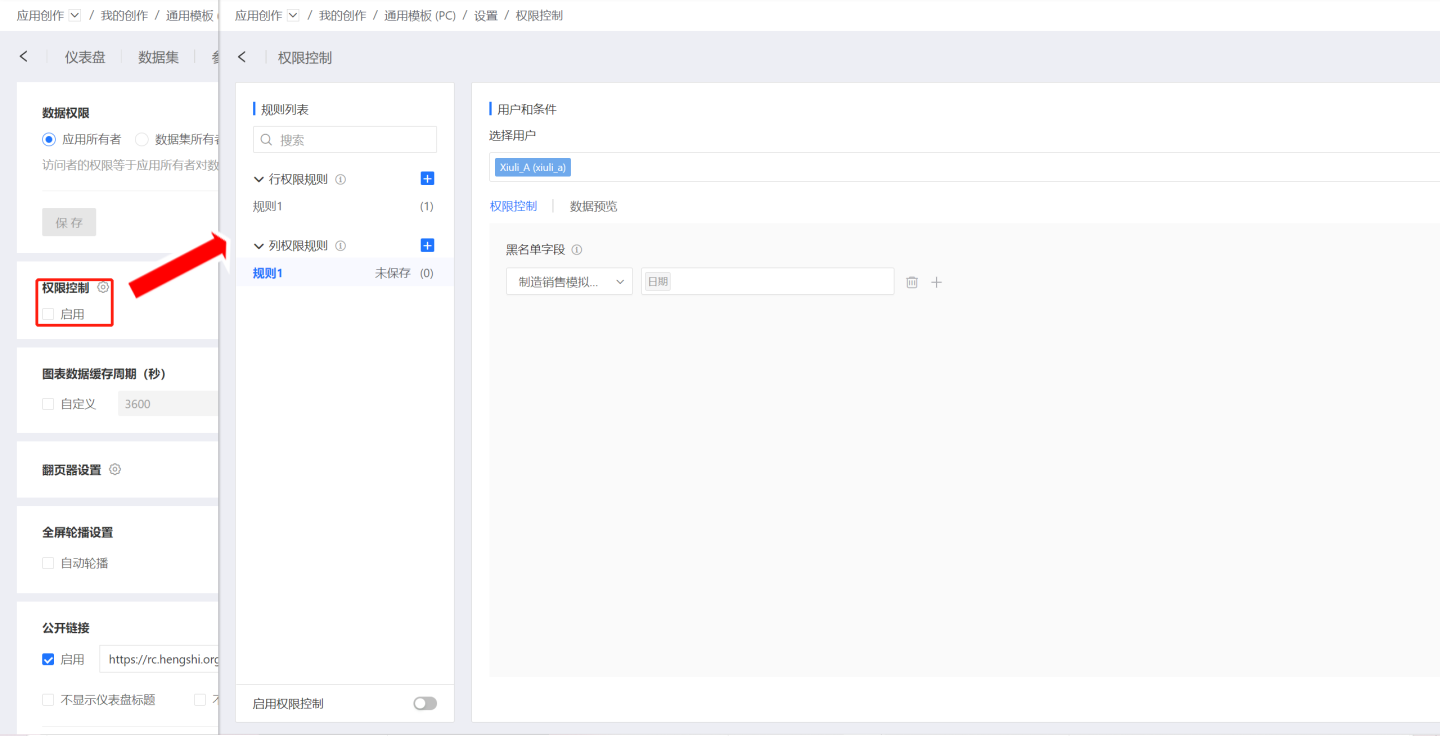
Tip
When using the User permission mode for data permission settings, application administrators cannot set permissions for datasets.
Row Permissions Addition Rules
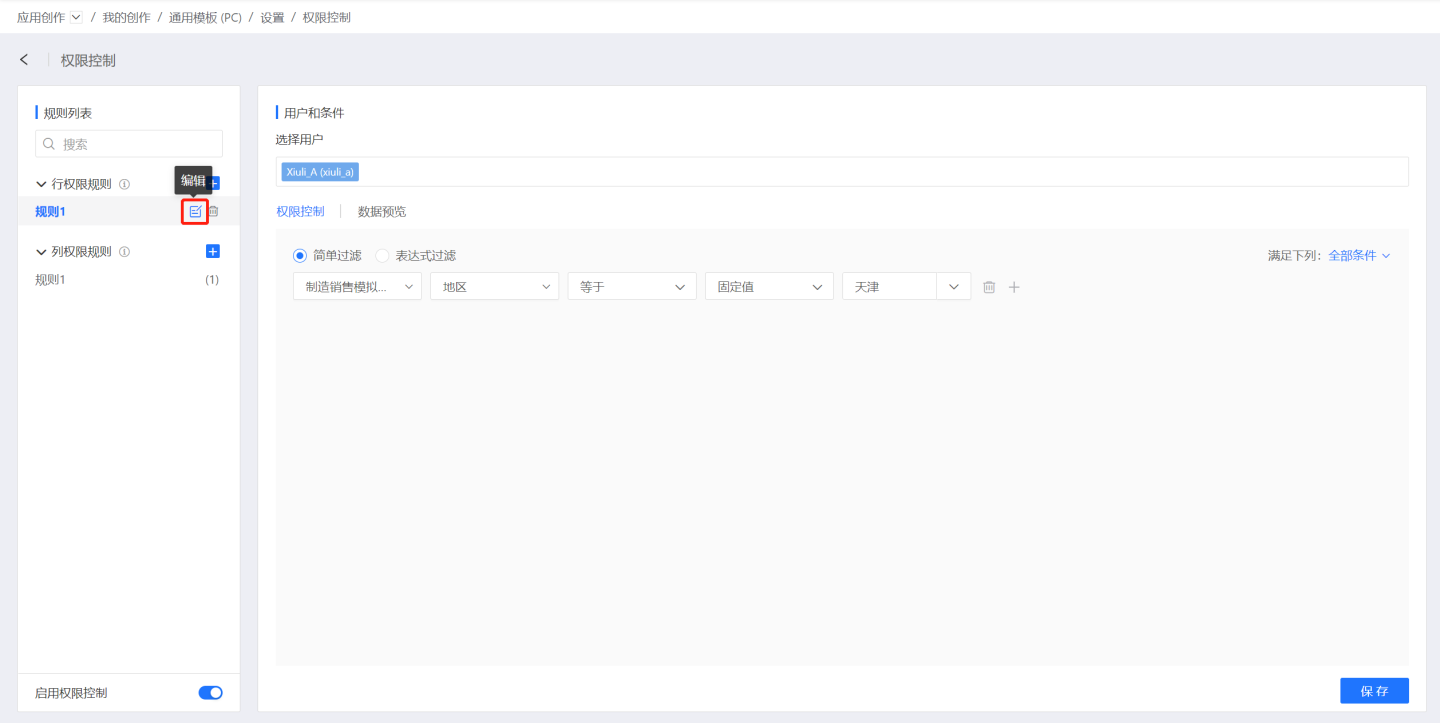
Open the permission control settings page, click the plus sign next to the row permissions rule, and add row permissions for the dataset.
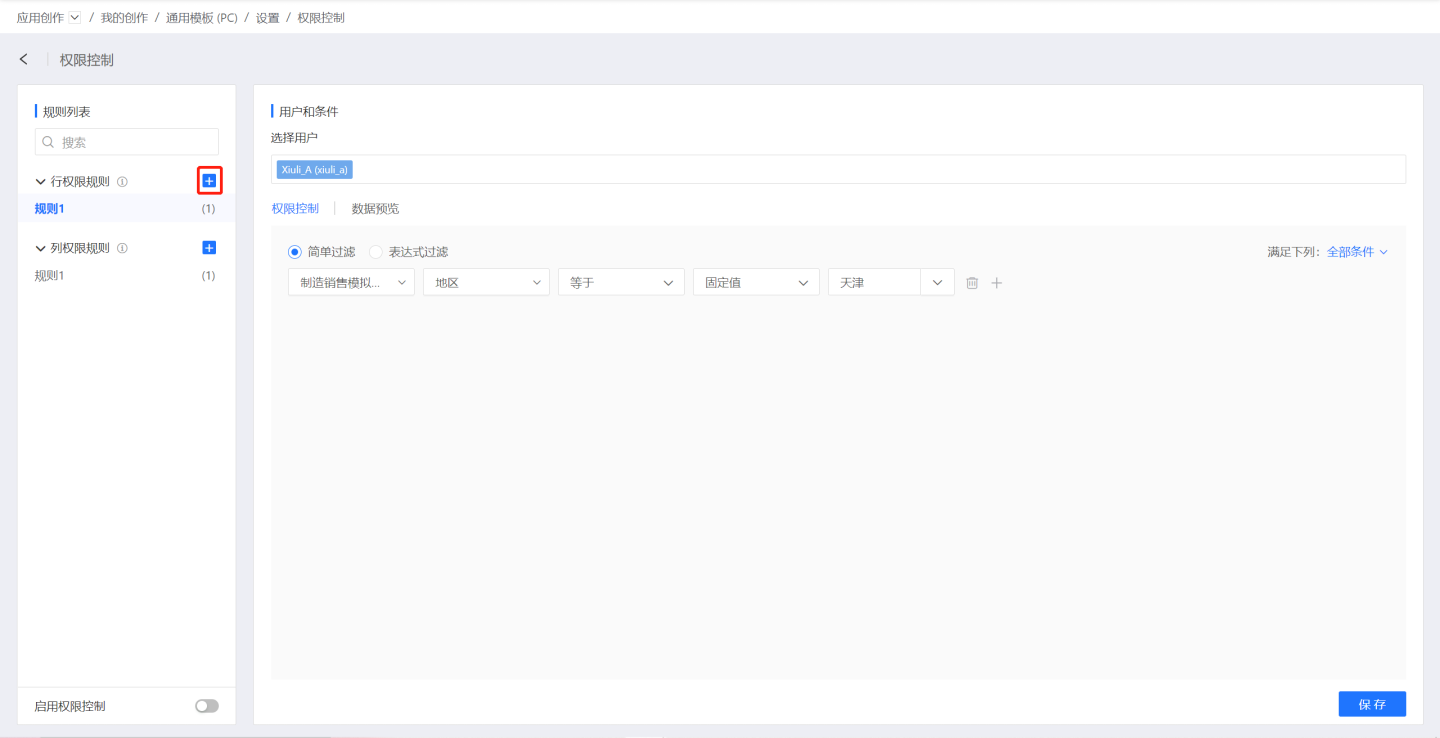
Step 1: Select Users Click on the user, select the users who need to set row permissions, these users can see the data that meets the row permission rules.
Step 2: Select Permission Setting Method, Support Simple Filtering and Expression Filtering
In the case of simple filtering, the comparison value in row permissions can be a parameter value, and in some cases, user attributes can also be selected.
Row permissions can choose comparison conditions for user attributes:
Text: Except for empty/not empty, all comparison methods can choose user attributes as the comparison value;
Number: The comparison values for the equal/not equal comparison methods can choose user attributes;
Date: The comparison values for the equal/not equal comparison methods can choose user attributes;
Select multiple datasets, add row permission controls respectively, the row permissions here can be "and" or "or" relationships, select the dataset to add row permissions in the first dropdown, select the field in the second dropdown, specify the comparison method and comparison value.
Parameter Value
Comparison method selects parameter value:
For example: Add row permissions for the users selected in
Users, add row permissions for each of the two datasets: Dataset Manufacturing Sales Data: The visible data is only the rows where the field "Region" is equal to the parameter value "Location".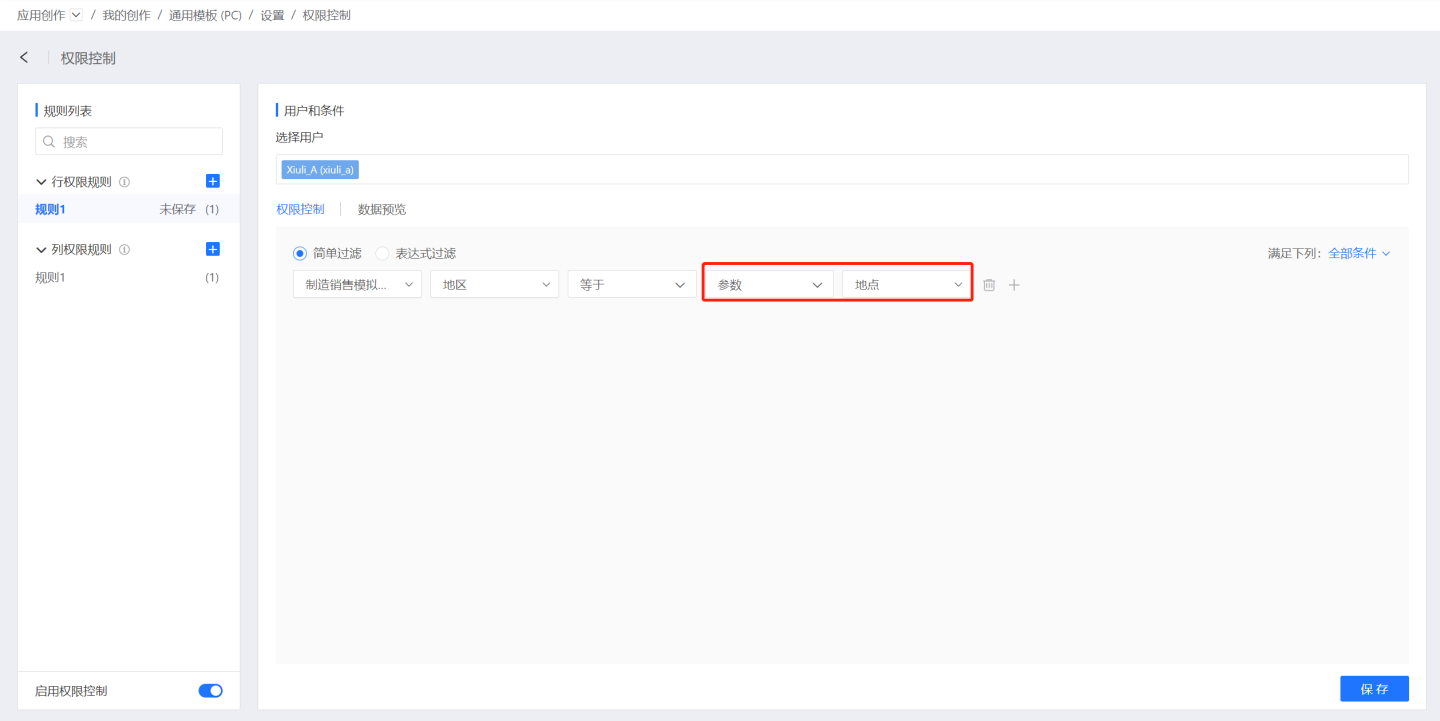
User Attribute
Comparison method selects user attribute (see User Management for setting user attributes):
For example: Add row permissions for the users selected in the rule "District Manager":
Dataset
User Attribute: The field "Region" is equal to "User Attribute", in the dropdown connected to the user attribute, all user attributes in the system will be listed, select the user attributeProvince Attribute: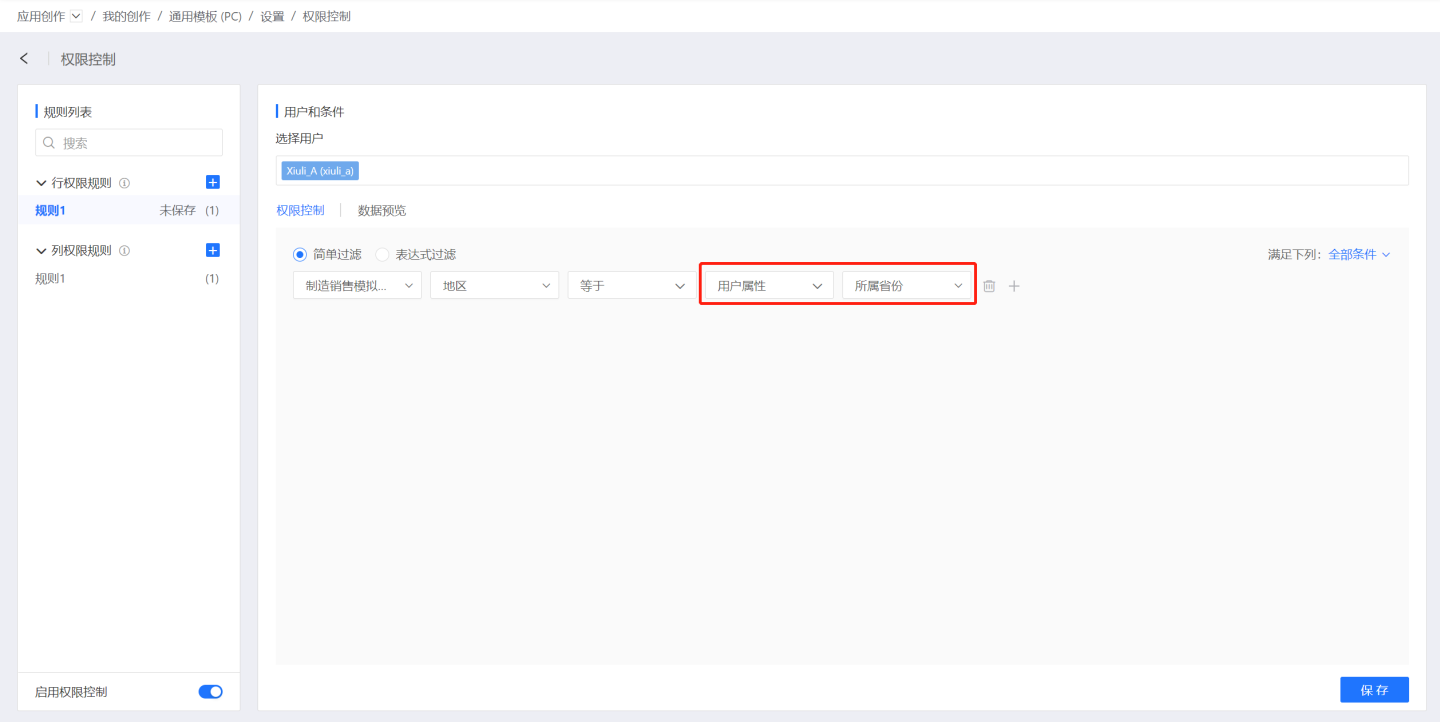
When users within this rule access the application, in charts that depend on the
User Attributedataset, they can only see the rows where the field "Region" is equal to their own user attribute value.
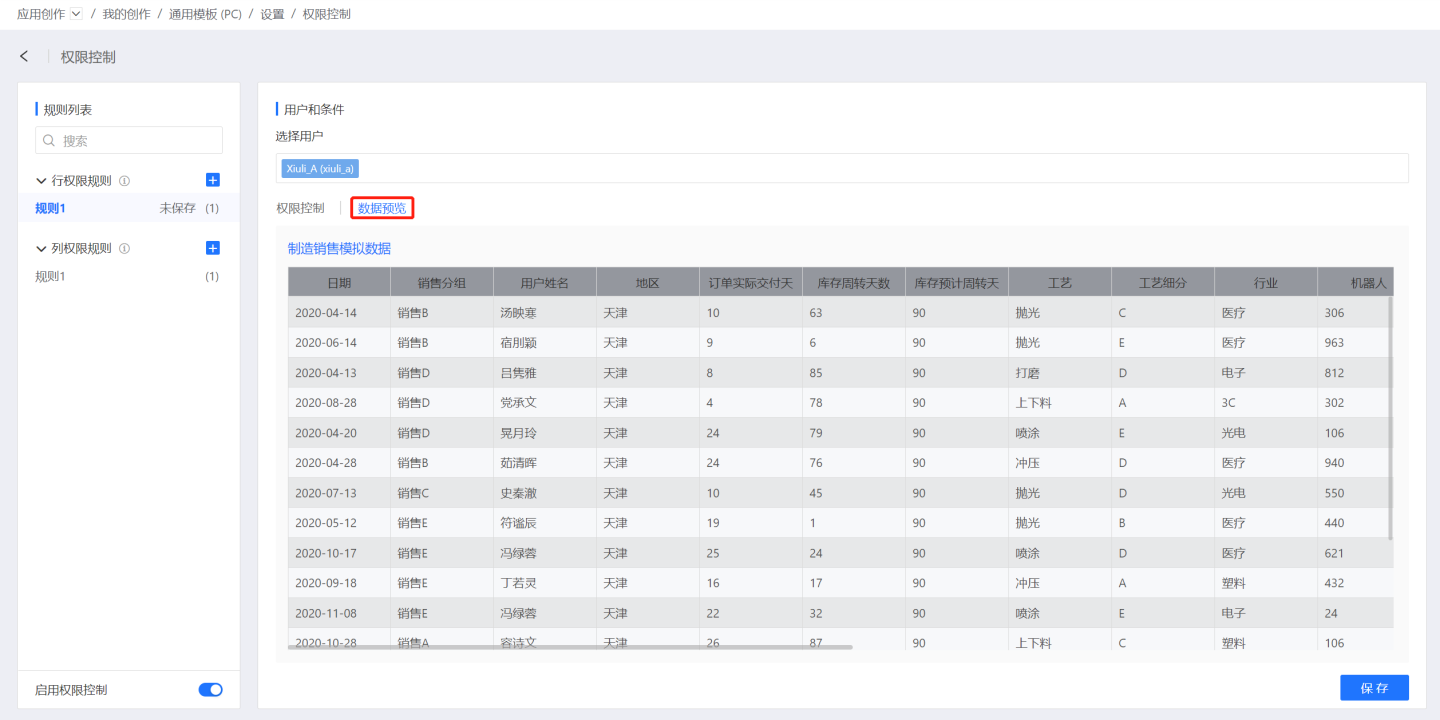
Step 3: Preview
Click Preview, when previewing data, you can switch datasets to view which data is visible for all datasets that have added rules.
Step 4: Save
Click save, the rule is added successfully, and the window closes.
Column Permissions Addition Rules
Column permissions control whether dataset fields are visible to users. When a column permission is set for a specific field in a dataset, users will not be able to see that field when viewing the dataset.
Setting column permission rules is relatively simple. Select the user, dataset, and the field that should be invisible to the user, then click save.

Edit Rules
Click the Edit button on the rule to edit the already set permission rules.
Delete Rule
Click the Delete button on the right side of the rule to delete the set permission rule.
Note
Row permissions set for datasets will not be pushed downstream, for example: dataset C = A join B, row permissions are set on dataset A and B respectively: A where a = $user.a and B where b = $user.b, then the tableSql of C is A join B, and will not be A where a = user.a join B where b = $user.b If users need to control permissions, additional row permissions need to be set on C.
Calculation Method Between Rules
Intersection between Row Permissions and Column Permissions For the same user and the same dataset, the dataset after the row permissions and column permissions are applied takes the intersection.
Union within Multiple Rules for Row Permissions or Column Permissions For the same user and the same dataset, if multiple rules are created, the final effective permissions are the union of the rules.
For example, in Rule 1, user A is granted access to data in the "Beijing" region, and in Rule 2, user A is granted access to data in the "Shanghai" region. Ultimately, user A can access data in both the "Beijing" and "Shanghai" regions.
Relationship Between Connection Permissions, Data Permissions, and Row Permissions Control
Connection permissions control is the first line of defense, governing who can access the data connection and what data they can access when doing so.
Data permissions control what data a user should see when accessing the dataset of the application: the data of the application author, the dataset author, or the user's own data.
Row permissions control further manages the distribution of dataset data after determining the data permissions mode of the application, i.e., the dataset's data.
Chart Data Cache Period
The chart data cache period refers to the time period during which the chart data for each query is read from the cache, with a default of 3600 seconds, or 1 hour. This means that the chart data is stored in the cache for 1 hour, and the system refreshes the data when the cache period is exceeded.
Each app supports customizing the chart data cache period. If not set, the chart data is updated according to the time set in System Settings -> Chart Data Cache Period.
Date Attribute Settings
The system date display format is fixed from Monday to Sunday, but different business statistical cycles may vary. Some business statistical cycles start from Sunday to Saturday. In such cases, you can customize the start date of the week through date settings, making it convenient for users to perform data cycle statistics, year-over-year/month-over-month comparisons, and other operations.
After setting the date attributes, they will take effect throughout the entire application. Date-related parameter controls, date filters, and other controls within the application will display according to the configured date attributes. Period calculations such as year-over-year/month-over-month will also be performed based on the configured date attributes.

Pager Settings
Please refer to App Pager for detailed usage of the pager.
Global Carousel
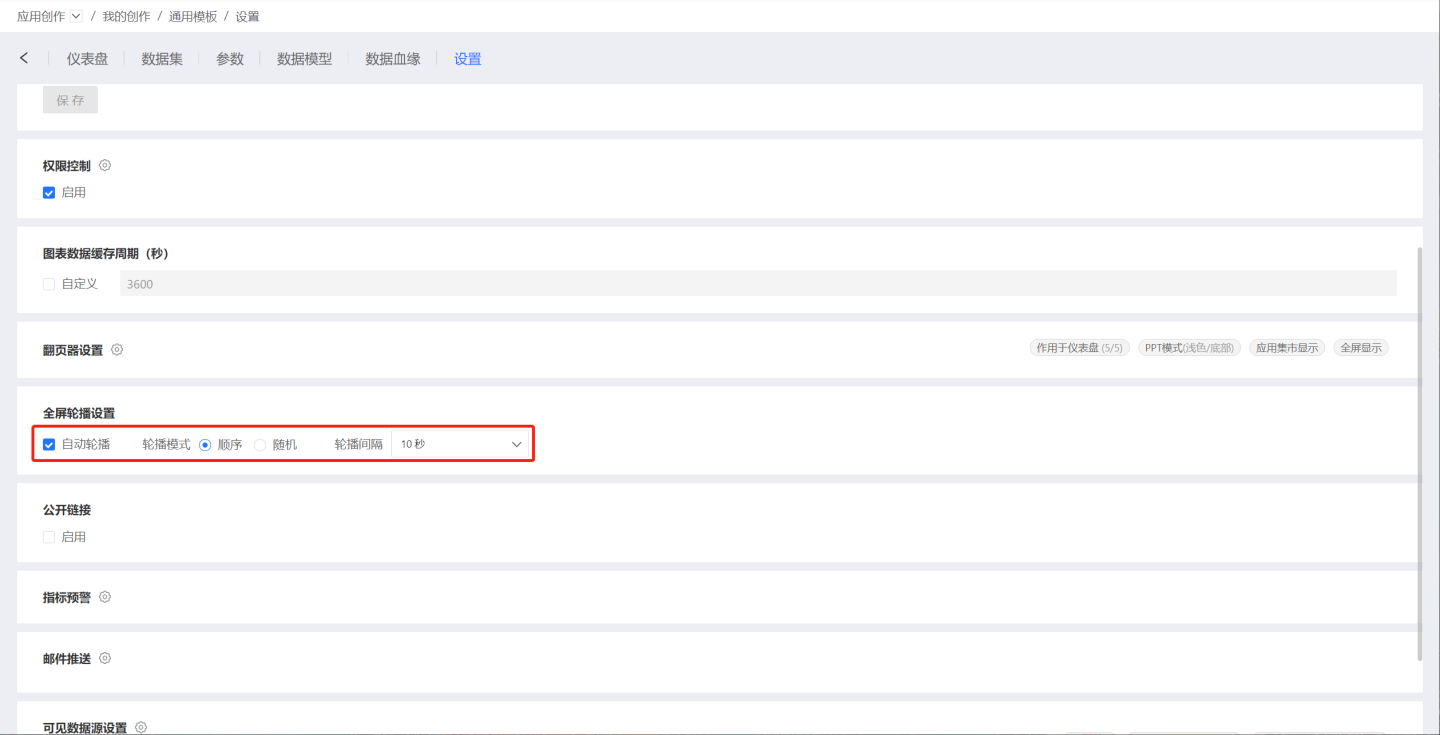
The global carousel refers to the carousel display of dashboards in the app in full-screen mode. It supports two methods: sequential carousel and random carousel. The carousel interval can be set to 5 seconds, 10 seconds, 30 seconds, 60 seconds, 120 seconds, 5 minutes, 10 minutes, 15 minutes, or 20 minutes. After enabling automatic carousel, the app will automatically enter full-screen mode and the dashboards will be automatically carouseled according to the settings.
Public Link
When using the App Author permission or the Dataset Author permission, a sharing link can be generated (not available with the User permission), allowing both system users and non-logged-in users to view the app through the shared link.

Note
The public link is not subject to the Row Permissions Control in the App Settings. This means that regardless of whether the user is logged in, the data viewed through the public link is filtered based on the data connection permissions of the Dataset Author or App Author, and row permissions do not take effect. The public link button is not enabled under the User permission mode.
Public Link Settings
Public link settings for apps support the following configurations.
Public Link QR Code
Public links for apps support sharing via QR code. Click the QR code on the right to obtain it. Mobile users can scan the code to view the app, making sharing more convenient and faster.
Hide Dashboard Title
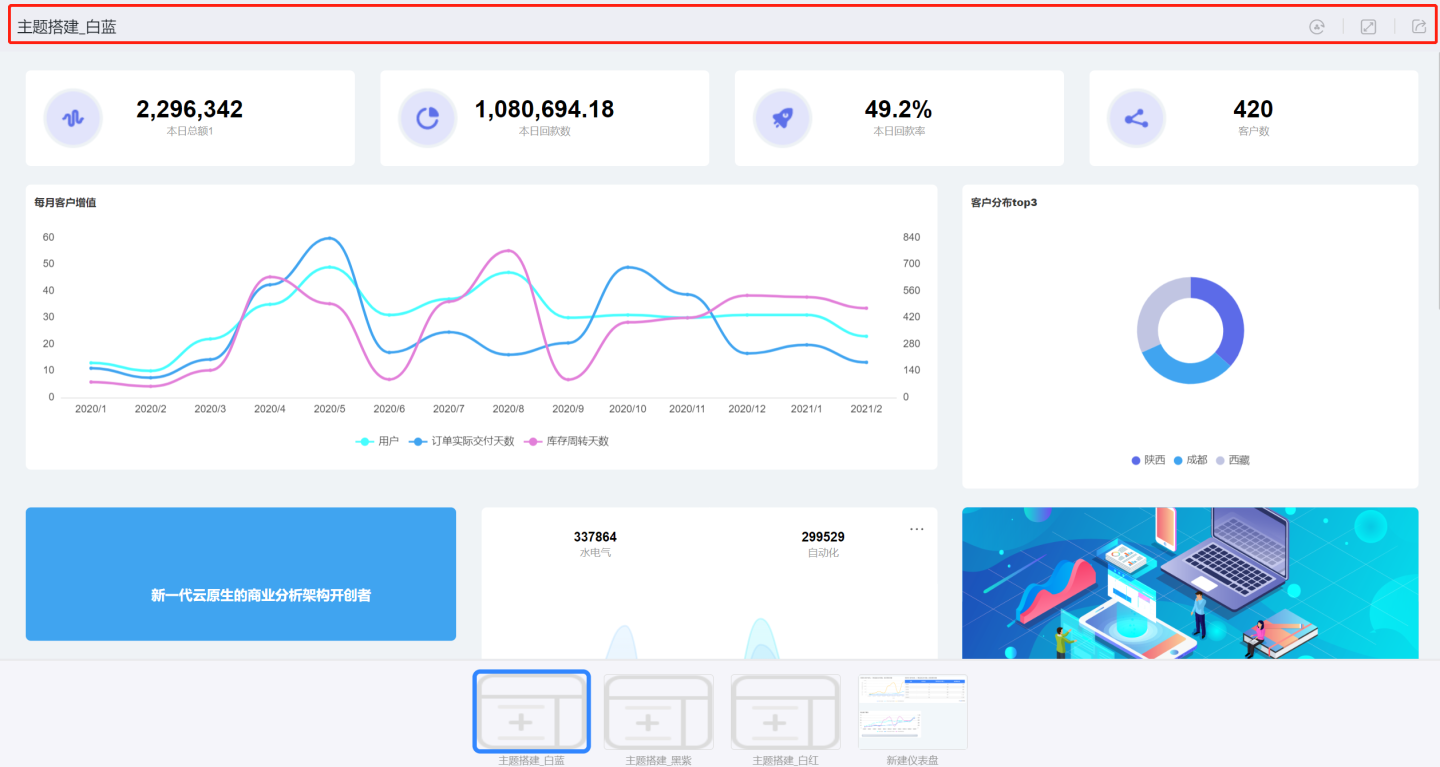
When "Hide Dashboard Title" is checked, the dashboard title at the top (highlighted in red in the image) will not be displayed when previewing the public link. The function buttons on the right side of the dashboard title, such as "Full Screen," "Refresh," and "Export," will also not be displayed. Corresponding parameters will be generated in the app link.
Hide Paginator
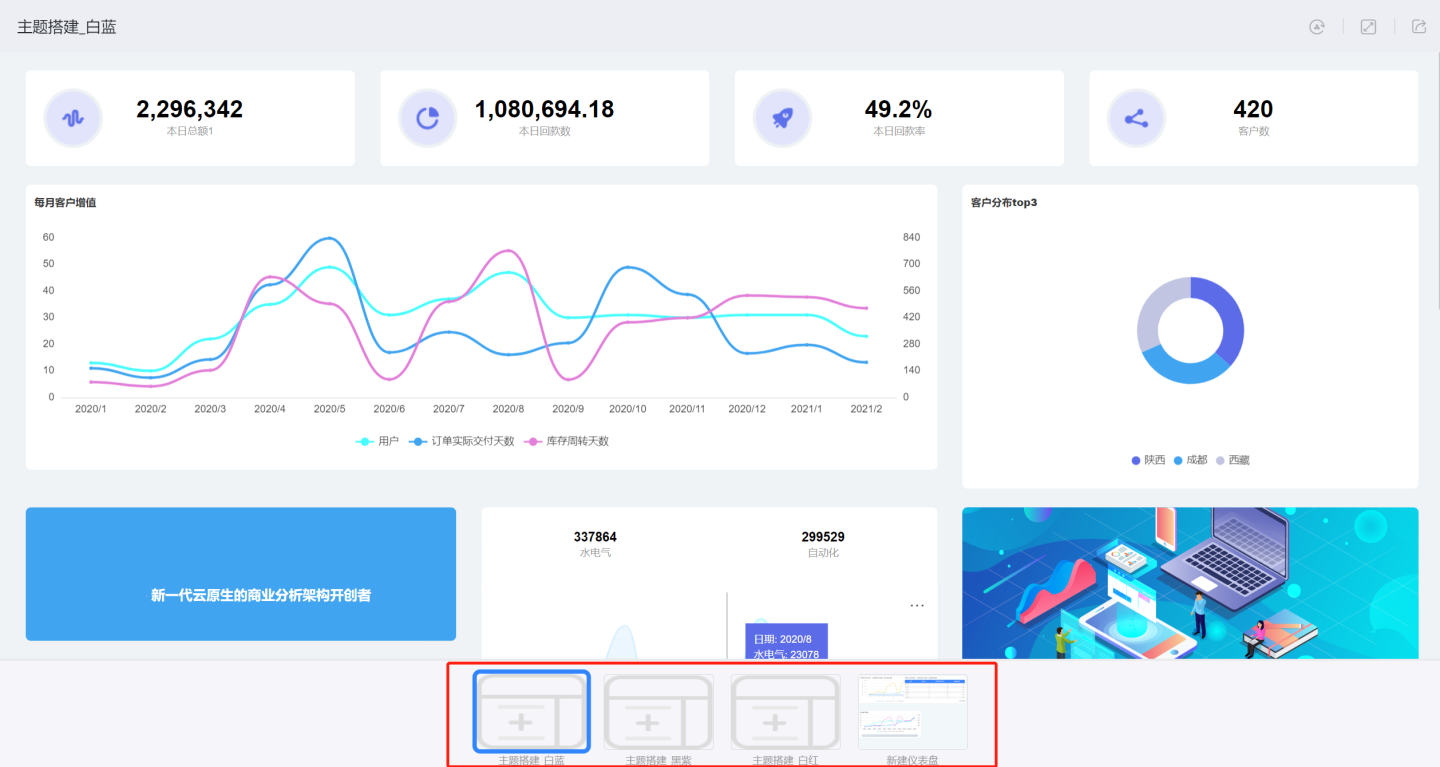
When "Hide Paginator" is checked, the paginator (highlighted in red in the image) will not be displayed when previewing the public link. Corresponding parameters will be generated in the app link.
Password Required Access
For users outside the system, public links + password can be used to share dashboard-related information, protecting data security. The system defaults to a random password, and users can also edit and define their own public link password.
HMAC Signature Protection
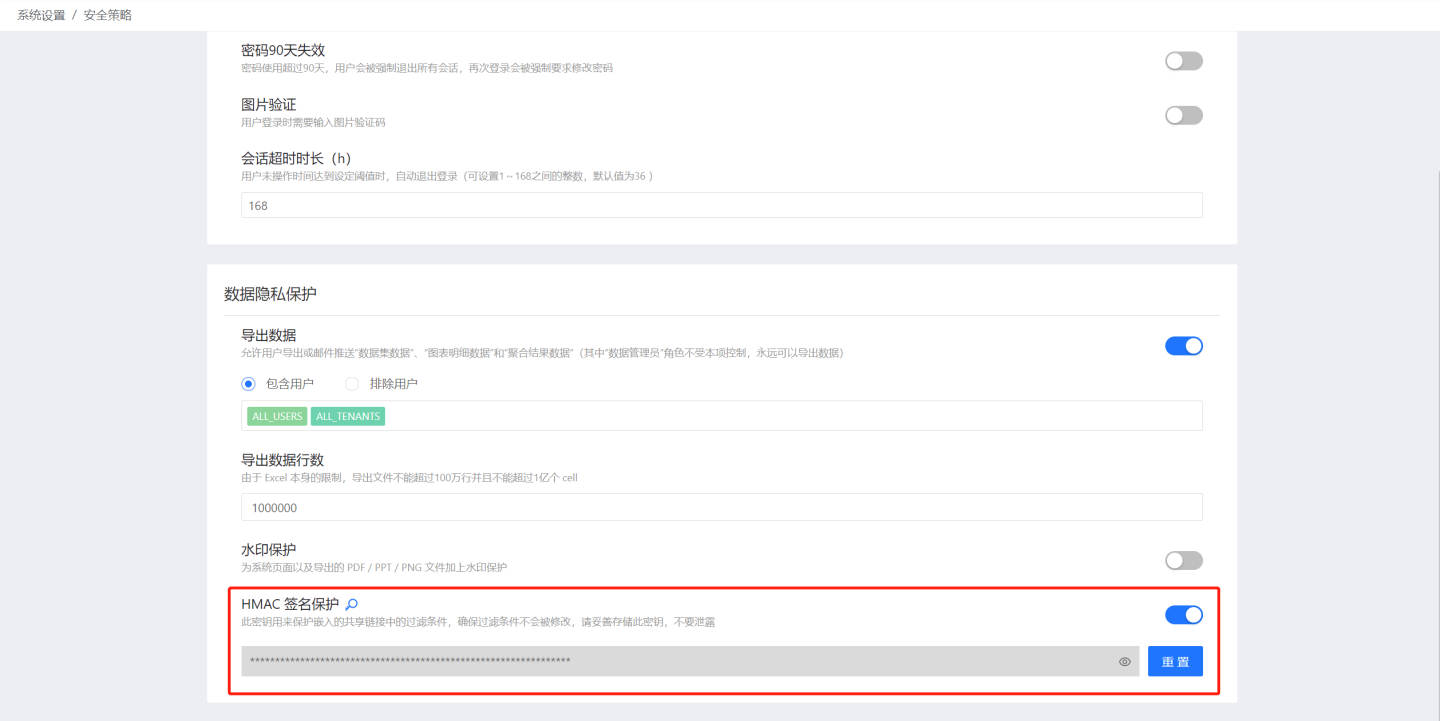
Many enterprises are highly sensitive about their data and do not want it to be viewed arbitrarily. Therefore, to ensure the security of shared URLs, we have added the HMAC hash verification feature in App Settings -> Public Links.
The specific steps are as follows:
- The system administrator enables HMAC Signature Protection in
Settings->Security Policies->Data Privacy Protection.
Only when HMAC Signature Protection is enabled in Settings -> Security Policies -> Data Privacy Protection can users see the secret key and copy it.
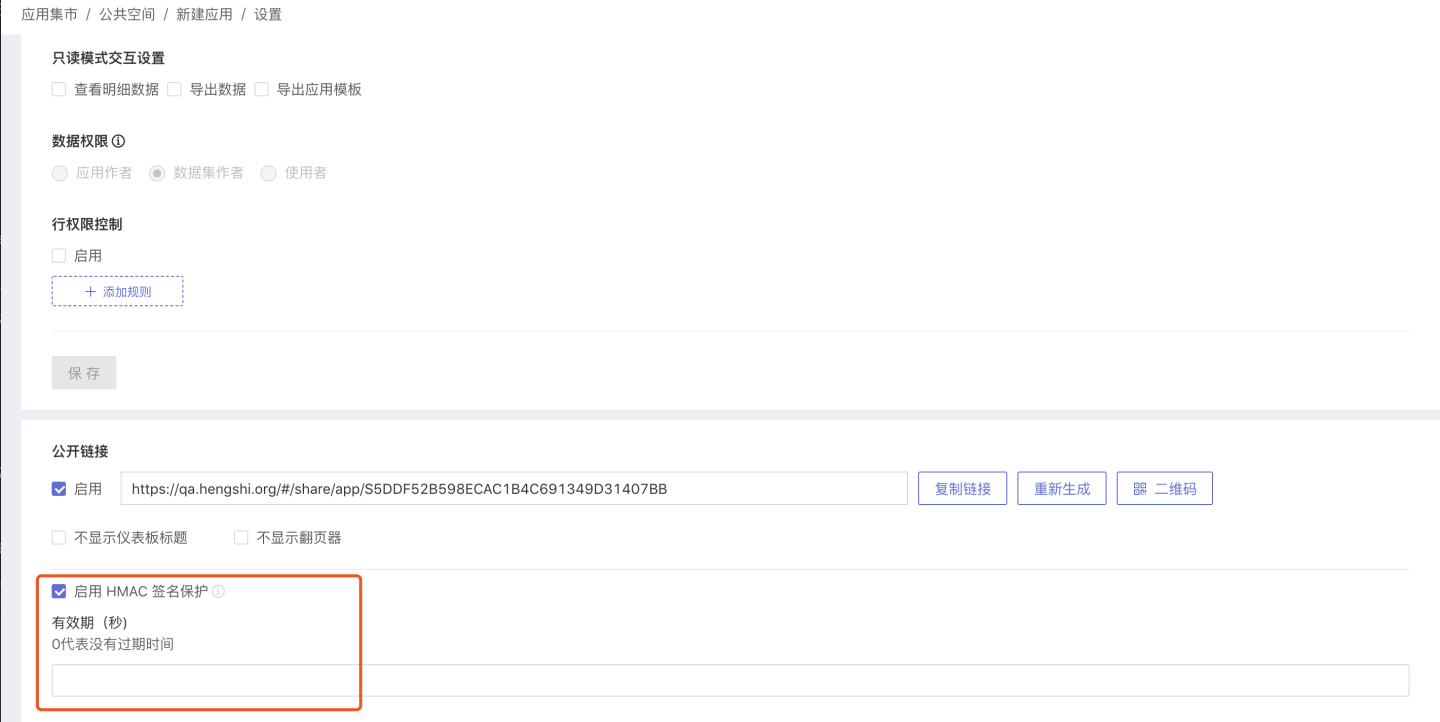
- Users enable Public Links and HMAC Signature Protection in
App Settings->Public Links.
- When enabling HMAC Signature Protection, an expiration time can be set as needed. If not set or set to 0, there is no expiration time. The validity period is calculated as being effective within a time range before and after the current time. For example, if the validity period is set to 60 seconds and the HENGSHI server time is 2021-01-01 10:10:10, the public link will be valid between 2021-01-01 10:09:10 and 2021-01-01 10:11:10.
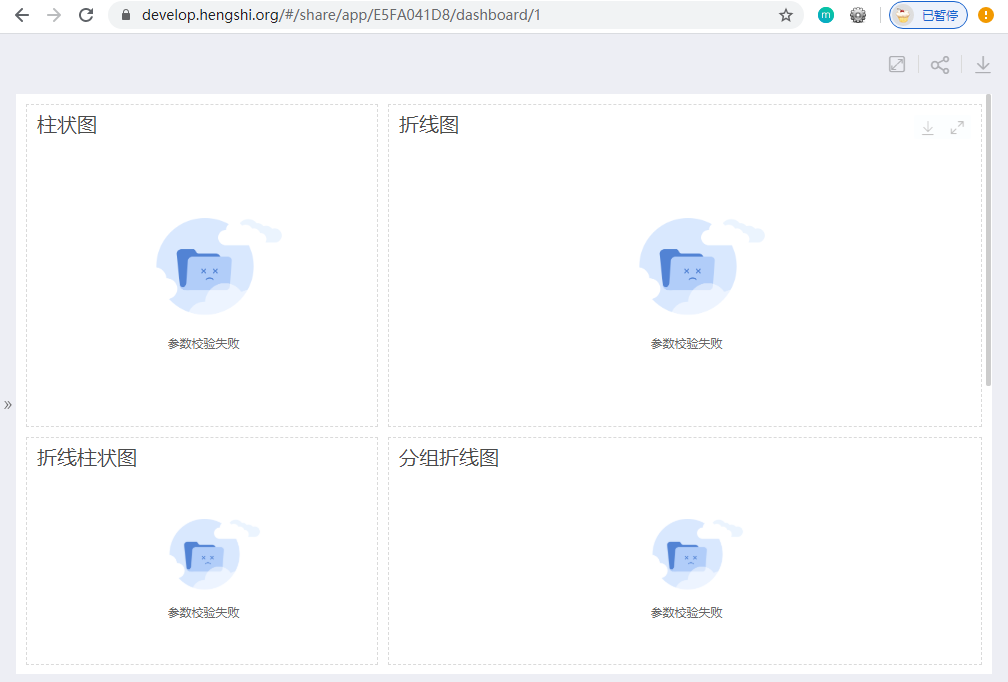
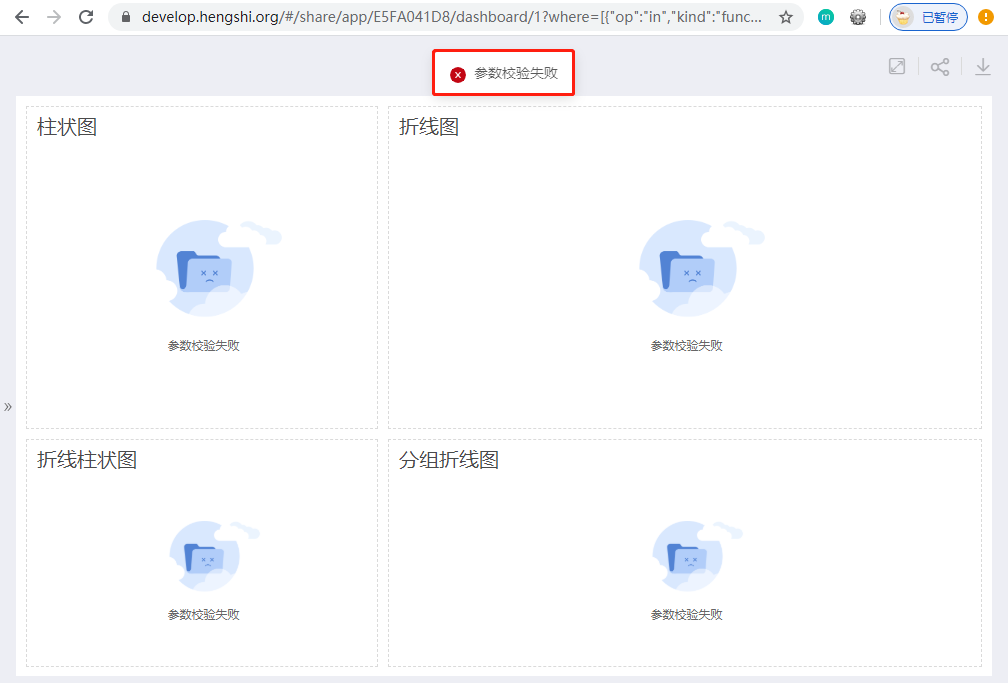
- Unauthenticated users accessing the public link will be prompted with "Parameter Verification Failed."
When accessing the public link, users must calculate the signature to embed the shared URL. Click the signature icon, fill in the example in the pop-up box, and click calculate to get the signature result.

The format for embedding the shared URL is:
shareUrl?having={having}&where={where}&utcSecond={utcSecond}&signature={signature}.
Example:
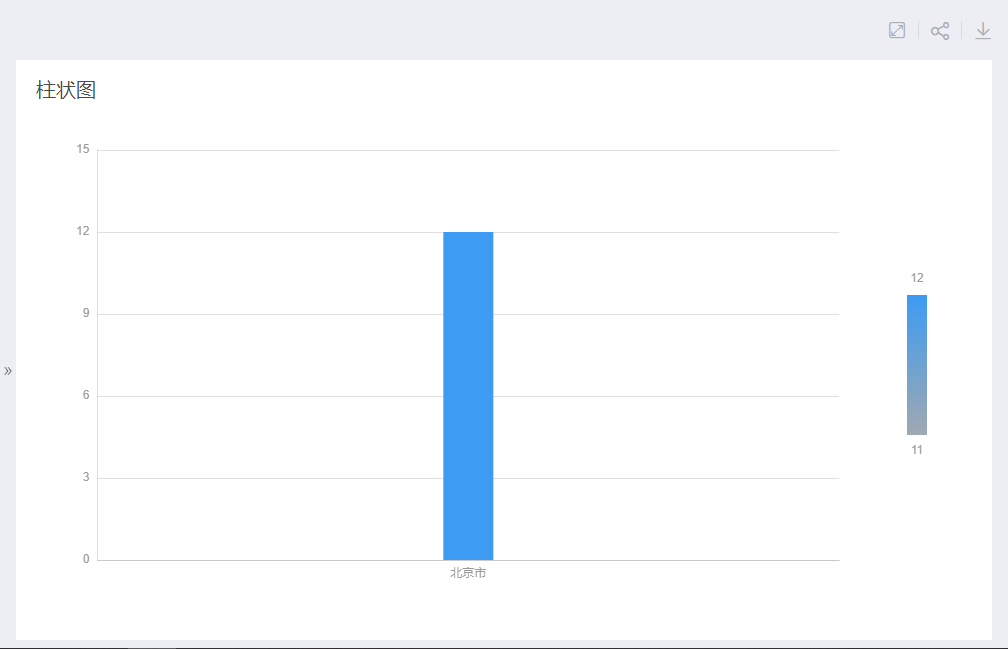
- An unauthenticated user accessing the following link with the signature parameter (with HMAC hash verification enabled) will not see any data after changing "Beijing" to "Shanghai" and will be prompted with "Parameter Verification Failed":
https://develop.hengshi.org/#/share/app/E5FA041D8/dashboard/1?where=[{"op":"in","kind":"function","args":[{"kind":"field","op":"city","dataset":1},{"kind":"constant","op":["北京市"],"dataset":1}]}]&signature=bf576f3de3259555e2247b64bd341a27a237ef87
Tip
The system administrator can reset the HMAC key in the system settings, and users must also update the key (64-bit hmacKey) in their logic for generating the "hash value."
Metric Alerts
The Metric Alerts feature is used to monitor the metrics of charts within an application. When a metric reaches a threshold condition, users are notified, allowing them to promptly perceive changes in business metrics and adjust business strategies accordingly. Metric Alerts support setting multiple alerts, each of which can be customized with detection time and alert frequency. Alerts can be sent to users via email and Webhook. Currently, this feature is not available in the published state of an application. Metric Alerts are also supported in tenant scenarios, and can be set for applications shared by the platform.
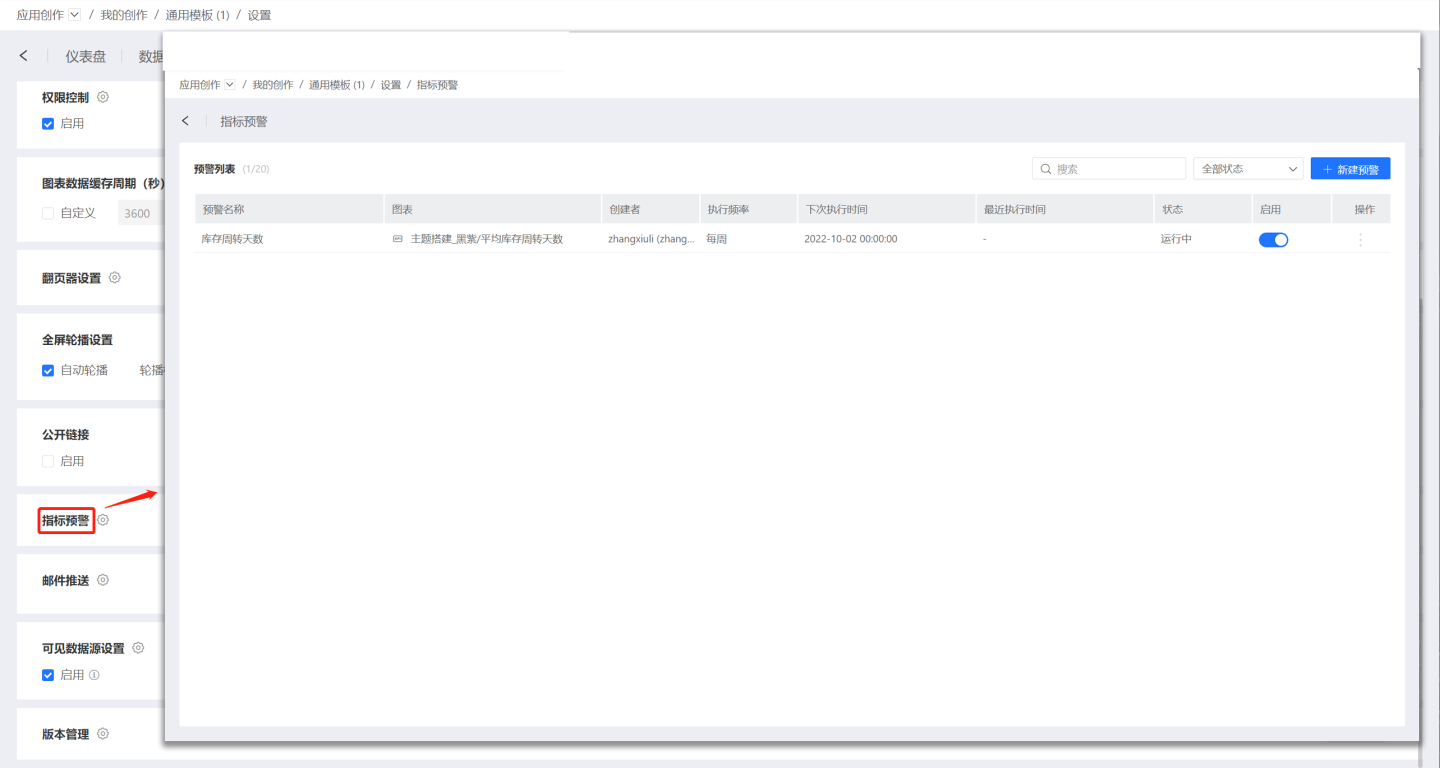
Set Metric Alerts
Follow the instructions below to set up metric alerts.
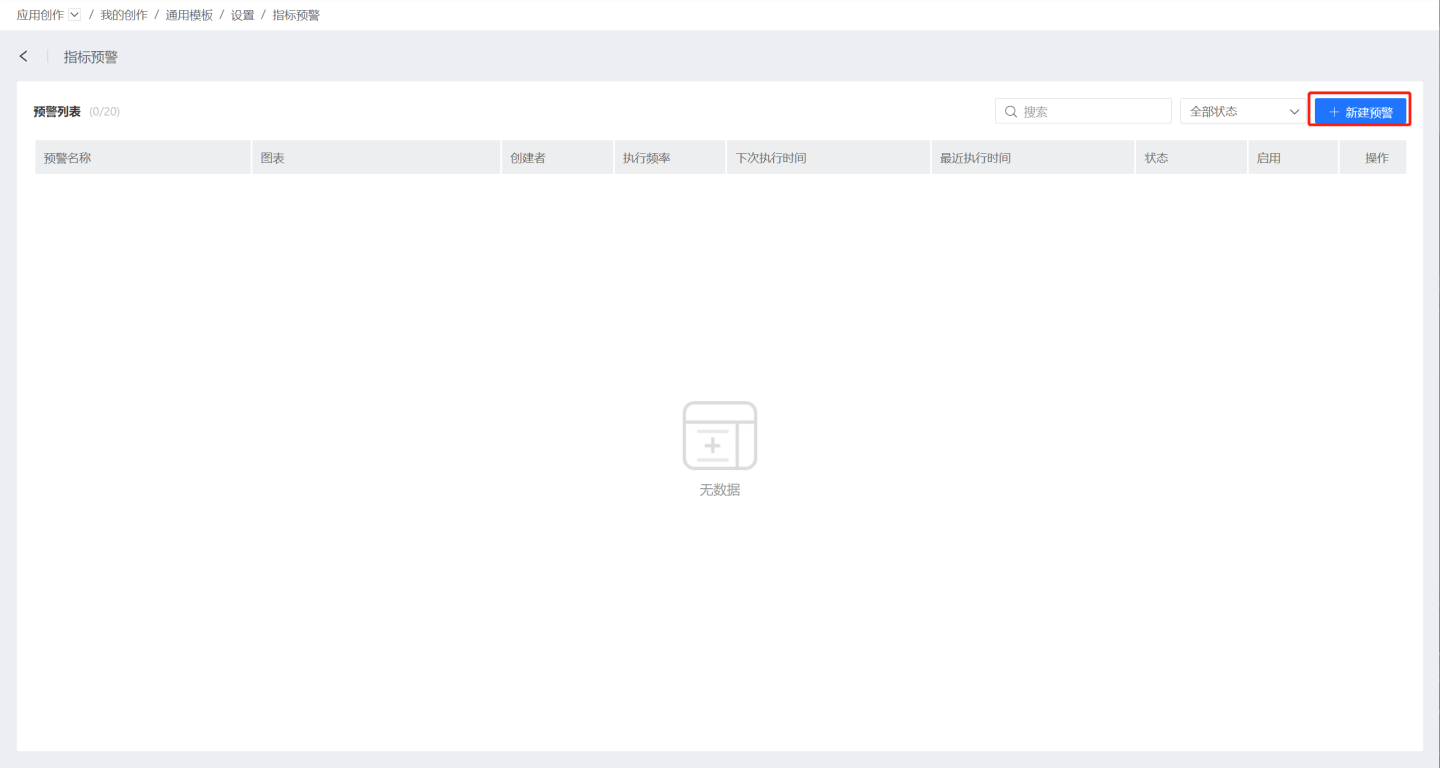
In the metric alert interface, click "New Alert."
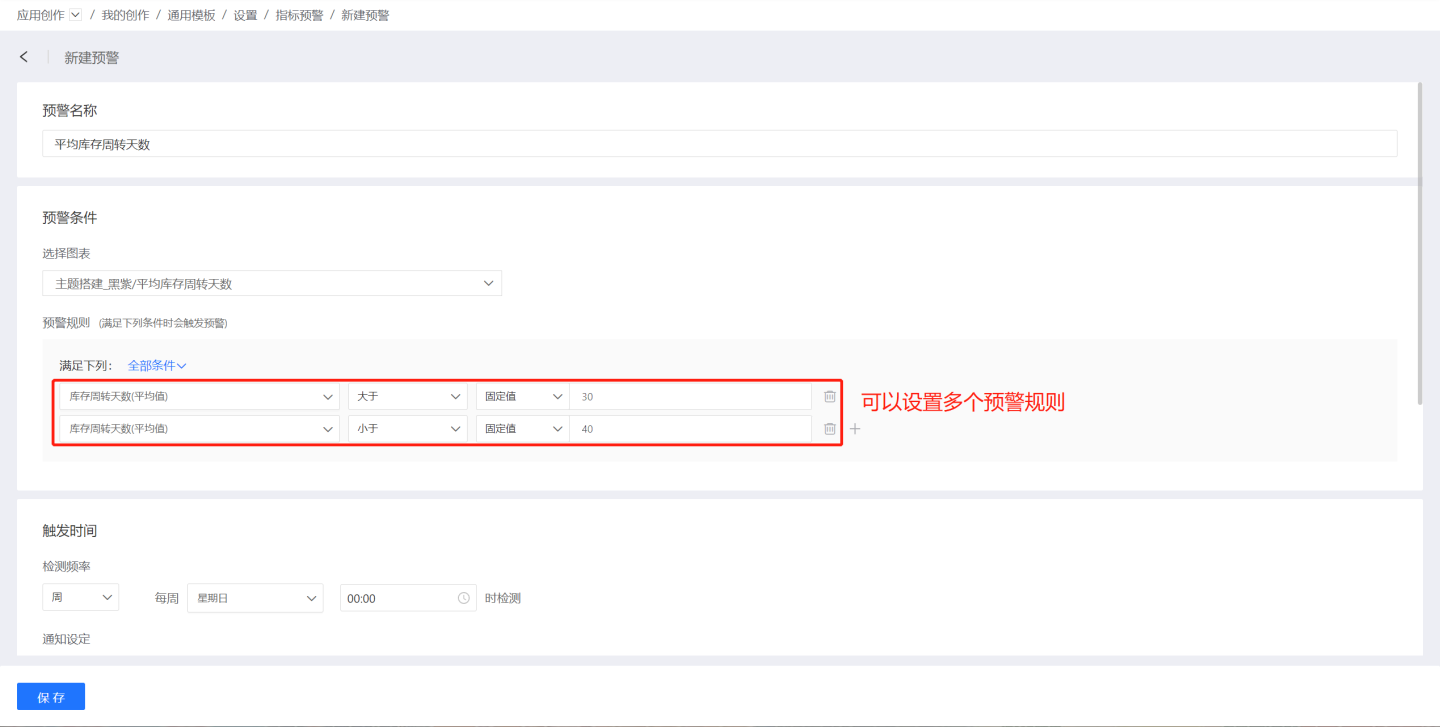
Fill in the alert name and alert conditions. Select the chart where the alert metric is located and set the alert rules. Each chart can have multiple alert rules, and you can choose the trigger conditions for the alert rules, setting the alert to trigger when any rule is met or when all rules are met.
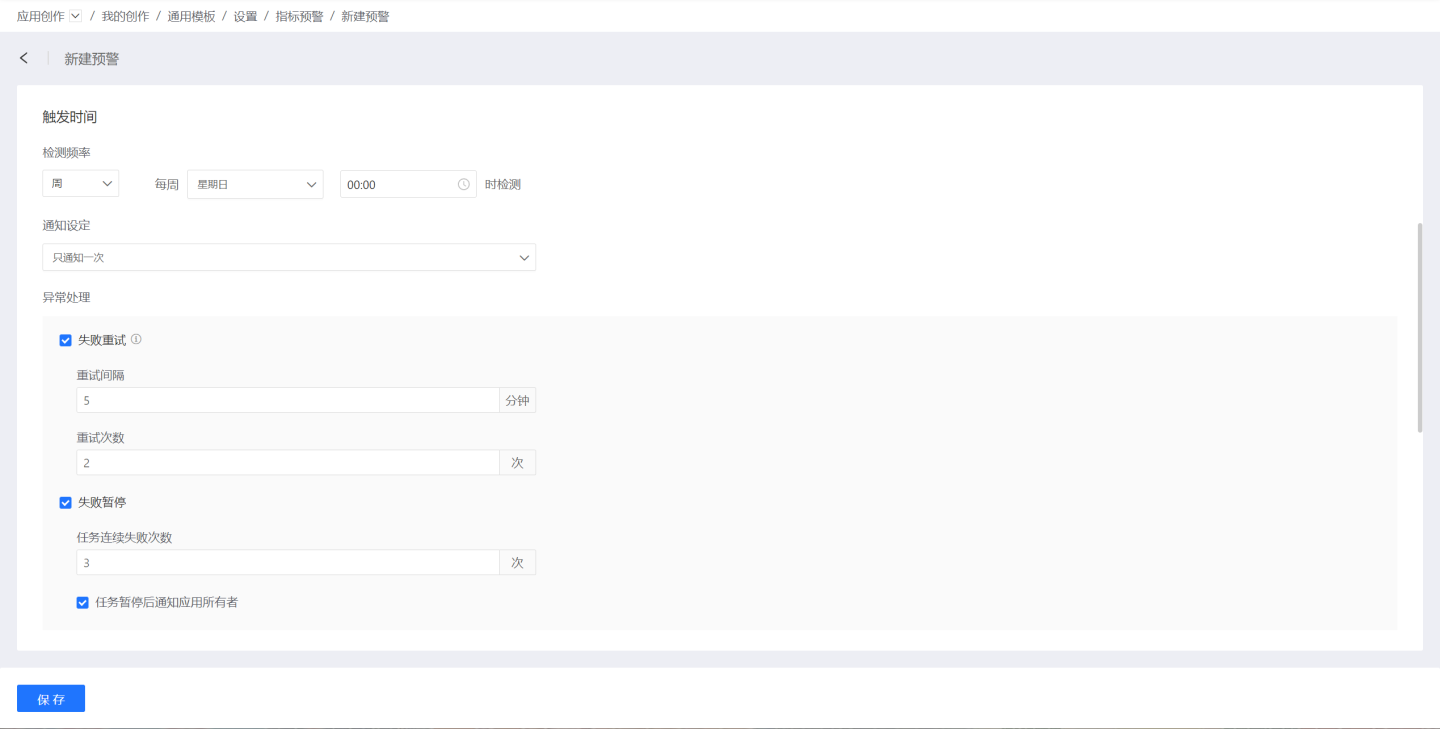
Set the alert trigger time.
- Set the frequency of metric detection, which can be hourly, daily, weekly, monthly, or custom.
- Notification settings refer to the number of times users are notified when the alert conditions are met, either once or continuously. Notifying once means the user is notified when the metric meets the alert condition during the current detection. If the metric still meets the alert condition during the next detection, the user is not notified again. Continuous notification means the user is notified whenever the metric meets the alert condition.
- Exception handling refers to the task processing when the detection task encounters an exception. You can set it to retry on failure or pause on failure. Retry on failure means the task is restarted after failure, based on the retry interval and number of retries. Pause on failure means the task is paused after a certain number of failures, and the app owner is notified.
- Set the notification methods. The system supports the following notification methods: email, Webhook, WeChat Work, Lark, and DingTalk. For detailed configuration methods, please refer to the relevant introduction in the Subscriptions section.
Template Variables
Template variables are supported in both the body and title of the message content.
Example:
This is a temporary subscription message {{%%system.dashboard.url}}Supported Template Variables List:
| Variable Name | Description |
|---|---|
| system.app.title | App title |
| system.app.url | App link |
| system.today | Current date |
| system.app.share.url.pwd | When the app's public link is enabled and the access password option is turned on, the access password for the public link will override this template variable. If the public link is not enabled, or if the access password option is not turned on, and this template variable is used, the placeholder text will be used instead. |
| system.dashboard.title | Dashboard title |
| system.chart.title | Chart title |
| system.alert.title | Alert item title |
| system.chart.data | Chart preview data |
List of Template Variables Supported by Webhook Push Only:
| Variable Name | Description |
|---|---|
| system.dashboard.url | Combined text of dashboard title and dashboard link |
Subscription
The platform supports immediate or scheduled delivery of dashboards within apps to users inside and outside the organization, allowing target users to instantly view the business metrics they need as a basis for decision-making in business operations, and to respond and adjust business directions in a timely manner.
Data analysts on the platform, for apps with management permissions, including personal and team space apps in the creation module and apps in the app module, can set up email delivery. Each app can have multiple subscriptions, delivering different content to different users.
Subscription functionality is also supported in tenant scenarios, and subscription tasks can be set up for apps shared by the platform provider.
Create Subscription Task
Each subscription task includes a subscription name and subscription delivery. The settings for subscription delivery vary depending on the delivery method, which includes the following methods: Email Notification, WeChat Work, Feishu, Webhook, DingTalk. These methods can be used simultaneously, such as setting both Email Notification and WeChat Work subscription methods.
Select Users
When selecting users for Feishu, DingTalk, or WeCom push methods, the user selection interface will display whether the users have bound their accounts with the corresponding third-party applications.
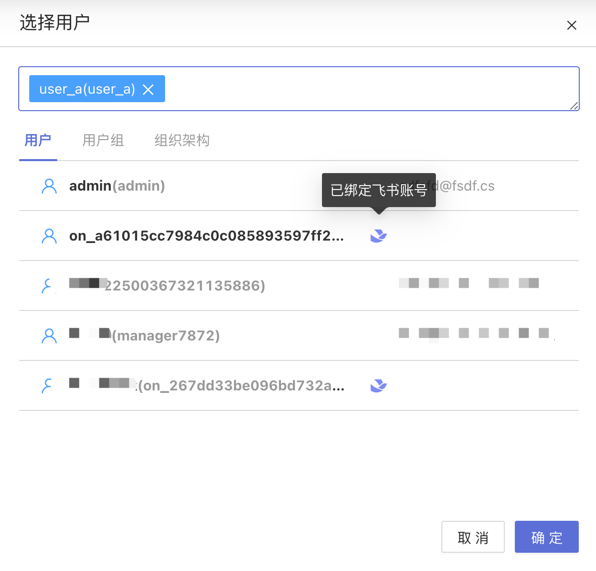
If the selected system users have not bound their accounts with the corresponding third-party applications, the task will skip these users during execution. The same behavior applies to user groups and organizational structures that have not bound their accounts with the corresponding third-party applications.
Template Variables
Template variables are supported in both the body and title of push content.
Example:
This is a temporary subscription message {{%%system.dashboard.url}}Supported Template Variables List:
| Variable Name | Description |
|---|---|
| system.app.title | Application title |
| system.app.url | Application link |
| system.today | Current date |
| system.app.share.url.pwd | When the application's public link is enabled and the option for requiring a password is turned on, the access password for the public link will override this template variable. If the public link is not enabled, or if the password requirement is not turned on, and this template variable is used, the placeholder text will be used instead. |
List of Template Variables Supported by Webhook Push Method Only:
| Variable Name | Description |
|---|---|
| system.dashboard.url | Combined text of dashboard title and dashboard link |
Email Notification
Email notification is a method of informing business-related information about dashboards via email. Before using email notifications, please ensure that the SMTP service has been configured.
- Select User: Fill in the system user for the email notification.
- Other Email Addresses: When the recipient is not a system user, fill in the recipient's email address.
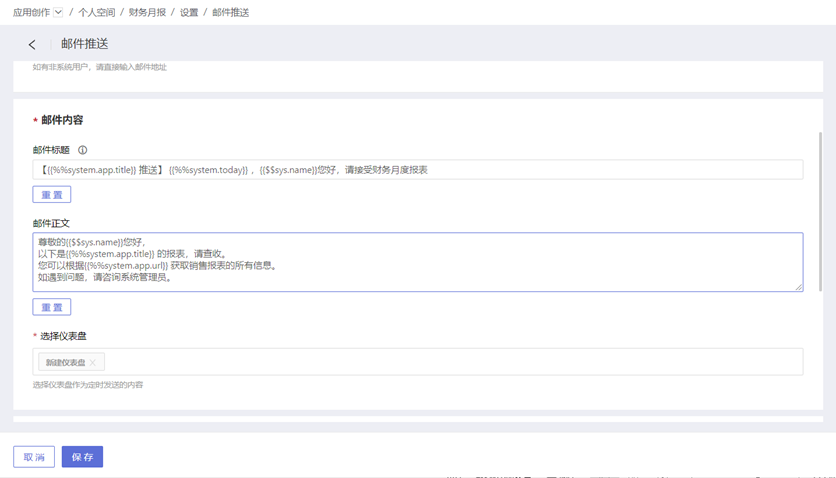
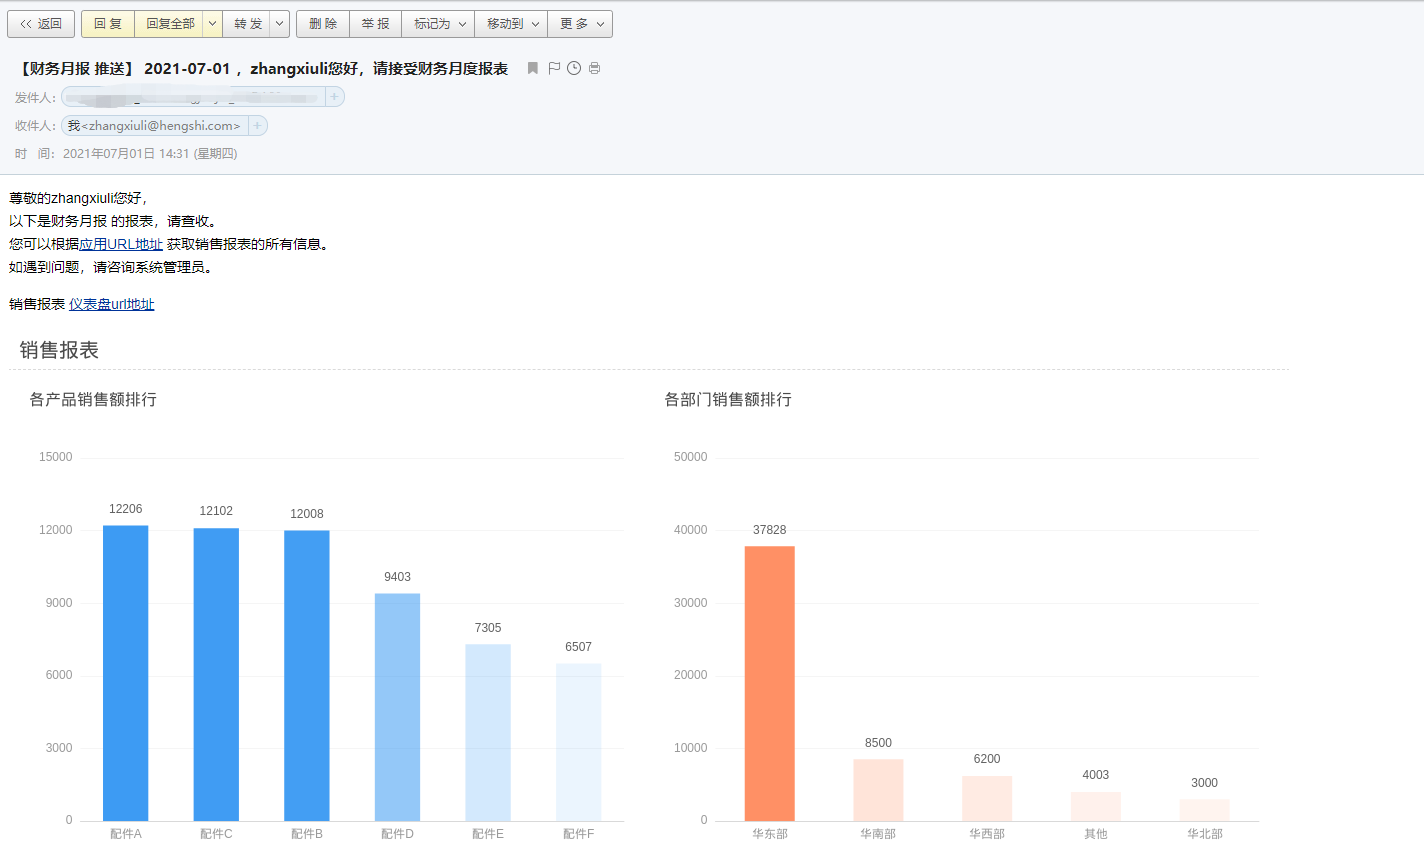
- Email Content: Includes email subject, email body, and selection of dashboards. The email content supports custom plain text, system parameters, application parameters, and user attributes.
- System Parameters: Include application name, application URL, and email push date.
- Application Parameters
- User Attributes The example below demonstrates the use of various parameters and user attributes in writing email content and the situation when the email is sent.
- Advanced Configuration: Supports previewing dashboard images in the body, attaching dashboard links in the body, and attaching dashboard data (the result data of dashboard analysis, displayed as a file in the email attachment).
- Special Configuration: Sends a prompt email when the email content is too large.
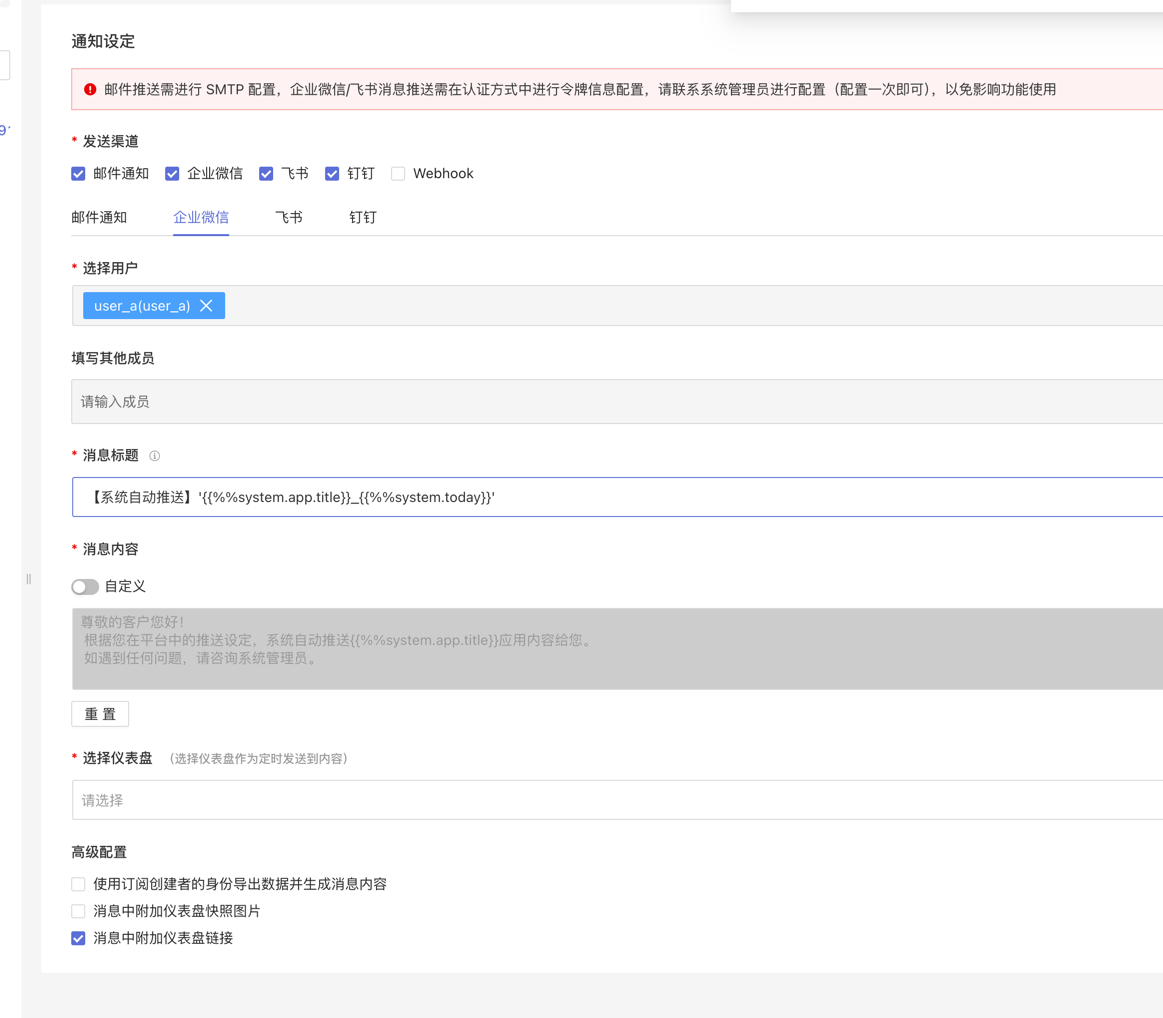
WeCom
WeCom method notifies users in the form of WeCom messages and supports adding dashboard information in the messages. Before enabling the WeCom method, you need to configure the token information in Authorization Method. Please contact the system administrator for configuration (configuration is required only once), otherwise it will affect the functionality.
When subscribing to dashboard messages using the WeCom method, you need to configure the following:
- Message Title: Required, no more than 100 characters, supports using parameter information.
- Select Users: Optional, select users within the system.
- Enter Other Members: Optional, manually enter user IDs of users within WeCom, supports multiple users, separated by English commas. WeCom
useridtutorial: Tutorial Link. - Message Content: The system sends a fixed message content by default, supports user-defined message content. Custom plain text, supports system parameters, app parameters, and user attributes.
- Select Dashboard: Select the dashboard information to be sent in the subscription message.
- Advanced Configuration: You can attach dashboard snapshot images and dashboard links in the message.
At least one of the system users and other members cannot be empty.
Feishu
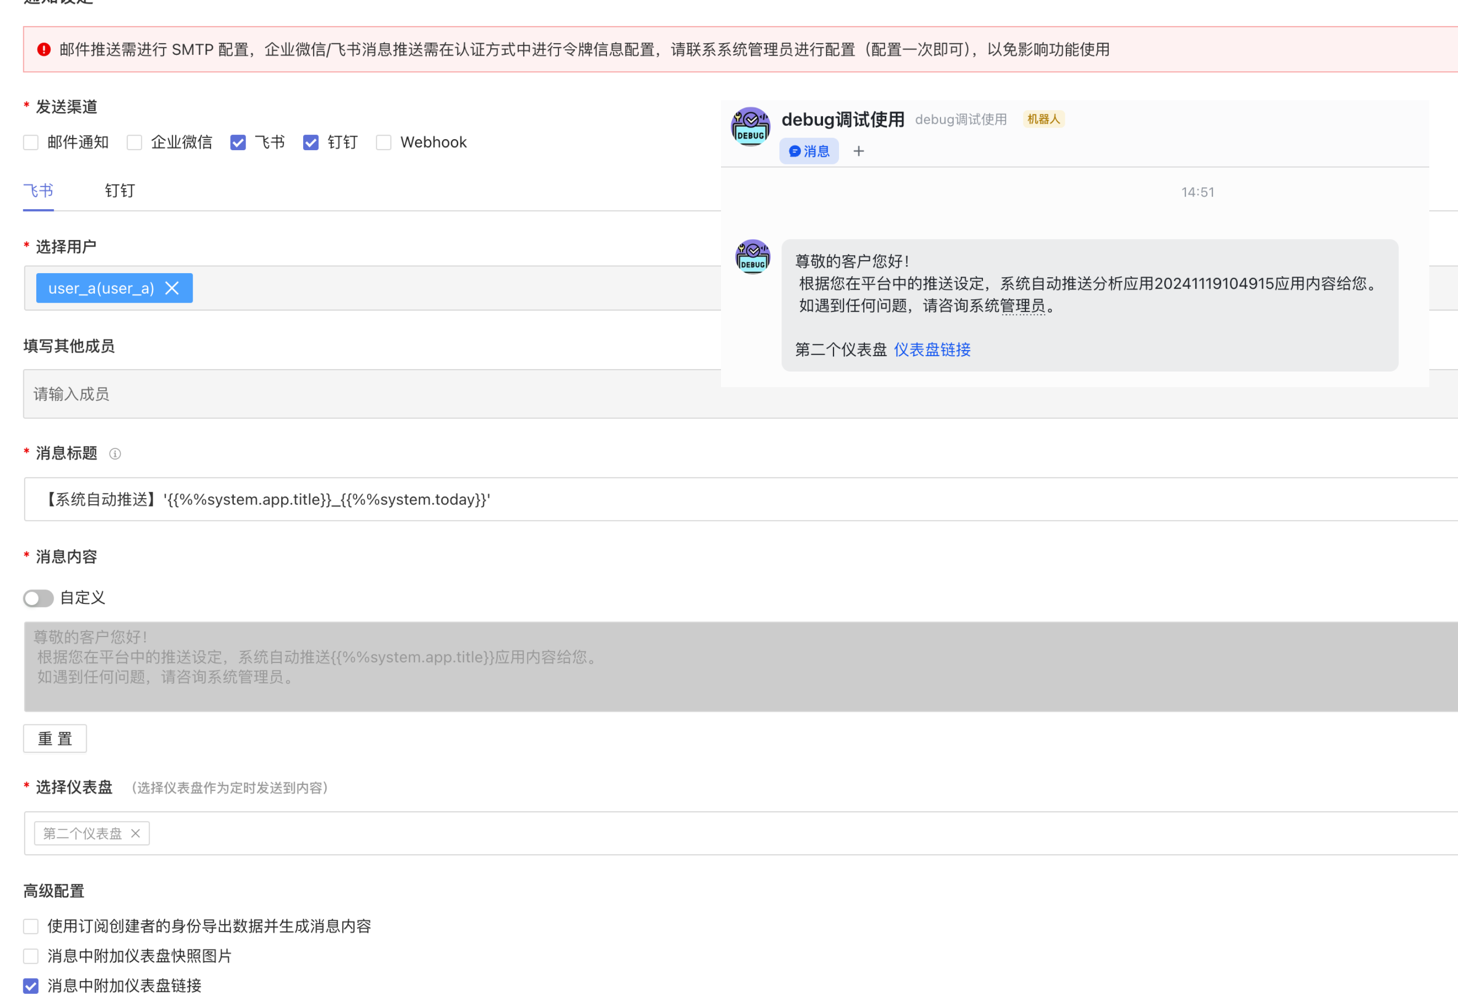
Feishu notifications are sent to users in the form of messages within the Feishu app and support adding dashboard information in the message. Before enabling Feishu notifications, token information configuration is required in Authorization Method. Please contact the system administrator for configuration (configuration is required only once), otherwise it will affect the functionality.
When subscribing to dashboard messages using the Feishu method, the following content needs to be configured:
- Message Title: Required, no more than 100 characters, supports the use of parameter information.
- Select Users: Optional, select users within the system.
- Enter Other Members: Optional, manually enter user IDs of users within Feishu, supports multiple users, separated by English commas. Feishu
user_idacquisition tutorial: Tutorial Link. - Message Content: The system sends a fixed message content by default, supports user-defined message content. Custom plain text, supports system parameters, application parameters, and user attributes.
- Select Dashboard: Select the dashboard information to be sent in the subscription message.
- Advanced Configuration: You can attach dashboard snapshot images and dashboard links in the message.
- At least one of the system users and other members cannot be empty.
- There are three types of user IDs in Feishu, the manually entered
user_idneeds to be of theuser_idtype. If the user ID type is incorrect, it will lead to abnormal push results.
DingTalk
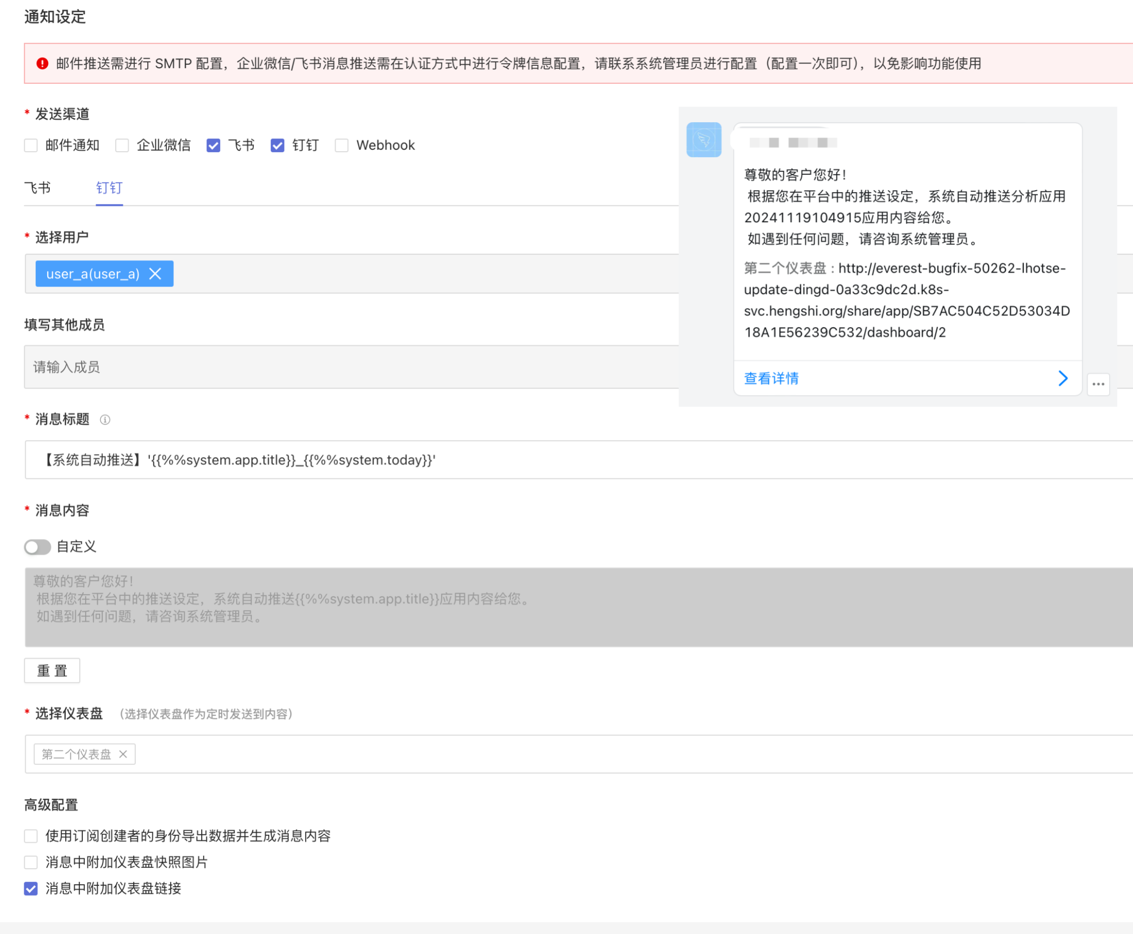
DingTalk notifications are sent to users in the form of messages within the DingTalk app and support adding dashboard information in the message. Before enabling DingTalk notifications, you need to configure token information in Authorization Method. Please contact the system administrator for configuration (configuration is required only once), otherwise, it will affect the functionality.
For DingTalk push notifications, in addition to the required authentication configuration, you also need to configure the AgentId.
When using DingTalk to subscribe to dashboard messages, you need to configure the following:
- Message Title: Required, no more than 100 characters, supports the use of parameter information.
- Select Users: Optional, select users within the system.
- Enter Other Members: Optional, manually enter user IDs of users within DingTalk, supports multiple users, separated by English commas. DingTalk
useridretrieval tutorial: Tutorial Link. - Message Content: The system sends a fixed message content by default, supports user-defined message content. Custom plain text, supports system parameters, app parameters, and user attributes.
- Select Dashboard: Select the dashboard information to be sent in the subscription message.
- Advanced Configuration: You can attach a dashboard snapshot image and dashboard link in the message.
- At least one of the system users and other members must not be empty.
- Due to DingTalk message restrictions, the DingTalk attached dashboard link feature can only attach links to a maximum of 6 dashboards. If more than 6 dashboards are selected, a prompt will be attached in the push message.
- Due to DingTalk message restrictions, the DingTalk attached dashboard snapshot image feature can only attach images of a maximum of 1 dashboard. If more than 1 dashboard is selected when this feature is checked, a prompt will be attached in the push message.
Webhook
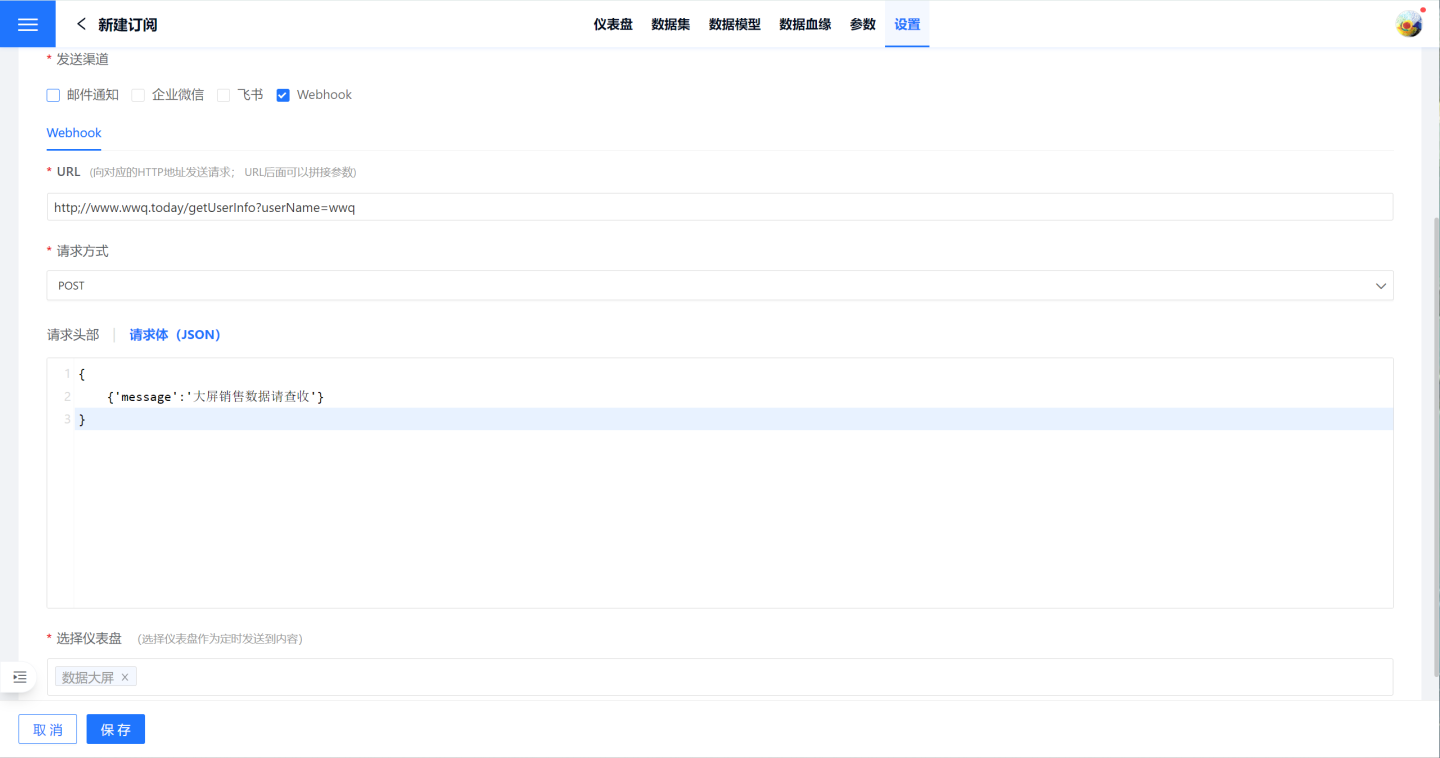
When using Webhook, users need to customize the message request method and content.
- URL: The system sends a request to the corresponding HTTP address, and parameters can be appended after the URL.
- Request Method: Supports GET, POST, PUT, DELETE.
- Request Headers and Request Body: Fill in the request headers and request body according to the alert content. Both the request headers and request body can carry alert information. In the example, the POST method is used to send the message, and the alert content is filled in the request body to notify the user to handle it. The GET method request only includes the request headers.
- Select Dashboard: Select a dashboard as the content to be sent on a schedule.
Subscription Push Plan
After the email subscription setup is complete, clicking on the subscription in the subscription list page will display the setup details. In the top-right corner of the details page, you can click "Push Now" to immediately send the app to the target recipients. Alternatively, you can choose "Push Plan" to set up scheduled email pushes, which will be delivered to the recipients at the agreed time.
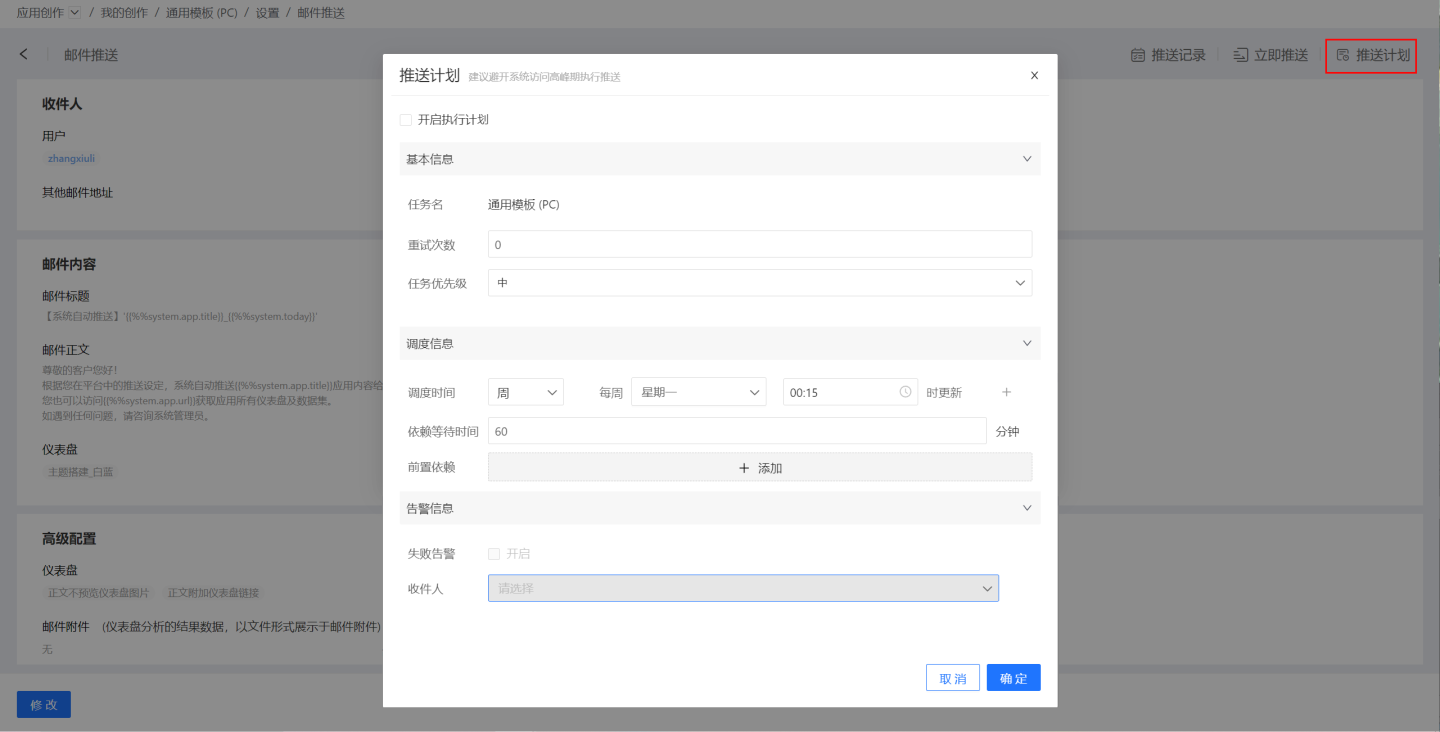
- Basic Information: Set the number of retries during execution and the priority of the task. Task priority is divided into high, medium, and low levels. High-priority tasks are processed first.
- Scheduling Information:
- Set the scheduling time for the task, with the option to set multiple scheduling times. Supports setting execution plans by hour, day, week, and month.
- Hour: Can set the minute of each hour to update.
- Day: Can set a specific time of day to update.
- Week: Can set a specific time on certain days of the week to update, with multiple selections allowed.
- Month: Can set a specific time on certain days of the month to update, with multiple selections allowed.
- Custom: Can set the update time points manually.
- Set the pre-dependencies for the task, with the option to set multiple pre-dependency tasks.
- Set the dependency wait time.
- Set the scheduling time for the task, with the option to set multiple scheduling times. Supports setting execution plans by hour, day, week, and month.
- Alert Information: Enable failure alerts. When a task fails to execute, an email notification will be sent to the recipients.
Subscription Push Records
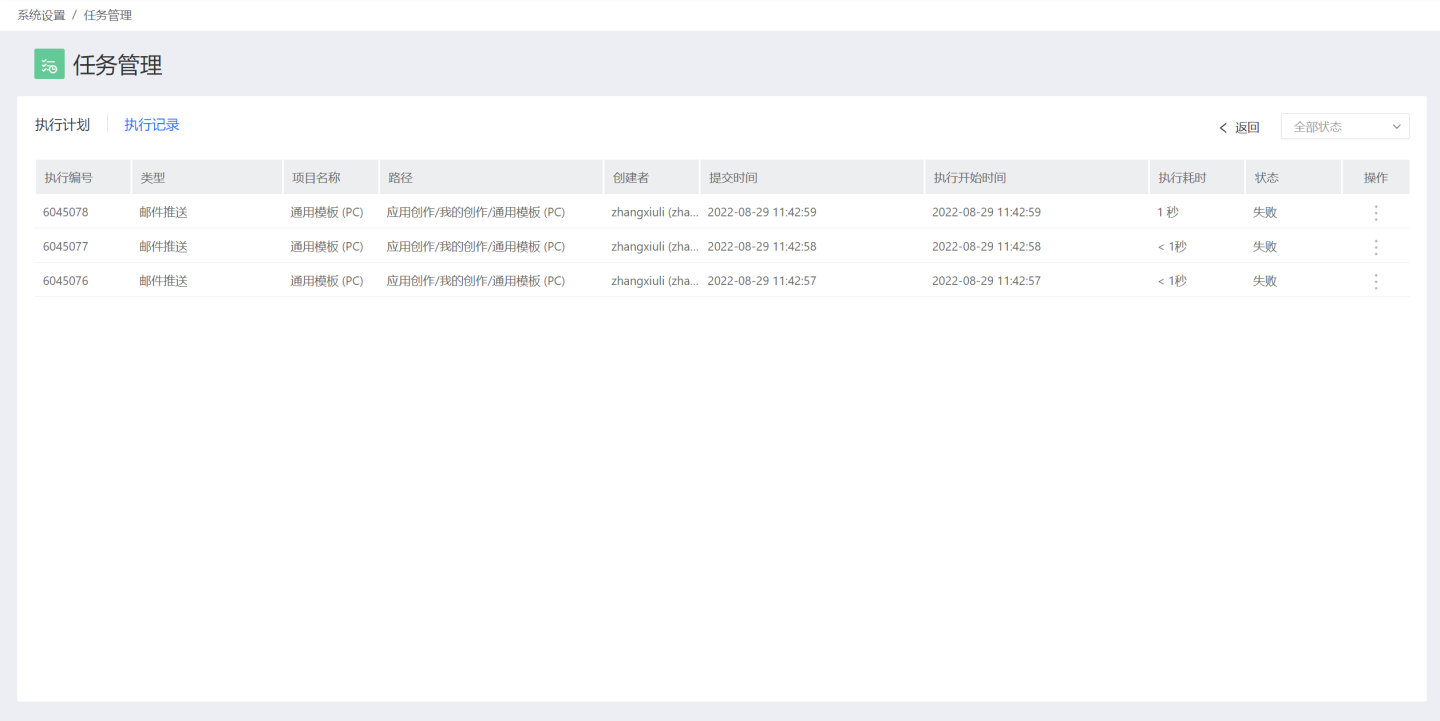
In the upper right corner of the email push details page, select "Push Records" to view all push history and push logs for the application.
Push Permission Rules
• The content of email push received by users within the system has the same data permissions as App -> Settings -> Data Permissions.
• The content of email push received by users outside the system has the same data permissions as the app author.
Visible Data Source Settings
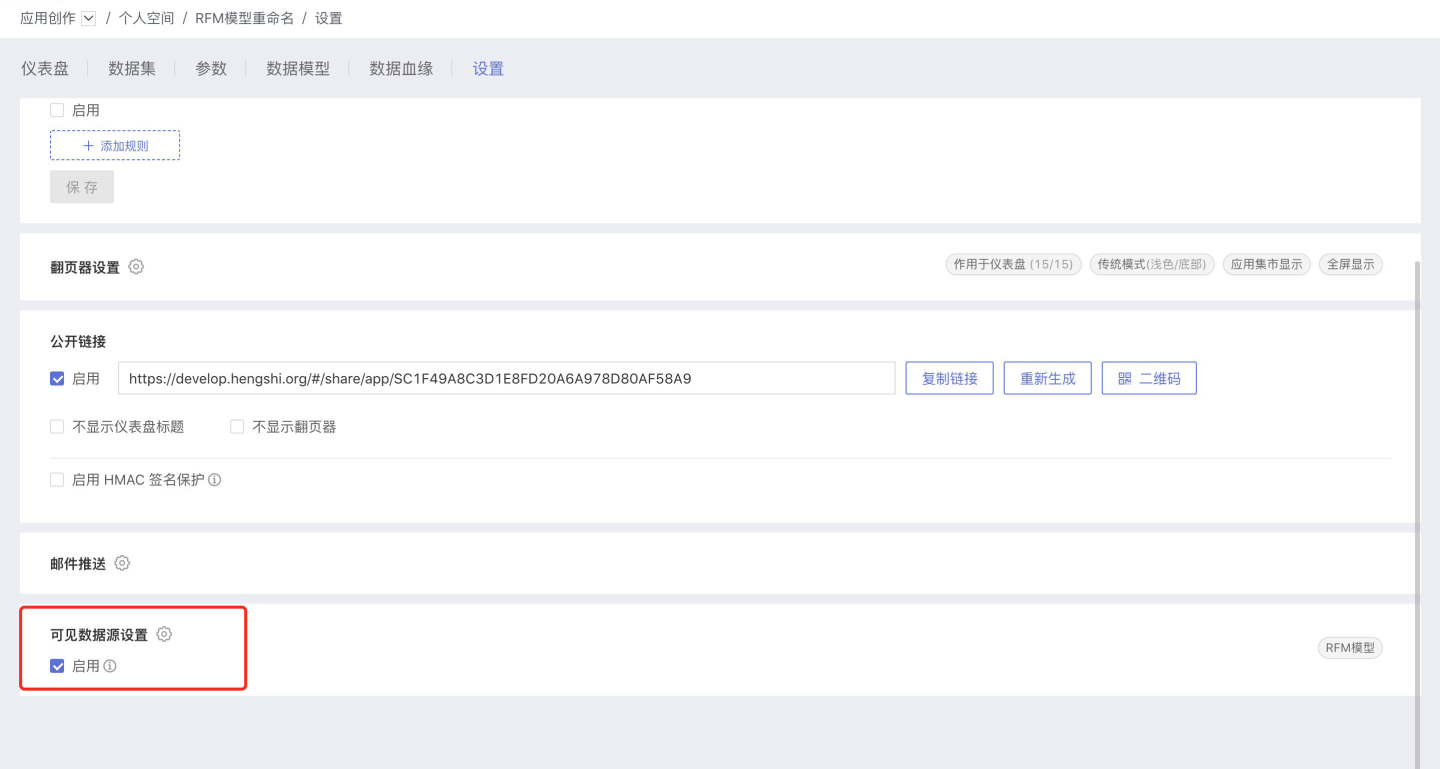
Click App -> Settings, and navigate to the Visible Data Source Settings area.
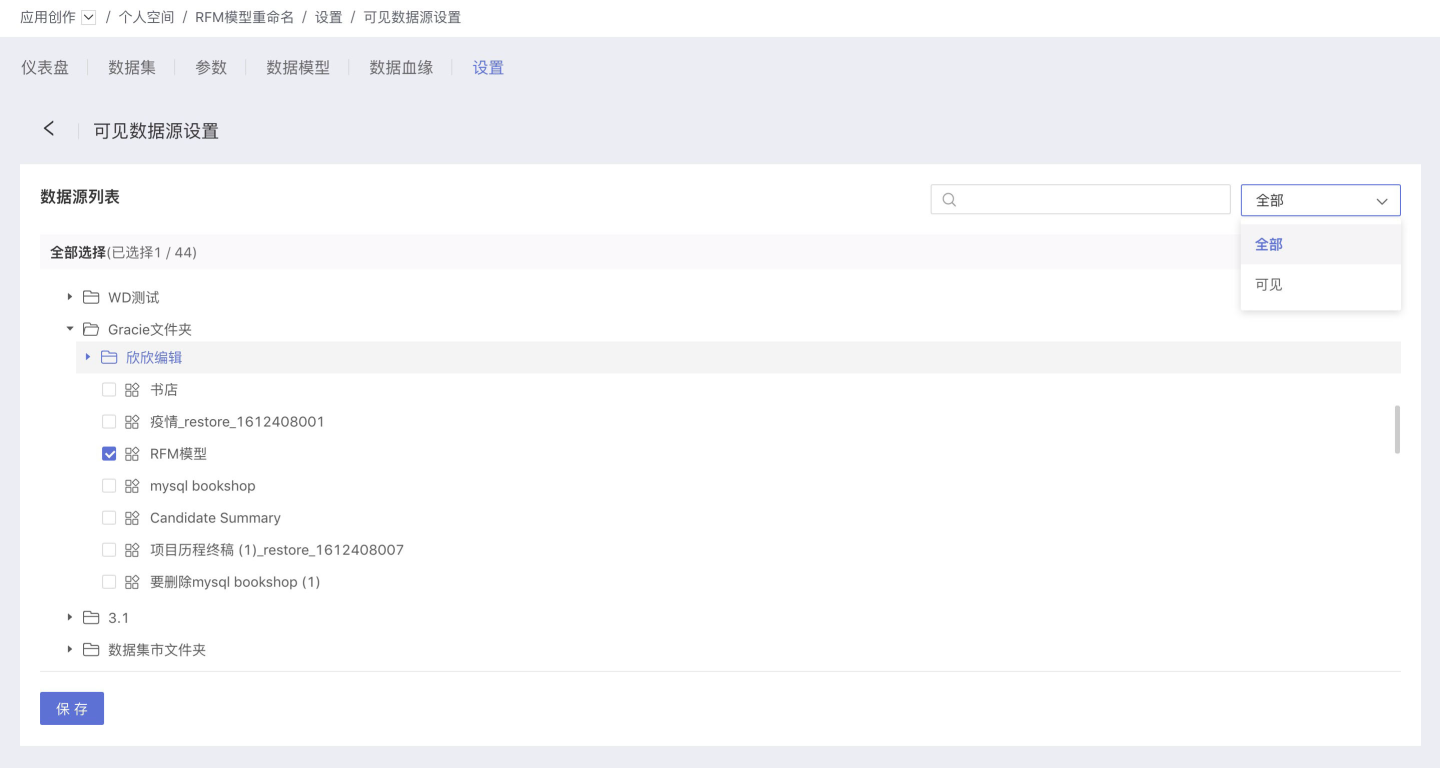
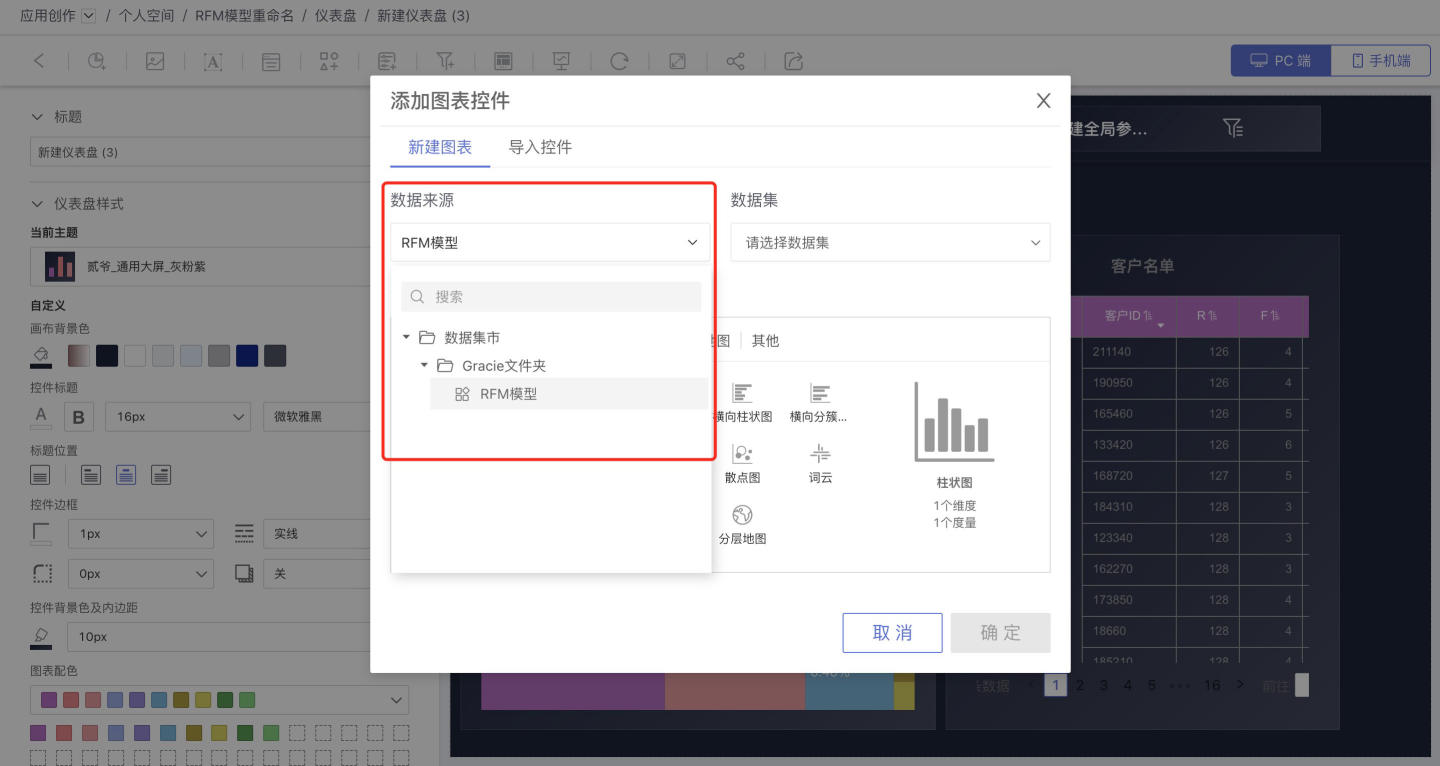
The purpose of visible data source settings is to set the data sources that can be used when creating charts in this application, including data packages from the current application and the data mart.
When a user only wants to use specific data sources for chart creation in a certain application, they can set those data sources as visible. This avoids the need to select from a lengthy dropdown list of data sources each time a chart is created, making chart creation more convenient.
Visible data sources are disabled by default. When disabled, all data sources are visible.
When enabled, only the data sources selected in the visible data sources list are visible. These data sources will appear in the data source dropdown list when creating charts.
If no data sources are selected, the data source dropdown list will be empty when creating charts.
If only one data source is selected, the data source dropdown list will default to that data source. There is no need to switch data sources when creating charts; you can directly select the dataset.
The visible data source settings do not control backend data source permissions; they only control the data source list when creating charts in the current application.
Version Management
After some apps are released, they continue to be updated with new content, resulting in multiple versions of an app. The new version overwrites the old version, making it impossible for users to view the content of a specific historical release.
The app version management feature saves the data and related analysis content at the time of app release. When it is necessary to revert to a historical version, you can find that version in the app management and restore it with one click, quickly and conveniently. The app version management feature is currently not available for tenant scenarios.
The app version only retains all content related to data analysis: dashboards, datasets, data models, parameters, paginators, etc. Settings related to connections and permissions cannot be retained. Versions are automatically retained upon app release. To avoid occupying a large amount of memory space, only the last 3 versions are kept, and earlier versions are automatically deleted.
