JS SDK Integration Guide
The JS SDK provides a comprehensive conversational UI component, suitable for scenarios that require customized interactions, request interception, or embedding Q&A capabilities. Simply include the SDK file in your page and initialize it.
Prerequisites
Using the JS SDK requires a certain level of JavaScript development experience.
Quick Start
1. Obtain the SDK Link
On any page in the system, click Data Agent to expand the chat sidebar. Click the first icon button in the upper right corner to obtain the SDK link in the drawer popup, for example:
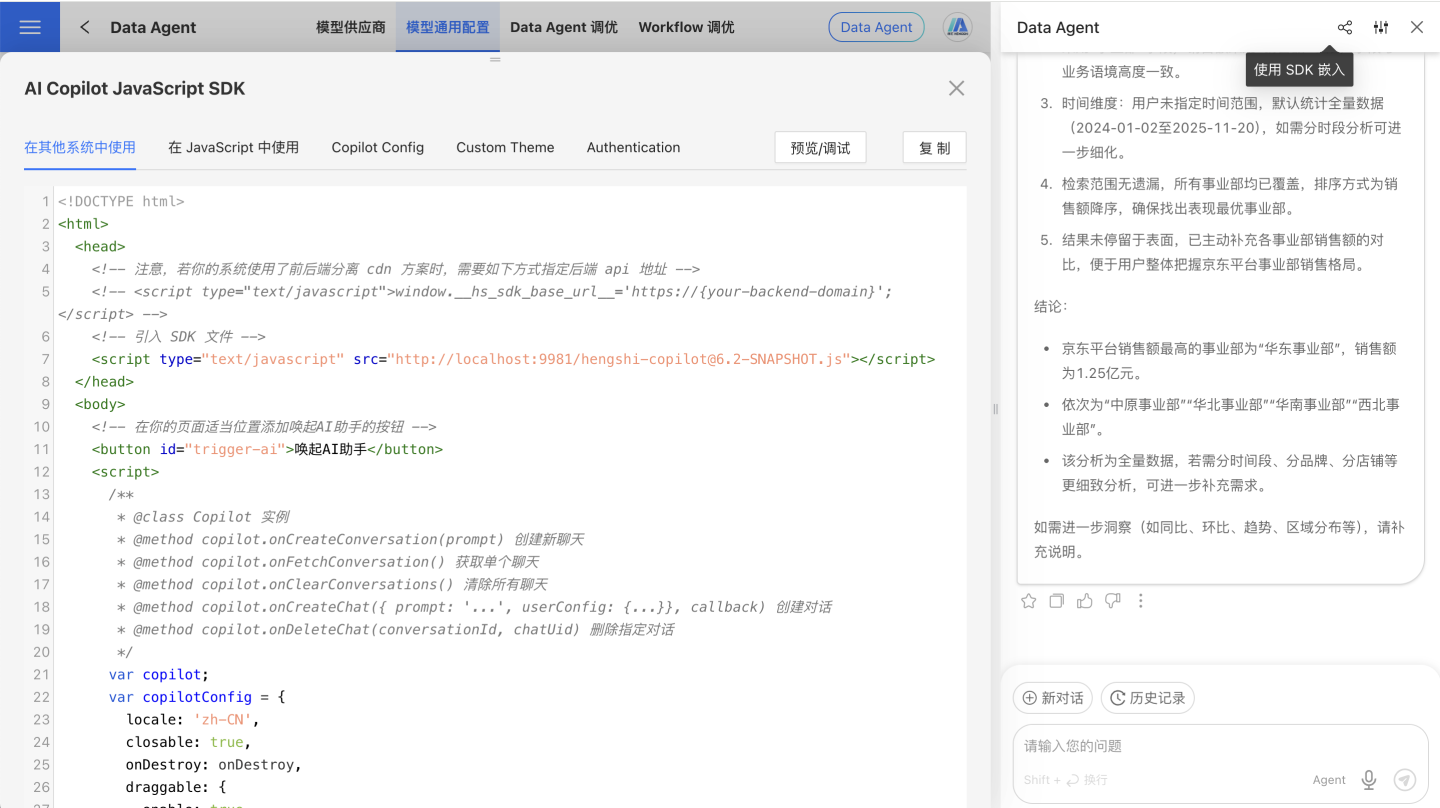
<host>/assets/hengshi-copilot@<version>.jsNote
@<version> is the SDK version number. Please ensure it matches the system version. It also needs to be updated when the system is upgraded.
2. Import the SDK and Initialize
<!DOCTYPE html>
<html lang="en-US">
<head>
  <meta charset="UTF-8">
  <meta name="viewport" content="width=device-width, initial-scale=1.0">
  <title>AI Assistant</title>
  <script type="text/javascript" src="https://develop.hengshi.org/assets/hengshi-copilot@<version>.js" defer></script>
</head>
<body>
  <button id="trigger-ai">Activate AI Assistant</button>
  <div id="copilot-root" style="display: none;"></div>

  <script>
    const copilotConfig = {
      locale: 'zh-CN',
      draggable: {
        enable: true,
        minWidth: 440,
        minHeight: 440,
        position: { x: window.innerWidth - 480, y: 20 },
        size: { width: 440, height: window.innerHeight * 0.8 },
        onDragStop,
        onResize,
      },
      userConfig: {
        dataAppId: 130870,
        datasetId: 1,
      },
    };

    let copilotInstance = null;
    const button = document.getElementById('trigger-ai');
    const copilotRoot = document.getElementById('copilot-root');
    button.addEventListener('click', toggleCopilot);

    function onDragStop(event, position) {
      copilotConfig.draggable.position = position;
    }

    function onResize(event, position, size) {
      copilotConfig.draggable.position = position;
      copilotConfig.draggable.size = size;
    }

    function launchCopilot() {
      if (typeof Copilot === 'undefined') {
        (function(fn) { fn(launchCopilot); })(requestIdleCallback || setTimeout);
      } else {
        if (!copilotInstance) {
          copilotInstance = new Copilot(copilotRoot, copilotConfig);
          copilotRoot.style.display = 'block';
          button.textContent = 'Close AI Assistant';
        } else {
          copilotInstance.show();
        }
      }
    }

    function toggleCopilot() {
      if (copilotInstance) {
        const isVisible = copilotRoot.style.display !== 'none';
        if (isVisible) {
          copilotInstance.hide();
          button.textContent = 'Activate AI Assistant';
        } else {
          copilotInstance.show();
          button.textContent = 'Close AI Assistant';
        }
      } else {
        launchCopilot();
      }
    }
  </script>
</body>
</html>3. Specify Backend API Host When Deploying via CDN
When the SDK file is hosted on a CDN, the SDK will, by default, send API requests to the host where the SDK file is located. This is usually not the actual address of the backend API and may result in request errors.
In this case, please set the global variable window.__hs_sd_base_url__ before importing the SDK to explicitly specify the backend API host:
<head>
  <script>
    window.__hs_sd_base_url__ = 'https://develop.hengshi.org';
  </script>
  <script type="text/javascript" src="https://cdn.example.com/assets/hengshi-copilot@<version>.js"></script>
</head>Note
The CDN host is only used to load the SDK file. The API request host must be explicitly specified via window.__hs_sd_base_url__.
4. Run the Project
Start or open your project, and click the button to check if the dialog box is successfully triggered.
Integration in React / Vue Projects
The JS SDK is framework-agnostic. When integrating into React or Vue projects, the core approach is to load the SDK script first, then initialize the Copilot instance.
Key Points for React Integration
- Load the SDK script inside the component's
useEffect - Create the
Copilotinstance only after the script has loaded - Remove the script or hide the instance when the component unmounts
Key Points for Vue Integration
- Load the SDK script inside
onMounted - Create the
Copilotinstance only after the script has loaded - Perform cleanup in
onBeforeUnmount
For more comprehensive framework sample code, refer to the renderChat example later on this page, or directly reuse the HTML example logic mentioned above.
SDK Instance and Methods
The result of new Copilot(...) is a copilot instance, which you can use to operate Copilot.
{
  copilotConfig: {
    config: {...}, // Large model configuration information
    loading: false, // Whether it is loading
    onVerifyConfig: () => {}, // Verify configuration information
    onChangeProvider: () => {}, // Switch model provider
    // ...
  },
  context: {
    api: {...},
    endpoints: {...},
    // Copilot status
    isLoading: false,
    // Current conversation list, data format reference
    // https://api.hengshi.com/conversation.html#conversation
    conversations: [],
    setConversations: () => {},
    currentConversationId: null,
    setCurrentConversationId: () => {},
    runningChatUid: null,
    setRunningChatUid: () => {},
    setChat: (id, chatUid, chat) => {},
    // Get historical conversation list
    onFetchConversations: (offset = 0, limit = 10) => {},
    // Create conversation
    onCreateConversation: prompt => {},
    onFetchConversation: id => {},
    onClearConversations: () => {},
    onFetchPreviousConversations: () => {},
    // Create Q&A
    onCreateChat: body => {},
    onDeleteChat: (id, chatUid) => {},
    onFetchSuggestions: refresh => {},
    onFetchFavorites: () => {},
    onCancelChatFavorite: (id, chatUid) => {},
  },
  // Control dialog display/hide
  show: () => {}, // Show dialog
  hide: () => {}, // Hide dialog
}SDK Configuration Parameters
The configuration parameters for new Copilot(...) include the following main sections:
const copilotConfig = {
  locale: 'zh-CN', // Language setting
  i18n: { // Localization text configuration
    "zh-CN": {
      'copilot.question-reasoning': '问题理解',
      'copilot.question-answer': '数据表现',
      'copilot.question-reasoning-logic': '取数逻辑'
    },
    "en-US": {
      'copilot.question-reasoning': 'Question Understanding',
      'copilot.question-answer': 'Data Performance',
      'copilot.question-reasoning-logic': 'Data Logic'
    }
  },
  stylesheet: ':host > *, ::before, ::after { --brand: #4CAF50; }', // Custom styles
  draggable: { // Dialog drag configuration
    enable: true,
    minWidth: 440,
    minHeight: 440,
    position: {
      x: window.innerWidth - 480,
      y: 20,
    },
    size: {
      width: 440,
      height: window.innerHeight * 0.8,
    },
    onDragStop: onDragStop,
    onResize: onResize,
  },
  userConfig: { // Data source configuration
    dataSources: [
      {
        dataAppId: 130870,
        datasetId: 1,
      },
      {
        dataAppId: 130871,
        datasetId: 2,
      }
    ]
  },
  completionConfig: { // AI conversation completion configuration
    meta: 'answer,chart,chartConfig', // Specify the content combination to render
    openChartConfig: false, // Whether to expand the data logic panel, default is true
    stylesheet: ':host > *, ::before, ::after { --brand: #4CAF50; }', // Custom styles after conversation completion
    i18n: { // Localization text configuration after conversation completion
      "zh-CN": {
        'copilot.question-reasoning': '问题理解',
        'copilot.question-answer': '数据表现',
        'copilot.question-reasoning-logic': '取数逻辑'
      }
    },
    onCompletionDone: (conversationId, uid) => {
      // AI conversation completion callback
      // conversationId: Current conversation ID
      // uid: Unique identifier for the completed conversation
      console.log('AI completion done:', conversationId, uid);
    },
  },
};Configuration Instructions
userConfig Data Source Configuration
userConfig is used to configure data sources and supports multiple data source configurations. There are two modes for data source configuration, but only one mode can be used within the same configuration:
- Data Package and Dataset Mode:
dataSources: An array containing multiple data source configuration objectsdataAppId: Data Package IDdatasetId: Dataset ID
Example:
userConfig: {
  dataSources: [
    {
      dataAppId: 130870,
      datasetId: 1,
    },
    {
      dataAppId: 130871,
      datasetId: 2,
    }
  ]
}- Business Metric Subject Area Mode:
dataSources: An array containing multiple subject area configuration objectssubjectId: Subject Area ID
Example:
userConfig: {
  dataSources: [
    {
      subjectId: 1,
    },
    {
      subjectId: 2,
    }
  ]
}Note: Only one mode can be used in each dataSources configuration. That is, you must use either the dataAppId + datasetId combination for all, or use subjectId for all. Mixing the two modes within the same configuration is not allowed.
i18n Localization Configuration
The i18n configuration is used to customize interface copy and supports multiple languages:
- Organize copy by language code (such as 'zh-CN', 'en-US')
- Multiple key-value pairs of copy can be configured under each language
- Predefined copy keys include:
copilot.question-reasoning: Title for the question understanding sectioncopilot.question-answer: Title for the data performance sectioncopilot.question-reasoning-logic: Title for the data retrieval logic section
Stylesheet Configuration
The stylesheet is used to customize the interface style:
- Accepts CSS strings
- Can be defined and retrieved via the
<style>tag - Supports CSS custom properties (variables)
- Main style variable:
--brand: Theme color
Example: Define styles using the style tag
<style id="copilot-css">
  /* Modify theme color */
  :host > *, ::before, ::after {
    --brand: #4CAF50;
  }
</style>
<script>
  const css = document.querySelector('#copilot-css');
  const style = css.textContent;

  // Use in Copilot configuration
  const copilot = new window.Copilot({
    // Other configurations...
    stylesheet: style,
  });

  // Or use in chat completion configuration
  window.Copilot.renderChat(container, {
    // Other configurations...
    stylesheet: style,
  });
</script>completionConfig Configuration Description
completionConfig is used to control the completion behavior and display mode of AI conversations:
meta: String, specifies the combination of content to renderopenChartConfig: Boolean, controls whether to expand the data query logic panel, default istruestylesheet: String, custom styles after conversation completioni18n: Object, custom copywriting after conversation completiononCompletionDone: Function, callback triggered when the AI conversation is completed, receives two parameters:conversationId: The ID of the current conversationuid: The unique identifier of the completed conversation
Other Optional Configurations
Below are commonly used optional configuration items, to be used as needed:
| Configuration | Description |
|---|---|
closable | Whether to display the close button, default is false |
draggable.bounds | Drag boundary: window or parent |
className / style | Class name and style for the dialog root container |
bodyClassName / bodyStyle | Class name and style for the dialog content area |
header | Custom content for the title area |
systemMsg | Welcome message text |
parser | Chart selector configuration (selectText / onSelect) |
chartTheme | Chart theme (consistent with the dashboard theme) |
Login Authentication
When integrating the SDK, you may need to complete login authentication first. The following methods are supported:
- SSO Single Sign-On: If your system is already integrated with the HENGSHI system, no additional login is required.
- JWT Authentication: Complete login authentication using the following method:
fetch('https://develop.hengshi.org/api/auth/login-info?activeAuth=jwt-param&jwtParam=Your JWT Parameter')
  .then(response => {
    // Login successful, continue using the SDK
  })
  .catch(error => {
    // Login failed, handle the error
});Tip
Please make sure you have configured "Settings → Organization Management → Authentication Method → JWT Request Parameter", and replace Your JWT Parameter with the actual value.
Control Dialog Display/Hide
The Copilot instance provides show and hide methods to control the display and hiding of the dialog, which is more efficient than completely destroying and recreating the instance:
// Create a Copilot instance
const copilotInstance = new Copilot(copilotRoot, copilotConfig);

// Hide the dialog (does not destroy the instance, only hides the UI)
copilotInstance.hide();

// Show the dialog
copilotInstance.show();

// Toggle display/hide status
function toggleCopilot() {
  if (copilotInstance) {
    // You can check the DOM element status to determine the current display state
    const isVisible = copilotRoot.style.display !== 'none';
    if (isVisible) {
      copilotInstance.hide();
      button.textContent = 'Activate AI Assistant';
    } else {
      copilotInstance.show();
      button.textContent = 'Close AI Assistant';
    }
  }
}Compared to completely destroying and recreating the instance, using the show/hide methods has the following advantages:
- Maintains dialog context and state
- Faster response (no need to reinitialize)
- Lower resource consumption
Calling HTTP APIs via JS
In the copilot example above, the api object provides all the methods for calling HTTP APIs. You can interact with the backend by invoking these methods, for example:
2.1 Create Conversation
const { body: { data: conversation }} = await copilot.api.requestCreateConversation({
  body: {
    title: 'This is the title of this conversation',
  },
}).value;Data Example
conversation = {
  "id": 135,
  "title": "This is the title of this conversation",
  "createdBy": 268,
  "createdAt": "2024-09-14 15:47:23",
  "updatedBy": 268,
  "updatedAt": "2024-09-14 15:47:23"
}2.2 Create Q&A
const { body: { data: chat }} = await copilot.api.requestCreateChat({
  id: conversation.id,
  body: {
    prompt: 'Which director's movies have the highest box office?', // This is the user's question
    userConfig: { // Refer to userConfig in copilotConfig above
      dataAppId: 129150,
      datasetId: 1,
    }
  },
  qs: {
    sync: true, // Whether to execute synchronously
    timeout: 1000 * 60, // Timeout in milliseconds
  },
}).value;Data Example
chat = {
    "conversationId": 135,
    "prompt": "Which director's movies have the highest box office?",
    "answer": "Director Christopher Nolan's movies have the highest box office.",
    "model": "gpt-4o",
    "uid": "08ff93ca-1972-4916-b884-35fab6f91c64",
    "temperature": 0,
    "createdBy": 268,
    "createdAt": "2024-09-14 15:47:23",
    "updatedBy": 268,
    "updatedAt": "2024-09-14 15:47:23",
    "responseAt": "2024-09-14 15:47:30",
    "isDelete": false,
    "isContextEnd": false,
    "suggestQuestions": [],
    "statusList": [
        "PENDING",
        "ANALYZE_REQUEST",
        "HQL_SELECT_FIELDS",
        "HQL_SELECT_FUNCTIONS",
        "GENERATE_HQL_QUERY",
        "DOING_HQL_QUERY",
        "DOING_SUMMARY",
        "DOING_QUESTION_SUGGESTING",
        "DONE"
    ],
    "userConfig": {
        "datasetId": 1,
        "dataAppId": 129150
    },
    "autoConfig": {
        "agentType": "HQL_AGENT"
    },
    "isCurrent": true,
    "usage": [
        {
            "completion_tokens": 24,
            "prompt_tokens": 4063,
            "total_tokens": 4087
        },
        {
            "completion_tokens": 5,
            "prompt_tokens": 1424,
            "total_tokens": 1429
        },
        {
            "completion_tokens": 49,
            "prompt_tokens": 3906,
            "total_tokens": 3955
        },
        {
            "completion_tokens": 16,
            "prompt_tokens": 299,
            "total_tokens": 315
        }
    ],
    "chartCreatedAt": "2024-09-14 15:47:30",
    "refineQuestion": "Which director's movies have the highest box office?",
    "favorite": false,
    "charts": [
        {
            "appId": 129150,
            "datasetId": 1,
            "options": {
                "axes": [
                    {
                        "op": "{{1}}.{director}",
                        "uid": "uid1",
                        "fieldName": "director",
                        "kind": "formula",
                        "datasetId": 1,
                        "labelOrigin": "director",
                        "label": "director",
                        "isAggregate": false,
                        "value": "{{coffe_产品表}}.{director}",
                        "dataset": 1,
                        "fieldType": "string"
                    },
                    {
                        "op": "max({{1}}.{votes})",
                        "uid": "uid2",
                        "fieldName": "votes",
                        "kind": "formula",
                        "datasetId": 1,
                        "labelOrigin": "votes",
                        "label": "votes",
                        "isAggregate": true,
                        "value": "max({{coffe_产品表}}.{votes})",
                        "dataset": 1,
                        "fieldType": "number"
                    }
                ],
                "name": "Bar",
                "limit": 1,
                "sort": [
                    {
                        "op": "uid2",
                        "kind": "reference",
                        "direction": "desc"
                    },
                    {
                        "op": "uid1",
                        "kind": "reference",
                        "direction": "asc"
                    }
                ]
            },
            "dataAppId": 129150,
            "datasetIds": [
                1
            ]
        }
    ]
}Embedding Data Query Capabilities into Existing AI Chat Tools
In addition to embedding the complete AI assistant chat functionality, the SDK also provides a static method renderChat. This method allows you to integrate data query capabilities into your own large language model chat tools, supporting two usage modes: prompt-based dynamic query mode and static rendering mode.
Dynamic Q&A Mode
In this mode, you only need to provide the user's question (prompt), and the SDK will automatically complete data querying, analysis, and visualization. This is ideal for integrating data analysis capabilities into your own AI conversation tools.
<div class="conversation"></div>
<script src="https://develop.hengshi.org/assets/hengshi-copilot@<version>.js"></script>
<script>
  // Using the prompt configuration, the SDK will automatically complete data querying and analysis
  const chat = {
    prompt: "Module distribution of bug issues",
    // type: "agent", // Optional parameter, you can specify the copilot mode via type agent|workflow. By default, it is determined by the system's PREFER_AGENT_MODE switch.
    // conversationId: 1, // Optional parameter, you can specify conversationId to continue in an existing conversation
  };
  const container = document.querySelector('.conversation');
  // case 1: Without specifying a data source
  window.Copilot.renderChat(container, chat);

  // case 2: Specifying a data source
  // window.Copilot.renderChat(container, chat, {
  //   usePropsUserConfig: true,
  //   userConfig: {
  //     dataSources: [{
  //       dataAppId: 136789,
  //       datasetId: 10,
  //     }],
  //   },
  // });
</script>Static Rendering Mode
This mode is suitable for displaying existing analysis results. You need to provide a complete conversation data structure.
<div class="conversation"></div>
<script src="https://develop.hengshi.org/assets/hengshi-copilot@<version>.js"></script>
<script>
  // Provide the complete conversation data structure for static rendering
  const chat = {
    "meta": "refineQuestion,answer,chart,chartConfig",
    "conversationId": 226,
    "uid": "00747081-9cc3-4c7c-b3de-735244498fd6",
    "prompt": "Module distribution of bug issues",
    "answer": "The distribution of bug issues across modules is relatively even. The module with the most has 4 bugs, while most other modules have 2-3 bugs.",
    "refineQuestion": "Please provide the distribution of bug issues across modules.",
    "options": {
      "charts": [],
      "chartsData": []
    },
  };
  const container = document.querySelector('.conversation');
  window.Copilot.renderChat(container, chat);
</script>Parameter Description
The Copilot.renderChat method accepts three parameters:
container: DOM element, used as the container for rendering chat contentchat: Chat data object, supports two configuration methods:a. Dynamic Q&A Configuration:
prompt: String, the user's question. When this is provided, the SDK will automatically perform data query and analysis.type: (Optional) Stringagent|workflow, specifies the copilot modeconversationId: (Optional) Conversation ID, specifies to continue the conversation based on an existing conversationmeta: (Optional) String, specifies the combination of content to render, which can be a combination of fields such asrefineQuestion,answer,chart, andchartConfigopenChartConfig: (Optional) Boolean, controls whether to expand the data logic panel, defaults totrueonCompletionDone: (Optional) Function, callback when the conversation is completed
b. Static Rendering Configuration:
meta: String, specifies the content to render, which can be a combination of fields such asrefineQuestion,answer,chart, andchartConfigconversationId: Conversation IDuid: Unique identifier for the conversationprompt: Original questionanswer: AI answer contentrefineQuestion: Refined questioncharts: Chart configuration arraychartsData: Chart data array
config: (Optional) Configuration options, useusePropsUserConfigwithuserConfigto specify the data source in dynamic Q&A mode